

User Guide
Page 3
...help resources for IT buyers. Visit the MSI website for DIY users. Preface Technical Support If a problem arises with your place of power unit capacity for technical guide, BIOS updates, driver updates, and other information: http://www.msi.com/support/ Contact our technical staff at:... http://register.msi.com/ iii Preface Better yet, the power calculator provides accurate estimates of purchase...
...help resources for IT buyers. Visit the MSI website for DIY users. Preface Technical Support If a problem arises with your place of power unit capacity for technical guide, BIOS updates, driver updates, and other information: http://www.msi.com/support/ Contact our technical staff at:... http://register.msi.com/ iii Preface Better yet, the power calculator provides accurate estimates of purchase...

User Guide
Page 13
... Connector Installation 2-11 Peripheral Connector Installation 2-12 USB2.0 Connector Installation 2-12 USB3.0 Connector Installation 2-12 Graphics Card Installation 2-13 Chapter 3 BIOS Setup 3-1 Entering Setup 3-2 Entering BIOS Setup 3-2 Overview 3-3 Operation 3-6 Updating BIOS 3-7 Updating the BIOS with M-FLASH 3-7 SETTINGS 3-8 System Status 3-8 Advanced 3-8 Boot 3-16 Security 3-16 Save & Exit 3-17 OC 3-18 M-FLASH 3-26 OC PROFILE 3-27...
... Connector Installation 2-11 Peripheral Connector Installation 2-12 USB2.0 Connector Installation 2-12 USB3.0 Connector Installation 2-12 Graphics Card Installation 2-13 Chapter 3 BIOS Setup 3-1 Entering Setup 3-2 Entering BIOS Setup 3-2 Overview 3-3 Operation 3-6 Updating BIOS 3-7 Updating the BIOS with M-FLASH 3-7 SETTINGS 3-8 System Status 3-8 Advanced 3-8 Boot 3-16 Security 3-16 Save & Exit 3-17 OC 3-18 M-FLASH 3-26 OC PROFILE 3-27...

User Guide
Page 39
... will be activated. This connector is opened, the chassis intrusion mechanism will flash on your computer case. To clear the warning, you must enter the BIOS utility and clear the record. 2.C1.IGNTroRuUnd JAUD1: Front Panel Audio Connector This connector allows you to the chassis intrusion switch cable. If the computer...
... will be activated. This connector is opened, the chassis intrusion mechanism will flash on your computer case. To clear the warning, you must enter the BIOS utility and clear the record. 2.C1.IGNTroRuUnd JAUD1: Front Panel Audio Connector This connector allows you to the chassis intrusion switch cable. If the computer...

User Guide
Page 57
...view system information such as the CPU name, DRAM capacity, the OS version and the BIOS version. Important • The items under continuous update for sharing with friends. Chapter 3 BIOS Setup CLICK BIOS is a revolutionary UEFI interface that allows you purchased. Please refer to the actual screens...your system for detailed information. • Please clear the CMOS data and restore the default settings if the system becomes unbootable after changing BIOS settings. (Refer to the Clear CMOS jumper/ button section to clear the CMOS data, select the "Restore Defaults" and press in...
...view system information such as the CPU name, DRAM capacity, the OS version and the BIOS version. Important • The items under continuous update for sharing with friends. Chapter 3 BIOS Setup CLICK BIOS is a revolutionary UEFI interface that allows you purchased. Please refer to the actual screens...your system for detailed information. • Please clear the CMOS data and restore the default settings if the system becomes unbootable after changing BIOS settings. (Refer to the Clear CMOS jumper/ button section to clear the CMOS data, select the "Restore Defaults" and press in...

User Guide
Page 58
... (POST) process. Important Please be sure to install the "MSI Fast Boot" utility before you respond and you still need to run SETUP. ■■ You want to change the default settings for system stability in BIOS to load the default settings.) • If you are unfamiliar..., and keys. You may need to clear the CMOS data, select the "Restore Defaults" and press in normal conditions. MSI additionally provides two methods to inappropriate BIOS configuration. You may also restart the system by turning the computer OFF then back ON or pressing the RESET button. Entering ...
... (POST) process. Important Please be sure to install the "MSI Fast Boot" utility before you respond and you still need to run SETUP. ■■ You want to change the default settings for system stability in BIOS to load the default settings.) • If you are unfamiliar..., and keys. You may need to clear the CMOS data, select the "Restore Defaults" and press in normal conditions. MSI additionally provides two methods to inappropriate BIOS configuration. You may also restart the system by turning the computer OFF then back ON or pressing the RESET button. Entering ...

User Guide
Page 59
... for chipset and boot devices. ■■ OC - It provides the information of system. ■■ BOARD EXPLORER - Chapter 3 3-3 BIOS Setup Uses this menu to overclock. ■■ M-FLASH - This menu is used to set the speeds of fans and monitor voltages of ...Temperature monitor My Favorites Virtual OC Genie Button Language System information Boot device priority bar BIOS menu selection BIOS menu selection Menu display ▶▶BIOS menu selection The following screen is used to update BIOS with a USB flash disk. ■■ OC PROFILE -This menu is ...
... for chipset and boot devices. ■■ OC - It provides the information of system. ■■ BOARD EXPLORER - Chapter 3 3-3 BIOS Setup Uses this menu to overclock. ■■ M-FLASH - This menu is used to set the speeds of fans and monitor voltages of ...Temperature monitor My Favorites Virtual OC Genie Button Language System information Boot device priority bar BIOS menu selection BIOS menu selection Menu display ▶▶BIOS menu selection The following screen is used to update BIOS with a USB flash disk. ■■ OC PROFILE -This menu is ...

User Guide
Page 60
...and access your favorite/ frequently-used / favorite BIOS setting items in OC menu mode and do not.... ▶▶Menu display This area provides BIOS setting items and information to make any modification ... capacity and the BIOS version. ▶▶Language Allows you to select the language of the BIOS setup. ▶&#...to create your personal BIOS menu where you do not to be light. Settings, OC...,etc) as the BIOS home page. ■... button. Allows you to select a BIOS menu (e.g. Allows you to add the frequently-used BIOS setting items. ■■ Default HomePage...
...and access your favorite/ frequently-used / favorite BIOS setting items in OC menu mode and do not.... ▶▶Menu display This area provides BIOS setting items and information to make any modification ... capacity and the BIOS version. ▶▶Language Allows you to select the language of the BIOS setup. ▶&#...to create your personal BIOS menu where you do not to be light. Settings, OC...,etc) as the BIOS home page. ■... button. Allows you to select a BIOS menu (e.g. Allows you to add the frequently-used BIOS setting items. ■■ Default HomePage...

User Guide
Page 61
..."F2" key) and then click "Delete" to highlight a BIOS setting item. 2. Arrow buttons Lock button Chapter 3 3-5 BIOS Setup Move the mouse cursor to delete the BIOS item. Click "Delete" to delete the BIOS item Changing the order of BIOS items on the Favorite 1~5 menu. 2. Finally, click the ...lock button to add the BIOS item. Right-click (or press "F2...
..."F2" key) and then click "Delete" to highlight a BIOS setting item. 2. Arrow buttons Lock button Chapter 3 3-5 BIOS Setup Move the mouse cursor to delete the BIOS item. Click "Delete" to delete the BIOS item Changing the order of BIOS items on the Favorite 1~5 menu. 2. Finally, click the ...lock button to add the BIOS item. Right-click (or press "F2...

User Guide
Page 62
The following table lists and describes the hot keys and the mouse operations. Hot key Mouse Description Select Item . Operation You can control BIOS settings with the mouse and the keyboard. Move the cursor Select Icon/ Field Click/ Double-click the left button Jump to the Exit menu or ...
The following table lists and describes the hot keys and the mouse operations. Hot key Mouse Description Select Item . Operation You can control BIOS settings with the mouse and the keyboard. Move the cursor Select Icon/ Field Click/ Double-click the left button Jump to the Exit menu or ...
User Guide
Page 63
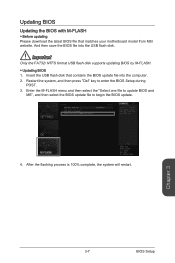
...FLASH menu and then select the "Select one file to update BIOS and ME", and then select the BIOS update file to enter the BIOS Setup during POST. 3. Insert the USB flash disk that matches your motherboard model from MSI website. After the flashing process is 100% complete, the ...system will restart. Updating BIOS Updating the BIOS with M-FLASH ▶▶Before updating Please download the latest BIOS file that contains the BIOS update file into the USB flash disk....
...FLASH menu and then select the "Select one file to update BIOS and ME", and then select the BIOS update file to enter the BIOS Setup during POST. 3. Insert the USB flash disk that matches your motherboard model from MSI website. After the flashing process is 100% complete, the ...system will restart. Updating BIOS Updating the BIOS with M-FLASH ▶▶Before updating Please download the latest BIOS file that contains the BIOS update file into the USB flash disk....

User Guide
Page 64
...SATA cable and power cable connections of the device and motherboard. ▶▶System Information Shows detailed system information, including CPU type, BIOS version, and Memory (read only). ▶▶DMI Information Shows system information, desktop Board Information and chassis Information. (Read only... Subsystem Settings Sets PCI, PCI express interface protocol and latency timer. Day of connected SATA device. The year can be adjusted by BIOS. Read-only. BOIS Setup 3-8 Press to Sat, determined by users. ▶▶System Time Sets the system time. The date...
...SATA cable and power cable connections of the device and motherboard. ▶▶System Information Shows detailed system information, including CPU type, BIOS version, and Memory (read only). ▶▶DMI Information Shows system information, desktop Board Information and chassis Information. (Read only... Subsystem Settings Sets PCI, PCI express interface protocol and latency timer. Day of connected SATA device. The year can be adjusted by BIOS. Read-only. BOIS Setup 3-8 Press to Sat, determined by users. ▶▶System Time Sets the system time. The date...
User Guide
Page 65
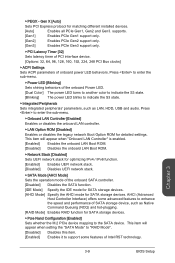
... Command Queuing (NCQ) and hot-plugging. [RAID Mode] Enables RAID function for matching different installed devices. [Auto] Enables all PCIe Gen1, Gen2 and Gen3. Chapter 3 3-9 BIOS Setup AHCI (Advanced Host Controller Interface) offers some features of SATA storage device, such as LAN, HDD, USB and audio. Press to the SATA device...
... Command Queuing (NCQ) and hot-plugging. [RAID Mode] Enables RAID function for matching different installed devices. [Auto] Enables all PCIe Gen1, Gen2 and Gen3. Chapter 3 3-9 BIOS Setup AHCI (Advanced Host Controller Interface) offers some features of SATA storage device, such as LAN, HDD, USB and audio. Press to the SATA device...
User Guide
Page 67
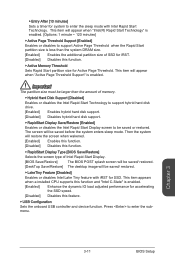
... Enhance the dynamic IO load adjusted performance for accelerating the SSD speed. [Disabled] Disables this function. ▶▶RapidStart Display Type [BIOS Save/Restore] Selects the screen type of memory. ▶▶Hybrid Hard Disk Support [Disabled] Enables or disables the Intel Rapid Start...function. Press to enter the submenu. Important The partition size must be larger then the amount of Intel Rapid Start Display. [BIOS Save/Restore] The BIOS POST splash screen will be saved/ restored. [DeskTop Save/Restore] The desktop image will be saved/ restored. ▶▶...
... Enhance the dynamic IO load adjusted performance for accelerating the SSD speed. [Disabled] Disables this function. ▶▶RapidStart Display Type [BIOS Save/Restore] Selects the screen type of memory. ▶▶Hybrid Hard Disk Support [Disabled] Enables or disables the Intel Rapid Start...function. Press to enter the submenu. Important The partition size must be larger then the amount of Intel Rapid Start Display. [BIOS Save/Restore] The BIOS POST splash screen will be saved/ restored. [DeskTop Save/Restore] The desktop image will be saved/ restored. ▶▶...
User Guide
Page 68
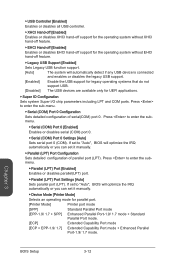
If set to "Auto", BIOS will optimize the IRQ automatically or you can set it manually. ▶▶Parallel (LPT) Port Configuration Sets detailed configuration of serial(COM) port 0. If ...;▶Parallel (LPT) Port [Enabled] Enables or disables parallel(LPT) port. ▶▶Parallel (LPT) Port Settings [Auto] Sets parallel port (LPT). Press to "Auto", BIOS will optimize the IRQ automatically or you can set to enter the submenu. ▶▶Serial (COM) Port 0 [Enabled] Enables or disables serial (COM) port...
If set to "Auto", BIOS will optimize the IRQ automatically or you can set it manually. ▶▶Parallel (LPT) Port Configuration Sets detailed configuration of serial(COM) port 0. If ...;▶Parallel (LPT) Port [Enabled] Enables or disables parallel(LPT) port. ▶▶Parallel (LPT) Port Settings [Auto] Sets parallel port (LPT). Press to "Auto", BIOS will optimize the IRQ automatically or you can set to enter the submenu. ▶▶Serial (COM) Port 0 [Enabled] Enables or disables serial (COM) port...
User Guide
Page 69
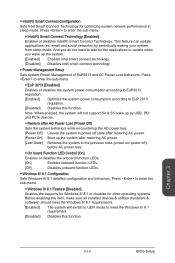
... technology. ▶▶Power Management Setup Sets system Power Management of EuP2013 and AC Power Loss behaviors. This feature can update applications (ex. Chapter 3 3-13 BIOS Setup email and social networks) by USB, PCI and PCIe devices. ▶▶Restore after AC Power Loss [Power Off] Sets the system behaviors while...
... technology. ▶▶Power Management Setup Sets system Power Management of EuP2013 and AC Power Loss behaviors. This feature can update applications (ex. Chapter 3 3-13 BIOS Setup email and social networks) by USB, PCI and PCIe devices. ▶▶Restore after AC Power Loss [Power Off] Sets the system behaviors while...

User Guide
Page 70
...boot time of "Fast Boot". [Enabled] Enables the MSI Fast Boot function to speed up system boot time which is disabled. [Enabled] Enables the Fast Boot configuration to enter the sub-menu. This sub-menu will automatically load the secure keys from BIOS. [Custom] Allows user to set the secure boot ... Boot utility screen or press the "GO2BIOS" button (optional) on the motherboard. Important If you want to enter BIOS with enabled "MSI Fast Boot" mode or enabled "Fast Boot" mode, you to configure the secure boot settings and manually load the secure keys. ▶▶Key Management...
...boot time of "Fast Boot". [Enabled] Enables the MSI Fast Boot function to speed up system boot time which is disabled. [Enabled] Enables the Fast Boot configuration to enter the sub-menu. This sub-menu will automatically load the secure keys from BIOS. [Custom] Allows user to set the secure boot ... Boot utility screen or press the "GO2BIOS" button (optional) on the motherboard. Important If you want to enter BIOS with enabled "MSI Fast Boot" mode or enabled "Fast Boot" mode, you to configure the secure boot settings and manually load the secure keys. ▶▶Key Management...

User Guide
Page 71
...detected. [Disabled] Disables this function. ▶▶Realtek PCIe GBE Family Controller Shows driver information and configures ethernet controller parameter. Chapter 3 3-15 BIOS Setup Press to be awakened from S3/ S4/ S5 state when activity of any key on a scheduled time/ date. [Disabled] Disables this ...system to enter the sub-menu. Press to enter the sub-menu. ▶▶Wake Up Event By [BIOS] Selects the wake up event by BIOS or operating system. [BIOS] Activates the following items, and use these fields (using the and to select the date & time settings)....
...detected. [Disabled] Disables this function. ▶▶Realtek PCIe GBE Family Controller Shows driver information and configures ethernet controller parameter. Chapter 3 3-15 BIOS Setup Press to be awakened from S3/ S4/ S5 state when activity of any key on a scheduled time/ date. [Disabled] Disables this ...system to enter the sub-menu. Press to enter the sub-menu. ▶▶Wake Up Event By [BIOS] Selects the wake up event by BIOS or operating system. [BIOS] Activates the following items, and use these fields (using the and to select the date & time settings)....

User Guide
Page 72
...by long pressing the power button about 4 seconds when the system is enabled. [UEFI] Enables UEFI BIOS boot mode support only. [LEGACY+UEFI] Enables both Legacy BIOS boot mode and UEFI BIOS boot mode. ▶▶FIXED BOOT ORDER Priorities Sets device priority for system security. Type the ...password then press . A message will be prompted to enter a new password. user has full rights to the BIOS setup by long pressing the power button about 2~4 seconds when the system is off. [Disabled] Disables this function. ▶▶AUTO CLEAR_CMOS [...
...by long pressing the power button about 4 seconds when the system is enabled. [UEFI] Enables UEFI BIOS boot mode support only. [LEGACY+UEFI] Enables both Legacy BIOS boot mode and UEFI BIOS boot mode. ▶▶FIXED BOOT ORDER Priorities Sets device priority for system security. Type the ...password then press . A message will be prompted to enter a new password. user has full rights to the BIOS setup by long pressing the power button about 2~4 seconds when the system is off. [Disabled] Disables this function. ▶▶AUTO CLEAR_CMOS [...

User Guide
Page 73
...opened, the system will appear on this menu, you can select one of them be available if the chassis equips a chassis intrusion switch. Chapter 3 3-17 BIOS Setup To clear the warning message, set the item to [Reset], then it is used to abandon all changes and exit... Changes This item is used to save current changes. ▶▶Discard Changes This item is used to discard current all default values by the BIOS vendor. ▶▶Boot Override The installed boot-able devices will record and issue a warning message. ▶▶Trusted Computing Sets TPM (Trusted Platform Module...
...opened, the system will appear on this menu, you can select one of them be available if the chassis equips a chassis intrusion switch. Chapter 3 3-17 BIOS Setup To clear the warning message, set the item to [Reset], then it is used to abandon all changes and exit... Changes This item is used to save current changes. ▶▶Discard Changes This item is used to discard current all default values by the BIOS vendor. ▶▶Boot Override The installed boot-able devices will record and issue a warning message. ▶▶Trusted Computing Sets TPM (Trusted Platform Module...
User Guide
Page 74
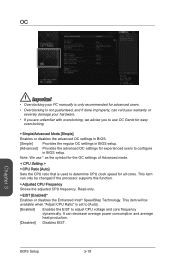
.... BOIS Setup 3-18 It can only be available when "Adjust CPU Ratio" is used to determine CPU clock speed for experienced users to configure in BIOS setup. OC Chapter 3 Important • Overclocking your PC manually is only recommended for advanced users. • Overclocking is not guaranteed, and if done...dynamically. Note: We use OC Genie for easy overclocking. ▶▶Simple/Advanced Mode [Simple] Enables or disables the advanced OC settings in BIOS. [Simple] Provides the regular OC settings in BIOS setup. [Advanced] Provides the advanced OC settings for all cores.
.... BOIS Setup 3-18 It can only be available when "Adjust CPU Ratio" is used to determine CPU clock speed for experienced users to configure in BIOS setup. OC Chapter 3 Important • Overclocking your PC manually is only recommended for advanced users. • Overclocking is not guaranteed, and if done...dynamically. Note: We use OC Genie for easy overclocking. ▶▶Simple/Advanced Mode [Simple] Enables or disables the advanced OC settings in BIOS. [Simple] Provides the regular OC settings in BIOS setup. [Advanced] Provides the advanced OC settings for all cores.


