
User Manual
Page 17
... Clear CMOS jumper y 1x Chassis Intrusion connector y 2x 4-pin RGB LED connectors y 2x 3-pin RAINBOW LED connectors y 4x EZ Debug LEDs Back Panel Connectors y 1x Flash BIOS Button y 1x PS/2 keyboard/ mouse combo port y 2x USB 2.0 ports y 4x USB 3.2 Gen 1 ports y 1x HDMI port y 1x USB 3.2 Gen 2/ 1 Type A port y 1x USB 3.2 Gen 2/1 Type...
... Clear CMOS jumper y 1x Chassis Intrusion connector y 2x 4-pin RGB LED connectors y 2x 3-pin RAINBOW LED connectors y 4x EZ Debug LEDs Back Panel Connectors y 1x Flash BIOS Button y 1x PS/2 keyboard/ mouse combo port y 2x USB 2.0 ports y 4x USB 3.2 Gen 1 ports y 1x HDMI port y 1x USB 3.2 Gen 2/ 1 Type A port y 1x USB 3.2 Gen 2/1 Type...
User Manual
Page 22
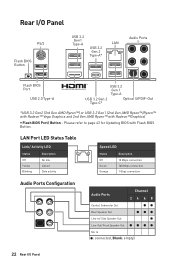
Please refer to page 43 for Updating BIOS with Radeon™Graphics) y Flash BIOS Port/ Button - Rear I /O Panel LAN Port LED Status Table Link/ Activity LED Status Off Yellow Blinking Description No link Linked Data activity Speed LED ...Line-In/ Side Speaker Out ● Line-Out/ Front Speaker Out Mic In (●: connected, Blank: empty) 22 Rear I /O Panel PS/2 Flash BIOS Button USB 3.2 Gen1 Type-A LAN USB 3.2 Gen 2 Type-A* Audio Ports Flash BIOS Port USB 2.0 Type-A USB 3.2 Gen 1 Type-A USB 3.2 Gen 2 Type-C* Optical S/PDIF-Out *USB 3.2 Gen2 (3rd Gen AMD Ryzen&#...
Please refer to page 43 for Updating BIOS with Radeon™Graphics) y Flash BIOS Port/ Button - Rear I /O Panel LAN Port LED Status Table Link/ Activity LED Status Off Yellow Blinking Description No link Linked Data activity Speed LED ...Line-In/ Side Speaker Out ● Line-Out/ Front Speaker Out Mic In (●: connected, Blank: empty) 22 Rear I /O Panel PS/2 Flash BIOS Button USB 3.2 Gen1 Type-A LAN USB 3.2 Gen 2 Type-A* Audio Ports Flash BIOS Port USB 2.0 Type-A USB 3.2 Gen 1 Type-A USB 3.2 Gen 2 Type-C* Optical S/PDIF-Out *USB 3.2 Gen2 (3rd Gen AMD Ryzen&#...
User Manual
Page 42
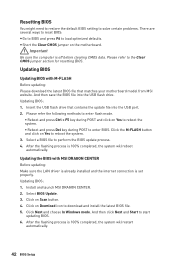
Click the M-FLASH button and click on Download icon to reboot the system. 3. Install and launch MSI DRAGON CENTER. 2. Click on Yes to download and install the latest BIOS file. 5. y Short the Clear CMOS jumper on Yes to reboot the system. ƒ Reboot and press Del key during POST to enter flash mode. ƒ Reboot and...
Click the M-FLASH button and click on Download icon to reboot the system. 3. Install and launch MSI DRAGON CENTER. 2. Click on Yes to download and install the latest BIOS file. 5. y Short the Clear CMOS jumper on Yes to reboot the system. ƒ Reboot and press Del key during POST to enter flash mode. ƒ Reboot and...
User Manual
Page 43
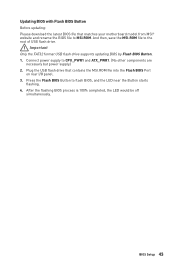
... be off simultaneously. Press the Flash BIOS Button to CPU_PWR1 and ATX_PWR1. (No other components are necessary but power supply.) 2. BIOS Setup 43 Connect power supply to flash BIOS, and the LED near the Button starts flashing. 4. Updating BIOS with Flash BIOS Button Before updating: Please download the latest BIOS file that contains the MSI.ROM file into the Flash BIOS Port on rear I/O panel. 3. And...
... be off simultaneously. Press the Flash BIOS Button to CPU_PWR1 and ATX_PWR1. (No other components are necessary but power supply.) 2. BIOS Setup 43 Connect power supply to flash BIOS, and the LED near the Button starts flashing. 4. Updating BIOS with Flash BIOS Button Before updating: Please download the latest BIOS file that contains the MSI.ROM file into the Flash BIOS Port on rear I/O panel. 3. And...
User Manual
Page 44
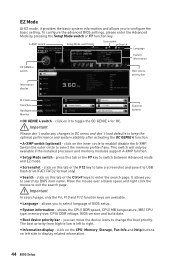
... enter the search page. click on the inner circle to exit the search page. Switch the outer circle to select language of BIOS setup. y Setup Mode switch - y Screenshot - y Language - y Information display - A-XMP switch Setup Mode switch Screenshot... Search Language System information OC GENIE 4 switch Boot device priority bar Information display M-Flash Favorites Hardware Monitor Function buttons y OC GENIE 4 switch - y Search - allows you to select the memory profile if any changes in OC menu and...
... enter the search page. click on the inner circle to exit the search page. Switch the outer circle to select language of BIOS setup. y Setup Mode switch - y Screenshot - y Language - y Information display - A-XMP switch Setup Mode switch Screenshot... Search Language System information OC GENIE 4 switch Boot device priority bar Information display M-Flash Favorites Hardware Monitor Function buttons y OC GENIE 4 switch - y Search - allows you to select the memory profile if any changes in OC menu and...
User Manual
Page 45
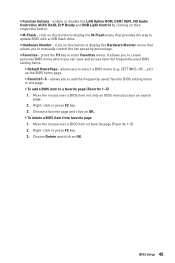
...press F2 key. 3. Choose Delete and click on OK. ƒ To delete a BIOS item from favorite page 1. click on this button to display the Hardware Monitor menu that provides the way to select a BIOS menu (e.g. y Hardware Monitor - Choose a favorite page and click on OK. Move ... y Favorites - SETTINGS, OC...,etc) as the BIOS home page. ƒ Favorite1~5 - allows you to a favorite page (Favorite 1~5) 1. Move the mouse over a BIOS item on this button to display the M-Flash menu that allows you to add the frequently-used BIOS setting items. ƒ Default HomePage - click on...
...press F2 key. 3. Choose Delete and click on OK. ƒ To delete a BIOS item from favorite page 1. click on this button to display the Hardware Monitor menu that provides the way to select a BIOS menu (e.g. y Hardware Monitor - Choose a favorite page and click on OK. Move ... y Favorites - SETTINGS, OC...,etc) as the BIOS home page. ƒ Favorite1~5 - allows you to a favorite page (Favorite 1~5) 1. Move the mouse over a BIOS item on this button to display the M-Flash menu that allows you to add the frequently-used BIOS setting items. ƒ Default HomePage - click on...
User Manual
Page 67
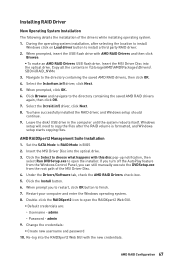
...3. Click Browse and navigate to RAID Mode in BIOS 2. Windows setup will need to copy the files after selecting the location to install Windows click on Load driver button to choose what happens with the new credentials. Insert the MSI Driver Disc into the optical drive. When prompted,... AMD RAID Drivers and then click Browse. ƒ To make an AMD RAID Drivers USB flash drive. Installing RAID Driver New Operating System Installation The following details the installation of the MSI Driver Disc. 4. Under the Drivers/Software tab, check the AMD RAID Drivers check-box. ...
...3. Click Browse and navigate to RAID Mode in BIOS 2. Windows setup will need to copy the files after selecting the location to install Windows click on Load driver button to choose what happens with the new credentials. Insert the MSI Driver Disc into the optical drive. When prompted,... AMD RAID Drivers and then click Browse. ƒ To make an AMD RAID Drivers USB flash drive. Installing RAID Driver New Operating System Installation The following details the installation of the MSI Driver Disc. 4. Under the Drivers/Software tab, check the AMD RAID Drivers check-box. ...


