

User Manual
Page 13
...2 Quick Start ...3 Preparing Tools and Components 3 Installing a Processor 4 Installing DDR4 memory 5 Connecting the Front Panel Header 6 Installing the Motherboard 7 Installing SATA Drives 8 Installing a Graphics Card 9 Connecting Peripheral Devices 10 Connecting the Power Connectors 11 Power On...12 Specifications...15 Block Diagram ...19 Rear I/O Panel ...20 LAN Port LED Status Table 20 Audio Ports Configuration 20 Realtek HD Audio Manager 21 Overview of Components 23 CPU Socket ...25 DIMM Slots...26 PCI_E1~6: PCIe Expansion Slots 27 M2_1: M.2 Slot (Key M 30 SATA1~6: SATA 6Gb...
...2 Quick Start ...3 Preparing Tools and Components 3 Installing a Processor 4 Installing DDR4 memory 5 Connecting the Front Panel Header 6 Installing the Motherboard 7 Installing SATA Drives 8 Installing a Graphics Card 9 Connecting Peripheral Devices 10 Connecting the Power Connectors 11 Power On...12 Specifications...15 Block Diagram ...19 Rear I/O Panel ...20 LAN Port LED Status Table 20 Audio Ports Configuration 20 Realtek HD Audio Manager 21 Overview of Components 23 CPU Socket ...25 DIMM Slots...26 PCI_E1~6: PCIe Expansion Slots 27 M2_1: M.2 Slot (Key M 30 SATA1~6: SATA 6Gb...
User Manual
Page 14
JLED1: RGB LED connector 38 Onboard LEDs ...39 EZ Debug LED...39 GPU LED ...39 BIOS Setup ...40 Entering BIOS Setup 40 Resetting BIOS...41 Updating BIOS...41 Advanced Mode ...44 SETTINGS...45 Advanced...45 Boot...50 Security ...51 Save & Exit...52 OC...54 M-FLASH ...57 OC PROFILE ...58 HARDWARE MONITOR 59 Software Description 60 Installing Windows® 7 64-bit/ Windows®10 64-bit 60 Installing Drivers 60 Installing Utilities 60 LIVE UPDATE 6...61 COMMAND CENTER 63 RAMDISK...67 X-BOOST ...68 MSI SMART TOOL 70 NETWORK GENIE 72 CPU-Z...74 Regulatory Notices 75 14 Contents
JLED1: RGB LED connector 38 Onboard LEDs ...39 EZ Debug LED...39 GPU LED ...39 BIOS Setup ...40 Entering BIOS Setup 40 Resetting BIOS...41 Updating BIOS...41 Advanced Mode ...44 SETTINGS...45 Advanced...45 Boot...50 Security ...51 Save & Exit...52 OC...54 M-FLASH ...57 OC PROFILE ...58 HARDWARE MONITOR 59 Software Description 60 Installing Windows® 7 64-bit/ Windows®10 64-bit 60 Installing Drivers 60 Installing Utilities 60 LIVE UPDATE 6...61 COMMAND CENTER 63 RAMDISK...67 X-BOOST ...68 MSI SMART TOOL 70 NETWORK GENIE 72 CPU-Z...74 Regulatory Notices 75 14 Contents
User Manual
Page 15
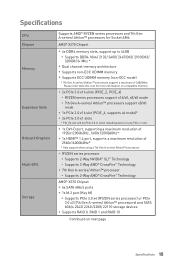
...; X370 Chipset y 6x SATA 6Gb/s ports y 1x M.2 port (Key M) ƒ Supports PCIe 3.0 x4 (RYZEN series processor) or PCIe 3.0 x2 (7th Gen A-series/ Athlon™ processors) and SATA 6Gb/s 2242/ 2260 /2280/ 22110 storage devices y Supports RAID 0, RAID 1 and RAID 10 Continued on compatible memory y 2x PCIe 3.0 x16 slots (PCIE_2, PCIE_4) ƒ RYZEN series processors support x16/x0, x8/x8 mode ƒ 7th Gen A-series/ Athlon™ processors support x8/x0 mode y 1x PCIe 2.0 x16 slot (PCIE_6, supports x4 mode)* y 3x PCIe 2.0 x1 slots * PCI_E6 slot will be PCIe 2.0 x1 when installing device...
...; X370 Chipset y 6x SATA 6Gb/s ports y 1x M.2 port (Key M) ƒ Supports PCIe 3.0 x4 (RYZEN series processor) or PCIe 3.0 x2 (7th Gen A-series/ Athlon™ processors) and SATA 6Gb/s 2242/ 2260 /2280/ 22110 storage devices y Supports RAID 0, RAID 1 and RAID 10 Continued on compatible memory y 2x PCIe 3.0 x16 slots (PCIE_2, PCIE_4) ƒ RYZEN series processors support x16/x0, x8/x8 mode ƒ 7th Gen A-series/ Athlon™ processors support x8/x0 mode y 1x PCIe 2.0 x16 slot (PCIE_6, supports x4 mode)* y 3x PCIe 2.0 x1 slots * PCI_E6 slot will be PCIe 2.0 x1 when installing device...

User Manual
Page 16
...) Type-A port on the back panel y AMD® X370 Chipset ƒ 4x USB 3.1 Gen1 (SuperSpeed USB) ports available through the internal USB connectors ƒ 6x USB 2.0 (High-speed USB) ports (2 Type-A ports on the back panel, 4 ports available through the internal USB connectors) y AMD® CPU ƒ 4x USB 3.1 Gen1 (SuperSpeed USB) Type-A ports on the back panel y Realtek® ALC892 Codec y 7.1-Channel High Definition Audio y 1x Realtek® 8111H Gigabit LAN controller y 1x PS/2 keyboard/ mouse combo port y 2x USB 2.0 Type-A ports y 1x DVI-D port y 1x HDMI™ 1.4 port y 1x LAN (RJ45...
...) Type-A port on the back panel y AMD® X370 Chipset ƒ 4x USB 3.1 Gen1 (SuperSpeed USB) ports available through the internal USB connectors ƒ 6x USB 2.0 (High-speed USB) ports (2 Type-A ports on the back panel, 4 ports available through the internal USB connectors) y AMD® CPU ƒ 4x USB 3.1 Gen1 (SuperSpeed USB) Type-A ports on the back panel y Realtek® ALC892 Codec y 7.1-Channel High Definition Audio y 1x Realtek® 8111H Gigabit LAN controller y 1x PS/2 keyboard/ mouse combo port y 2x USB 2.0 Type-A ports y 1x DVI-D port y 1x HDMI™ 1.4 port y 1x LAN (RJ45...

User Manual
Page 37
... but DO NOT unplug the power cord (system under S5/ Soft-off mode) 2. JLPT1: Parallel Port Connector This connector allows you want to clear the system configuration, set the jumpers to clear the CMOS memory. Remove the jumper cap from a battery located on the computer. Use a jumper cap to default values 1. Keep Data (default) Clear CMOS/ Reset BIOS Resetting BIOS to short JBAT1 for about 5-10 seconds. 3. Power on the motherboard to connect the optional parallel port with bracket. 2 26 1 25 1 RSTB...
... but DO NOT unplug the power cord (system under S5/ Soft-off mode) 2. JLPT1: Parallel Port Connector This connector allows you want to clear the system configuration, set the jumpers to clear the CMOS memory. Remove the jumper cap from a battery located on the computer. Use a jumper cap to default values 1. Keep Data (default) Clear CMOS/ Reset BIOS Resetting BIOS to short JBAT1 for about 5-10 seconds. 3. Power on the motherboard to connect the optional parallel port with bracket. 2 26 1 25 1 RSTB...
User Manual
Page 41
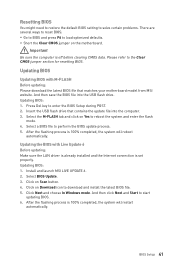
... the USB flash drive that matches your motherboard model from MSI website. Select BIOS Update. 3. And then click Next and Start to download and install the latest BIOS file. 5. Click on Yes to reboot the system and enter the flash mode. 4. After the flashing process is 100% completed, the system will restart automatically. Updating BIOS Updating BIOS with Live Update 6 Before updating: Make sure the LAN driver is already installed and the Internet connection is off before clearing CMOS...
... the USB flash drive that matches your motherboard model from MSI website. Select BIOS Update. 3. And then click Next and Start to download and install the latest BIOS file. 5. Click on Yes to reboot the system and enter the flash mode. 4. After the flashing process is 100% completed, the system will restart automatically. Updating BIOS Updating BIOS with Live Update 6 Before updating: Make sure the LAN driver is already installed and the Internet connection is off before clearing CMOS...

User Manual
Page 42
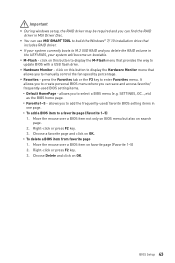
... page will show. shows the CPU/ DDR speed, CPU/ MB temperature, MB/ CPU type, memory size, CPU/ DDR voltage, BIOS version and build date. y Information display - enable or disable the LAN Option ROM, HD audio controller, AHCI, RAID, CPU Fan Fail Warning Control and BIOS Log Review by pressing the Setup Mode switch or F7 function key. y Search - click on their respective button. 42 BIOS Setup Important In search page, only the F6, F10 and F12 function keys are available. y Boot device priority bar - y System information - you...
... page will show. shows the CPU/ DDR speed, CPU/ MB temperature, MB/ CPU type, memory size, CPU/ DDR voltage, BIOS version and build date. y Information display - enable or disable the LAN Option ROM, HD audio controller, AHCI, RAID, CPU Fan Fail Warning Control and BIOS Log Review by pressing the Setup Mode switch or F7 function key. y Search - click on their respective button. 42 BIOS Setup Important In search page, only the F6, F10 and F12 function keys are available. y Boot device priority bar - y System information - you...
User Manual
Page 43
... can use MSI SMART TOOL to build the Windows® 7/ 10 installation drive that provides the way to update BIOS with a USB flash drive. click on this button to display the Hardware Monitor menu that allows you to add the frequently-used BIOS setting items. ƒ Default HomePage - allows you to manually control the fan speed by percentage. BIOS Setup 43 allows you delete the RAID volume in the UEFI BIOS, your system currently boots to M.2 SSD RAID and you...
... can use MSI SMART TOOL to build the Windows® 7/ 10 installation drive that provides the way to update BIOS with a USB flash drive. click on this button to display the Hardware Monitor menu that allows you to add the frequently-used BIOS setting items. ƒ Default HomePage - allows you to manually control the fan speed by percentage. BIOS Setup 43 allows you delete the RAID volume in the UEFI BIOS, your system currently boots to M.2 SSD RAID and you...

User Manual
Page 44
... bar BIOS menu selection BIOS menu selection Menu display y GAME BOOST switch/ Setup Mode switch/ Screenshot/ Favorites/ Language/ System information/ Boot device priority bar - Increasing the frequency may get better performance. ƒ M-FLASH - provides the information of system. ƒ BOARD EXPLORER - please refer to be configured. 44 BIOS Setup provides the way to set the speeds of fans and monitor voltages of installed devices on this motherboard. allows you to update BIOS with a USB flash drive. ƒ OC PROFILE - Advanced Mode Press Setup Mode switch...
... bar BIOS menu selection BIOS menu selection Menu display y GAME BOOST switch/ Setup Mode switch/ Screenshot/ Favorites/ Language/ System information/ Boot device priority bar - Increasing the frequency may get better performance. ƒ M-FLASH - provides the information of system. ƒ BOARD EXPLORER - please refer to be configured. 44 BIOS Setup provides the way to set the speeds of fans and monitor voltages of installed devices on this motherboard. allows you to update BIOS with a USB flash drive. ƒ OC PROFILE - Advanced Mode Press Setup Mode switch...

User Manual
Page 46
...Disabled] Disables UEFI network stack. This item is available when Onboard LAN Controller is enabled. [Enabled] Enables the Ipv6 PXE boot support. [Disabled] Disables the Ipv6 PXE boot support. 46 BIOS Setup This item will appear when Onboard LAN Controller is Enabled. [Enabled] Enables the Ipv4 PXE boot support. [Disabled] Disables the Ipv4 PXE boot support. Press Enter to enter the sub-menu. fPCI Latency Timer [32] Sets latency timer of PCI interface device. [Options: 32, 64, 96, 128, 160, 192, 224, 248 PCI Bus clocks] f ACPI Settings Sets ACPI parameters of the onboard Power LED. [Dual...
...Disabled] Disables UEFI network stack. This item is available when Onboard LAN Controller is enabled. [Enabled] Enables the Ipv6 PXE boot support. [Disabled] Disables the Ipv6 PXE boot support. 46 BIOS Setup This item will appear when Onboard LAN Controller is Enabled. [Enabled] Enables the Ipv4 PXE boot support. [Disabled] Disables the Ipv4 PXE boot support. Press Enter to enter the sub-menu. fPCI Latency Timer [32] Sets latency timer of PCI interface device. [Options: 32, 64, 96, 128, 160, 192, 224, 248 PCI Bus clocks] f ACPI Settings Sets ACPI parameters of the onboard Power LED. [Dual...

User Manual
Page 47
.... BIOS Setup 47 This item appears when the installed CPU has iGPU. [IGD] Integrated Graphics Display. [PEG] PCI-Express Graphics Device. fUMA Frame Buffer Size [Auto] (optional) Selects a fixed amount of the onboard SATA controller. [AHCI Mode] Specify the AHCI mode for SATA storage devices. Press Enter to enter the submenu. fPrimary Video Adapter [PEG] (optional) Selects a graphics device as Native Command Queuing (NCQ) and hot-plugging. [RAID Mode] Enables RAID function for the SATA ports. fLegacy USB Support [Enabled] Sets Legacy USB function support. [Auto] The...
.... BIOS Setup 47 This item appears when the installed CPU has iGPU. [IGD] Integrated Graphics Display. [PEG] PCI-Express Graphics Device. fUMA Frame Buffer Size [Auto] (optional) Selects a fixed amount of the onboard SATA controller. [AHCI Mode] Specify the AHCI mode for SATA storage devices. Press Enter to enter the submenu. fPrimary Video Adapter [PEG] (optional) Selects a graphics device as Native Command Queuing (NCQ) and hot-plugging. [RAID Mode] Enables RAID function for the SATA ports. fLegacy USB Support [Enabled] Sets Legacy USB function support. [Auto] The...

User Manual
Page 48
... mode for parallel port. [STD Printer Mode] Printer port mode [SPP] Standard Parallel Port mode [EPP-1.9 and SPP Mode] Enhanced Parallel Port-1.9 mode + Standard Parallel Port mode. fSerial (COM) Port x [Enabled] Enables or disables serial (COM) port x. fParallel (LPT) Port Settings [Auto] Sets parallel port (LPT). Press Enter to ErP regulation. If set to Auto, BIOS will not support S4 & S5 wake up the system after restoring AC power. [Power On] Boot up by USB and PCIe devices. [Disabled] Disables this function. fRestore after AC Power Loss [Power Off] Sets...
... mode for parallel port. [STD Printer Mode] Printer port mode [SPP] Standard Parallel Port mode [EPP-1.9 and SPP Mode] Enhanced Parallel Port-1.9 mode + Standard Parallel Port mode. fSerial (COM) Port x [Enabled] Enables or disables serial (COM) port x. fParallel (LPT) Port Settings [Auto] Sets parallel port (LPT). Press Enter to ErP regulation. If set to Auto, BIOS will not support S4 & S5 wake up the system after restoring AC power. [Power On] Boot up by USB and PCIe devices. [Disabled] Disables this function. fRestore after AC Power Loss [Power Off] Sets...

User Manual
Page 49
... boot up on a scheduled time/ date. [Disabled] Disables this function. fInternal GOP Configuration Manages the onboard Graphics Output Protocol (GOP). Press Enter to prevent the unauthorized accessing. This sub-menu will appear when Windows 10 WHQL Support is set wake up behaviors for other operating systems. Before enabling this item, make sure all installed devices & utilities (hardware & software) should meet the Windows requirement. [Disabled] Disables this function. fWake Up Event By [BIOS...
... boot up on a scheduled time/ date. [Disabled] Disables this function. fInternal GOP Configuration Manages the onboard Graphics Output Protocol (GOP). Press Enter to prevent the unauthorized accessing. This sub-menu will appear when Windows 10 WHQL Support is set wake up behaviors for other operating systems. Before enabling this item, make sure all installed devices & utilities (hardware & software) should meet the Windows requirement. [Disabled] Disables this function. fWake Up Event By [BIOS...
User Manual
Page 50
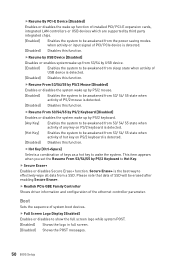
... PCI-E Device [Disabled] Enables or disables the wake up function of installed PCI/ PCI-E expansion cards, integrated LAN controllers or USB devices which are supported by third party integrated chips. [Enabled] Enables the system to Hot Key. This item appears when you set the Resume From S3/S4/S5 by PS/2 keyboard. [Any Key] Enables the system to be awakened from S3/ S4/ S5 state when activity of PCI/ PCIe device is detected. [Disabled] Disables this function. f Realtek PCIe...
... PCI-E Device [Disabled] Enables or disables the wake up function of installed PCI/ PCI-E expansion cards, integrated LAN controllers or USB devices which are supported by third party integrated chips. [Enabled] Enables the system to Hot Key. This item appears when you set the Resume From S3/S4/S5 by PS/2 keyboard. [Any Key] Enables the system to be awakened from S3/ S4/ S5 state when activity of PCI/ PCIe device is detected. [Disabled] Disables this function. f Realtek PCIe...

User Manual
Page 52
.... [Reset] Clear the warning message. You may also press Esc key to enter the sub-menu. fDevice Select [Auto] Sets the version of the TPM device. fChassis Intrusion [Disabled] Enables or disables recording messages while the chassis is opened . Save & Exit f Discard Changes and Exit Exit BIOS setup without authorization. fAMD fTPM switch [AMD CPU fTPM] Selects TPM device. [AMD CPU fTPM] Select it for AMD Firmware TPM. [AMD CPU fTPM Disabled] Select it for accessing the system. f Chassis...
.... [Reset] Clear the warning message. You may also press Esc key to enter the sub-menu. fDevice Select [Auto] Sets the version of the TPM device. fChassis Intrusion [Disabled] Enables or disables recording messages while the chassis is opened . Save & Exit f Discard Changes and Exit Exit BIOS setup without authorization. fAMD fTPM switch [AMD CPU fTPM] Selects TPM device. [AMD CPU fTPM] Select it for AMD Firmware TPM. [AMD CPU fTPM Disabled] Select it for accessing the system. f Chassis...

User Manual
Page 54
... Clear CMOS jumper/ button (optional) section to clear the CMOS data, and enter the BIOS to configure in BIOS setup. [Expert] Provides the advanced OC settings for each/ all memory channel. f OC Explore Mode [Normal] Enables or disables to show the normal or expert version of processor cores to enter the sub-menu. OC Important y Overclocking your hardware. f Core Performance Boost [Auto] Enables or disables the Core Performance Boost (CPB). The system may become unstable or unbootable after changing memory timing. f CPU Frequency [Auto] Sets...
... Clear CMOS jumper/ button (optional) section to clear the CMOS data, and enter the BIOS to configure in BIOS setup. [Expert] Provides the advanced OC settings for each/ all memory channel. f OC Explore Mode [Normal] Enables or disables to show the normal or expert version of processor cores to enter the sub-menu. OC Important y Overclocking your hardware. f Core Performance Boost [Auto] Enables or disables the Core Performance Boost (CPB). The system may become unstable or unbootable after changing memory timing. f CPU Frequency [Auto] Sets...

User Manual
Page 55
... default settings for CPU over-current protection. f DRAM/PROM Voltages control [Auto] These options allows you to set it manually. If set to Auto, BIOS will issue a warning message during boot when the CPU or memory has been replaced. [Enabled] The system will set to "Auto", BIOS will configure this setting automatically. Controls the digital powers related to enter the sub-menu. Higher load-line calibration could get higher voltage and good overclocking performance, but increase the temperature...
... default settings for CPU over-current protection. f DRAM/PROM Voltages control [Auto] These options allows you to set it manually. If set to Auto, BIOS will issue a warning message during boot when the CPU or memory has been replaced. [Enabled] The system will set to "Auto", BIOS will configure this setting automatically. Controls the digital powers related to enter the sub-menu. Higher load-line calibration could get higher voltage and good overclocking performance, but increase the temperature...

User Manual
Page 57
... BIOS switch to the target BIOS ROM, and then click OK to update BIOS with a USB flash drive. After the flashing process is 100% completed, the system will appear after rebooting. 4. Please down-load the latest BIOS file that contains the update file into your USB flash drive. Click on Yes to update BIOS. 1. BIOS Setup 57 Select the BIOS file. 5. And then follow the steps below to reboot and enter the flash mode. 3. The system will enter...
... BIOS switch to the target BIOS ROM, and then click OK to update BIOS with a USB flash drive. After the flashing process is 100% completed, the system will appear after rebooting. 4. Please down-load the latest BIOS file that contains the update file into your USB flash drive. Click on Yes to update BIOS. 1. BIOS Setup 57 Select the BIOS file. 5. And then follow the steps below to reboot and enter the flash mode. 3. The system will enter...

User Manual
Page 60
... Boot Menu. 5. Software Description Please download and update the latest utilities and drivers at www.msi.com Installing Windows® 7 64-bit/ Windows®10 64-bit 1. Note: Due to chipset limitation, during the computer POST (Power-On Self Test) to get into your optical drive. 2. You can use MSI Smart Tool to boot from the Boot Menu. 6. Press the Restart button on the computer. 2. Press F11 key during the Windows 7 installation process, USB optical drives or USB flash drives are not supported...
... Boot Menu. 5. Software Description Please download and update the latest utilities and drivers at www.msi.com Installing Windows® 7 64-bit/ Windows®10 64-bit 1. Note: Due to chipset limitation, during the computer POST (Power-On Self Test) to get into your optical drive. 2. You can use MSI Smart Tool to boot from the Boot Menu. 6. Press the Restart button on the computer. 2. Press F11 key during the Windows 7 installation process, USB optical drives or USB flash drives are not supported...

User Manual
Page 78
...Version 2.0, 2017/02, First release. 78 Regulatory Notices We take every care in the preparation of this document, but no solution can be obtained from the user guide, please contact your place of Micro-Star Int'l Co.,Ltd. y Visit the MSI website for further guidance. Alternatively, please try the following help resources for technical guide, BIOS updates, driver updates... the right to make changes without notice. Technical Support If a problem arises with your product at: http://register.msi.com Trademark Recognition All product names used in this manual are the properties of ...
...Version 2.0, 2017/02, First release. 78 Regulatory Notices We take every care in the preparation of this document, but no solution can be obtained from the user guide, please contact your place of Micro-Star Int'l Co.,Ltd. y Visit the MSI website for further guidance. Alternatively, please try the following help resources for technical guide, BIOS updates, driver updates... the right to make changes without notice. Technical Support If a problem arises with your product at: http://register.msi.com Trademark Recognition All product names used in this manual are the properties of ...


