
User Manual
Page 3
...18 Bottom Side View ...2-19 Getting Started Power Management ...3-2 AC Adapter ...3-2 Battery Pack ...3-4 Using the Battery Pack...3-7 Basic Operations ...3-9 Safety and Comfort Tips...3-9 Having a Good Work Habit...3-10 Knowing the Keyboard ...3-11 Knowing the Touchpad ...3-16 About Hard Disk Drive...3-18 Connecting the External Devices 3-19 Using the External Optical Storage Device 3-19 Connecting the Peripheral Devices 3-21 Connecting the Communication Devices 3-23 Safely Remove Hardware ...3-24 Windows XP Installation...3-25 Installation Requirement...3-25 Installing Windows XP ...3-25
...18 Bottom Side View ...2-19 Getting Started Power Management ...3-2 AC Adapter ...3-2 Battery Pack ...3-4 Using the Battery Pack...3-7 Basic Operations ...3-9 Safety and Comfort Tips...3-9 Having a Good Work Habit...3-10 Knowing the Keyboard ...3-11 Knowing the Touchpad ...3-16 About Hard Disk Drive...3-18 Connecting the External Devices 3-19 Using the External Optical Storage Device 3-19 Connecting the Peripheral Devices 3-21 Connecting the Communication Devices 3-23 Safely Remove Hardware ...3-24 Windows XP Installation...3-25 Installation Requirement...3-25 Installing Windows XP ...3-25
User Manual
Page 9
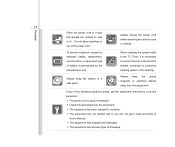
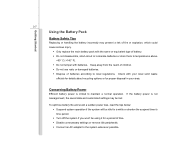
... in a safe place. To prevent explosion caused by improper battery replacement, use the same or equivalent type of battery recommended by a service personnel: Š The power cord or plug is damaged. Š Liquid has penetrated into the equipment. Š The equipment has been exposed to moisture. Š The equipment has not worked well or you can not get it...
... in a safe place. To prevent explosion caused by improper battery replacement, use the same or equivalent type of battery recommended by a service personnel: Š The power cord or plug is damaged. Š Liquid has penetrated into the equipment. Š The equipment has been exposed to moisture. Š The equipment has not worked well or you can not get it...
User Manual
Page 23
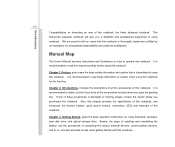
... these accessories is recommended to read this manual carefully before using keyboard, touchpad, hard disk drive, and optical storage drive. Introductions 2-2 Congratulations on , are proud to tell our users that this notebook is interrelated to using this notebook. and the procedures of connecting the various external devices, communication devices, and so on becoming an user of installing and uninstalling the battery; This brand-new exquisite notebook will give you purchased this...
... these accessories is recommended to read this manual carefully before using keyboard, touchpad, hard disk drive, and optical storage drive. Introductions 2-2 Congratulations on , are proud to tell our users that this notebook is interrelated to using this notebook. and the procedures of connecting the various external devices, communication devices, and so on becoming an user of installing and uninstalling the battery; This brand-new exquisite notebook will give you purchased this...
User Manual
Page 24
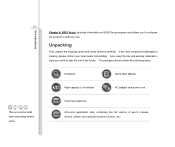
.... The package should contain the following items: Notebook Quick Start Manual High-capacity Li-ion battery AC adapter and power cord Carry bag (optional) All-in the future. Also, keep the box and packing materials in case you to ship the unit in -one application disk, containing the full version of user's manual, drivers, utilities, and optional recovery function, etc.. If any item contained is damaged...
.... The package should contain the following items: Notebook Quick Start Manual High-capacity Li-ion battery AC adapter and power cord Carry bag (optional) All-in the future. Also, keep the box and packing materials in case you to ship the unit in -one application disk, containing the full version of user's manual, drivers, utilities, and optional recovery function, etc.. If any item contained is damaged...
User Manual
Page 26
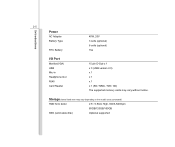
Storage (Items listed here may vary without notice. Introductions 2-5 Power AC Adapter Battery Type RTC Battery 40W, 20V 3 cells (optional) 6 cells (optional) Yes I/O Port Monitor(VGA) USB Mic-in Headphone Out RJ45 Card Reader 15 pin D-Sub x 1 x 3 (USB version 2.0) x 1 x 1 x 1 x 1 (SD / MMC / MS / XD) The supported memory cards may vary depending on the model users purchased) HDD form factor 2.5", 9.5mm High, SATA 5400rpm 80GB/120GB/160GB SSD (solid-state disk) Optional supported
Storage (Items listed here may vary without notice. Introductions 2-5 Power AC Adapter Battery Type RTC Battery 40W, 20V 3 cells (optional) 6 cells (optional) Yes I/O Port Monitor(VGA) USB Mic-in Headphone Out RJ45 Card Reader 15 pin D-Sub x 1 x 3 (USB version 2.0) x 1 x 1 x 1 x 1 (SD / MMC / MS / XD) The supported memory cards may vary depending on the model users purchased) HDD form factor 2.5", 9.5mm High, SATA 5400rpm 80GB/120GB/160GB SSD (solid-state disk) Optional supported

User Manual
Page 27
2-6 Introductions Communication Port (Items listed here may vary without notice) LAN 10/100 Ethernet Wireless LAN Optional Supported Bluetooth Optional Supported 3G/ 3.5G Optional Supported Audio Sound Interface Internal Speaker Sound Volume Intel HD audio link 2 speakers with housing Adjust by K/B hot-keys WebCam CMOS (optional) Supported Supported Display LCD Type Brightness 10" / 10.2" / 8.9" (optional) Brightness controlled by K/B hot-key & SW Video Dual View Function CRT Output LCD or CRT will be auto detected when connected.
2-6 Introductions Communication Port (Items listed here may vary without notice) LAN 10/100 Ethernet Wireless LAN Optional Supported Bluetooth Optional Supported 3G/ 3.5G Optional Supported Audio Sound Interface Internal Speaker Sound Volume Intel HD audio link 2 speakers with housing Adjust by K/B hot-keys WebCam CMOS (optional) Supported Supported Display LCD Type Brightness 10" / 10.2" / 8.9" (optional) Brightness controlled by K/B hot-key & SW Video Dual View Function CRT Output LCD or CRT will be auto detected when connected.
User Manual
Page 31
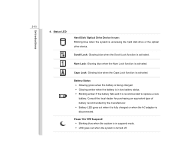
... the battery is being charged. Š Glowing amber when the battery is in suspend mode. Š LED goes out when the system is turned off. Caps Lock: Glowing blue when the Caps Lock function is accessing the hard disk drive or the optical drive device. Status LED Hard Disk/ Optical Drive Device In-use: Blinking blue when the system is activated. Scroll Lock: Glowing blue when the Scroll Lock function is activated. Num Lock: Glowing blue when the Num Lock function is activated. Power...
... the battery is being charged. Š Glowing amber when the battery is in suspend mode. Š LED goes out when the system is turned off. Caps Lock: Glowing blue when the Caps Lock function is accessing the hard disk drive or the optical drive device. Status LED Hard Disk/ Optical Drive Device In-use: Blinking blue when the system is activated. Scroll Lock: Glowing blue when the Scroll Lock function is activated. Num Lock: Glowing blue when the Num Lock function is activated. Power...
User Manual
Page 36
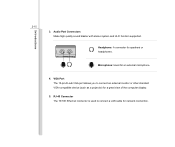
Introductions 2-15 3. Microphone: Used for speakers or headphones. Audio Port Connectors Make high quality sound blaster with stereo system and Hi-Fi function supported. Headphone: A connector for an external microphone. 4. VGA Port The 15-pin-D-sub VGA port allows you to connect a LAN cable for a great view of the computer display. 5. RJ-45 Connector The 10/100 Ethernet connector is used to connect an external monitor or other standard VGA-compatible device (such as a projector) for network connection.
Introductions 2-15 3. Microphone: Used for speakers or headphones. Audio Port Connectors Make high quality sound blaster with stereo system and Hi-Fi function supported. Headphone: A connector for an external microphone. 4. VGA Port The 15-pin-D-sub VGA port allows you to connect a LAN cable for a great view of the computer display. 5. RJ-45 Connector The 10/100 Ethernet connector is used to connect an external monitor or other standard VGA-compatible device (such as a projector) for network connection.
User Manual
Page 46
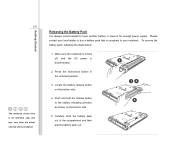
Make sure the notebook is turned off, and the AC power is compliant to your local dealer to buy a battery pack that users purchased. Push and hold the release button 5 to have another battery in the unlocked position. 3. To remove the battery pack, following the steps below: 1. Getting Started Releasing the Battery Pack It is always recommended to the battery releasing direction as shown on...
Make sure the notebook is turned off, and the AC power is compliant to your local dealer to buy a battery pack that users purchased. Push and hold the release button 5 to have another battery in the unlocked position. 3. To remove the battery pack, following the steps below: 1. Getting Started Releasing the Battery Pack It is always recommended to the battery releasing direction as shown on...
User Manual
Page 48
... settings or remove idle peripherals. Š Connect an AC adapter to local regulations. To optimize battery life and avoid a sudden power loss, read the tips below: Š Suspend system operation if the system will be idle for a while or shorten the suspend timer's time period. Š Turn off the system if you won't be lost. Check with batteries. Getting Started 3-7 Using...
... settings or remove idle peripherals. Š Connect an AC adapter to local regulations. To optimize battery life and avoid a sudden power loss, read the tips below: Š Suspend system operation if the system will be idle for a while or shorten the suspend timer's time period. Š Turn off the system if you won't be lost. Check with batteries. Getting Started 3-7 Using...
User Manual
Page 55
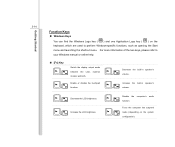
... disable the touchpad function. Decrease the LCD brightness. + Increase the LCD brightness. + Disable the computer's audio + function. Decrease the built-in speaker's + volume. For more information of the two keys, please refer to perform Windows-specific functions, such as opening the Start menu and launching the shortcut menu. Force the computer into suspend mode (depending on the keyboard, which are used to your Windows manual or online help. „ [Fn] Key + + Switch the display output mode between the LCD, external monitor...
... disable the touchpad function. Decrease the LCD brightness. + Increase the LCD brightness. + Disable the computer's audio + function. Decrease the built-in speaker's + volume. For more information of the two keys, please refer to perform Windows-specific functions, such as opening the Start menu and launching the shortcut menu. Force the computer into suspend mode (depending on the keyboard, which are used to your Windows manual or online help. „ [Fn] Key + + Switch the display output mode between the LCD, external monitor...
User Manual
Page 57
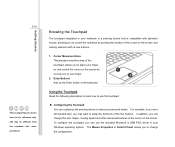
... the Enter button of the keyboard. 1 2 Using the Touchpad Read the following description to learn how to use the touchpad: „ Configuring the Touchpad You can use the standard Microsoft or IBM PS/2 driver in Control Panel allows you to change the size, shape, moving one of the cursor on the screen. 3-16 The touchpad figures shown here are a left-handed user, you to place your personal needs...
... the Enter button of the keyboard. 1 2 Using the Touchpad Read the following description to learn how to use the touchpad: „ Configuring the Touchpad You can use the standard Microsoft or IBM PS/2 driver in Control Panel allows you to change the size, shape, moving one of the cursor on the screen. 3-16 The touchpad figures shown here are a left-handed user, you to place your personal needs...
User Manual
Page 60
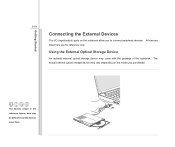
The actual external optical storage device may come with the package of the notebook. Using the External Optical Storage Device An optional external optical storage device may vary depending on the notebook allow you purchased. The devices shown in the reference figures here may be different from the devices users have. Getting Started 3-19 Connecting the External Devices The I/O (input/output) ports on the model you to connect peripheral devices. All devices listed here are for reference only.
The actual external optical storage device may come with the package of the notebook. Using the External Optical Storage Device An optional external optical storage device may vary depending on the notebook allow you purchased. The devices shown in the reference figures here may be different from the devices users have. Getting Started 3-19 Connecting the External Devices The I/O (input/output) ports on the model you to connect peripheral devices. All devices listed here are for reference only.
User Manual
Page 62
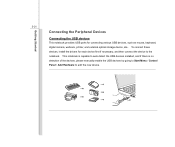
... connect these devices, install the drivers for connecting various USB devices, such as mouse, keyboard, digital camera, webcam, printer, and external optical storage device, ete.. This notebook is capable to auto detect the USB devices installed, and if there is no detection of the devices, please manually enable the USB devices by going to Start Menu / Control Panel / Add Hardware to the notebook. Getting Started 3-21 Connecting the Peripheral Devices Connecting the USB devices This notebook provides USB ports for each device first if necessary, and then connect the device...
... connect these devices, install the drivers for connecting various USB devices, such as mouse, keyboard, digital camera, webcam, printer, and external optical storage device, ete.. This notebook is capable to auto detect the USB devices installed, and if there is no detection of the devices, please manually enable the USB devices by going to Start Menu / Control Panel / Add Hardware to the notebook. Getting Started 3-21 Connecting the Peripheral Devices Connecting the USB devices This notebook provides USB ports for each device first if necessary, and then connect the device...
User Manual
Page 63
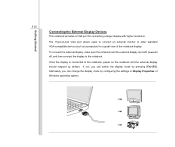
... notebook, power on the notebook and the external display should respond by default. Alternately, you can change the display mode by pressing [Fn]+[F2]. Once the display is connected to the notebook. If not, you can switch the display mode by configuring the settings in Display Properties of the notebook display. Getting Started 3-22 Connecting the External Display Devices This notebook provides a VGA port for a great view of Windows operating system. The 15-pin-D-sub VGA port allows users to connect an external monitor...
... notebook, power on the notebook and the external display should respond by default. Alternately, you can change the display mode by pressing [Fn]+[F2]. Once the display is connected to the notebook. If not, you can switch the display mode by configuring the settings in Display Properties of the notebook display. Getting Started 3-22 Connecting the External Display Devices This notebook provides a VGA port for a great view of Windows operating system. The 15-pin-D-sub VGA port allows users to connect an external monitor...
User Manual
Page 66
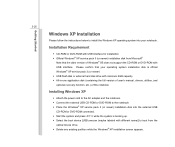
... DVD-ROM connected. Š Start the system and press while the system is booting up. Š Select the boot device [USB:xxxxxxx (maybe labeled with different name)] to install the Windows XP operating system into your operating system installation disk is official Windows® XP service pack 3 (or newer) Š USB flash disk or external hard disk drive with minimum 2GB capacity. Š All-in-one application disk (containing the full version of user's manual, drivers, utilities, and optional recovery function...
... DVD-ROM connected. Š Start the system and press while the system is booting up. Š Select the boot device [USB:xxxxxxx (maybe labeled with different name)] to install the Windows XP operating system into your operating system installation disk is official Windows® XP service pack 3 (or newer) Š USB flash disk or external hard disk drive with minimum 2GB capacity. Š All-in-one application disk (containing the full version of user's manual, drivers, utilities, and optional recovery function...
User Manual
Page 71
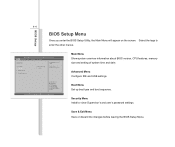
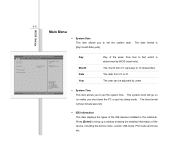
...] Use [ENTER] to enter the other menus. Boot Menu Set up boot type and boot sequence. Main Menu Show system overview information about BIOS version, CPU features, memory size and setting of system time and date. Save & Exit Menu Save or discard the changes before leaving the BIOS Setup Menu. Copyright (C) 2007 American Megatrends, Inc. Security Menu Install or clear Supervisor's and user's password settings. BIOS Setup 4-4 BIOS Setup Menu Once you enter the BIOS Setup Utility, the Main Menu will appear on the screen. Use [+], [-] to configure...
...] Use [ENTER] to enter the other menus. Boot Menu Set up boot type and boot sequence. Main Menu Show system overview information about BIOS version, CPU features, memory size and setting of system time and date. Save & Exit Menu Save or discard the changes before leaving the BIOS Setup Menu. Copyright (C) 2007 American Megatrends, Inc. Security Menu Install or clear Supervisor's and user's password settings. BIOS Setup 4-4 BIOS Setup Menu Once you enter the BIOS Setup Utility, the Main Menu will appear on the screen. Use [+], [-] to configure...
User Manual
Page 72
...:08:53] Use [ENTER] to configure system Date. :Select Screen :Select Item Enter: Select +/-: Change Opt. F1: General Help F2: Previous Values F9: Optimized Default F4: Save Version 1.23.1109. The date format is [hour:minute:second]. Š IDE Information This item displays the types of the device, including the device name, vendor, LBA mode, PIO mode and more, etc.. The time format is [day...
...:08:53] Use [ENTER] to configure system Date. :Select Screen :Select Item Enter: Select +/-: Change Opt. F1: General Help F2: Previous Values F9: Optimized Default F4: Save Version 1.23.1109. The date format is [hour:minute:second]. Š IDE Information This item displays the types of the device, including the device name, vendor, LBA mode, PIO mode and more, etc.. The time format is [day...
User Manual
Page 74
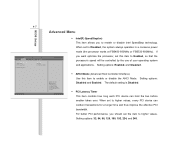
... before another takes over. Setting options: Enabled, and Disabled. :Select Screen :Select Item Enter: Select +/-: Change Opt. The default setting is Disabled. Š PCI Latency Timer This item controls how long each PCI device can conduct transactions for a longer time and thus improve the effective PCI bandwidth. Setting options: 32, 64, 96, 128, 160, 192, 224, and 248. 4-7 Advanced Menu BIOS Setup Main Atpio Setup Utility - Copyright (C) 2007 American...
... before another takes over. Setting options: Enabled, and Disabled. :Select Screen :Select Item Enter: Select +/-: Change Opt. The default setting is Disabled. Š PCI Latency Timer This item controls how long each PCI device can conduct transactions for a longer time and thus improve the effective PCI bandwidth. Setting options: 32, 64, 96, 128, 160, 192, 224, and 248. 4-7 Advanced Menu BIOS Setup Main Atpio Setup Utility - Copyright (C) 2007 American...
User Manual
Page 77
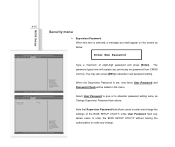
... (C) 2007 American Megatrends, Inc. You may also press [ESC] to abandon password setting same as below: Main Atpio Setup Utility - Enter New Password Type a maximum of the BIOS SETUP UTILITY, while User Password field only allows users to enter the BIOS SETUP UTILITY without having the authorization to enter and change . Advanced Boot Security Save & Exit Supervisor Password :Select Screen :Select Item Enter: Select +/-: Change Opt. BIOS Setup 4-10 Security menu Š Supervisor Password When this item is set password from CMOS memory.
... (C) 2007 American Megatrends, Inc. You may also press [ESC] to abandon password setting same as below: Main Atpio Setup Utility - Enter New Password Type a maximum of the BIOS SETUP UTILITY, while User Password field only allows users to enter the BIOS SETUP UTILITY without having the authorization to enter and change . Advanced Boot Security Save & Exit Supervisor Password :Select Screen :Select Item Enter: Select +/-: Change Opt. BIOS Setup 4-10 Security menu Š Supervisor Password When this item is set password from CMOS memory.


