
User Manual
Page 3
... Rear Side View...2-19 Bottom Side View ...2-20 Getting Started Power Management ...3-2 AC Adapter ...3-2 Battery Pack ...3-4 Using the Battery Pack...3-7 Basic Operations ...3-9 Safety and Comfort Tips...3-9 Having a Good Work Habit...3-11 Knowing the Keyboard ...3-11 Knowing the Touchpad ...3-15 About Hard Disk Drive...3-18 Using the Optical Storage Device 3-19 Connecting the External Devices 3-22 Connecting the Peripheral Devices 3-22 Connecting the Communication Devices 3-25 Express Card Installation...3-27 Removing the Express card 3-27 Installing the Express card ...3-27
... Rear Side View...2-19 Bottom Side View ...2-20 Getting Started Power Management ...3-2 AC Adapter ...3-2 Battery Pack ...3-4 Using the Battery Pack...3-7 Basic Operations ...3-9 Safety and Comfort Tips...3-9 Having a Good Work Habit...3-11 Knowing the Keyboard ...3-11 Knowing the Touchpad ...3-15 About Hard Disk Drive...3-18 Using the Optical Storage Device 3-19 Connecting the External Devices 3-22 Connecting the Peripheral Devices 3-22 Connecting the Communication Devices 3-25 Express Card Installation...3-27 Removing the Express card 3-27 Installing the Express card ...3-27

User Manual
Page 23
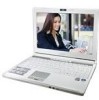
... using this notebook. Beside, the steps of this notebook. Manual Map This User's Manual provides instructions and illustrations on how to using this notebook. It is interrelated to operate this notebook. It is thoroughly tested and certified by our reputation for the first time. Also, this chapter provides the specification of this notebook, and introduces the function buttons, quick launch buttons, connectors, LEDs and externals of installing and uninstalling the battery...
... using this notebook. Beside, the steps of this notebook. Manual Map This User's Manual provides instructions and illustrations on how to using this notebook. It is interrelated to operate this notebook. It is thoroughly tested and certified by our reputation for the first time. Also, this chapter provides the specification of this notebook, and introduces the function buttons, quick launch buttons, connectors, LEDs and externals of installing and uninstalling the battery...

User Manual
Page 27
...-ray (Devices listed here may vary without notice) Communication Port (Items listed here may vary depending on the television connected. Supported The best resolution may vary without notice) 56K Fax/MODEM HD Audio/AC'97 LAN 10/100/1000 Ethernet Bluetooth Yes (optional) Wireless LAN 802.11a/b/g/n* (optional) Display LCD Type Brightness 12.1" WXGA (Glare type) (Optional) 13.3" WXGA (Glare type) (Optional) Brightness controlled by K/B hot-keys Video Controller Dual View Function CRT Output HDMI Output UMA LCD or CRT...
...-ray (Devices listed here may vary without notice) Communication Port (Items listed here may vary depending on the television connected. Supported The best resolution may vary without notice) 56K Fax/MODEM HD Audio/AC'97 LAN 10/100/1000 Ethernet Bluetooth Yes (optional) Wireless LAN 802.11a/b/g/n* (optional) Display LCD Type Brightness 12.1" WXGA (Glare type) (Optional) 13.3" WXGA (Glare type) (Optional) Brightness controlled by K/B hot-keys Video Controller Dual View Function CRT Output HDMI Output UMA LCD or CRT...
User Manual
Page 32
... recommended to replace a new battery. Consult the local dealer for the notebook. 9. Status LED Power On/ Off/ Suspend: Š Blinking Green when the system is in low battery status. Š Blinking amber if the battery fails and it is fully charged or when the AC adapter is enabled. Š Glowing blue when Bluetooth function of the notebook. 8. Introductions 2-11 7. Wireless LAN and Bluetooth Š Glowing green when wireless LAN function is disconnected...
... recommended to replace a new battery. Consult the local dealer for the notebook. 9. Status LED Power On/ Off/ Suspend: Š Blinking Green when the system is in low battery status. Š Blinking amber if the battery fails and it is fully charged or when the AC adapter is enabled. Š Glowing blue when Bluetooth function of the notebook. 8. Introductions 2-11 7. Wireless LAN and Bluetooth Š Glowing green when wireless LAN function is disconnected...
User Manual
Page 36
... cable. 4. USB Port The USB 2.0 port allows you to cool the system. TV-Tuner Antenna Connector (Optional) Notebook with Digital TV tuner - Ventilator The ventilator is a new interface standard for air circulation. Introductions 2-15 3. Card Reader The built-in card reader may vary without notice. 5. DO NOT block the ventilator for PCs, displays and consumer electronics devices that the supported memory cards may support various types of adaptor. Notebook with...
... cable. 4. USB Port The USB 2.0 port allows you to cool the system. TV-Tuner Antenna Connector (Optional) Notebook with Digital TV tuner - Ventilator The ventilator is a new interface standard for air circulation. Introductions 2-15 3. Card Reader The built-in card reader may vary without notice. 5. DO NOT block the ventilator for PCs, displays and consumer electronics devices that the supported memory cards may support various types of adaptor. Notebook with...
User Manual
Page 38
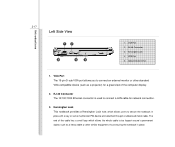
RJ-45 Connector 3. Kensington Lock 4. USB Port 5. RJ-45 Connector The 10/100/1000 Ethernet connector is used to connect a LAN cable for a great view of the cable has a small loop which allows users to secure the notebook in place. The end of the computer display. 2. Optical Device Drive 1. Kensington Lock This notebook provides a Kensington Lock hole, which allows the whole cable to connect an external monitor or other standard VGA...
RJ-45 Connector 3. Kensington Lock 4. USB Port 5. RJ-45 Connector The 10/100/1000 Ethernet connector is used to connect a LAN cable for a great view of the cable has a small loop which allows users to secure the notebook in place. The end of the computer display. 2. Optical Device Drive 1. Kensington Lock This notebook provides a Kensington Lock hole, which allows the whole cable to connect an external monitor or other standard VGA...
User Manual
Page 46
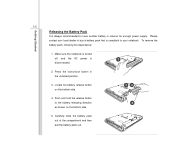
... compartment and then pull the battery pack out. Push and hold the release button to buy a battery pack that is 2 disconnected. 2. To remove the battery pack, following the steps below: 1. Locate the battery release button on the bottom side. 5. Press the lock/unlock button in reserve for enough power supply. Make sure the notebook is turned off, and the AC power is compliant to your local...
... compartment and then pull the battery pack out. Push and hold the release button to buy a battery pack that is 2 disconnected. 2. To remove the battery pack, following the steps below: 1. Locate the battery release button on the bottom side. 5. Press the lock/unlock button in reserve for enough power supply. Make sure the notebook is turned off, and the AC power is compliant to your local...

User Manual
Page 55
... refer to perform Windows-specific functions, such as opening the Start menu and launching the shortcut menu. Enable or disable the touchpad function. Getting Started 3-14 Function Keys „ Windows Keys You can find the Windows Logo key ( ) and one Application Logo key ( ) on the system + configuration). Force the computer into suspend mode (depending on the keyboard, which are used to your Windows manual or online help. „ [Fn] Key + + Switch the display output mode between the LCD, external monitor and both.
... refer to perform Windows-specific functions, such as opening the Start menu and launching the shortcut menu. Enable or disable the touchpad function. Getting Started 3-14 Function Keys „ Windows Keys You can find the Windows Logo key ( ) and one Application Logo key ( ) on the system + configuration). Force the computer into suspend mode (depending on the keyboard, which are used to your Windows manual or online help. „ [Fn] Key + + Switch the display output mode between the LCD, external monitor and both.

User Manual
Page 56
Finger Print Reader This Finger Print reader allows you to control the notebook by pointing the location of the cursor on the screen by moving one of the touchpad, allows you to place your finger on and control the cursor on the screen and making selection with standard mouse, allowing you to collect the finger print data and identify the specified finger...
Finger Print Reader This Finger Print reader allows you to control the notebook by pointing the location of the cursor on the screen by moving one of the touchpad, allows you to place your finger on and control the cursor on the screen and making selection with standard mouse, allowing you to collect the finger print data and identify the specified finger...

User Manual
Page 57
... to swap the functions of the cursor on the screen. Getting Started 3-16 Using the Touchpad Read the following description to learn how to use the standard Microsoft or IBM PS/2 driver in Control Panel allows you to change the size, shape, moving speed and other advanced features of the two buttons. To configure the touchpad, you can use the touchpad: „ Configuring the Touchpad You can...
... to swap the functions of the cursor on the screen. Getting Started 3-16 Using the Touchpad Read the following description to learn how to use the standard Microsoft or IBM PS/2 driver in Control Panel allows you to change the size, shape, moving speed and other advanced features of the two buttons. To configure the touchpad, you can use the touchpad: „ Configuring the Touchpad You can...

User Manual
Page 63
All devices listed here are for connecting various USB devices, such as mouse, keyboard, digital camera, webcam, printer, and external optical storage device, ete.. Connecting the Peripheral Devices Connecting the USB devices This notebook provides USB ports for reference only. This notebook is capable to auto detect the USB devices installed, and if there is no detection of the devices, please manually enable the USB devices by going to Start Menu / Control Panel / Add Hardware to connect peripheral devices. Getting Started 3-22 Connecting the External Devices The I/O (input/...
All devices listed here are for connecting various USB devices, such as mouse, keyboard, digital camera, webcam, printer, and external optical storage device, ete.. Connecting the Peripheral Devices Connecting the USB devices This notebook provides USB ports for reference only. This notebook is capable to auto detect the USB devices installed, and if there is no detection of the devices, please manually enable the USB devices by going to Start Menu / Control Panel / Add Hardware to connect peripheral devices. Getting Started 3-22 Connecting the External Devices The I/O (input/...

User Manual
Page 64
The 15-pin-D-sub VGA port allows users to connect an external monitor or other standard VGA-compatible device (such as a projector) for connecting a larger display with higher resolution. Getting Started 3-23 Connecting the External Display Devices This notebook provides a VGA port for a great view of the notebook display.
The 15-pin-D-sub VGA port allows users to connect an external monitor or other standard VGA-compatible device (such as a projector) for connecting a larger display with higher resolution. Getting Started 3-23 Connecting the External Display Devices This notebook provides a VGA port for a great view of the notebook display.
User Manual
Page 65
... switch the display mode by configuring the settings in Display Properties of Windows operating system. HDMI (High Definition Multimedia Interface Support) is connected to the notebook. To connect the external display, make sure the notebook and the external display are both powered off, and then connect the display to the notebook, power on a single cable. Once the display is a new interface standard for connecting a larger display with higher resolution. Getting Started 3-24 This notebook provides a HDMI port for PCs, displays and consumer electronics devices that supports...
... switch the display mode by configuring the settings in Display Properties of Windows operating system. HDMI (High Definition Multimedia Interface Support) is connected to the notebook. To connect the external display, make sure the notebook and the external display are both powered off, and then connect the display to the notebook, power on a single cable. Once the display is a new interface standard for connecting a larger display with higher resolution. Getting Started 3-24 This notebook provides a HDMI port for PCs, displays and consumer electronics devices that supports...
User Manual
Page 67
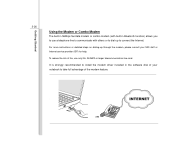
...connect the Internet. It is strongly recommended to install the modem driver included in Bluetooth function) allows you to use only No. 26 AWG or larger telecommunication line cord. To reduce the risk of fire, use a telephone line to communicate with others or to dial-up through the modem, please consult your notebook... to take full advantage of your MIS staff or Internet service provider (ISP) for help. Getting Started 3-26 Using the Modem or Combo Modem The built-in 56Kbps fax/data modem or combo modem (with built-in the software disk of the modem ...
...connect the Internet. It is strongly recommended to install the modem driver included in Bluetooth function) allows you to use only No. 26 AWG or larger telecommunication line cord. To reduce the risk of fire, use a telephone line to communicate with others or to dial-up through the modem, please consult your notebook... to take full advantage of your MIS staff or Internet service provider (ISP) for help. Getting Started 3-26 Using the Modem or Combo Modem The built-in 56Kbps fax/data modem or combo modem (with built-in the software disk of the modem ...
User Manual
Page 74
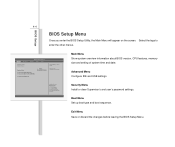
... Default F4: Save Main Menu Show system overview information about BIOS version, CPU features, memory size and setting of system time and date. Security Menu Install or clear Supervisor's and user's password settings. Exit Menu Save or discard the changes before leaving the BIOS Setup Menu. Boot Menu Set up boot type and boot sequence. Advanced Menu Configure IDE and USB settings. Use [+], [-] to select a field. Select the tags to enter the other menus. BIOS Setup 4-4 BIOS Setup Menu Once you enter the BIOS Setup Utility, the Main Menu...
... Default F4: Save Main Menu Show system overview information about BIOS version, CPU features, memory size and setting of system time and date. Security Menu Install or clear Supervisor's and user's password settings. Exit Menu Save or discard the changes before leaving the BIOS Setup Menu. Boot Menu Set up boot type and boot sequence. Advanced Menu Configure IDE and USB settings. Use [+], [-] to select a field. Select the tags to enter the other menus. BIOS Setup 4-4 BIOS Setup Menu Once you enter the BIOS Setup Utility, the Main Menu...

User Manual
Page 75
... format is [day:month:date:year]. Main Advanced BIOS SETUP UTILITY Security Boot Exit Market Name Model Name System Time System Date Serial ATA [Hard Disk] Serial ATA [ATAPI CDROM] System Infomation [18:08:53] [Wed 05/07/2008] Use [ENTER] to 12 (December). Month (Month) The month from Sun to bring up a window showing the detailed information of the IDE devices installed in the notebook...
... format is [day:month:date:year]. Main Advanced BIOS SETUP UTILITY Security Boot Exit Market Name Model Name System Time System Date Serial ATA [Hard Disk] Serial ATA [ATAPI CDROM] System Infomation [18:08:53] [Wed 05/07/2008] Use [ENTER] to 12 (December). Month (Month) The month from Sun to bring up a window showing the detailed information of the IDE devices installed in the notebook...
User Manual
Page 77
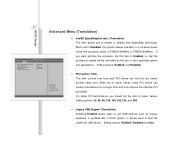
... 248. Š Legacy USB Support (Translation) Selecting Enabled allows users to boot the system by the use USB devices, such as mouse, keyboard, or portable disk, in a conserve power mode (the processor works at FSB400-600MHz or FSB533-800MHz). or allows users to use of your operating system and applications. Setting options: Enabled, Disabled and Auto. When set this item to Enabled, so that the processor's speed will be controlled by USB device. F1: General Help...
... 248. Š Legacy USB Support (Translation) Selecting Enabled allows users to boot the system by the use USB devices, such as mouse, keyboard, or portable disk, in a conserve power mode (the processor works at FSB400-600MHz or FSB533-800MHz). or allows users to use of your operating system and applications. Setting options: Enabled, Disabled and Auto. When set this item to Enabled, so that the processor's speed will be controlled by USB device. F1: General Help...
User Manual
Page 79
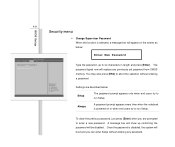
... SETUP UTILITY Security Boot Exit Supervisor Password: Not Installed User Password : Not Installed Change Supervisor Password :Select Screen :Select Item Enter: Select +/-: Change Opt. A message box will show up to six characters in length and press [Enter]. The password typed now will replace any password. F1: General Help F2: Previous Values F9: Optimized Default F4: Save Enter New Password Type the password, up confirming the password will be disabled. Settings are prompted to enter a new password. BIOS Setup 4-9 Security menu Š Change Supervisor Password...
... SETUP UTILITY Security Boot Exit Supervisor Password: Not Installed User Password : Not Installed Change Supervisor Password :Select Screen :Select Item Enter: Select +/-: Change Opt. A message box will show up to six characters in length and press [Enter]. The password typed now will replace any password. F1: General Help F2: Previous Values F9: Optimized Default F4: Save Enter New Password Type the password, up confirming the password will be disabled. Settings are prompted to enter a new password. BIOS Setup 4-9 Security menu Š Change Supervisor Password...

User Manual
Page 80
BIOS Setup 4-10 Š Supervisor Password / User Password Supervisor Password allows the user to make changes. User Password only allows the user to enter the setup menu, but do not have the right to enter and change the settings of the setup menu;
BIOS Setup 4-10 Š Supervisor Password / User Password Supervisor Password allows the user to make changes. User Password only allows the user to enter the setup menu, but do not have the right to enter and change the settings of the setup menu;

User Manual
Page 81
F1: General Help F2: Previous Values F9: Optimized Default F4: Save BIOS Setup 4-11 Boot menu Š Boot Settings Configuration Configure settings during system boot. Main Advanced BIOS SETUP UTILITY Security Boot Exit Boot Setting Configuration Š Boot Device Priority Press [Enter] to bring up a sub-window showing the sequence of boot devices where BIOS attempts to load the disk operating system. :Select Screen :Select Item Enter: Select +/-: Change Opt.
F1: General Help F2: Previous Values F9: Optimized Default F4: Save BIOS Setup 4-11 Boot menu Š Boot Settings Configuration Configure settings during system boot. Main Advanced BIOS SETUP UTILITY Security Boot Exit Boot Setting Configuration Š Boot Device Priority Press [Enter] to bring up a sub-window showing the sequence of boot devices where BIOS attempts to load the disk operating system. :Select Screen :Select Item Enter: Select +/-: Change Opt.

