User Guide
Page 8
... Equipment) Statement v Chapter 1 Getting Started 1-1 Mainboard Specifications 1-2 Mainboard Layout 1-4 Packing Checklist 1-5 Chapter 2 Hardware Setup 2-1 Quick Components Guide 2-2 CPU (Central Processing Unit 2-3 Memory 2-6 Power Supply 2-8 Back Panel 2-9 Connectors 2-11 Switch 2-17 Jumpers 2-18 Button 2-19 Slots 2-20 LED Status Indicators 2-24 Chapter 3 BIOS Setup 3-1 Entering Setup 3-2 The Main Menu 3-4 Standard CMOS Features...
... Equipment) Statement v Chapter 1 Getting Started 1-1 Mainboard Specifications 1-2 Mainboard Layout 1-4 Packing Checklist 1-5 Chapter 2 Hardware Setup 2-1 Quick Components Guide 2-2 CPU (Central Processing Unit 2-3 Memory 2-6 Power Supply 2-8 Back Panel 2-9 Connectors 2-11 Switch 2-17 Jumpers 2-18 Button 2-19 Slots 2-20 LED Status Indicators 2-24 Chapter 3 BIOS Setup 3-1 Entering Setup 3-2 The Main Menu 3-4 Standard CMOS Features...
User Guide
Page 12
...Athlon II/ Sempron processors in the AM3 package (For the latest information about CPU, please visit http://www.msi.com/index.php?func=cpuform2) Hyper Transport ■ Supports Hyper Transport(HT) 3.0 Technology Chipset ■ ... Max) ■ 4 DDR3 DIMMs (240pin/ 1.5V) (For more information on compatible components, please visit http://www.msi.com/index.php?func=testreport) Integrated Graphic ■ Integrated Geforce 8200 GPU (for NVIDIA® nForce 750a SLI Chipset)...720 KB, 1.2 MB, 1.44 MB and 2.88 MB Connectors ■ Back panel - 1 PS/2 mouse port - 1 PS/2 Keyboard port - 1 VGA port 1-2
...Athlon II/ Sempron processors in the AM3 package (For the latest information about CPU, please visit http://www.msi.com/index.php?func=cpuform2) Hyper Transport ■ Supports Hyper Transport(HT) 3.0 Technology Chipset ■ ... Max) ■ 4 DDR3 DIMMs (240pin/ 1.5V) (For more information on compatible components, please visit http://www.msi.com/index.php?func=testreport) Integrated Graphic ■ Integrated Geforce 8200 GPU (for NVIDIA® nForce 750a SLI Chipset)...720 KB, 1.2 MB, 1.44 MB and 2.88 MB Connectors ■ Back panel - 1 PS/2 mouse port - 1 PS/2 Keyboard port - 1 VGA port 1-2

User Guide
Page 13
... - 1 DVI-D port - 1 HDMI port - 1 eSATA port - 1 LAN jack - 6 USB 2.0 ports - 6 flexible audio jacks ■ On-Board Connectors - 3 USB 2.0 connectors - 1 SPDIF-Out connector - 1 Front Panel Audio connector - 1 CD-In connector - 1 TPM connector - 1 Chassis Intrusion Switch connector - 1 Serial port connector - 1 Easy OC Switch - 1 Power button Slots ■ 2 PCI Express x16 slots (... into two x 8 ports when SLI Enabled) ■ 2 PCI Express x1 slots ■ 1 PCI slot ■ Support 3.3V/ 5V PCI bus Interface Form Factor ■ ATX (30.48cm X 22.38cm) Mounting ■ 6 mounting holes 1-3
... - 1 DVI-D port - 1 HDMI port - 1 eSATA port - 1 LAN jack - 6 USB 2.0 ports - 6 flexible audio jacks ■ On-Board Connectors - 3 USB 2.0 connectors - 1 SPDIF-Out connector - 1 Front Panel Audio connector - 1 CD-In connector - 1 TPM connector - 1 Chassis Intrusion Switch connector - 1 Serial port connector - 1 Easy OC Switch - 1 Power button Slots ■ 2 PCI Express x16 slots (... into two x 8 ports when SLI Enabled) ■ 2 PCI Express x1 slots ■ 1 PCI slot ■ Support 3.3V/ 5V PCI bus Interface Form Factor ■ ATX (30.48cm X 22.38cm) Mounting ■ 6 mounting holes 1-3
User Guide
Page 25
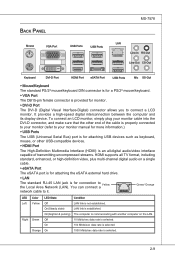
.... ▶ eSATA Port The eSATA port is for attaching the eSATA external hard drive. ▶ LAN The standard RJ-45 LAN jack is established. Back Panel Mouse VGA Port USB Ports USB Ports MS-7578 LAN Line-In RS-Out Line-Out CS-Out Keyboard DVI-D Port HDMI Port eSATA Port...
.... ▶ eSATA Port The eSATA port is for attaching the eSATA external hard drive. ▶ LAN The standard RJ-45 LAN jack is established. Back Panel Mouse VGA Port USB Ports USB Ports MS-7578 LAN Line-In RS-Out Line-Out CS-Out Keyboard DVI-D Port HDMI Port eSATA Port...

User Guide
Page 28
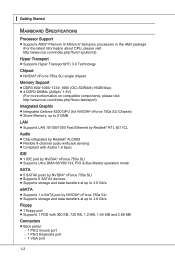
... to one Serial ATA device. ▍ Hardware Setup Serial ATA Connector: SATA1~5 This connector is compliant with Intel® Front Panel I/O Connectivity Design Guide. Each connector can connect to the front panel switches and LEDs. PowPoewr LeEr DSwi2tc.h+41.0-6..N+8o.-Pin JFP1 1.+3.-5.-7.H+9D.RDReLseEesDrevteSdwitch SpeakeBr2uz.z-e4r.+6.-8.+ JFP2 1.G3.rSo5uu.Psn7opd.NweonedrPLLinEEDD 2-12...
... to one Serial ATA device. ▍ Hardware Setup Serial ATA Connector: SATA1~5 This connector is compliant with Intel® Front Panel I/O Connectivity Design Guide. Each connector can connect to the front panel switches and LEDs. PowPoewr LeEr DSwi2tc.h+41.0-6..N+8o.-Pin JFP1 1.+3.-5.-7.H+9D.RDReLseEesDrevteSdwitch SpeakeBr2uz.z-e4r.+6.-8.+ JFP2 1.G3.rSo5uu.Psn7opd.NweonedrPLLinEEDD 2-12...

User Guide
Page 30
... Design Guide. 2.G4r.oP6uR.Mn8Ed.1INSC0Eo.DHNPeeCitnaeEdc#tPiohnone Detection 1.M3.IMC5.ILHC7e.RS9a.EdHNPeShaEodn_PeShERoNneDL 2-14 Front Panel Audio Connector: JAUD1 This connector allows you to connect the front panel audio and is ideal for connecting high-speed USB interface peripherals such as USB HDD, digital cameras, MP3 players, printers, modems and the...
... Design Guide. 2.G4r.oP6uR.Mn8Ed.1INSC0Eo.DHNPeeCitnaeEdc#tPiohnone Detection 1.M3.IMC5.ILHC7e.RS9a.EdHNPeShaEodn_PeShERoNneDL 2-14 Front Panel Audio Connector: JAUD1 This connector allows you to connect the front panel audio and is ideal for connecting high-speed USB interface peripherals such as USB HDD, digital cameras, MP3 players, printers, modems and the...

User Guide
Page 38
A configuration panel will be provided for the onboard graphics cards (concerning the details of multi-GPU settings, please refer to your system and a pop-up message will ...
A configuration panel will be provided for the onboard graphics cards (concerning the details of multi-GPU settings, please refer to your system and a pop-up message will ...
User Guide
Page 39
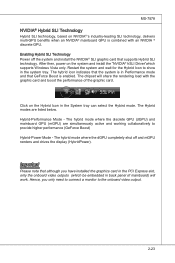
... where the discrete GPU (dGPU) and mainboard GPU (mGPU) are listed below. The Hybrid modes are simultaneously active and working collaboratively to show in back panel of the graphic card. Important Please note that supports Hybrid SLI technology. Hence, you have installed the graphics card in the PCI Express slot, only...
... where the discrete GPU (dGPU) and mainboard GPU (mGPU) are listed below. The Hybrid modes are simultaneously active and working collaboratively to show in back panel of the graphic card. Important Please note that supports Hybrid SLI technology. Hence, you have installed the graphics card in the PCI Express slot, only...
User Guide
Page 59
... confirm that Cool'n'Quiet function is activated and will be working properly, it is required to "Enabled". • Enter Windows, and select [Start]->[Settings]->[Control Panel]->[Power Options]. 3-19
... confirm that Cool'n'Quiet function is activated and will be working properly, it is required to "Enabled". • Enter Windows, and select [Start]->[Settings]->[Control Panel]->[Power Options]. 3-19

User Guide
Page 72
It is also available to enable the audio driver by clicking the Realtek HD Audio Manager from the system tray at the lower-right corner of the screen to use the 2-, 4-, 6- or 8- Double click A-4 channel audio feature now. Click the audio icon from the Control Panel. ▍ Realtek Audio Software Configuration After installing the audio driver, you are able to activate the HD Audio Configuration.
It is also available to enable the audio driver by clicking the Realtek HD Audio Manager from the system tray at the lower-right corner of the screen to use the 2-, 4-, 6- or 8- Double click A-4 channel audio feature now. Click the audio icon from the Control Panel. ▍ Realtek Audio Software Configuration After installing the audio driver, you are able to activate the HD Audio Configuration.

User Guide
Page 76
... will appear. Click the button and the Mixer ToolBox menu will appear after you pluging the speakers into the jacks on the rear and front panel first before enable the multi-stream function. This feature is very helpful when 2 people are well plugged in the jacks on the front...; Multi-Stream Function Realtek audio supports an outstanding feature called Multi-Stream, which means you pluged in front or rear panel by select the Realtek HD Audio rear output or Realtek HD Audio front output items. Important Before set up, please make sure the playback devices ...
... will appear. Click the button and the Mixer ToolBox menu will appear after you pluging the speakers into the jacks on the rear and front panel first before enable the multi-stream function. This feature is very helpful when 2 people are well plugged in the jacks on the front...; Multi-Stream Function Realtek audio supports an outstanding feature called Multi-Stream, which means you pluged in front or rear panel by select the Realtek HD Audio rear output or Realtek HD Audio front output items. Important Before set up, please make sure the playback devices ...

User Guide
Page 77
Then you are playing the first audio source (for example: use Windows Media Player to play MP3 files). You will find that the second audio source (MP3 music) will come out from the scroll list first, and use a different program to play the second audio source (for example: use Winamp to play DVD/VCD), the output will be played from the rear panel, which is the default setting. A-9 MS-7578 When you must to select the Realtek HD Audio 2nd output from the Line-Out audio jack of Front Panel.
Then you are playing the first audio source (for example: use Windows Media Player to play MP3 files). You will find that the second audio source (MP3 music) will come out from the scroll list first, and use a different program to play the second audio source (for example: use Winamp to play DVD/VCD), the output will be played from the rear panel, which is the default setting. A-9 MS-7578 When you must to select the Realtek HD Audio 2nd output from the Line-Out audio jack of Front Panel.

User Guide
Page 78
... This function is to let you freely decide which ports to output the sound. A-10 And this function, you can have music (stream 2 from front panel) while still have maximum 2 streams operating simultaneously. Advanced controls - Show the following volume controls This is essential when multistreaming playback enabled. - Enable playback multi-... You may choose to mute single or multiple volume controls or to have an audio chat with your friends via headphone (stream 1 from back panel) in play. At any given period, you will be displayed. - Realtek HD Audio Rear Output -
... This function is to let you freely decide which ports to output the sound. A-10 And this function, you can have music (stream 2 from front panel) while still have maximum 2 streams operating simultaneously. Advanced controls - Show the following volume controls This is essential when multistreaming playback enabled. - Enable playback multi-... You may choose to mute single or multiple volume controls or to have an audio chat with your friends via headphone (stream 1 from back panel) in play. At any given period, you will be displayed. - Realtek HD Audio Rear Output -

User Guide
Page 81
Please check if front jacks on your system are so-called AC'97 jacks. MS-7578 Disable front panel jack detection (optional) Jack detection function only works with HD audio front panel. A-13 If so, please check this item checked, the dialog "Connected device" would automatically pop up when device plugged in. Mute rear panel output when front headphone plugged in Once this item to access connector settings. Enable auto popup dialogue, when device has been plugged in . ■ Connector Settings Click to disable front panel jack detection.
Please check if front jacks on your system are so-called AC'97 jacks. MS-7578 Disable front panel jack detection (optional) Jack detection function only works with HD audio front panel. A-13 If so, please check this item checked, the dialog "Connected device" would automatically pop up when device plugged in. Mute rear panel output when front headphone plugged in Once this item to access connector settings. Enable auto popup dialogue, when device has been plugged in . ■ Connector Settings Click to disable front panel jack detection.
User Guide
Page 99
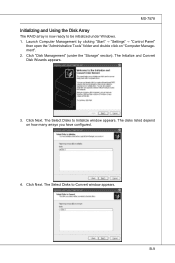
... is now ready to be initialized under the "Storage" section). Click "Disk Management" (under Windows. 1. Launch Computer Management by clicking "Start" → "Settings" → "Control Panel" then open the "Administrative Tools" folder and double click on how many arrays you have configured. 4.
... is now ready to be initialized under the "Storage" section). Click "Disk Management" (under Windows. 1. Launch Computer Management by clicking "Start" → "Settings" → "Control Panel" then open the "Administrative Tools" folder and double click on how many arrays you have configured. 4.

User Guide
Page 101
The NVIDIA Control Panel - B-11 Click Star-> Programs-> NVIDIA Corporation-> NVIDIA Control Panel-> Storage. 2. Storage page appears. MS-7578 Using the NVMediaShield Software Accessing the Storage Page To access the NVIDIA Control Panel Storage page: 1.
The NVIDIA Control Panel - B-11 Click Star-> Programs-> NVIDIA Corporation-> NVIDIA Control Panel-> Storage. 2. Storage page appears. MS-7578 Using the NVMediaShield Software Accessing the Storage Page To access the NVIDIA Control Panel Storage page: 1.

User Guide
Page 107
...: Windows XP 1. B-17 The events are listed in the NVRAIDSERVICE Source entries. Click View storage configuration to open the associated page. 2. Open the Windows Control Panel. 2. Under System Tools→Event Viewer→Windows Logs, click Application. Under System Tools→Event Viewer→Windows Logs, click System. Double‐click... status: 1. Click on a disk from the list of array disks. The events are listed in the STATUS notes section. Windows Vista 1. Open the Windows Control Panel. 2.
...: Windows XP 1. B-17 The events are listed in the NVRAIDSERVICE Source entries. Click View storage configuration to open the associated page. 2. Open the Windows Control Panel. 2. Under System Tools→Event Viewer→Windows Logs, click Application. Under System Tools→Event Viewer→Windows Logs, click System. Double‐click... status: 1. Click on a disk from the list of array disks. The events are listed in the STATUS notes section. Windows Vista 1. Open the Windows Control Panel. 2.

