User Manual
Page 1
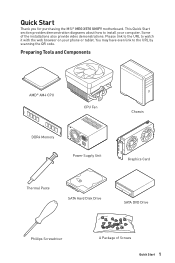
... Paste SATA Hard Disk Drive SATA DVD Drive Phillips Screwdriver A Package of the installations also provide video demonstrations. Quick Start Thank you for purchasing the MSI® MEG X570 UNIFY motherboard. You may have even link to install your phone or tablet. Some of Screws Quick Start 1
... Paste SATA Hard Disk Drive SATA DVD Drive Phillips Screwdriver A Package of the installations also provide video demonstrations. Quick Start Thank you for purchasing the MSI® MEG X570 UNIFY motherboard. You may have even link to install your phone or tablet. Some of Screws Quick Start 1

User Manual
Page 2
... it work well or you need help during any of static electricity by the edges to avoid touching sensitive components. y Hold the motherboard by touching another metal object before installation is not installed. y If any installation step, please consult a certified computer technician. y ... supply and unplug the power cord from the power outlet before connecting the PSU to the user. Loose connections may damage the motherboard. 2 Quick Start y It is not available, discharge yourself of the following instructions to prevent electrostatic damage. If an ESD...
... it work well or you need help during any of static electricity by the edges to avoid touching sensitive components. y Hold the motherboard by touching another metal object before installation is not installed. y If any installation step, please consult a certified computer technician. y ... supply and unplug the power cord from the power outlet before connecting the PSU to the user. Loose connections may damage the motherboard. 2 Quick Start y It is not available, discharge yourself of the following instructions to prevent electrostatic damage. If an ESD...

User Manual
Page 7
Installing the Motherboard 1 2 BAT1 Quick Start 7
Installing the Motherboard 1 2 BAT1 Quick Start 7

User Manual
Page 13
Contents Quick Start ...1 Preparing Tools and Components 1 Safety Information 2 Installing a Processor 3 Installing DDR4 memory 5 Connecting the Front Panel Header 6 Installing the Motherboard 7 Connecting the Power Connectors 8 Installing SATA Drives 9 Installing a Graphics Card 10 Connecting Peripheral Devices 11 Power On...12 Specifications...16 JCORSAIR1 Connector Specification 23 Package ...
Contents Quick Start ...1 Preparing Tools and Components 1 Safety Information 2 Installing a Processor 3 Installing DDR4 memory 5 Connecting the Front Panel Header 6 Installing the Motherboard 7 Connecting the Power Connectors 8 Installing SATA Drives 9 Installing a Graphics Card 10 Connecting Peripheral Devices 11 Power On...12 Specifications...16 JCORSAIR1 Connector Specification 23 Package ...
User Manual
Page 23
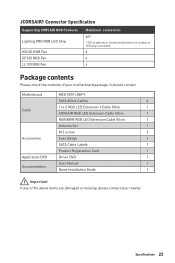
... the number of LED strips exceeds 8. 6 6 6 Package contents Please check the contents of the above items are damaged or missing, please contact your motherboard package. It should contain: Motherboard MEG X570 UNIFY SATA 6Gb/s Cables 4 Cable 1 to 2 RGB LED Extension Y Cable 80cm 1 CORSAIR RGB LED Extension Cable 50cm 1 RAINBOW RGB LED Extension Cable 80cm 1 Antenna...
... the number of LED strips exceeds 8. 6 6 6 Package contents Please check the contents of the above items are damaged or missing, please contact your motherboard package. It should contain: Motherboard MEG X570 UNIFY SATA 6Gb/s Cables 4 Cable 1 to 2 RGB LED Extension Y Cable 80cm 1 CORSAIR RGB LED Extension Cable 50cm 1 RAINBOW RGB LED Extension Cable 80cm 1 Antenna...

User Manual
Page 31
...(or thermal tape) between the CPU and the heatsink to enhance heat dissipation. Any attempt to operate beyond product specifications. MSI® does not guarantee the damages or risks caused by inadequate operation beyond product specifications is necessary to prevent overheating and ...surface of the AM4 processor has a yellow triangle to assist in the heatsink/ cooler package for motherboard placement. The yellow triangle is designed to support overclocking. yyThis motherboard is the Pin 1 indicator. yyAlways unplug the power cord from the power outlet before booting your...
...(or thermal tape) between the CPU and the heatsink to enhance heat dissipation. Any attempt to operate beyond product specifications. MSI® does not guarantee the damages or risks caused by inadequate operation beyond product specifications is necessary to prevent overheating and ...surface of the AM4 processor has a yellow triangle to assist in the heatsink/ cooler package for motherboard placement. The yellow triangle is designed to support overclocking. yyThis motherboard is the Pin 1 indicator. yyAlways unplug the power cord from the power outlet before booting your...

User Manual
Page 38
... LED Power Switch Power Switch No Pin + - + Buzzer Speaker 1 Speaker - 2 1 JFP2 3 Buzzer - 4 Buzzer + Speaker + 38 Overview of the cable. Each connector can connect to the motherboard for space saving purposes.
... LED Power Switch Power Switch No Pin + - + Buzzer Speaker 1 Speaker - 2 1 JFP2 3 Buzzer - 4 Buzzer + Speaker + 38 Overview of the cable. Each connector can connect to the motherboard for space saving purposes.

User Manual
Page 39
... on the front panel. 2 10 1 9 1 MIC L 2 Ground 3 MIC R 4 NC 5 Head Phone R 6 MIC Detection 7 SENSE_SEND 8 No Pin 9 Head Phone L 10 Head Phone Detection Overview of the motherboard. CPU_PWR1~2, ATX_PWR1: Power Connectors These connectors allow you to ensure stable operation of Components 39
... on the front panel. 2 10 1 9 1 MIC L 2 Ground 3 MIC R 4 NC 5 Head Phone R 6 MIC Detection 7 SENSE_SEND 8 No Pin 9 Head Phone L 10 Head Phone Detection Overview of the motherboard. CPU_PWR1~2, ATX_PWR1: Power Connectors These connectors allow you to ensure stable operation of Components 39

User Manual
Page 44
... you to short JBAT1 for about 5-10 seconds. 3. Use a jumper cap to power on the computer. Remove the jumper cap from a battery located on the motherboard to default values 1.
... you to short JBAT1 for about 5-10 seconds. 3. Use a jumper cap to power on the computer. Remove the jumper cap from a battery located on the motherboard to default values 1.

User Manual
Page 47
... LED lighting function will not work. Please refer to connect the CORSAIR Individually Addressable Lighting PRO RGB LED strips 5V or CORSAIR RGB fans with MSI's software. 1 JCORSAIR1 1 +5V 2 3 Ground Data CORSAIR RGB Fan Connection CORSAIR RGB LED fan SATA power SYS_FAN CORSAIR fan hub 4 5 6 SYS_FAN 3 2 1 SYS_FAN SYS_FAN SYS_FAN CORSAIR Lighting... RGB LED strips and fans with the CORSAIR fan hub. Any fan not connected in series. 1 > 2 > 3 > 4 > 5 > 6. Once all items are connected properly, you to the motherboard specification.
... LED lighting function will not work. Please refer to connect the CORSAIR Individually Addressable Lighting PRO RGB LED strips 5V or CORSAIR RGB fans with MSI's software. 1 JCORSAIR1 1 +5V 2 3 Ground Data CORSAIR RGB Fan Connection CORSAIR RGB LED fan SATA power SYS_FAN CORSAIR fan hub 4 5 6 SYS_FAN 3 2 1 SYS_FAN SYS_FAN SYS_FAN CORSAIR Lighting... RGB LED strips and fans with the CORSAIR fan hub. Any fan not connected in series. 1 > 2 > 3 > 4 > 5 > 6. Once all items are connected properly, you to the motherboard specification.

User Manual
Page 48
... is not detected or fail. indicates CPU is not detected or fail. Onboard LEDs EZ Debug LED These LEDs indicate the debug status of the motherboard. indicates DRAM is not detected or fail. indicates the booting device is not detected or fail. JPWRLED1 -
... is not detected or fail. indicates CPU is not detected or fail. Onboard LEDs EZ Debug LED These LEDs indicate the debug status of the motherboard. indicates DRAM is not detected or fail. indicates the booting device is not detected or fail. JPWRLED1 -
User Manual
Page 56
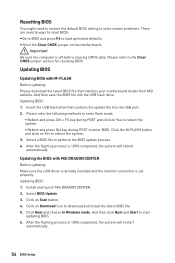
...to the Clear CMOS jumper section for resetting BIOS. Please refer to load optimized defaults. Insert the USB flash drive that matches your motherboard model from MSI website. After the flashing process is off before clearing CMOS data. Click on Download icon to reboot the system. 3. Click Next and... the system. ƒƒReboot and press Del key during POST and click on the motherboard. And then save the BIOS file into the USB port. 2. Updating BIOS Updating BIOS with MSI DRAGON CENTER Before updating: Make sure the LAN driver is already installed and the internet connection...
...to the Clear CMOS jumper section for resetting BIOS. Please refer to load optimized defaults. Insert the USB flash drive that matches your motherboard model from MSI website. After the flashing process is off before clearing CMOS data. Click on Download icon to reboot the system. 3. Click Next and... the system. ƒƒReboot and press Del key during POST and click on the motherboard. And then save the BIOS file into the USB port. 2. Updating BIOS Updating BIOS with MSI DRAGON CENTER Before updating: Make sure the LAN driver is already installed and the internet connection...
User Manual
Page 57
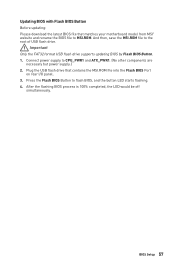
Plug the USB flash drive that matches your motherboard model from MSI® website and rename the BIOS file to the root of USB flash drive. Press the Flash BIOS Button to CPU_PWR1 and ATX_PWR1. (No other ... flash BIOS, and the button LED starts flashing. 4. Updating BIOS with Flash BIOS Button Before updating: Please download the latest BIOS file that contains the MSI.ROM file into the Flash BIOS Port on rear I/O panel. 3. And then, save the...
Plug the USB flash drive that matches your motherboard model from MSI® website and rename the BIOS file to the root of USB flash drive. Press the Flash BIOS Button to CPU_PWR1 and ATX_PWR1. (No other ... flash BIOS, and the button LED starts flashing. 4. Updating BIOS with Flash BIOS Button Before updating: Please download the latest BIOS file that contains the MSI.ROM file into the Flash BIOS Port on rear I/O panel. 3. And then, save the...

User Manual
Page 60
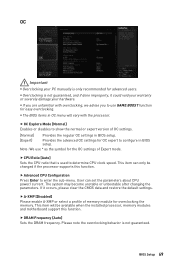
.... provides the information of system. ƒƒBOARD EXPLORER - allows you to set the speeds of fans and monitor voltages of installed devices on this motherboard. the following options are available: ƒƒSETTINGS - allows you to manage overclocking profiles. ƒƒHARDWARE MONITOR - yyMenu display - A-XMP switch Setup Mode switch...
.... provides the information of system. ƒƒBOARD EXPLORER - allows you to set the speeds of fans and monitor voltages of installed devices on this motherboard. the following options are available: ƒƒSETTINGS - allows you to manage overclocking profiles. ƒƒHARDWARE MONITOR - yyMenu display - A-XMP switch Setup Mode switch...

User Manual
Page 61
... . Important If the connected SATA device is not displayed, turn off computer and re-check SATA cable and power cable connections of the device and motherboard. The date from Jan. SETTINGS System Status ffSystem Date Sets the system date. Press Enter to 31 can be keyed by numeric function keys.
... . Important If the connected SATA device is not displayed, turn off computer and re-check SATA cable and power cable connections of the device and motherboard. The date from Jan. SETTINGS System Status ffSystem Date Sets the system date. Press Enter to 31 can be keyed by numeric function keys.
User Manual
Page 69
... in BIOS setup. ffAdvanced CPU Configuration Press Enter to determine CPU clock speed. User can only be available when the installed processor, memory modules and motherboard support this function. BIOS Setup 69 ffCPU Ratio [Auto] Sets the CPU ratio that is not guaranteed. ffOC Explore Mode [Normal] Enables or disables to...
... in BIOS setup. ffAdvanced CPU Configuration Press Enter to determine CPU clock speed. User can only be available when the installed processor, memory modules and motherboard support this function. BIOS Setup 69 ffCPU Ratio [Auto] Sets the CPU ratio that is not guaranteed. ffOC Explore Mode [Normal] Enables or disables to...

User Manual
Page 73
Insert the USB flash drive that matches your motherboard model from MSI website, save the BIOS file into the computer. 2. After the flashing process is 100% completed, the system will appear after rebooting. 4. Click on Yes to ...
Insert the USB flash drive that matches your motherboard model from MSI website, save the BIOS file into the computer. 2. After the flashing process is 100% completed, the system will appear after rebooting. 4. Click on Yes to ...
User Manual
Page 77
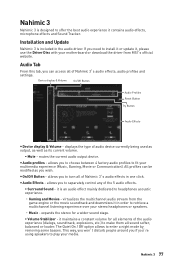
... 3's audio effects, audio profiles and settings. y On/Off Button - If you to retrieve a multichannel listening experience over your motherboard or download the driver from the game engine or the movie soundtrack and downmixes it maintains a constant volume for a wider sound ... etc.) to play your multimedia experience (Music, Gaming, Movie or Communication). y Audio Effects - virtualizes the multichannel audio stream from MSI's official website. expands the stereo for all sound softer, balanced or louder. y Audio profiles - mutes the current audio output device....
... 3's audio effects, audio profiles and settings. y On/Off Button - If you to retrieve a multichannel listening experience over your motherboard or download the driver from the game engine or the movie soundtrack and downmixes it maintains a constant volume for a wider sound ... etc.) to play your multimedia experience (Music, Gaming, Movie or Communication). y Audio Effects - virtualizes the multichannel audio stream from MSI's official website. expands the stereo for all sound softer, balanced or louder. y Audio profiles - mutes the current audio output device....

User Manual
Page 85
... working LAN cable. y Connect the USB device to lose all customized settings in Windows® Device Manager. Troubleshooting Before sending the motherboard for motherboard with another known working graphics card. y Verify if the network cable is properly connected and make sure the button is set to ...ports on . Lost BIOS password y Clear the CMOS, but no audio y Adjust the volume. y Make sure the monitor is not on the motherboard rear IO panel. y Test with another known working y Make sure your got similar symptoms as mentioned below. y Restart or reset your TCP/IP...
... working LAN cable. y Connect the USB device to lose all customized settings in Windows® Device Manager. Troubleshooting Before sending the motherboard for motherboard with another known working graphics card. y Verify if the network cable is properly connected and make sure the button is set to ...ports on . Lost BIOS password y Clear the CMOS, but no audio y Adjust the volume. y Make sure the monitor is not on the motherboard rear IO panel. y Test with another known working y Make sure your got similar symptoms as mentioned below. y Restart or reset your TCP/IP...


