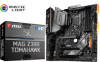

User Manual
Page 11
... Quick Start ...1 Preparing Tools and Components 1 Installing a Processor 2 Installing DDR4 memory 3 Connecting the Front Panel Header 4 Installing the Motherboard 5 Installing SATA Drives 6 Installing a Graphics Card 7 Connecting Peripheral Devices 8 Connecting the Power Connectors 9 Power On...10 Specifications...13 Package contents 18 Block Diagram ...19 Rear I/O Panel ...20 LAN Port LED Status Table 20 Audio Ports Configuration 20 Realtek Audio Console 21 Overview of Components 23 CPU Socket ...25 DIMM Slots...26 PCI_E1~5: PCIe Expansion Slots 27 M2_1~2: M.2 Slots (Key M 28...
... Quick Start ...1 Preparing Tools and Components 1 Installing a Processor 2 Installing DDR4 memory 3 Connecting the Front Panel Header 4 Installing the Motherboard 5 Installing SATA Drives 6 Installing a Graphics Card 7 Connecting Peripheral Devices 8 Connecting the Power Connectors 9 Power On...10 Specifications...13 Package contents 18 Block Diagram ...19 Rear I/O Panel ...20 LAN Port LED Status Table 20 Audio Ports Configuration 20 Realtek Audio Console 21 Overview of Components 23 CPU Socket ...25 DIMM Slots...26 PCI_E1~5: PCIe Expansion Slots 27 M2_1~2: M.2 Slots (Key M 28...

User Manual
Page 12
... Installing Utilities 39 MYSTIC LIGHT...40 Device LED effect control screen 40 BIOS Setup ...43 Entering BIOS Setup 43 Resetting BIOS...44 Updating BIOS...44 EZ Mode ...45 Advanced Mode ...47 SETTINGS...48 Advanced...48 Boot...55 Security ...56 Save & Exit...57 OC...58 M-FLASH ...64 OC PROFILE ...65 HARDWARE MONITOR 66 RAID Configuration 67 Enabling Intel® Rapid Storage Technology 67 Creating RAID Volume 68 Removing a RAID Volume 69 Resetting Disks to Non-RAID 70 Rebuilding RAID Array 71 Installing RAID Driver 72 Installing Intel® Rapid Storage Technology Software...
... Installing Utilities 39 MYSTIC LIGHT...40 Device LED effect control screen 40 BIOS Setup ...43 Entering BIOS Setup 43 Resetting BIOS...44 Updating BIOS...44 EZ Mode ...45 Advanced Mode ...47 SETTINGS...48 Advanced...48 Boot...55 Security ...56 Save & Exit...57 OC...58 M-FLASH ...64 OC PROFILE ...65 HARDWARE MONITOR 66 RAID Configuration 67 Enabling Intel® Rapid Storage Technology 67 Creating RAID Volume 68 Removing a RAID Volume 69 Resetting Disks to Non-RAID 70 Rebuilding RAID Array 71 Installing RAID Driver 72 Installing Intel® Rapid Storage Technology Software...

User Manual
Page 36
... jumper cap from a battery located on the computer. 36 Overview of Components JTPM1: TPM Module Connector This connector is external powered from JBAT1. 4. Power off the computer and unplug the power cord 2. Plug the power cord and power on the motherboard to default values 1. If you want to clear the system configuration, set the jumpers to short JBAT1 for TPM (Trusted Platform Module). Use a jumper cap to clear the CMOS memory. Keep Data (default) Clear CMOS/ Reset BIOS Resetting BIOS...
... jumper cap from a battery located on the computer. 36 Overview of Components JTPM1: TPM Module Connector This connector is external powered from JBAT1. 4. Power off the computer and unplug the power cord 2. Plug the power cord and power on the motherboard to default values 1. If you want to clear the system configuration, set the jumpers to short JBAT1 for TPM (Trusted Platform Module). Use a jumper cap to clear the CMOS memory. Keep Data (default) Clear CMOS/ Reset BIOS Resetting BIOS...

User Manual
Page 39
... MSI® Driver Disc into your computer. Click the Utilities tab. 3. Press any key when screen shows Press any key to boot from the Boot Menu. 6. Follow the instructions on the computer. 2. The installer will prompt you to install Windows® 10. Restart your optical drive. 3. Click the Install button in Windows® 10. 2. Power on the screen to restart. 7. Select the Windows® 10 installation disc/USB from CD or DVD... Installing Drivers 1. Click...
... MSI® Driver Disc into your computer. Click the Utilities tab. 3. Press any key when screen shows Press any key to boot from the Boot Menu. 6. Follow the instructions on the computer. 2. The installer will prompt you to install Windows® 10. Restart your optical drive. 3. Click the Install button in Windows® 10. 2. Power on the screen to restart. 7. Select the Windows® 10 installation disc/USB from CD or DVD... Installing Drivers 1. Click...
User Manual
Page 44
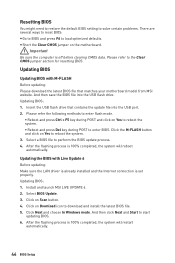
... install the latest BIOS file. 5. Select a BIOS file to start updating BIOS. 6. Install and launch MSI LIVE UPDATE 6. 2. Click Next and choose In Windows mode. y Short the Clear CMOS jumper on Yes to reboot the system. ƒ Reboot and press Del key during POST and click on the motherboard. After the flashing process is set properly. After the flashing process is off before clearing CMOS data. Updating BIOS: 1. Insert the USB flash drive that matches your motherboard model from MSI website. Click the M-FLASH button...
... install the latest BIOS file. 5. Select a BIOS file to start updating BIOS. 6. Install and launch MSI LIVE UPDATE 6. 2. Click Next and choose In Windows mode. y Short the Clear CMOS jumper on Yes to reboot the system. ƒ Reboot and press Del key during POST and click on the motherboard. After the flashing process is set properly. After the flashing process is off before clearing CMOS data. Updating BIOS: 1. Insert the USB flash drive that matches your motherboard model from MSI website. Click the M-FLASH button...
User Manual
Page 45
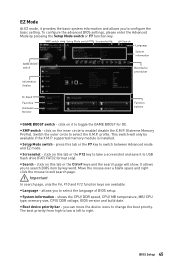
... information - you to USB flash drive (FAT/ FAT32 format only). BIOS Setup 45 XMP switch Setup Mode switch Screenshot Search Language System information GAME BOOST switch Boot device priority bar Information display M-Flash Favorites Hardware Monitor Function buttons y GAME BOOST switch - Move the mouse over a blank space and right click the mouse to change the boot priority. The boot priority from high to low is installed. y XMP switch - This switch will show. click on...
... information - you to USB flash drive (FAT/ FAT32 format only). BIOS Setup 45 XMP switch Setup Mode switch Screenshot Search Language System information GAME BOOST switch Boot device priority bar Information display M-Flash Favorites Hardware Monitor Function buttons y GAME BOOST switch - Move the mouse over a blank space and right click the mouse to change the boot priority. The boot priority from high to low is installed. y XMP switch - This switch will show. click on...
User Manual
Page 46
y Information display - enable or disable the LAN Option ROM, M.2/ Optane Genie, HD audio controller, AHCI/ RAID, CPU Fan Fail Warning Control and BIOS Log Review by percentage. click on this button to display the Hardware Monitor menu that provides the way to update BIOS with a USB flash drive. Move the mouse over a BIOS item on their respective button. click on this button to perform M-Flash function that allows you can save and access favorite/ frequently-used / favorite BIOS setting items in one page...
y Information display - enable or disable the LAN Option ROM, M.2/ Optane Genie, HD audio controller, AHCI/ RAID, CPU Fan Fail Warning Control and BIOS Log Review by percentage. click on this button to display the Hardware Monitor menu that provides the way to update BIOS with a USB flash drive. Move the mouse over a BIOS item on their respective button. click on this button to perform M-Flash function that allows you can save and access favorite/ frequently-used / favorite BIOS setting items in one page...
User Manual
Page 49
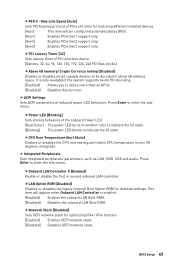
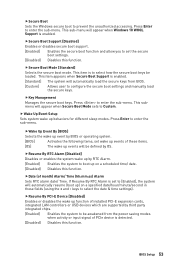
...Boot ROM. BIOS Setup 49 fNetwork Stack [Disabled] Sets UEFI network stack for detailed settings. Max Link Speed [Auto] Sets PCI Express protocol of PCI interface device. [Options: 32, 64, 96, 128, 160, 192, 224, 248 PCI Bus clocks] fAbove 4G memory/ Crypto Currency mining [Disabled] Enables or disables 64-bit capable devices to be configured automatically by BIOS. [Gen1] Enables PCIe Gen1 support only. [Gen2] Enables PCIe Gen2 support only. [Gen3] Enables PCIe Gen3 support only. f Integrated Peripherals Sets integrated peripherals' parameters, such as LAN, HDD, USB...
...Boot ROM. BIOS Setup 49 fNetwork Stack [Disabled] Sets UEFI network stack for detailed settings. Max Link Speed [Auto] Sets PCI Express protocol of PCI interface device. [Options: 32, 64, 96, 128, 160, 192, 224, 248 PCI Bus clocks] fAbove 4G memory/ Crypto Currency mining [Disabled] Enables or disables 64-bit capable devices to be configured automatically by BIOS. [Gen1] Enables PCIe Gen1 support only. [Gen2] Enables PCIe Gen2 support only. [Gen3] Enables PCIe Gen3 support only. f Integrated Peripherals Sets integrated peripherals' parameters, such as LAN, HDD, USB...
User Manual
Page 50
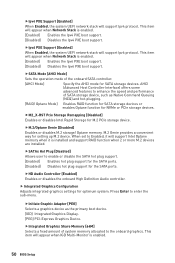
... when Network Stack is enabled. 50 BIOS Setup M.2 Genie provides a convenient way for optimum system. This item will appear when IGD Multi-Monitor is enabled. [Enabled] Enables the Ipv4 PXE boot support. [Disabled] Disables the Ipv4 PXE boot support. fInitiate Graphic Adapter [PEG] Selects a graphics device as Native Command Queuing (NCQ) and hot-plugging. [RAID/ Optane Mode] Enables RAID function for SATA storage devices or enables Optane function for the SATA ports. fHD Audio Controller [Enabled] Enables or disables the onboard High Definition Audio controller.
... when Network Stack is enabled. 50 BIOS Setup M.2 Genie provides a convenient way for optimum system. This item will appear when IGD Multi-Monitor is enabled. [Enabled] Enables the Ipv4 PXE boot support. [Disabled] Disables the Ipv4 PXE boot support. fInitiate Graphic Adapter [PEG] Selects a graphics device as Native Command Queuing (NCQ) and hot-plugging. [RAID/ Optane Mode] Enables RAID function for SATA storage devices or enables Optane function for the SATA ports. fHD Audio Controller [Enabled] Enables or disables the onboard High Definition Audio controller.
User Manual
Page 51
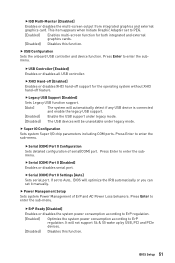
... PEG. [Enabled] Enables multi-screen function for the operating system without XHCI hand-off feature. f Power Management Setup Sets system Power Management of serial(COM) port. Press Enter to enter the sub-menu. BIOS Setup 51 fSerial (COM) Port 0 Settings [Auto] Sets serial port. It will be unavailable under legacy mode. [Disabled] The USB devices will not support S4 & S5 wake up by USB, PCI and PCIe devices. [Disabled] Disables this function. fIGD Multi-Monitor [Disabled] Enables or disables the multi-screen output from integrated graphics and external graphics card.
... PEG. [Enabled] Enables multi-screen function for the operating system without XHCI hand-off feature. f Power Management Setup Sets system Power Management of serial(COM) port. Press Enter to enter the sub-menu. BIOS Setup 51 fSerial (COM) Port 0 Settings [Auto] Sets serial port. It will be unavailable under legacy mode. [Disabled] The USB devices will not support S4 & S5 wake up by USB, PCI and PCIe devices. [Disabled] Disables this function. fIGD Multi-Monitor [Disabled] Enables or disables the multi-screen output from integrated graphics and external graphics card.
User Manual
Page 52
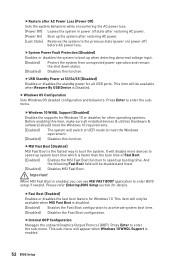
f Windows OS Configuration Sets Windows OS detailed configuration and behaviors. fFast Boot [Enabled] Enables or disables the fast boot feature for all installed devices & utilities (hardware & software) should meet the Windows 10 requirements. [Enabled] The system will disable more devices to speed up system boot time which is enabled, you can use MSI FAST BOOT application to enter BIOS setup if needed. fUSB Standby Power at S3/S4/S5 [Disabled] Enables or disables the standby power for Windows 10. fWindows 10 WHQL Support [Disabled] Enables the supports for...
f Windows OS Configuration Sets Windows OS detailed configuration and behaviors. fFast Boot [Enabled] Enables or disables the fast boot feature for all installed devices & utilities (hardware & software) should meet the Windows 10 requirements. [Enabled] The system will disable more devices to speed up system boot time which is enabled, you can use MSI FAST BOOT application to enter BIOS setup if needed. fUSB Standby Power at S3/S4/S5 [Disabled] Enables or disables the standby power for Windows 10. fWindows 10 WHQL Support [Disabled] Enables the supports for...
User Manual
Page 53
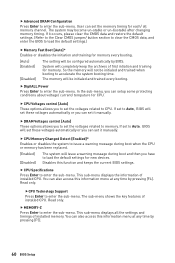
... secure boot keys. fDate (of installed PCI-E expansion cards, integrated LAN controllers or USB devices which are supported by RTC Alarm. [Enabled] Enables the system to Custom. BIOS Setup 53 fSecure Boot Mode [Standard] Selects the secure boot mode. keys to enter the sub-menu. fResume By RTC Alarm [Disabled] Disables or enables the system wake up by third party integrated chips. [Enabled] Enables the system to enter the sub-menu. Press to prevent the unauthorized accessing. fSecure Boot Sets the Windows secure boot to enter...
... secure boot keys. fDate (of installed PCI-E expansion cards, integrated LAN controllers or USB devices which are supported by RTC Alarm. [Enabled] Enables the system to Custom. BIOS Setup 53 fSecure Boot Mode [Standard] Selects the secure boot mode. keys to enter the sub-menu. fResume By RTC Alarm [Disabled] Disables or enables the system wake up by third party integrated chips. [Enabled] Enables the system to enter the sub-menu. Press to prevent the unauthorized accessing. fSecure Boot Sets the Windows secure boot to enter...

User Manual
Page 54
... you set the Resume From S3/S4/S5 by PS/2 Keyboard to wake the system. Secure Erase+ is the best way to be awakened from the power saving modes when activity or input signal of USB device is enabled. 54 BIOS Setup f Intel ( R ) Ethernet Connection I219-V Shows driver information and configuration of hot key on PS/2 keyboard is detected. [Disabled] Disables this function. fResume By Onboard Intel LAN [Disabled] Enables or disables...
... you set the Resume From S3/S4/S5 by PS/2 Keyboard to wake the system. Secure Erase+ is the best way to be awakened from the power saving modes when activity or input signal of USB device is enabled. 54 BIOS Setup f Intel ( R ) Ethernet Connection I219-V Shows driver information and configuration of hot key on PS/2 keyboard is detected. [Disabled] Disables this function. fResume By Onboard Intel LAN [Disabled] Enables or disables...

User Manual
Page 58
... PC manually is used to use * as the symbol for advanced users. f Adjusted CPU Frequency Shows the adjusted CPU frequency. f CPU Ratio Offset When Running AVX [Auto] Sets a offset value to All Core. This item appears when the installed CPU supports this setting automatically. f GT Ratio [Auto] Sets the integrated graphics ratio. If set . The valid value range depends on the installed CPU. 58 BIOS Setup The valid value range depends on the installed CPU. y Overclocking is...
... PC manually is used to use * as the symbol for advanced users. f Adjusted CPU Frequency Shows the adjusted CPU frequency. f CPU Ratio Offset When Running AVX [Auto] Sets a offset value to All Core. This item appears when the installed CPU supports this setting automatically. f GT Ratio [Auto] Sets the integrated graphics ratio. If set . The valid value range depends on the installed CPU. 58 BIOS Setup The valid value range depends on the installed CPU. y Overclocking is...
User Manual
Page 60
... during boot when the CPU or memory has been replaced. [Enabled] [Disabled] The system will be configured automatically by BIOS. If set to load the default settings for new devices. You can set to memory. f CPU Voltages control [Auto] These options allows you to set the voltages related to Auto, BIOS will be initialed and trained every booting. This sub-menu displays the information of installed CPU. The sub-menu shows the key features of installed CPU. f DigitALL Power Press Enter to enter the sub-menu. f CPU Speci...
... during boot when the CPU or memory has been replaced. [Enabled] [Disabled] The system will be configured automatically by BIOS. If set to load the default settings for new devices. You can set to memory. f CPU Voltages control [Auto] These options allows you to set the voltages related to Auto, BIOS will be initialed and trained every booting. This sub-menu displays the information of installed CPU. The sub-menu shows the key features of installed CPU. f DigitALL Power Press Enter to enter the sub-menu. f CPU Speci...

User Manual
Page 62
... reduce the CPU frequency and voltage for power-saving in halt state. [Disabled] Disables this function. The options of system and reduce CPU power consumption accordingly. [Disabled] Disable this function. 62 BIOS Setup fCFG Lock [Enabled] Lock or un-lock the MSR 0xE2[15], CFG lock bit. [Enabled] Locks the CFG lock bit. [Disabled] Un-locks the CFG lock bit. This item will be configured automatically by ACPI. [Auto] This setting will appear...
... reduce the CPU frequency and voltage for power-saving in halt state. [Disabled] Disables this function. The options of system and reduce CPU power consumption accordingly. [Disabled] Disable this function. 62 BIOS Setup fCFG Lock [Enabled] Lock or un-lock the MSR 0xE2[15], CFG lock bit. [Enabled] Locks the CFG lock bit. [Disabled] Un-locks the CFG lock bit. This item will be configured automatically by ACPI. [Auto] This setting will appear...

User Manual
Page 72
...® Rapid Storage Technology software. 72 RAID Configuration Installing RAID Driver New Operating System Installation The following details the installation of the MSI Driver Disc. 4. Navigate to finish. 7. Click the Install button. 6. Insert the MSI Driver Disc into the optical drive. 3. Windows setup will need to copy the files after selecting the location to install Windows click on Load driver button to open the installer. If you turn off the AutoPlay feature from the Windows Control Panel, you...
...® Rapid Storage Technology software. 72 RAID Configuration Installing RAID Driver New Operating System Installation The following details the installation of the MSI Driver Disc. 4. Navigate to finish. 7. Click the Install button. 6. Insert the MSI Driver Disc into the optical drive. 3. Windows setup will need to copy the files after selecting the location to install Windows click on Load driver button to open the installer. If you turn off the AutoPlay feature from the Windows Control Panel, you...
User Manual
Page 73
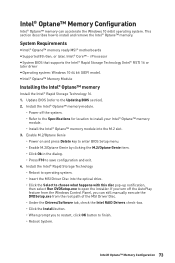
y Intel® Optane™ Memory Module Installing the Intel® Optane™ memory Install the Intel® Rapid Storage Technology 16. 1. Update BIOS (refer to save configuration and exit. 4. i Processor y System BIOS that supports the Intel® Rapid Storage Technology (Intel® RST) 16 or later driver y Operating system: Windows 10 64 bit (UEFI mode). Enable M.2/Optane Genie ˜ Power on and press Delete key to enter BIOS Setup menu. ˜ Enable M.2/Optane Genie by clicking the M.2/Optane...
y Intel® Optane™ Memory Module Installing the Intel® Optane™ memory Install the Intel® Rapid Storage Technology 16. 1. Update BIOS (refer to save configuration and exit. 4. i Processor y System BIOS that supports the Intel® Rapid Storage Technology (Intel® RST) 16 or later driver y Operating system: Windows 10 64 bit (UEFI mode). Enable M.2/Optane Genie ˜ Power on and press Delete key to enter BIOS Setup menu. ˜ Enable M.2/Optane Genie by clicking the M.2/Optane...
User Manual
Page 76
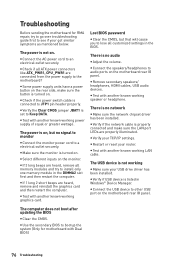
... not boot after updating the BIOS y Clear the CMOS. Troubleshooting Before sending the motherboard for motherboard with Dual BIOS) 76 Troubleshooting y Check if the power switch cable is no audio y Adjust the volume. y If 3 long beeps are properly illuminated. y If 1 long 2 short beeps are connected from the power supply to install only one memory module in Windows® Device Manager. y Test with another known working LAN cable. y Restart or reset your USB drive driver has been installed. The power is no network y Make sure the network chipset driver has been installed...
... not boot after updating the BIOS y Clear the CMOS. Troubleshooting Before sending the motherboard for motherboard with Dual BIOS) 76 Troubleshooting y Check if the power switch cable is no audio y Adjust the volume. y If 3 long beeps are properly illuminated. y If 1 long 2 short beeps are connected from the power supply to install only one memory module in Windows® Device Manager. y Test with another known working LAN cable. y Restart or reset your USB drive driver has been installed. The power is no network y Make sure the network chipset driver has been installed...

User Manual
Page 80
... help resources for technical guide, BIOS updates, driver updates, and other marks and names mentioned may be obtained from the user guide, please contact your place of their respective owners and are acknowledged. y Visit the MSI website for further guidance...Version 1.0, 2018/08, First release. 80 The MSI logo used in this document without prior notice. No warranty as to this manual are the properties of Micro-Star Int'l Co., Ltd. Technical Support If a problem arises with your product at: http://register.msi.com Trademark Recognition All product names used is expressed...
... help resources for technical guide, BIOS updates, driver updates, and other marks and names mentioned may be obtained from the user guide, please contact your place of their respective owners and are acknowledged. y Visit the MSI website for further guidance...Version 1.0, 2018/08, First release. 80 The MSI logo used in this document without prior notice. No warranty as to this manual are the properties of Micro-Star Int'l Co., Ltd. Technical Support If a problem arises with your product at: http://register.msi.com Trademark Recognition All product names used is expressed...


