User Manual
Page 10
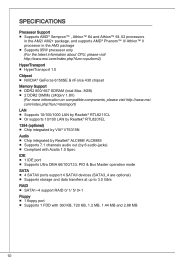
... AMD® Phenom™ II/ Athlon™ II processor in the AM3 package ■ Supports 95W processor only (For the latest information about CPU, please visit http://www.msi.com/index.php?func=cpuform2) HyperTransport ■ HyperTransport 1.0 Chipset ■ NVIDIA® GeForce 6150SE & nForce 430 chipset Memory Support ■ DDR2 800/ 667...
... AMD® Phenom™ II/ Athlon™ II processor in the AM3 package ■ Supports 95W processor only (For the latest information about CPU, please visit http://www.msi.com/index.php?func=cpuform2) HyperTransport ■ HyperTransport 1.0 Chipset ■ NVIDIA® GeForce 6150SE & nForce 430 chipset Memory Support ■ DDR2 800/ 667...

User Manual
Page 12
...-Out (optional) HARDWARE SETUP This chapter provides you install in holding the components and follow the installation procedures. Meanwhile, do not forget to install the CPU & cooler correctly. While doing the installation, be careful in the wrong orientation, the components will cause the damage of your...
...-Out (optional) HARDWARE SETUP This chapter provides you install in holding the components and follow the installation procedures. Meanwhile, do not forget to install the CPU & cooler correctly. While doing the installation, be careful in the wrong orientation, the components will cause the damage of your...
User Manual
Page 13
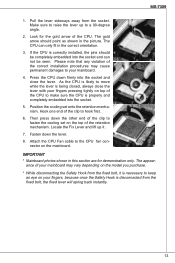
... arrow should be completely embedded into the socket and close the lever with your mainboard. 4. Hook one end of the clip to the CPU fan con- Attach the CPU Fan cable to hook first. 6. nector on the model you purchase. * While disconnecting the Safety Hook from the fixed bolt, it . 7....this section are for the gold arrow of the correct installation procedures may vary depending on the mainboard. Please note that any violation of the CPU. Then press down the other end of the retention mechanism. Pull the lever sideways away from the fixed bolt, the fixed lever will spring...
... arrow should be completely embedded into the socket and close the lever with your mainboard. 4. Hook one end of the clip to the CPU fan con- Attach the CPU Fan cable to hook first. 6. nector on the model you purchase. * While disconnecting the Safety Hook from the fixed bolt, it . 7....this section are for the gold arrow of the correct installation procedures may vary depending on the mainboard. Please note that any violation of the CPU. Then press down the other end of the retention mechanism. Pull the lever sideways away from the fixed bolt, the fixed lever will spring...
User Manual
Page 15
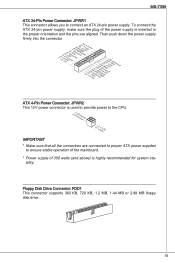
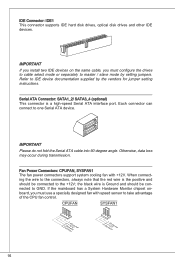
... the mainboard. * Power supply of the power supply is inserted in the proper orientation and the pins are connected to proper ATX power supplies to connect an ATX 24-pin power supply. Then push down the power supply firmly into the connector. 1.+23.+3.33.G4V.3.r+5Vo.5uG6Vn.r7+do...rP9do.Wu51nV0R1d.S1+O1B.1+K2211.V+3213.V+4.133.-5V.113.2G6V1V.rP7o1.SuG81-n.rO9Gdo2.NurG0o2n#.ruR1do2n.eu+2ds2n5.+3dV2.5+4V5.GVround ATX 4-Pin Power Connector: JPWR2 This 12V power connector is used to provide power to the CPU. 2.G1.rGouronudnd 4.+31.+21V2V Important * Make sure that all the connectors are aligned.
... the mainboard. * Power supply of the power supply is inserted in the proper orientation and the pins are connected to proper ATX power supplies to connect an ATX 24-pin power supply. Then push down the power supply firmly into the connector. 1.+23.+3.33.G4V.3.r+5Vo.5uG6Vn.r7+do...rP9do.Wu51nV0R1d.S1+O1B.1+K2211.V+3213.V+4.133.-5V.113.2G6V1V.rP7o1.SuG81-n.rO9Gdo2.NurG0o2n#.ruR1do2n.eu+2ds2n5.+3dV2.5+4V5.GVround ATX 4-Pin Power Connector: JPWR2 This 12V power connector is used to provide power to the CPU. 2.G1.rGouronudnd 4.+31.+21V2V Important * Make sure that all the connectors are aligned.
User Manual
Page 16
... When connecting the wire to the connectors, always note that the red wire is the positive and should be connected to take advantage of the CPU fan control. Refer to GND. Important Please do not fold the Serial ATA cable into 90-degree angle. Serial ATA Connector: SATA1_2/ SATA3_4 (optional) This...
... When connecting the wire to the connectors, always note that the red wire is the positive and should be connected to take advantage of the CPU fan control. Refer to GND. Important Please do not fold the Serial ATA cable into 90-degree angle. Serial ATA Connector: SATA1_2/ SATA3_4 (optional) This...
User Manual
Page 22
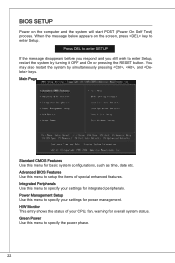
..., press key to enter Setup. Integrated Peripherals Use this menu to specify the power phase. 22 Advanced BIOS Features Use this menu to specify your CPU, fan, warning for basic system configurations, such as time, date etc.
..., press key to enter Setup. Integrated Peripherals Use this menu to specify the power phase. 22 Advanced BIOS Features Use this menu to specify your CPU, fan, warning for basic system configurations, such as time, date etc.
User Manual
Page 23
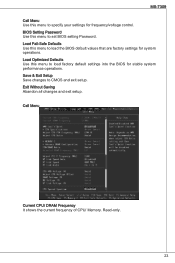
... Frequency It shows the current frequency of CPU/ Memory. MS-7309 Cell Menu Use this menu to load the BIOS default values that are factory settings for system operations. Load Fail-Safe Defaults ...
... Frequency It shows the current frequency of CPU/ Memory. MS-7309 Cell Menu Use this menu to load the BIOS default values that are factory settings for system operations. Load Fail-Safe Defaults ...
User Manual
Page 24
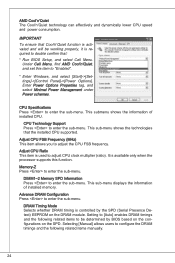
...Mode Selects whether DRAM timing is required to [Auto] enables DRAM timings and the following related items manually. 24 Memory-Z Press to adjust CPU clock multiplier (ratio). This submenu shows the information of installed memory. It is activated and will be determined by the SPD (Serial ...by BIOS based on the configurations on the DRAM module. AMD Cool'n'Quiet The Cool'n'Quiet technology can effectively and dynamically lower CPU speed and power consumption. Advance DRAM Configuration Press to enter the sub-menu. Under Cell Menu, find AMD Cool'n'Quiet, and set...
...Mode Selects whether DRAM timing is required to [Auto] enables DRAM timings and the following related items manually. 24 Memory-Z Press to adjust CPU clock multiplier (ratio). This submenu shows the information of installed memory. It is activated and will be determined by the SPD (Serial ...by BIOS based on the configurations on the DRAM module. AMD Cool'n'Quiet The Cool'n'Quiet technology can effectively and dynamically lower CPU speed and power consumption. Advance DRAM Configuration Press to enter the sub-menu. Under Cell Menu, find AMD Cool'n'Quiet, and set...
User Manual
Page 25
...you to set to [Enabled], the system will become less stable. HT Link Width This item allows you to enable or disable the CPU Spread Spectrum feature. But if you are used to adjust the PCI-E frequency. For the most suitable Spread Spectrum value, please consult your...2T] makes DRAM signal controller run at 2 clock cycles rate. Adjust PCI-E Frequency (MHz) This item allows you to lock up. 25 CPU VDD Voltage (V)/ Adjust CPU Voltage Offset/ DRAM Voltage (V)/ NB Voltage (V)/ HT Link Voltage (V) These items are overclocking because even a slight jitter can introduce a temporary ...
...you to set to [Enabled], the system will become less stable. HT Link Width This item allows you to enable or disable the CPU Spread Spectrum feature. But if you are used to adjust the PCI-E frequency. For the most suitable Spread Spectrum value, please consult your...2T] makes DRAM signal controller run at 2 clock cycles rate. Adjust PCI-E Frequency (MHz) This item allows you to lock up. 25 CPU VDD Voltage (V)/ Adjust CPU Voltage Offset/ DRAM Voltage (V)/ NB Voltage (V)/ HT Link Voltage (V) These items are overclocking because even a slight jitter can introduce a temporary ...

User Manual
Page 40
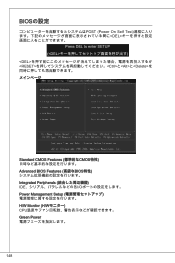
BIOS 설정 POST(Power On Self Test DEL Press DEL to enter SETUP (DEL RESET Ctrl>, 및
BIOS 설정 POST(Power On Self Test DEL Press DEL to enter SETUP (DEL RESET Ctrl>, 및
User Manual
Page 41
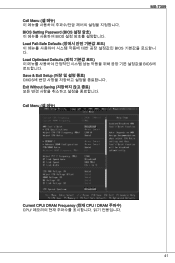
MS-7309 Cell Menu BIOS Setting Password (BIOS BIOS Load Fail-Safe Defaults BIOS Load Optimized Defaults BIOS Save & Exit Setup CMOS Exit Without Saving Cell Menu Current CPU/ DRAM Frequency (현재 CPU / DRAM 주파수) CPU 41
MS-7309 Cell Menu BIOS Setting Password (BIOS BIOS Load Fail-Safe Defaults BIOS Load Optimized Defaults BIOS Save & Exit Setup CMOS Exit Without Saving Cell Menu Current CPU/ DRAM Frequency (현재 CPU / DRAM 주파수) CPU 41
User Manual
Page 42
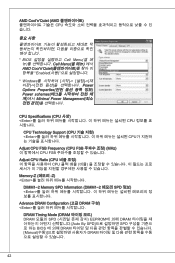
AMD Cool'n'Quiet (AMD CPU BIOS Cell Menu(셀 메 Cell Menu AMD Cool'n'Quiet Enabled * Windows Power Options Properties Power schemes Minimal Power Management CPU Specifications (CPU 사양)
AMD Cool'n'Quiet (AMD CPU BIOS Cell Menu(셀 메 Cell Menu AMD Cool'n'Quiet Enabled * Windows Power Options Properties Power schemes Minimal Power Management CPU Specifications (CPU 사양)

User Manual
Page 102
后置面板 PS/2 鼠标 (选配) 1394 LAN Line-In RS-Out Line-Out CS-Out PS/2 VGA 端口 USB 端口 MIC SS-Out (选配) 硬件安装 CPU AM2/ AM2+/ AM3 CPU CPU时, 确认CPU CPU CPU CPU CPU 102
后置面板 PS/2 鼠标 (选配) 1394 LAN Line-In RS-Out Line-Out CS-Out PS/2 VGA 端口 USB 端口 MIC SS-Out (选配) 硬件安装 CPU AM2/ AM2+/ AM3 CPU CPU时, 确认CPU CPU CPU CPU CPU 102
User Manual
Page 113
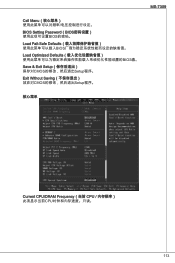
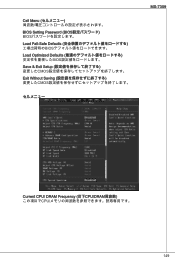
MS-7309 Cell Menu BIOS Setting Password(BIOS BIOS Load Fail-Safe Defaults BIOS Load Optimized Defaults BIOS值。 Save & Exit Setup CMOS Setup程序。 Exit Without Saving CMOS Setup Current CPU/DRAM Frequency(当前 CPU CPU 113
MS-7309 Cell Menu BIOS Setting Password(BIOS BIOS Load Fail-Safe Defaults BIOS Load Optimized Defaults BIOS值。 Save & Exit Setup CMOS Setup程序。 Exit Without Saving CMOS Setup Current CPU/DRAM Frequency(当前 CPU CPU 113
User Manual
Page 115
... Auto(HT Enabled HT HT Link Speed(HT Hyper-Transport HT Link Width(HT Hyper-Transport CPU VDD Voltage (V)/ Adjust CPU Voltage Offset/ DRAM Voltage (V)/ NB Voltage (V)/ HT Link Voltage (V CPU CPU Spread Spectrum(CPU CPU EMI [Disabled EMI Spread Spectrum EMI。 * Spread Spectrum EMI Spread Spectrum EMI Spread Spectrum 115
... Auto(HT Enabled HT HT Link Speed(HT Hyper-Transport HT Link Width(HT Hyper-Transport CPU VDD Voltage (V)/ Adjust CPU Voltage Offset/ DRAM Voltage (V)/ NB Voltage (V)/ HT Link Voltage (V CPU CPU Spread Spectrum(CPU CPU EMI [Disabled EMI Spread Spectrum EMI。 * Spread Spectrum EMI Spread Spectrum EMI Spread Spectrum 115
User Manual
Page 131
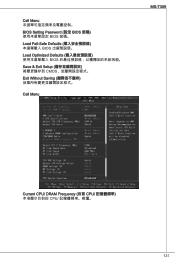
Cell Menu BIOS Setting Password (設定 BIOS BIOS 密碼。 Load Fail-Safe Defaults BIOS Load Optimized Defaults BIOS Save & Exit Setup CMOS Exit Without Saving Cell Menu MS-7309 Current CPU/ DRAM Frequency (目前 CPU CPU 131
Cell Menu BIOS Setting Password (設定 BIOS BIOS 密碼。 Load Fail-Safe Defaults BIOS Load Optimized Defaults BIOS Save & Exit Setup CMOS Exit Without Saving Cell Menu MS-7309 Current CPU/ DRAM Frequency (目前 CPU CPU 131

User Manual
Page 133
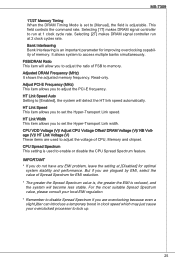
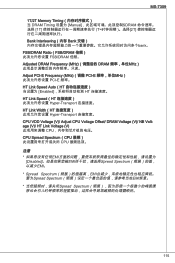
MS-7309 1T/2T Memory Timing (1T/2T Manual SDRAM 1T],則 SDRAM T 2T Bank Interleaving FSB/DRAM Ratio (FSB FSB Adjusted DRAM Frequency (MHz Adjust PCI-E Frequency (MHz) (調整 PCI-E PCI-E 頻率(以 MHz 計)。 HT Link Speed Auto Enabled HT HT Link Speed HyperTransport HT Link Width HyperTransport CPU VDD Voltage (V)/ Adjust CPU Voltage Offset/ DRAM Voltage (V)/ NB Voltage (V)/ HT Link Voltage (V CPU CPU Spread Spectrum (CPU CPU EMI Disabled EMI 133
MS-7309 1T/2T Memory Timing (1T/2T Manual SDRAM 1T],則 SDRAM T 2T Bank Interleaving FSB/DRAM Ratio (FSB FSB Adjusted DRAM Frequency (MHz Adjust PCI-E Frequency (MHz) (調整 PCI-E PCI-E 頻率(以 MHz 計)。 HT Link Speed Auto Enabled HT HT Link Speed HyperTransport HT Link Width HyperTransport CPU VDD Voltage (V)/ Adjust CPU Voltage Offset/ DRAM Voltage (V)/ NB Voltage (V)/ HT Link Voltage (V CPU CPU Spread Spectrum (CPU CPU EMI Disabled EMI 133

User Manual
Page 138
PS/2マウス LAN 1394 Line-In RS-Out Line-Out CS-Out PS/2 VGAポート USBポート MIC SS-Out AM2/ AM2+/ AM3 CPU CPU CPU CPU CPUとCPU CPU 138
PS/2マウス LAN 1394 Line-In RS-Out Line-Out CS-Out PS/2 VGAポート USBポート MIC SS-Out AM2/ AM2+/ AM3 CPU CPU CPU CPU CPUとCPU CPU 138
User Manual
Page 148
BIOSの設定 POST (Power On Self Test DEL Press DEL to enter SETUP (とと
BIOSの設定 POST (Power On Self Test DEL Press DEL to enter SETUP (とと
User Manual
Page 149
Cell Menu BIOS Setting Password (BIOS BIOS Load Fail-Safe Defaults BIOS Load Optimized Defaults BIOS Save & Exit Setup CMOS Exit Without Saving CMOS MS-7309 Current CPU/ DRAM Frequency (目下CPU/DRAM CPU 149
Cell Menu BIOS Setting Password (BIOS BIOS Load Fail-Safe Defaults BIOS Load Optimized Defaults BIOS Save & Exit Setup CMOS Exit Without Saving CMOS MS-7309 Current CPU/ DRAM Frequency (目下CPU/DRAM CPU 149

