User Guide
Page 8
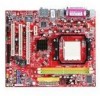
...Sempron , Athlon 64 and Athlon 64 X2 (For the latest information about CPU, please visit http://www.msi.com.tw/program/products/mainboard/mbd/pro_mbd_cpu_support.php ) Chipset • nVIDIA MCP61(P) / MCP61(S) / MCP61(V) Memory Support • DDRII 533/667/800 SDRAM (2GB Max) • 2 DDRII... Dual channel (For the updated supporting memory modules, please visit http://www.msi.com.tw/program/products/mainboard/mbd/pro_mbd_trp_list.php ) LAN • Supports 10/100 LAN by Realtek 8201CL (K9N6SGM-V, K9N6VGM-V) • Supports 10/100/1000 LAN by Realtek 8211BL-GR (K9N6PGM-FI/F) Audio • 7.1...
...Sempron , Athlon 64 and Athlon 64 X2 (For the latest information about CPU, please visit http://www.msi.com.tw/program/products/mainboard/mbd/pro_mbd_cpu_support.php ) Chipset • nVIDIA MCP61(P) / MCP61(S) / MCP61(V) Memory Support • DDRII 533/667/800 SDRAM (2GB Max) • 2 DDRII... Dual channel (For the updated supporting memory modules, please visit http://www.msi.com.tw/program/products/mainboard/mbd/pro_mbd_trp_list.php ) LAN • Supports 10/100 LAN by Realtek 8201CL (K9N6SGM-V, K9N6VGM-V) • Supports 10/100/1000 LAN by Realtek 8211BL-GR (K9N6PGM-FI/F) Audio • 7.1...
User Guide
Page 10
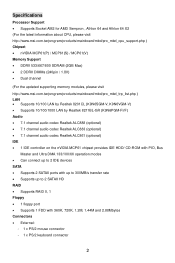
... socket and can only fit in holding the components and follow the installation procedures. (For the latest information about CPU, please visit: http://www.msi.com.tw/program/products/mainboard/mbd/pro_mbd_cpu_support.php) Central Processing Unit: CPU The mainboard supports AMD® Athlon64 X2 / Athlon64 / Sempron processors. Please note that any violation of the...
... socket and can only fit in holding the components and follow the installation procedures. (For the latest information about CPU, please visit: http://www.msi.com.tw/program/products/mainboard/mbd/pro_mbd_cpu_support.php) Central Processing Unit: CPU The mainboard supports AMD® Athlon64 X2 / Athlon64 / Sempron processors. Please note that any violation of the...
User Guide
Page 11
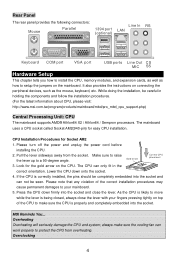
... other end of the clip to install the CPU & cooler correctly. Attach the CPU Fan cable to support overclocking. We do not forget to prevent overheating. MSI Reminds You... 1. Therefore we suggest you do not plug/unplug the CPU too often. 5 CPU and Cooler Installation When you are able to ...cooling set onto the retention mechanism. This motherboard is 20 cycles. Wrong installation will cause the damage of H/W Monitor in BIOS for better heat dispersion. Position the cooling set on the top of the CPU is designed to the CPU fan connector on the computer. Locate ...
... other end of the clip to install the CPU & cooler correctly. Attach the CPU Fan cable to support overclocking. We do not forget to prevent overheating. MSI Reminds You... 1. Therefore we suggest you do not plug/unplug the CPU too often. 5 CPU and Cooler Installation When you are able to ...cooling set onto the retention mechanism. This motherboard is 20 cycles. Wrong installation will cause the damage of H/W Monitor in BIOS for better heat dispersion. Position the cooling set on the top of the CPU is designed to the CPU fan connector on the computer. Locate ...
User Guide
Page 12
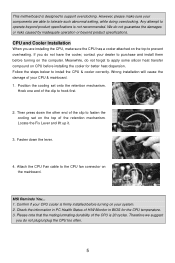
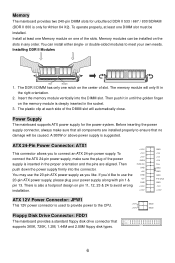
... DDR II 533 / 667 / 800 SDRAM (DDR II 800 is suggested. To operate properly, at each side of slot. or double-sided modules to the CPU. The DDR II DIMM has only one notch on the slots in until the golden finger on one DIMM slot must be installed on the... DIMM slot will only fit in the proper orientation and the pins are installed properly to connect an ATX 24-pin power supply. To connect the ATX 24-pin power supply, make sure that supports 360K, 720K, 1.2M, 1.44M and 2.88M floppy disk types. +12V +12V GND GND 6 Installing DDR II Modules Volt...
... DDR II 533 / 667 / 800 SDRAM (DDR II 800 is suggested. To operate properly, at each side of slot. or double-sided modules to the CPU. The DDR II DIMM has only one notch on the slots in until the golden finger on one DIMM slot must be installed on the... DIMM slot will only fit in the proper orientation and the pins are installed properly to connect an ATX 24-pin power supply. To connect the ATX 24-pin power supply, make sure that supports 360K, 720K, 1.2M, 1.44M and 2.88M floppy disk types. +12V +12V GND GND 6 Installing DDR II Modules Volt...
User Guide
Page 13
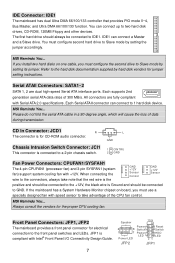
... GND. L GND 1 CINTRU 2 GND Fan Power Connectors: CPUFAN1/SYSFAN1 The 4-pin CPUFAN1 (processor fan) and 3-pin SYSFAN1 (system fan) support system cooling fan with speed sensor to Slave mode by setting its jumper. If you install two hard disks on -board, you must configure second...of 300 MB/s. When connecting the wire to the connectors, always take advantage of the CPU fan control. MSI Reminds You... MSI Reminds You... CD In Connector: JCD1 R The connector is for the proper CPU cooling fan. If the mainboard has a System Hardware Monitor chipset on one cable, ...
... GND. L GND 1 CINTRU 2 GND Fan Power Connectors: CPUFAN1/SYSFAN1 The 4-pin CPUFAN1 (processor fan) and 3-pin SYSFAN1 (system fan) support system cooling fan with speed sensor to Slave mode by setting its jumper. If you install two hard disks on -board, you must configure second...of 300 MB/s. When connecting the wire to the connectors, always take advantage of the CPU fan control. MSI Reminds You... MSI Reminds You... CD In Connector: JCD1 R The connector is for the proper CPU cooling fan. If the mainboard has a System Hardware Monitor chipset on one cable, ...
User Guide
Page 16
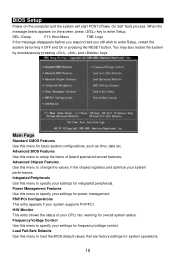
...specify your settings for system operations. 10 Frequency/Voltage Control Use this menu to change the values in the chipset registers and optimize your system supports PnP/PCI. DEL: Setup F11: Boot Menu TAB: Logo If the message disappears before you respond and you still wish to enter Setup,...Use this menu to load the BIOS default values that are factory settings for power management. Advanced BIOS Features Use this menu to specify your CPU, fan, warning for integrated peripherals. You may also restart the system by turning it OFF and On or pressing the RESET button. H/W ...
...specify your settings for system operations. 10 Frequency/Voltage Control Use this menu to change the values in the chipset registers and optimize your system supports PnP/PCI. DEL: Setup F11: Boot Menu TAB: Logo If the message disappears before you respond and you still wish to enter Setup,...Use this menu to load the BIOS default values that are factory settings for power management. Advanced BIOS Features Use this menu to specify your CPU, fan, warning for integrated peripherals. You may also restart the system by turning it OFF and On or pressing the RESET button. H/W ...


