

User Manual
Page 3
... View...2-19 Bottom Side View ...2-21 Getting Started Exclusive Functions ...3-2 NVIDIA OC Tool...3-2 SLM Setting ...3-4 Power Management ...3-5 Connecting the AC Power ...3-5 Using the Battery Power...3-7 ECO Power Saving Function 3-13 Power Management in Windows OS 3-15 Energy Saving Tips...3-17 Basic Operations ...3-18 Safety and Comfort Tips...3-18 Having a Good Work Habit...3-19 Knowing the Keyboard ...3-20 Knowing the Touchpad ...3-27 About Hard Disk Drive...3-30 Using the Optical Storage Device 3-31 Connecting the External Devices 3-34
... View...2-19 Bottom Side View ...2-21 Getting Started Exclusive Functions ...3-2 NVIDIA OC Tool...3-2 SLM Setting ...3-4 Power Management ...3-5 Connecting the AC Power ...3-5 Using the Battery Power...3-7 ECO Power Saving Function 3-13 Power Management in Windows OS 3-15 Energy Saving Tips...3-17 Basic Operations ...3-18 Safety and Comfort Tips...3-18 Having a Good Work Habit...3-19 Knowing the Keyboard ...3-20 Knowing the Touchpad ...3-27 About Hard Disk Drive...3-30 Using the Optical Storage Device 3-31 Connecting the External Devices 3-34

User Manual
Page 24
... is recommended to read this manual carefully before using this notebook. Also, this chapter provides the specification of this notebook, the finely designed notebook. and the procedures of connecting the various external devices, communication devices, and so on becoming an user of this notebook, and introduces the function buttons, quick launch sensors, connectors, LEDs and externals of installing and uninstalling the battery; Chapter 1, Preface, gives users the basic safety information...
... is recommended to read this manual carefully before using this notebook. Also, this chapter provides the specification of this notebook, the finely designed notebook. and the procedures of connecting the various external devices, communication devices, and so on becoming an user of this notebook, and introduces the function buttons, quick launch sensors, connectors, LEDs and externals of installing and uninstalling the battery; Chapter 1, Preface, gives users the basic safety information...
User Manual
Page 25
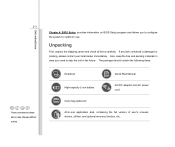
... 4, BIOS Setup, provides information on BIOS Setup program and allows you need to configure the system for optimum use. The package should contain the following items: Notebook Quick Start Manual High-capacity Li-ion battery AC/DC adapter and AC power cord Carry bag (optional) All-in the future. Unpacking First, unpack the shipping carton and check all items carefully. 2-3 These accessories listed above may change without...
... 4, BIOS Setup, provides information on BIOS Setup program and allows you need to configure the system for optimum use. The package should contain the following items: Notebook Quick Start Manual High-capacity Li-ion battery AC/DC adapter and AC power cord Carry bag (optional) All-in the future. Unpacking First, unpack the shipping carton and check all items carefully. 2-3 These accessories listed above may change without...
User Manual
Page 28
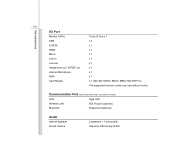
2-6 Introductions I/O Port Monitor (VGA) 15 pin D-Sub x 1 USB x 4 E-SATA x 1 HDMI x 1 Mic-in x 1 Line-in x 1 Line-out x 1 Headphone out / S/PDIF out x 1 Internal Microphone x 1 RJ45 x 1 Card Reader x 1 (XD/ SD/ SDHC/ SDXC/ MMC/ MS/ MS Pro) The supported memory cards may vary without notice. Communication Port (Items listed here may vary without notice) LAN Giga LAN Wireless LAN 802.11b/g/n (optional) Bluetooth Supported (optional) Audio Internal Speaker Sound Volume 2 speakers + 1 sub-woofer Adjust by K/B hot-key & SW
2-6 Introductions I/O Port Monitor (VGA) 15 pin D-Sub x 1 USB x 4 E-SATA x 1 HDMI x 1 Mic-in x 1 Line-in x 1 Line-out x 1 Headphone out / S/PDIF out x 1 Internal Microphone x 1 RJ45 x 1 Card Reader x 1 (XD/ SD/ SDHC/ SDXC/ MMC/ MS/ MS Pro) The supported memory cards may vary without notice. Communication Port (Items listed here may vary without notice) LAN Giga LAN Wireless LAN 802.11b/g/n (optional) Bluetooth Supported (optional) Audio Internal Speaker Sound Volume 2 speakers + 1 sub-woofer Adjust by K/B hot-key & SW

User Manual
Page 29
Yes x 1 WHQL Introductions 2-7 Video Graphics Display LCD Type Brightness Adjustment WebCam WebCam Software & BIOS USB Flash Boot BIOS Others Kensington Lock Hole Compliance Discrete 15.6" LED LCD (optional) Supported HD Camera Yes, USB floppy boot up DOS only Fast Boot Support ---
Yes x 1 WHQL Introductions 2-7 Video Graphics Display LCD Type Brightness Adjustment WebCam WebCam Software & BIOS USB Flash Boot BIOS Others Kensington Lock Hole Compliance Discrete 15.6" LED LCD (optional) Supported HD Camera Yes, USB floppy boot up DOS only Fast Boot Support ---
User Manual
Page 32
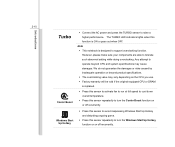
... Š Connect the AC power and press the TURBO sensor to tolerate such abnormal setting while doing overclocking. However, please make sure your components are able to raise a higher performance. Any attempt to support overclocking function. Windows Start Up Hotkey Š Press this sensor to avoid mispressing Windows Start Up Hotkey and disturbing ongoing game. Š Press this sensor repeatedly to turn the...
... Š Connect the AC power and press the TURBO sensor to tolerate such abnormal setting while doing overclocking. However, please make sure your components are able to raise a higher performance. Any attempt to support overclocking function. Windows Start Up Hotkey Š Press this sensor to avoid mispressing Windows Start Up Hotkey and disturbing ongoing game. Š Press this sensor repeatedly to turn the...

User Manual
Page 34
... (WiFi) (optional) Š Press and hold the Fn button, and then press the F8 button repeatedly to turn the Wireless LAN (WiFi) function on . Introductions 2-12 + Cinema Pro + ECO Engine (Power Saving) Š Press and hold the Fn button, and then press the F4 button to launch the Cinema Pro function. Š Press and hold the Fn button, and then press the F6 button to turn the Webcam function on...
... (WiFi) (optional) Š Press and hold the Fn button, and then press the F8 button repeatedly to turn the Wireless LAN (WiFi) function on . Introductions 2-12 + Cinema Pro + ECO Engine (Power Saving) Š Press and hold the Fn button, and then press the F4 button to launch the Cinema Pro function. Š Press and hold the Fn button, and then press the F6 button to turn the Webcam function on...
User Manual
Page 38
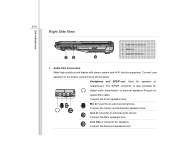
Audio Port Connectors Make high quality sound blaster with stereo system and Hi-Fi function supported. The S/PDIF connector is also provided for an external audio device. Line In: Used for digital audio transmission to the proper connectors as shown below. Connect the Center and Subwoofer speakers here. Mic In: Used for speakers. Line Out: A connector for an external microphone. Optical Drive Device 1. Connect the Surround speakers here. Connect the...
Audio Port Connectors Make high quality sound blaster with stereo system and Hi-Fi function supported. The S/PDIF connector is also provided for an external audio device. Line In: Used for digital audio transmission to the proper connectors as shown below. Connect the Center and Subwoofer speakers here. Mic In: Used for speakers. Line Out: A connector for an external microphone. Optical Drive Device 1. Connect the Surround speakers here. Connect the...
User Manual
Page 42
... utilize shielded cable outside the notebook to take advantage of the computer display. 5. Ventilator The ventilator is a new interface standard for air circulation. DO NOT block the ventilator for PCs, displays and consumer electronics devices that supports standard, enhanced and high-definition video, plus multi-channel digital audio on a single cable. 7. VGA Port The 15-pin D-sub VGA port allows you to connect an external monitor...
... utilize shielded cable outside the notebook to take advantage of the computer display. 5. Ventilator The ventilator is a new interface standard for air circulation. DO NOT block the ventilator for PCs, displays and consumer electronics devices that supports standard, enhanced and high-definition video, plus multi-channel digital audio on a single cable. 7. VGA Port The 15-pin D-sub VGA port allows you to connect an external monitor...
User Manual
Page 46
... operation or beyond CPU and system specifications may differ depending on the CPU you use the TDE - Any attempt to support overclocking function. To use . However, please make sure your components are able to raise a higher performance. The TURBO LED indicators lights when this function is replaced. 1. over-clocking function, follow the instructions below: Turbo Connect the AC power and press the TURBO sensor to tolerate such abnormal setting...
... operation or beyond CPU and system specifications may differ depending on the CPU you use the TDE - Any attempt to support overclocking function. To use . However, please make sure your components are able to raise a higher performance. The TURBO LED indicators lights when this function is replaced. 1. over-clocking function, follow the instructions below: Turbo Connect the AC power and press the TURBO sensor to tolerate such abnormal setting...

User Manual
Page 57
... mode, Presentation mode, Office mode, and Turbo Battery mode, to turn this notebook. Press and hold the Fn button. 2. Read the instructions bellow to activate the ECO Engine power saving function: 1. Gaming Mode Select this mode while playing multimedia applications To learn which power saving mode is activated presently, read the icon on the display when selected. Movie Mode Select this mode while performing game applications. Getting Started 3-13 ECO Power Saving Function (Optionally Supported) Enabling...
... mode, Presentation mode, Office mode, and Turbo Battery mode, to turn this notebook. Press and hold the Fn button. 2. Read the instructions bellow to activate the ECO Engine power saving function: 1. Gaming Mode Select this mode while playing multimedia applications To learn which power saving mode is activated presently, read the icon on the display when selected. Movie Mode Select this mode while performing game applications. Getting Started 3-13 ECO Power Saving Function (Optionally Supported) Enabling...
User Manual
Page 59
... you to control the power management features of electricity as well as following : Š the power button, Š the mouse, Š the keyboard. Then "Select a power plan" that meets your PC to sleep or hibernate mode after a period of following . 5. Getting Started 3-15 Power Management in Windows OS Power management of personal computers (PCs) and monitors has the potential to save significant amounts of your display, hard drive, and battery. The...
... you to control the power management features of electricity as well as following : Š the power button, Š the mouse, Š the keyboard. Then "Select a power plan" that meets your PC to sleep or hibernate mode after a period of following . 5. Getting Started 3-15 Power Management in Windows OS Power management of personal computers (PCs) and monitors has the potential to save significant amounts of your display, hard drive, and battery. The...

User Manual
Page 61
Getting Started 3-17 Energy Saving Tips Š Activate the ECO power saving function to manage the computer's energy consumption. Š Turn off the monitor after a period of user inactivity. Š Utilize the Fn and F12 sleep mode keys to turn into power saving mode. Š Tune the settings in Power Options under Windows OS to optimize the computer's power management. Š Always disconnect the AC power cord or uninstall the battery pack or switch off the wall socket if the computer would be left unused for a certain time to achieve zero energy consumption.
Getting Started 3-17 Energy Saving Tips Š Activate the ECO power saving function to manage the computer's energy consumption. Š Turn off the monitor after a period of user inactivity. Š Utilize the Fn and F12 sleep mode keys to turn into power saving mode. Š Tune the settings in Power Options under Windows OS to optimize the computer's power management. Š Always disconnect the AC power cord or uninstall the battery pack or switch off the wall socket if the computer would be left unused for a certain time to achieve zero energy consumption.

User Manual
Page 68
Getting Started 3-24 Enable or disable the touchpad function. + Decrease the LCD brightness. + Increase the LCD brightness. + Decrease the built-in speaker's volume. + Increase the built-in speaker's volume. + Disable the computer's audio function. + Force the computer into sleep state (depending on the system configuration). +
Getting Started 3-24 Enable or disable the touchpad function. + Decrease the LCD brightness. + Increase the LCD brightness. + Decrease the built-in speaker's volume. + Increase the built-in speaker's volume. + Disable the computer's audio function. + Force the computer into sleep state (depending on the system configuration). +
User Manual
Page 72
... basics of your display. The Mouse Properties in your Windows operating system. Unlike the traditional pointing device such as the mouse, the whole touchpad can customize the pointing device to meet your personal needs. Getting Started 3-28 Using the Touchpad Read the following description to learn how to use the standard Microsoft or IBM PS/2 driver in Control Panel allows you can change the configuration. „ Positioning and...
... basics of your display. The Mouse Properties in your Windows operating system. Unlike the traditional pointing device such as the mouse, the whole touchpad can customize the pointing device to meet your personal needs. Getting Started 3-28 Using the Touchpad Read the following description to learn how to use the standard Microsoft or IBM PS/2 driver in Control Panel allows you can change the configuration. „ Positioning and...
User Manual
Page 78
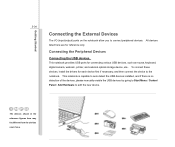
... camera, webcam, printer, and external optical storage device, ete.. Connecting the Peripheral Devices Connecting the USB devices This notebook provides USB ports for reference only. To connect these devices, install the drivers for each device first if necessary, and then connect the device to connect peripheral devices. This notebook is capable to auto detect the USB devices installed, and if there is no detection of the devices, please manually enable the USB devices by going to Start Menu / Control Panel / Add Hardware to add the new device...
... camera, webcam, printer, and external optical storage device, ete.. Connecting the Peripheral Devices Connecting the USB devices This notebook provides USB ports for reference only. To connect these devices, install the drivers for each device first if necessary, and then connect the device to connect peripheral devices. This notebook is capable to auto detect the USB devices installed, and if there is no detection of the devices, please manually enable the USB devices by going to Start Menu / Control Panel / Add Hardware to add the new device...
User Manual
Page 79
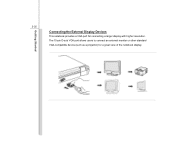
Getting Started 3-35 Connecting the External Display Devices This notebook provides a VGA port for a great view of the notebook display. The 15-pin D-sub VGA port allows users to connect an external monitor or other standard VGA-compatible device (such as a projector) for connecting a larger display with higher resolution.
Getting Started 3-35 Connecting the External Display Devices This notebook provides a VGA port for a great view of the notebook display. The 15-pin D-sub VGA port allows users to connect an external monitor or other standard VGA-compatible device (such as a projector) for connecting a larger display with higher resolution.

User Manual
Page 80
... the notebook, power on a single cable. Getting Started 3-36 This notebook provides a HDMI port for PCs, displays and consumer electronics devices that supports standard, enhanced and high-definition video, plus multi-channel digital audio on the notebook and the external display should respond by default. HDMI (High Definition Multimedia Interface) is connected to the notebook. If not, you can switch the display mode by configuring the settings in Display Properties of Windows operating system. Once the display is a new...
... the notebook, power on a single cable. Getting Started 3-36 This notebook provides a HDMI port for PCs, displays and consumer electronics devices that supports standard, enhanced and high-definition video, plus multi-channel digital audio on the notebook and the external display should respond by default. HDMI (High Definition Multimedia Interface) is connected to the notebook. If not, you can switch the display mode by configuring the settings in Display Properties of Windows operating system. Once the display is a new...
User Manual
Page 86
... service center. Additional memory module may be installed, by the authorized dealer or service center, to the section of this storage device may be upgradable and replaceable by users. To replace the battery pack, please refer to increase the performance of Using the Battery Power for details. This notebook is equipped with a high-capacity Li-ion battery pack, and the battery pack is equipped with a hard disk drive, and this notebook...
... service center. Additional memory module may be installed, by the authorized dealer or service center, to the section of this storage device may be upgradable and replaceable by users. To replace the battery pack, please refer to increase the performance of Using the Battery Power for details. This notebook is equipped with a high-capacity Li-ion battery pack, and the battery pack is equipped with a hard disk drive, and this notebook...

User Manual
Page 97
... screen as below: Enter New Password Type a maximum of the BIOS SETUP UTILITY, while User Password field only allows users to enter the BIOS SETUP UTILITY without having the authorization to make any previously set password from CMOS memory. The password typed now will be added in the menu. Select User Password to give or to abandon new password setting. Note that Supervisor Password field allows users to enter and change . You may also press [ESC] to abandon password. BIOS Setup 4-10 Security Menu Š Supervisor Password / User Password...
... screen as below: Enter New Password Type a maximum of the BIOS SETUP UTILITY, while User Password field only allows users to enter the BIOS SETUP UTILITY without having the authorization to make any previously set password from CMOS memory. The password typed now will be added in the menu. Select User Password to give or to abandon new password setting. Note that Supervisor Password field allows users to enter and change . You may also press [ESC] to abandon password. BIOS Setup 4-10 Security Menu Š Supervisor Password / User Password...


