User Guide
Page 10
... processors in the AM3 package. (For the latest information about CPU, please visit http://www.msi.com/index.php?func=cpuform2) HyperTransport ■ HyperTransport 1.0 Chipset ■ NVIDIA® Geforce 6150SE & nForce 430 chipset Memory Support ■ DDR3 800/ 1066/ 1333 SDRAM (total Max. ... more information on compatible components, please visit http://www.msi. com/index.php?func=testreport) LAN ■ Supports 10/100/1000 LAN by Realtek® RTL8111DL (GF615M-P33) ■ Or supports 10/100 LAN by Realtek® RTL8103EL (GF615M-P31) Audio ■ Chip integrated by Realtek®...
... processors in the AM3 package. (For the latest information about CPU, please visit http://www.msi.com/index.php?func=cpuform2) HyperTransport ■ HyperTransport 1.0 Chipset ■ NVIDIA® Geforce 6150SE & nForce 430 chipset Memory Support ■ DDR3 800/ 1066/ 1333 SDRAM (total Max. ... more information on compatible components, please visit http://www.msi. com/index.php?func=testreport) LAN ■ Supports 10/100/1000 LAN by Realtek® RTL8111DL (GF615M-P33) ■ Or supports 10/100 LAN by Realtek® RTL8103EL (GF615M-P31) Audio ■ Chip integrated by Realtek®...
User Guide
Page 15
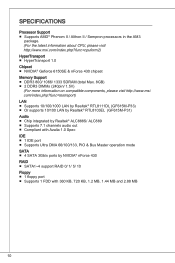
...S1+O1B.1+K2211.V+3213.V+4.133.-5V.113.2G6V1V.rP7o1.SuG81-n.rO9Gdo2.NurG0o2n#.ruR1do2n.eu+2ds2n5.+3dV2.5+4V5.GVround ATX 4-Pin Power Connector: JPWR2 This 12V power connector is used to provide power to the CPU. 2.G1.rGouronudnd 4.+31.+21V2V Important * Make sure that all the connectors are aligned. bility.... Floppy Disk Drive Connector: FDD1 This connector supports 360 KB, 720 KB, 1.2 MB, 1.44 MB or 2.88 MB floppy disk drive. 15 To connect the ATX 24-pin power supply, make sure the plug of 350 watts (and above) is inserted ...
...S1+O1B.1+K2211.V+3213.V+4.133.-5V.113.2G6V1V.rP7o1.SuG81-n.rO9Gdo2.NurG0o2n#.ruR1do2n.eu+2ds2n5.+3dV2.5+4V5.GVround ATX 4-Pin Power Connector: JPWR2 This 12V power connector is used to provide power to the CPU. 2.G1.rGouronudnd 4.+31.+21V2V Important * Make sure that all the connectors are aligned. bility.... Floppy Disk Drive Connector: FDD1 This connector supports 360 KB, 720 KB, 1.2 MB, 1.44 MB or 2.88 MB floppy disk drive. 15 To connect the ATX 24-pin power supply, make sure the plug of 350 watts (and above) is inserted ...

User Guide
Page 16
...install two IDE devices on the same cable, you must configure the drives to cable select mode or separately to take advantage of the CPU fan control. Each connector can connect to GND. Important Please do not fold the Serial ATA cable into 90-degree angle. Fan Power ... slave mode by the vendors for jumper setting instructions. the black wire is a high-speed Serial ATA interface port. IDE Connector: IDE1 This connector supports IDE hard disk drives, optical disk drives and other IDE devices. If the mainboard has a System Hardware Monitor chipset onboard, you must use a specially...
...install two IDE devices on the same cable, you must configure the drives to cable select mode or separately to take advantage of the CPU fan control. Each connector can connect to GND. Important Please do not fold the Serial ATA cable into 90-degree angle. Fan Power ... slave mode by the vendors for jumper setting instructions. the black wire is a high-speed Serial ATA interface port. IDE Connector: IDE1 This connector supports IDE hard disk drives, optical disk drives and other IDE devices. If the mainboard has a System Hardware Monitor chipset onboard, you must use a specially...
User Guide
Page 22
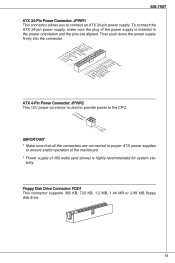
...shows the current frequency of installed CPU. This submenu shows the information of CPU/ Memory. Exit Without Saving Abandon all changes and exit setup. Read-only. Load Optimized Defaults Use this menu to load the BIOS default values that the installed CPU supported. 22 Save & Exit Setup ...Save changes to enter the sub-menu. CPU Specifications Press to CMOS and exit setup. CPU Technology Support Press to enter the sub-menu. This sub-menu shows the technologies ...
...shows the current frequency of installed CPU. This submenu shows the information of CPU/ Memory. Exit Without Saving Abandon all changes and exit setup. Read-only. Load Optimized Defaults Use this menu to load the BIOS default values that the installed CPU supported. 22 Save & Exit Setup ...Save changes to enter the sub-menu. CPU Specifications Press to CMOS and exit setup. CPU Technology Support Press to enter the sub-menu. This sub-menu shows the technologies ...

User Guide
Page 23
... to "Enabled". * Enter Windows, and select [Start]->[Settings]->[Control Panel]->[Power Options]. Adjust CPU FSB Frequency (MHz) This item allows you set to [Manual], the field is available only when the processor supports this item to [DCT 0], [DCT 1] or [Both], some fields will be working properly..., it is used to adjust CPU clock multiplier (ratio). This sub-menu displays the information of installed memory. MS...
... to "Enabled". * Enter Windows, and select [Start]->[Settings]->[Control Panel]->[Power Options]. Adjust CPU FSB Frequency (MHz) This item allows you set to [Manual], the field is available only when the processor supports this item to [DCT 0], [DCT 1] or [Both], some fields will be working properly..., it is used to adjust CPU clock multiplier (ratio). This sub-menu displays the information of installed memory. MS...
User Guide
Page 40
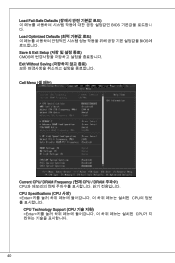
Load Fail-Safe Defaults BIOS Load Optimized Defaults BIOS Save & Exit Setup CMOS Exit Without Saving Cell Menu Current CPU/ DRAM Frequency (현재 CPU / DRAM 주파수) CPU CPU Specifications (CPU 사양)
Load Fail-Safe Defaults BIOS Load Optimized Defaults BIOS Save & Exit Setup CMOS Exit Without Saving Cell Menu Current CPU/ DRAM Frequency (현재 CPU / DRAM 주파수) CPU CPU Specifications (CPU 사양)

User Guide
Page 112
Cell Menu Load Fail-Safe Defaults BIOS Load Optimized Defaults BIOS值。 Save & Exit Setup CMOS Setup程序。 Exit Without Saving CMOS Setup Current CPU/DRAM Frequency(当前 CPU CPU CPU Specifications(CPU Enter CPU信息。 CPU Technology Support(CPU Enter CPU 112
Cell Menu Load Fail-Safe Defaults BIOS Load Optimized Defaults BIOS值。 Save & Exit Setup CMOS Setup程序。 Exit Without Saving CMOS Setup Current CPU/DRAM Frequency(当前 CPU CPU CPU Specifications(CPU Enter CPU信息。 CPU Technology Support(CPU Enter CPU 112
User Guide
Page 130
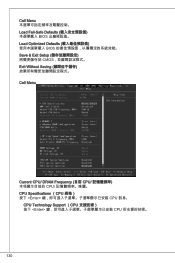
Cell Menu Load Fail-Safe Defaults BIOS Load Optimized Defaults BIOS Save & Exit Setup CMOS Exit Without Saving Cell Menu Current CPU/ DRAM Frequency (目前 CPU CPU CPU Specifications (CPU Enter CPU 訊息。 CPU Technology Support (CPU Enter CPU 130
Cell Menu Load Fail-Safe Defaults BIOS Load Optimized Defaults BIOS Save & Exit Setup CMOS Exit Without Saving Cell Menu Current CPU/ DRAM Frequency (目前 CPU CPU CPU Specifications (CPU Enter CPU 訊息。 CPU Technology Support (CPU Enter CPU 130

User Guide
Page 148
Load Fail-Safe Defaults BIOS Load Optimized Defaults BIOS Save & Exit Setup CMOS Exit Without Saving CMOS Current CPU/ DRAM Frequency(目下のCPU/ DRAM CPU CPU Specifications(CPUの仕様)
Load Fail-Safe Defaults BIOS Load Optimized Defaults BIOS Save & Exit Setup CMOS Exit Without Saving CMOS Current CPU/ DRAM Frequency(目下のCPU/ DRAM CPU CPU Specifications(CPUの仕様)


