
User Manual
Page 29
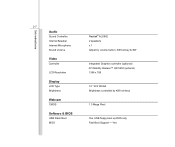
Introductions 2-7 Audio Sound Controller Internal Speaker Internal Microphone Sound Volume Video Controller LCD Resolution Display LCD Type Brightness Webcam CMOS Software & BIOS USB Flash Boot BIOS Realtek® ALC662 2 speakers x 1 Adjust by volume button, K/B hot-key & SW Integrated Graphics controller (optional) ATI Mobility Radeon™ HD 5430 (optional) 1366 x 768 14" 16:9 WXGA Brightness controlled by K/B hot-keys 1.3 Mega Pixel Yes, USB floppy boot up DOS only Fast Boot Support --- Yes
Introductions 2-7 Audio Sound Controller Internal Speaker Internal Microphone Sound Volume Video Controller LCD Resolution Display LCD Type Brightness Webcam CMOS Software & BIOS USB Flash Boot BIOS Realtek® ALC662 2 speakers x 1 Adjust by volume button, K/B hot-key & SW Integrated Graphics controller (optional) ATI Mobility Radeon™ HD 5430 (optional) 1366 x 768 14" 16:9 WXGA Brightness controlled by K/B hot-keys 1.3 Mega Pixel Yes, USB floppy boot up DOS only Fast Boot Support --- Yes
User Manual
Page 40
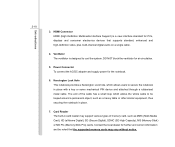
.... 4. The end of memory card, such as a heavy table or other similar equipment, thus securing the notebook in place. 7. Contact the local dealer for PCs, displays and consumer electronics devices that the supported memory cards may support various types of the cable has a small loop which allows users to cool the...
.... 4. The end of memory card, such as a heavy table or other similar equipment, thus securing the notebook in place. 7. Contact the local dealer for PCs, displays and consumer electronics devices that the supported memory cards may support various types of the cable has a small loop which allows users to cool the...

User Manual
Page 43
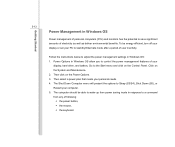
... connector is disconnected. 2. Introductions 2-21 Rear Side View 1 2 34 1. With the 56K V.90 modem, you to connect a LAN cable for a great view of the computer display. 3.
... connector is disconnected. 2. Introductions 2-21 Rear Side View 1 2 34 1. With the 56K V.90 modem, you to connect a LAN cable for a great view of the computer display. 3.

User Manual
Page 54
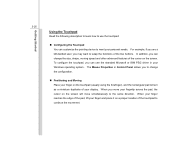
... mode while performing game applications. To learn which power saving mode is activated presently, read the icon on behalf of each mode appearing on the display when selected. Movie Mode Select this function off recurrently. 2. Gaming mode, Movie mode, Presentation mode, Office mode, and Turbo Battery mode, to activate the ECO...
... mode while performing game applications. To learn which power saving mode is activated presently, read the icon on behalf of each mode appearing on the display when selected. Movie Mode Select this function off recurrently. 2. Gaming mode, Movie mode, Presentation mode, Office mode, and Turbo Battery mode, to activate the ECO...
User Manual
Page 58
... potential to save significant amounts of electricity as well as deliver environmental benefits. Go to Sleep (S3/S4), Shut Down (S5), or Restart your display, hard drive, and battery. The Shut Down Computer menu will present the options to the Start menu and click on the Control Panel. The computer... should be energy efficient, turn off your display or set your personal needs 4. Click on the Power Options. 3. To be able to wake up from any of following: Š the power button, ...
... potential to save significant amounts of electricity as well as deliver environmental benefits. Go to Sleep (S3/S4), Shut Down (S5), or Restart your display, hard drive, and battery. The Shut Down Computer menu will present the options to the Start menu and click on the Control Panel. The computer... should be energy efficient, turn off your display or set your personal needs 4. Click on the Power Options. 3. To be able to wake up from any of following: Š the power button, ...

User Manual
Page 66
For more information of the two keys, please refer to your Windows manual or online help. „ [Fn] Key + Switch the display output mode between "insert" and "overtype" modes. Press this key to delete one character to the left of the cursor and move the following text ...
For more information of the two keys, please refer to your Windows manual or online help. „ [Fn] Key + Switch the display output mode between "insert" and "overtype" modes. Press this key to delete one character to the left of the cursor and move the following text ...
User Manual
Page 70
When you move your fingertip across the pad, the cursor on the screen will act as a miniature duplicate of your display. For example, if you are a left-handed user, you may want to the same direction. In addition, you can customize the pointing device to continue ...
When you move your fingertip across the pad, the cursor on the screen will act as a miniature duplicate of your display. For example, if you are a left-handed user, you may want to the same direction. In addition, you can customize the pointing device to continue ...
User Manual
Page 77
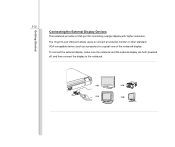
The 15-pin D-sub VGA port allows users to the notebook. To connect the external display, make sure the notebook and the external display are both powered off, and then connect the display to connect an external monitor or other standard VGA-compatible device (such as a projector) for connecting a larger display with higher resolution. Getting Started 3-32 Connecting the External Display Devices This notebook provides a VGA port for a great view of the notebook display.
The 15-pin D-sub VGA port allows users to the notebook. To connect the external display, make sure the notebook and the external display are both powered off, and then connect the display to connect an external monitor or other standard VGA-compatible device (such as a projector) for connecting a larger display with higher resolution. Getting Started 3-32 Connecting the External Display Devices This notebook provides a VGA port for a great view of the notebook display.

User Manual
Page 78
Once the display is a new interface standard for PCs, displays and consumer electronics devices that supports standard, enhanced and high-definition video, plus multi-channel digital audio on the notebook and the external display should respond by default. Alternately, you can change the display mode by configuring the settings in Display Properties of Windows operating system. If not, you can switch the display mode by pressing [Fn]+[F2]. Getting Started 3-33 HDMI (High Definition Multimedia Interface Support) is connected to the notebook, power on a single cable.
Once the display is a new interface standard for PCs, displays and consumer electronics devices that supports standard, enhanced and high-definition video, plus multi-channel digital audio on the notebook and the external display should respond by default. Alternately, you can change the display mode by configuring the settings in Display Properties of Windows operating system. If not, you can switch the display mode by pressing [Fn]+[F2]. Getting Started 3-33 HDMI (High Definition Multimedia Interface Support) is connected to the notebook, power on a single cable.
User Manual
Page 93
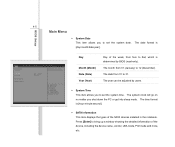
The date from 01 (January) to 12 (December). The time format is [hour:minute:second]. Š SATA Information This item displays the types of the device, including the device name, vendor, LBA mode, PIO mode and more, etc. The year can be adjusted by BIOS (read-...
The date from 01 (January) to 12 (December). The time format is [hour:minute:second]. Š SATA Information This item displays the types of the device, including the device name, vendor, LBA mode, PIO mode and more, etc. The year can be adjusted by BIOS (read-...


