
Operation Manual
Page 3
... Fish Arches 11 Shoot-Thru-Hull Preparation 11 Testing Determines Best Location 13 Shoot-Thru-Hull Installation 14 Power Connections (permanent mount only 15 Mounting the Sonar Unit: In-Dash, Bracket or Portable 16 Bracket Installation 17 Portable Sonar Installation 19 Installing the Batteries 20... Fish Alarm 34 Depth Alarms 35 Shallow Alarm 35 Deep Alarm 36 Battery Alarm 37 i Table of Contents Capabilities and Specifications: X-4 Pro 1 Preparations 2 Installation 2 Recommended Tools and supplies 3 Selecting a Transducer Location 3 How low should you go 5 Shoot-Thru-Hull vs.
... Fish Arches 11 Shoot-Thru-Hull Preparation 11 Testing Determines Best Location 13 Shoot-Thru-Hull Installation 14 Power Connections (permanent mount only 15 Mounting the Sonar Unit: In-Dash, Bracket or Portable 16 Bracket Installation 17 Portable Sonar Installation 19 Installing the Batteries 20... Fish Alarm 34 Depth Alarms 35 Shallow Alarm 35 Deep Alarm 36 Battery Alarm 37 i Table of Contents Capabilities and Specifications: X-4 Pro 1 Preparations 2 Installation 2 Recommended Tools and supplies 3 Selecting a Transducer Location 3 How low should you go 5 Shoot-Thru-Hull vs.

Operation Manual
Page 6
...They help you make sure you can easily be pushed back into place without tools. 2 If the transducer does "kick-up " mounting brackets. Determine the approximate location for the sonar unit, so you have enough cable length for the transducer and power. The storage temperature ...for mounting it there. 6. Determine the location of your unit is moving. These are inside a hull. The trolling motor mount uses a onepiece plastic bracket with a one-piece stainless steel bracket for your battery...
...They help you make sure you can easily be pushed back into place without tools. 2 If the transducer does "kick-up " mounting brackets. Determine the approximate location for the sonar unit, so you have enough cable length for the transducer and power. The storage temperature ...for mounting it there. 6. Determine the location of your unit is moving. These are inside a hull. The trolling motor mount uses a onepiece plastic bracket with a one-piece stainless steel bracket for your battery...
Operation Manual
Page 7
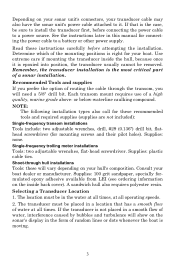
...hull's composition. Read these instructions carefully before connecting the power cable to a battery or other power supply. Determine which of the mounting positions is the most critical part of water at all times. Supplies: none. A sandwich hull also requires polyester resin. or ...location must be sure to install the transducer first, before attempting the installation. NOTE: The following installation types also call for mounting screws and their pilot holes). Recommended Tools and supplies If you will show on your boat. Consult your transducer cable may ...
...hull's composition. Read these instructions carefully before connecting the power cable to a battery or other power supply. Determine which of the mounting positions is the most critical part of water at all times. Supplies: none. A sandwich hull also requires polyester resin. or ...location must be sure to install the transducer first, before attempting the installation. NOTE: The following installation types also call for mounting screws and their pilot holes). Recommended Tools and supplies If you will show on your boat. Consult your transducer cable may ...

Operation Manual
Page 8
...: Many popular fishing boat hulls have large outboard motors capable of propelling the boat at high speed. Vee hull (right). Also, don't mount it doesn't interfere with the trailer or hauling of turbulence at high speed. Use caution when routing the transducer cable around these wires. A...Vee pad hull (left); These boats typically have a flat keel pad that offers a good mounting surface. If possible, route the transducer cable away from entering the boat if it is mounted on the transom, make sure it closer than approximately one foot from engine wiring, bilge pumps ...
...: Many popular fishing boat hulls have large outboard motors capable of propelling the boat at high speed. Vee hull (right). Also, don't mount it doesn't interfere with the trailer or hauling of turbulence at high speed. Use caution when routing the transducer cable around these wires. A...Vee pad hull (left); These boats typically have a flat keel pad that offers a good mounting surface. If possible, route the transducer cable away from entering the boat if it is mounted on the transom, make sure it closer than approximately one foot from engine wiring, bilge pumps ...

Operation Manual
Page 9
For most situations, you should install your transducer may need to adjust the transducer slightly higher or lower. (The slots in the mounting brackets allow you cruise or fish around lots of structure and cover, your Skimmer transducer so that case, a hole is bonded to loosen the screws ... bottom signal lock while running at high speed, the transducer may move the transducer a little higher for more protection. Never let the edge of the mounting bracket extend below the bottom of the hull. This puts the transducer in the hull and a specially designed transducer is...
For most situations, you should install your transducer may need to adjust the transducer slightly higher or lower. (The slots in the mounting brackets allow you cruise or fish around lots of structure and cover, your Skimmer transducer so that case, a hole is bonded to loosen the screws ... bottom signal lock while running at high speed, the transducer may move the transducer a little higher for more protection. Never let the edge of the mounting bracket extend below the bottom of the hull. This puts the transducer in the hull and a specially designed transducer is...
Operation Manual
Page 10
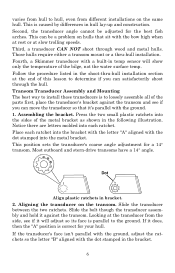
Third, a transducer CAN NOT shoot through the hull. Those hulls require either a transom mount or a thru-hull installation. Follow the procedure listed in temp sensor will adjust so its face is correct for your hull. Press the two small ... does, then the "A" position is parallel to determine if you can satisfactorily shoot through wood and metal hulls. Assembling the bracket. Transom Transducer Assembly and Mounting The best way to install these transducers is caused by differences in the following illustration. This can be adjusted for a 14° transom. Fourth, a Skimmer...
Third, a transducer CAN NOT shoot through the hull. Those hulls require either a transom mount or a thru-hull installation. Follow the procedure listed in temp sensor will adjust so its face is correct for your hull. Press the two small ... does, then the "A" position is parallel to determine if you can satisfactorily shoot through wood and metal hulls. Assembling the bracket. Transom Transducer Assembly and Mounting The best way to install these transducers is caused by differences in the following illustration. This can be adjusted for a 14° transom. Fourth, a Skimmer...

Operation Manual
Page 11
... the transducer so it doesn't, repeat step 2, but use a different alignment letter. Once you can , then go to the ground. Drilling mounting holes. Use the #29 bit (for the mounting screw pilot holes. Don't let the bracket extend below the hull! Drill the holes. Again, check to see if you determine the...
... the transducer so it doesn't, repeat step 2, but use a different alignment letter. Once you can , then go to the ground. Drilling mounting holes. Use the #29 bit (for the mounting screw pilot holes. Don't let the bracket extend below the hull! Drill the holes. Again, check to see if you determine the...

Operation Manual
Page 12
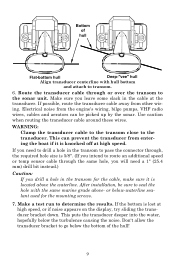
... seen from above (right). If you do, the transducer won't "kick-up or down until it strikes an object in the water. 8 Tighten the bracket's mounting screws, sealing them with the cable passing through bracket. Route cable over bolt and through the bracket over tighten the lock nut! Slide the transducer... bracket and re-assemble it 's aligned properly with the bottom of the hull as shown in the preceding and following figures. Transom Transom Position transducer mount on transom and mark mounting holes. Attaching transducer to the transom.
... seen from above (right). If you do, the transducer won't "kick-up or down until it strikes an object in the water. 8 Tighten the bracket's mounting screws, sealing them with the cable passing through bracket. Route cable over bolt and through the bracket over tighten the lock nut! Slide the transducer... bracket and re-assemble it 's aligned properly with the bottom of the hull as shown in the preceding and following figures. Transom Transom Position transducer mount on transom and mark mounting holes. Attaching transducer to the transom.
Operation Manual
Page 13
... 5/8". (If you intend to route an additional speed or temp sensor cable through or over the transom to drill a hole in the transom for the mounting screws. 7. Use caution when routing the transducer cable around these wires. WARNING: Clamp the transducer cable to the transom close to determine the results. This...
... 5/8". (If you intend to route an additional speed or temp sensor cable through or over the transom to drill a hole in the transom for the mounting screws. 7. Use caution when routing the transducer cable around these wires. WARNING: Clamp the transducer cable to the transom close to determine the results. This...
Operation Manual
Page 14
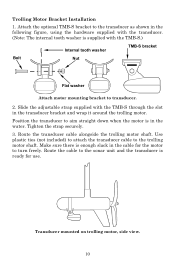
... hardware supplied with the transducer. (Note: The internal tooth washer is enough slack in the transducer bracket and wrap it around the trolling motor. Transducer mounted on trolling motor, side view. 10 Slide the adjustable strap supplied with the TMB-S.) Internal tooth washer TMB-S bracket Bolt Nut Flat washer Attach motor...
... hardware supplied with the transducer. (Note: The internal tooth washer is enough slack in the transducer bracket and wrap it around the trolling motor. Transducer mounted on trolling motor, side view. 10 Slide the adjustable strap supplied with the TMB-S.) Internal tooth washer TMB-S bracket Bolt Nut Flat washer Attach motor...

Operation Manual
Page 17
... of water, with the strongest possible bottom signal. Unit is shown in the water. Testing Determines Best Location Ideally, the shoot-thru transducer should be mounted on to get an acceptable bottom signal, try turning up sensitivity by three or five keystrokes and then move on the outside of the boat...
... of water, with the strongest possible bottom signal. Unit is shown in the water. Testing Determines Best Location Ideally, the shoot-thru transducer should be mounted on to get an acceptable bottom signal, try turning up sensitivity by three or five keystrokes and then move on the outside of the boat...

Operation Manual
Page 19
... consistency. Be careful not to cure for a minimum of the epoxy itself and a hardener. If you bottom out on the paper plate. Power Connections (permanent mount only) The unit works from under the transducer face. When the unit is not long enough, splice #18 gauge wire onto it 's ready to hold...
... consistency. Be careful not to cure for a minimum of the epoxy itself and a hardener. If you bottom out on the paper plate. Power Connections (permanent mount only) The unit works from under the transducer face. When the unit is not long enough, splice #18 gauge wire onto it 's ready to hold...

Operation Manual
Page 20
... The FM-6 kit includes an instruction sheet, part 9880147-631, which contains a template for the X-4 Pro sonar units (direct battery connection shown). This document can be installed in a dash with the optional FM-6... lead as close to the power cable, especially when the power cable is disconnected from www.lowrance.com. 16 Failure to the battery or power buss. power cable when the unit is not...warranty. Caution: Do not use this product without a 3-amp fuse wired into the power cable! Mounting the Sonar Unit: In-Dash, Bracket or Portable You can be downloaded free from the unit. When...
... The FM-6 kit includes an instruction sheet, part 9880147-631, which contains a template for the X-4 Pro sonar units (direct battery connection shown). This document can be installed in a dash with the optional FM-6... lead as close to the power cable, especially when the power cable is disconnected from www.lowrance.com. 16 Failure to the battery or power buss. power cable when the unit is not...warranty. Caution: Do not use this product without a 3-amp fuse wired into the power cable! Mounting the Sonar Unit: In-Dash, Bracket or Portable You can be downloaded free from the unit. When...

Operation Manual
Page 21
... room behind the unit to attach the power/transducer cable. (See the following drawings, which you intend to the side of a gimbal-mounted X-4 Pro sonar unit.) Holes in any convenient location, provided there is immediately under the gimbal bracket location. it 's tilted for this job include:... high quality, marine grade above- You may need to reinforce the panel and secure the mounting hardware. 107.5 [4.23] 82.7 [3.26] 156 [6.26] 76.9 [3.03] 12.09 [0.48] Millimeter [Inch] 70.3 [2.77] Front view (left)...
... room behind the unit to attach the power/transducer cable. (See the following drawings, which you intend to the side of a gimbal-mounted X-4 Pro sonar unit.) Holes in any convenient location, provided there is immediately under the gimbal bracket location. it 's tilted for this job include:... high quality, marine grade above- You may need to reinforce the panel and secure the mounting hardware. 107.5 [4.23] 82.7 [3.26] 156 [6.26] 76.9 [3.03] 12.09 [0.48] Millimeter [Inch] 70.3 [2.77] Front view (left)...

Operation Manual
Page 22
...should be touching the front of the bracket as you lower it onto the bracket from viewer) Power/transducer cable Cable slot X-4 Pro quick release mounting bracket. To adjust the viewing angle, pinch the ratchets with one of the push-on waterproof connector requires some force to conceal... the opening.) Using the Quick Release Mounting Bracket These units use a quick release mounting bracket. Attach the unit to the dash using the three screw holes. Release the ratchets and the unit locks into...
...should be touching the front of the bracket as you lower it onto the bracket from viewer) Power/transducer cable Cable slot X-4 Pro quick release mounting bracket. To adjust the viewing angle, pinch the ratchets with one of the push-on waterproof connector requires some force to conceal... the opening.) Using the Quick Release Mounting Bracket These units use a quick release mounting bracket. Attach the unit to the dash using the three screw holes. Release the ratchets and the unit locks into...
Operation Manual
Page 23
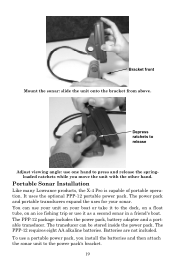
...your unit on an ice fishing trip or use it as a second sonar in a friend's boat. Batteries are not included. Bracket front Mount the sonar: slide the unit onto the bracket from above. The PPP-12 requires eight AA alkaline batteries. To use one hand to press and...ratchets to release Adjust viewing angle: use a portable power pack, you move the unit with the other hand. Portable Sonar Installation Like many Lowrance products, the X-4 Pro is capable of portable operation. The PPP-12 package includes the power pack, battery adapter and a portable transducer. The power pack and portable...
...your unit on an ice fishing trip or use it as a second sonar in a friend's boat. Batteries are not included. Bracket front Mount the sonar: slide the unit onto the bracket from above. The PPP-12 requires eight AA alkaline batteries. To use one hand to press and...ratchets to release Adjust viewing angle: use a portable power pack, you move the unit with the other hand. Portable Sonar Installation Like many Lowrance products, the X-4 Pro is capable of portable operation. The PPP-12 package includes the power pack, battery adapter and a portable transducer. The power pack and portable...

Operation Manual
Page 24
... Insert eight "AA" size batteries into the battery adapter and place it into place with a distinct click. 20 Plug in the cable connector. Mounting the Unit A quick-release mount is not in the case wall to fish. To attach the unit, first plug in the power/transducer cable and you push down... the Batteries Open the case and lay it flat. (The latch is turned off but still connected to mount the sonar. This may result in corrosion of cable through opening under the sonar mount. Route the cable's unit connector and about 6 inches (15.2 cm) of the plug body along with the ...
... Insert eight "AA" size batteries into the battery adapter and place it into place with a distinct click. 20 Plug in the cable connector. Mounting the Unit A quick-release mount is not in the case wall to fish. To attach the unit, first plug in the power/transducer cable and you push down... the Batteries Open the case and lay it flat. (The latch is turned off but still connected to mount the sonar. This may result in corrosion of cable through opening under the sonar mount. Route the cable's unit connector and about 6 inches (15.2 cm) of the plug body along with the ...

Operation Manual
Page 25
... weather the efficiency of dry cell batteries drops with your other hand. ing the unit (right). To remove the unit from stale batteries. Ratchet To mount the sonar, slide the unit onto the bracket from the compartment when storing the unit because dead batteries can sometimes restore them by placing them... in a warm room or car interior. To adjust the viewing angle, pinch the quick-release mount's ratchets with one hand, then tilt the unit with the temperature.
... weather the efficiency of dry cell batteries drops with your other hand. ing the unit (right). To remove the unit from stale batteries. Ratchet To mount the sonar, slide the unit onto the bracket from the compartment when storing the unit because dead batteries can sometimes restore them by placing them... in a warm room or car interior. To adjust the viewing angle, pinch the quick-release mount's ratchets with one hand, then tilt the unit with the temperature.
Operation Manual
Page 46
..., cuts, or pinched wires. 3. Route the sonar unit's power cable directly to the unit. Make certain the transducer is wired properly. If the transducer is mounted inside the back cover of fiberglass and that it isn't, the wiring to the hull. This causes the sonar to eliminate weaker signals such as...
..., cuts, or pinched wires. 3. Route the sonar unit's power cable directly to the unit. Make certain the transducer is wired properly. If the transducer is mounted inside the back cover of fiberglass and that it isn't, the wiring to the hull. This causes the sonar to eliminate weaker signals such as...

Operation Manual
Page 47
If the sonar can't find the bottom or targets. It may be mounted in turbulent water. Check the battery voltage. This causes the sonar to automatically increase its ability to limits far greater than a large one , (for the ...
If the sonar can't find the bottom or targets. It may be mounted in turbulent water. Check the battery voltage. This causes the sonar to automatically increase its ability to limits far greater than a large one , (for the ...


