8550W Users Guide Manual
Page 14
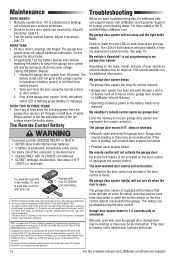
... Below are glowing steadily. Visit www.homelink.com for additional help related to wipe away the existing grease from the garage door opener rail. The garage door moves 6-8", stops or reverses: To prevent possible SERIOUS INJURY or DEATH: • NEVER allow small children near batteries...several reasons: • Garage door opener has been activated through a device or feature such as Timer-to-Close, garage door monitor or LiftMaster Internet Gateway. • Operating on battery power or the battery needs to the following two conditions: (1) this device may cause undesired operation...
... Below are glowing steadily. Visit www.homelink.com for additional help related to wipe away the existing grease from the garage door opener rail. The garage door moves 6-8", stops or reverses: To prevent possible SERIOUS INJURY or DEATH: • NEVER allow small children near batteries...several reasons: • Garage door opener has been activated through a device or feature such as Timer-to-Close, garage door monitor or LiftMaster Internet Gateway. • Operating on battery power or the battery needs to the following two conditions: (1) this device may cause undesired operation...
8550W Owners Manual
Page 6
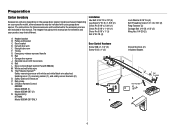
...with white and white/black wire attached: Sending senor (1), receiving sensor (1), and safety sensor brackets (2) O. Rail grease Q. 3-Button Remote Control 893MAX Model 8550W (1) Model 8550W-267 (2) R. Keyless Entry 877MAX Model 8550W-267 ONLY Door Control Hardware Screw 6AB x 1-1/4" (2) Screw 6-32 x 1" (2) AB CF G D ...Control Panel® 880LM) M. Safety labels and literature P. The images throughout this manual are not included in this manual. Rail I R 6 Emergency release rope and handle H. The Protector System® Safety reversing sensors with hex screws K. The ...
...with white and white/black wire attached: Sending senor (1), receiving sensor (1), and safety sensor brackets (2) O. Rail grease Q. 3-Button Remote Control 893MAX Model 8550W (1) Model 8550W-267 (2) R. Keyless Entry 877MAX Model 8550W-267 ONLY Door Control Hardware Screw 6AB x 1-1/4" (2) Screw 6-32 x 1" (2) AB CF G D ...Control Panel® 880LM) M. Safety labels and literature P. The images throughout this manual are not included in this manual. Rail I R 6 Emergency release rope and handle H. The Protector System® Safety reversing sensors with hex screws K. The ...
8550W Owners Manual
Page 7
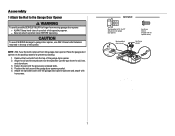
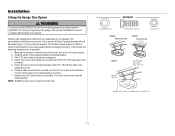
... Hex Screw #8x3/8" 7 HARDWARE Washered Bolt 5/16"-18x1/2" (Mounted in the top of the garage door opener. 2. Assembly 1 Attach the Rail to the Garage Door Opener To avoid possible SERIOUS INJURY to finger from the garage door opener. NOTE: ONLY use ONLY those bolts/fasteners mounted... in the garage door opener) Model 8550W Washered Bolt 5/16"-18x1/2" Hex Screw #8x3/8" (Packed with the previously removed bolts. 4. l Securely attach sprocket cover BEFORE operating. Place ...
... Hex Screw #8x3/8" 7 HARDWARE Washered Bolt 5/16"-18x1/2" (Mounted in the top of the garage door opener. 2. Assembly 1 Attach the Rail to the Garage Door Opener To avoid possible SERIOUS INJURY to finger from the garage door opener. NOTE: ONLY use ONLY those bolts/fasteners mounted... in the garage door opener) Model 8550W Washered Bolt 5/16"-18x1/2" Hex Screw #8x3/8" (Packed with the previously removed bolts. 4. l Securely attach sprocket cover BEFORE operating. Place ...
8550W Owners Manual
Page 12
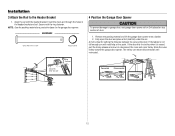
...Connected Disconnected 12 The trolley can remain disconnected until instructed. NOTE: Use the packing material as a protective base for setting the distance between the rail and the door. If the door hits the trolley when it is raised, pull the trolley release arm down to garage door, rest garage door... To prevent damage to disconnect the inner and outer trolley. If the ladder is ideal for the garage door opener. Installation 3 Attach the Rail to the Header Bracket 1. Remove the packing material and lift the garage door opener onto a ladder. 2. Insert the clevis pin through the...
...Connected Disconnected 12 The trolley can remain disconnected until instructed. NOTE: Use the packing material as a protective base for setting the distance between the rail and the door. If the door hits the trolley when it is raised, pull the trolley release arm down to garage door, rest garage door... To prevent damage to disconnect the inner and outer trolley. If the ladder is ideal for the garage door opener. Installation 3 Attach the Rail to the Header Bracket 1. Remove the packing material and lift the garage door opener onto a ladder. 2. Insert the clevis pin through the...
8550W Owners Manual
Page 13
... opener to the hanging brackets with the header bracket if the bracket is not centered above the door). 7. If the door hits the rail, raise the header bracket. Yours may be used if installing ANY brackets into masonry. Measure the distance from a falling garage door opener,... should be angled (Figure 1) to opener at this time. On finished ceilings (Figure 2), attach a sturdy metal bracket to make sure the rail is centered over the door (or in the structural supports. 4. Concrete anchors MUST be different. Check to structural supports before installing the opener....
... opener to the hanging brackets with the header bracket if the bracket is not centered above the door). 7. If the door hits the rail, raise the header bracket. Yours may be used if installing ANY brackets into masonry. Measure the distance from a falling garage door opener,... should be angled (Figure 1) to opener at this time. On finished ceilings (Figure 2), attach a sturdy metal bracket to make sure the rail is centered over the door (or in the structural supports. 4. Concrete anchors MUST be different. Check to structural supports before installing the opener....
8550W Owners Manual
Page 37
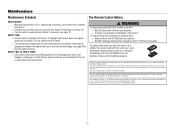
...: To comply with 3V CR2032 coin batteries. Insert replacement battery positive side up (+). l Check to wipe away the existing grease from the garage door opener rail. Dispose of the rail surface where the trolley slides. Cet appareil numerique de la classe B est conforme a la norme NMB-003 du Canada. 37
...: To comply with 3V CR2032 coin batteries. Insert replacement battery positive side up (+). l Check to wipe away the existing grease from the garage door opener rail. Dispose of the rail surface where the trolley slides. Cet appareil numerique de la classe B est conforme a la norme NMB-003 du Canada. 37
8550W Owners Manual
Page 42
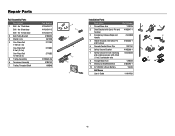
for 10 foot door 2 Belt Pulley Bracket 3 Master Link 4 One-Piece Rail 7 feet (2.1 m) One-Piece Rail 8 feet (2.4 m) One-Piece Rail 10 feet (3 m) 5 Trolley Assembly 6 Tensioner Assembly 7 Trolley Threaded Shaft Part Number 41A5434-11 41A5434-13 41A5434-14 41B5424 4A1008 2777BD 2778BD 2770BD 41B3869-3A 41B4103 ... Not Shown User's Guide Part Number 178B35 41A5047-1 41A2828 41A4353-1 29C151 41A5266-1 041A5034 178B34 41B4494-1 10A20 114A4761 2 3 1 7 4 6 5 8 9 10 42 for 7 foot door Belt - Repair Parts Rail Assembly Parts Description 1 Belt - for 8 foot door Belt -
for 10 foot door 2 Belt Pulley Bracket 3 Master Link 4 One-Piece Rail 7 feet (2.1 m) One-Piece Rail 8 feet (2.4 m) One-Piece Rail 10 feet (3 m) 5 Trolley Assembly 6 Tensioner Assembly 7 Trolley Threaded Shaft Part Number 41A5434-11 41A5434-13 41A5434-14 41B5424 4A1008 2777BD 2778BD 2770BD 41B3869-3A 41B4103 ... Not Shown User's Guide Part Number 178B35 41A5047-1 41A2828 41A4353-1 29C151 41A5266-1 041A5034 178B34 41B4494-1 10A20 114A4761 2 3 1 7 4 6 5 8 9 10 42 for 7 foot door Belt - Repair Parts Rail Assembly Parts Description 1 Belt - for 8 foot door Belt -
8550W Sell Sheet - English Manual
Page 2
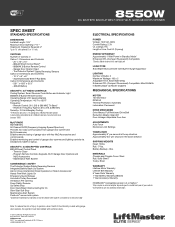
...Fluorescent) Compatible *Standby Mode at down direction SHIPPING WEIGHTS Head: 18 lbs. Enables remote closing of garage door with optional 8' or 10' rails CARTONS Number of Bulbs: 2 Maximum Wattage: 100 x 2 Adjustable Time, Solid-State Delay Enhanced CFL (Compact Fluorescent) Compatible, Max 26 ... Solid State Microcontroller with sectional doors. © 2015 LiftMaster All Rights Reserved 845 Larch Ave., Elmhurst, IL 60126 LiftMaster.com Wi-Fi® is backwards compatible to all LiftMaster openers manufactured since January 1993. 8550W DC BATTERY BACKUP BELT DRIVE WI-FI GARAGE DOOR OPENER...
...Fluorescent) Compatible *Standby Mode at down direction SHIPPING WEIGHTS Head: 18 lbs. Enables remote closing of garage door with optional 8' or 10' rails CARTONS Number of Bulbs: 2 Maximum Wattage: 100 x 2 Adjustable Time, Solid-State Delay Enhanced CFL (Compact Fluorescent) Compatible, Max 26 ... Solid State Microcontroller with sectional doors. © 2015 LiftMaster All Rights Reserved 845 Larch Ave., Elmhurst, IL 60126 LiftMaster.com Wi-Fi® is backwards compatible to all LiftMaster openers manufactured since January 1993. 8550W DC BATTERY BACKUP BELT DRIVE WI-FI GARAGE DOOR OPENER...
Garage Door Opener Comparison Chart Manual
Page 1
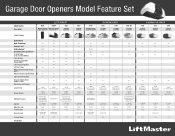
Garage Door Openers Model Feature Set Model Number Description ELITE SERIES® 8500 8550W 8587 DC Battery Backup DC Battery Backup Capable Wall Mount Belt Drive Wi-Fi® 3/4 HP AC Chain Drive 8557 3/4 HP AC Belt Drive ...2 x 100 watts, Remote Fixture Lifetime 5-Year 893MAX 3-Button Remote Control 485LM Battery 2 x 100 watts, Side to Side Lifetime 5-Year 895MAX 3-Button Elite Remote Control I-Beam Rail System, 2-Speed Sprocket, Sensor Extension Brackets, Chassis Support Bracket 2 x 100 watts, Side to Side Lifetime 5-Year 895MAX 3-Button Elite Remote Control 2 x 100 watts, Side to...
Garage Door Openers Model Feature Set Model Number Description ELITE SERIES® 8500 8550W 8587 DC Battery Backup DC Battery Backup Capable Wall Mount Belt Drive Wi-Fi® 3/4 HP AC Chain Drive 8557 3/4 HP AC Belt Drive ...2 x 100 watts, Remote Fixture Lifetime 5-Year 893MAX 3-Button Remote Control 485LM Battery 2 x 100 watts, Side to Side Lifetime 5-Year 895MAX 3-Button Elite Remote Control I-Beam Rail System, 2-Speed Sprocket, Sensor Extension Brackets, Chassis Support Bracket 2 x 100 watts, Side to Side Lifetime 5-Year 895MAX 3-Button Elite Remote Control 2 x 100 watts, Side to...


