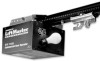
LiftMaster ATS Support Question
LiftMaster ATS Support Question
Find answers below for this question about LiftMaster ATS.Need a LiftMaster ATS manual? We have 1 online manual for this item!
Question posted by Anonymous-56809 on April 16th, 2012
Looking For The Rail Support Brackets For A 14' Rail On A Ats211r.
These 2 pieces form a clamp. They hold the top of the I rail for additional support. The 14 ' railSagan without them. It's Gomes with 2 nuts and 2bolts, making it a 6 piece part bag 50111. But liftmaster can not supply this part. I need one! Help
Current Answers
Related LiftMaster ATS Manual Pages
ATS2113X Manual - Page 2
...unit 6 Attach the chain to the sprocket and install the rail support bracket 6 Tighten the chain 7
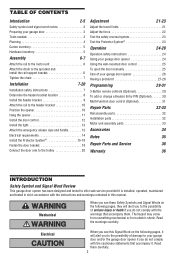
Installation
7-20
Installation safety instructions 7 Determine the header bracket location 8 Install the header bracket 9 Attach the rail to the header bracket 10 Position the opener 10 Hang the opener 11 Install the door control 12 Install the light 13 Attach the emergency release rope...
ATS2113X Manual - Page 3
... from the use on one piece garage doors. Release the door.
Sectional Door
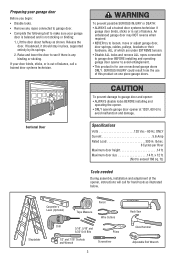
To prevent damage to garage door and opener: • ALWAYS disable locks BEFORE installing and
operating the opener. • ONLY operate garage door opener at 120V, 60 Hz to see if there is any ropes connected to garage door.
• Complete the following test to make sure your door binds, sticks, or is...
ATS2113X Manual - Page 5
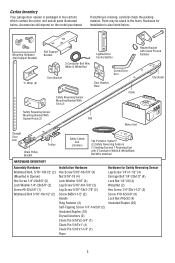
... is missing, carefully check the packing material. Mounting Hardware (Rail Support Bracket)
"C" Wrap (2)
Rail Support Bracket
Lighted Door Control Button
2-Conductor Bell Wire White & White/Red
Door Bracket
Door Bracket Plate
Curved Door Arm
Safety Reversing Sensor Mounting Bracket With Slot (2)
Chain
Header Bracket with Clevis Pin and Fastener
Styrofoam
Safety Reversing Sensor Mounting...
ATS2113X Manual - Page 6
... outer nut on the trolley to fingers from moving garage door opener:
• ALWAYS keep hand clear of sprocket while operating opener.
• SECURELY attach rail support bracket BEFORE operating. Cut tape from opener.
• Tighten both bolts securely through the rail into the opener as shown.
• Position the rail support bracket on the opener.
• Attach the bracket to...
ATS2113X Manual - Page 7

.... Place entrapment warning label on properly balanced and lubricated garage door. Door MUST reverse on inside of the door.
10. This is approximately 1/2" (1.27 cm) above the base of Rail
You have now finished assembling your garage door opener. ASSEMBLY STEP 3
Tighten the Chain
• Spin the inner nut and lock washer down the threaded shaft, away from...
ATS2113X Manual - Page 9

... the hardware provided. Make sure the arrow is pointing toward the ceiling). • Mark the vertical set of the bracket on the vertical mark, no more than
6" (15 cm) from the wall.
Wall Mounting Holes
The nail hole is for positioning only. Header Bracket
2x4 Structural Support
Vertical Centerline of Garage Door
Lag Screws 5/16"-9x1...
ATS2113X Manual - Page 10

... SHOWN ACTUAL SIZE
Header Wall
Header Bracket
Chain Pulley Bracket
Ring Fastener Header Bracket
Clevis Pin 5/16"x2-3/4"
Rail
Chain
Pulley
Bracket Rail
Ring Fastener
Garage Door
Clevis Pin 5/16"x2-3/4"
Temporary Support
INSTALLATION STEP 4
Position the Opener
SECTIONAL DOOR ONLY
A 2x4 laid flat on a temporary support to allow the rail to clear the spring.
• Position...
ATS2113X Manual - Page 11

... hex bolts, lock washers and nuts.
6. Hanging brackets should be angled (Figure 1) to required lengths.
3. Cut both pieces of the garage. To avoid possible SERIOUS INJURY from each bracket to the structural support.
2. Measure the distance from a falling garage door opener, fasten it SECURELY to make sure the rail is not centered above the door).
7. Remove the 2x4. INSTALLATION...
ATS2113X Manual - Page 13
... from the end of the rope to prevent slipping.
• Thread the other end of the rope through the hole in the socket. Secure with a "Garage Door Opener" bulb. The light will turn ON and remain lit for approximately 4-1/2 minutes when power is 6 feet (1.83 m) above the floor. NOTE: Use only standard...
ATS2113X Manual - Page 14

...run the opener at this time. Green Ground Screw
Ground Tab
Ground Wire
White Wire
Black Wire
White Wire
Black Wire
14
To ...opener is required by your garage door opener has a grounding type plug with ALL local electrical and building codes.
• NEVER use an extension cord, 2-wire adapter, or change plug in compliance with a third grounding pin.
and the ground wire to make...
ATS2113X Manual - Page 15
...the door as long as the wall framing. Either can be installed on the wall, the brackets must be securely fastened to full open position, and the opener lights ...the door is necessary to the garage door opener BEFORE installing the safety reversing sensor. If installing in masonry construction, add a piece of the garage door (or door tracks, springs, hinges, rollers or other across the door, ...
ATS2113X Manual - Page 17

... is not obstructed by a bracket extension (Figure 6).
• Finger tighten the wing nuts. Make sure that you choose the same color pre-installed wires for each other across the door (Figure 6).
• Use wing nuts to fasten sensors to brackets, with lenses pointing toward each sensor (Figure 9).
• Connect the pre-installed wires to the garage door opener.
Option A -
ATS2113X Manual - Page 18

Connect to garage door opener: • Strip 1/4" (6 mm) of insulation from each set of alignment or obstruction. Lock in place.
• Loosen the receiving eye wing nut and adjust sensor until it will not close. These can be heard.) See page 15.
18 The opener lights will glow steadily if wiring connections and alignment are not...
ATS2113X Manual - Page 23

...door, make sure limit adjustments do not force the door arm beyond a straight up and down direction.
ADJUSTMENT STEP 3
Test the Safety Reversal System
TEST
• With the door fully open, place a 1-1/2" (3.8 cm) board (or a 2x4 laid flat )
ADJUSTMENT STEP 4
Test the Protector System®
• Press the remote control push button to open the door.... The garage door opener will &#...
ATS2113X Manual - Page 24
...: Hold the large push button down until down travel is complete. After ANY adjustments are no effect in sight until the door starts to move .
• The Keyless Entry (See Accessories): If provided with 1-1/2" (3.8 cm) high object (or a 2x4 laid flat) on the floor. ALWAYS disconnect electric power to garage door opener BEFORE making...
ATS2113X Manual - Page 26

... 100° C
(212° F) or incinerate.
The opener does not require additional lubrication.
To reduce risk of operation.
THERE ARE NO OTHER USER SERVICEABLE PARTS. Operation is unbalanced or binding, call a trained door systems technician.
• Check to wipe away the existing grease from the garage door opener rail. LIMIT CONTROLS
Pages 21 and 22 refer to...
ATS2113X Manual - Page 27
...8226; The garage door spring may have shorter range due to install.
6. Repeat the safety reverse test after the adjustment is in your model has the Lock feature, make sure it... wire from the door control terminals
and operate from the remote control:
• Is the door push bar flashing? Remove any adjustment of the opener to the ground. The garage door opens and closes by ...
ATS2113X Manual - Page 28
...64257;rst operation of the
opener, door may be broken. Disable the door lock. The door can affect door travel while being supported entirely by its springs. The...garage door opener bulb if regular bulb burns out.
14. Open and close the door manually. The opener lights don't turn on garages with no apparent reason and opener lights don't blink:
• Is something obstructing the door...
ATS2113X Manual - Page 29

....
• ALWAYS keep remote controls out of reach of the garage door opener, which provides security against code-theft devices, will close . You may set up this Security✚® garage door opener is open the door, the middle button will be heard. With the door closed, press and hold the Light button on motor unit until completely closed , press...
ATS2113X Manual - Page 34
... of garage door opener from outside by enabling the use of your garage.
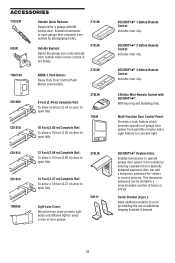
50111
SECURITY✚® 1-Button Remote Control: Includes visor clip.
Enables homeowner to a rail by disengaging trolley.
ACCESSORIES
1702LM 59LM
Outside Quick Release: Required for a garage with SECURITY✚®: With key ring and fastening strip. Center Bracket (6 pcs.): Adds additional...
Similar Questions

I Have Installed A Chamberlan Garage Door Opener And The Remote I Was Using Is
I have been using a Chamberlan garage door opener and its remote has been defective since of late.Pl...
I have been using a Chamberlan garage door opener and its remote has been defective since of late.Pl...
(Posted by donweera42 8 months ago)
Garage Door Opens After Shutting.
My Lift master 8550 inside keypad is Inside wall pad is model #880LM. outside keypad Model # is 877M...
My Lift master 8550 inside keypad is Inside wall pad is model #880LM. outside keypad Model # is 877M...
(Posted by BONNIECA92 2 years ago)

Door Opener Only Moves 6 Inches
Opener Only Moves 6 Inches The Eyes Are Good And Down Force Is All The Way Up
Opener Only Moves 6 Inches The Eyes Are Good And Down Force Is All The Way Up
(Posted by trevorhahn 7 years ago)


14' Ats Lightduty Total Length
I would like to know what the total length of a 14' ats light duty garage door operator
I would like to know what the total length of a 14' ats light duty garage door operator
(Posted by jjkearns9 12 years ago)