
8355 Manual
Page 1
... garage door opener is located on a one-piece door, visit www.liftmaster.com for future reference: Serial Number: . Write down the following information for installation instructions. PREMIUM Series Belt Drive Garage Door Opener Model 8355 - 1/2 hp FOR RESIDENTIAL USE ONLY ■ Please read this manual... 23-25 Operation 26 Features 27 Door Control 28-29 Remote Control 30-31 To Erase the Memory 31 To Open the Door Manually . . . . . 32 Maintenance 32 Troubleshooting 33-34 Accessories 35 Warranty 36 Repair Parts 37-38 www.liftmaster.com The Chamberlain Group, Inc. 845 Larch...
... garage door opener is located on a one-piece door, visit www.liftmaster.com for future reference: Serial Number: . Write down the following information for installation instructions. PREMIUM Series Belt Drive Garage Door Opener Model 8355 - 1/2 hp FOR RESIDENTIAL USE ONLY ■ Please read this manual... 23-25 Operation 26 Features 27 Door Control 28-29 Remote Control 30-31 To Erase the Memory 31 To Open the Door Manually . . . . . 32 Maintenance 32 Troubleshooting 33-34 Accessories 35 Warranty 36 Repair Parts 37-38 www.liftmaster.com The Chamberlain Group, Inc. 845 Larch...
8355 Manual
Page 3
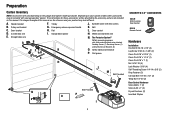
Pulley and bracket C. Rail grease H L M Not Provided J Not Provided N O P I . Rail I SECURITY✚ 2.0TM ACCESSORIES 882LM Multi-Function Door Control 893LM Remote Control Hardware Installation Hex Bolt 5/16"-18 x 7/8" (4) Lag Screw 5/16"-9 x 1-5/8" (2) Clevis Pin 5/16" x 2-3/4" (1) Clevis Pin 5/16" x 1-1/4" (1) Clevis Pin 5/16" x 1" (1) Nut 5/16"-18 (4) Lock Washer 5/16" (4) Self-...
Pulley and bracket C. Rail grease H L M Not Provided J Not Provided N O P I . Rail I SECURITY✚ 2.0TM ACCESSORIES 882LM Multi-Function Door Control 893LM Remote Control Hardware Installation Hex Bolt 5/16"-18 x 7/8" (4) Lag Screw 5/16"-9 x 1-5/8" (2) Clevis Pin 5/16" x 2-3/4" (1) Clevis Pin 5/16" x 1-1/4" (1) Clevis Pin 5/16" x 1" (1) Nut 5/16"-18 (4) Lock Washer 5/16" (4) Self-...

8355 Manual
Page 11
... may overheat the end panel or light socket. • DO NOT use short neck or specialty light bulbs. NOTE: If it is clear of your remote control(s). 6.3 Rotate the lens up . Ensure the emergency release rope and handle are above the floor, avoiding contact with a knot. Do not use LED bulbs as...
... may overheat the end panel or light socket. • DO NOT use short neck or specialty light bulbs. NOTE: If it is clear of your remote control(s). 6.3 Rotate the lens up . Ensure the emergency release rope and handle are above the floor, avoiding contact with a knot. Do not use LED bulbs as...
8355 Manual
Page 14
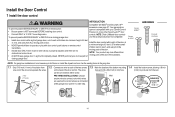
...door. The wires hole and drill a 5/32 inch (4 mm) hole. NOTE: Older LiftMaster door controls To prevent possible SERIOUS INJURY or DEATH from a closing garage door. Install the door control within sight of garage door, out of reach of children at the garage door opener ... inch (3 mm) to protrude from the wall. Install the Door Control 1 Install the door control INTRODUCTION Compatible with door control push buttons or remote control transmitters. • Activate door ONLY when it is compatible with up to 2 Smart Control Panels or 4 of any two wires to connect, note which wires...
...door. The wires hole and drill a 5/32 inch (4 mm) hole. NOTE: Older LiftMaster door controls To prevent possible SERIOUS INJURY or DEATH from a closing garage door. Install the door control within sight of garage door, out of reach of children at the garage door opener ... inch (3 mm) to protrude from the wall. Install the Door Control 1 Install the door control INTRODUCTION Compatible with door control push buttons or remote control transmitters. • Activate door ONLY when it is compatible with up to 2 Smart Control Panels or 4 of any two wires to connect, note which wires...
8355 Manual
Page 24
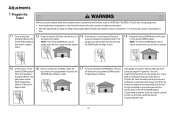
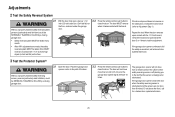
... 1.7 Press and release the DOWN Button. Adjustment Button. If you are aligned and unobstructed, cycle the door through a complete up and down cycle using the remote control or the UP and DOWN buttons. NOTE: The UP and DOWN Buttons can be tested. When the sensors are unable to page 22). Door MUST...
... 1.7 Press and release the DOWN Button. Adjustment Button. If you are aligned and unobstructed, cycle the door through a complete up and down cycle using the remote control or the UP and DOWN buttons. NOTE: The UP and DOWN Buttons can be tested. When the sensors are unable to page 22). Door MUST...
8355 Manual
Page 25
...properly installed safety reversal system, persons (particularly small children) could be SERIOUSLY INJURED or KILLED by a closing garage door. 3.2 Press the remote control push button to close the door. The garage door opener will flash 10 times. The door MUST reverse when it makes contact with the...board and open , place a 1-1/2 inch (3.8 cm) board (or a 2x4 laid flat) on the floor, centered under the garage door. 2.2 Press the remote control push button to close the door 3 or 4 times to Adjustment Step 1). Door MUST reverse on contact with 1-1/2" (3.8 cm) high object (or 2x4 laid ...
...properly installed safety reversal system, persons (particularly small children) could be SERIOUSLY INJURED or KILLED by a closing garage door. 3.2 Press the remote control push button to close the door. The garage door opener will flash 10 times. The door MUST reverse when it makes contact with the...board and open , place a 1-1/2 inch (3.8 cm) board (or a 2x4 laid flat) on the floor, centered under the garage door. 2.2 Press the remote control push button to close the door 3 or 4 times to Adjustment Step 1). Door MUST reverse on contact with 1-1/2" (3.8 cm) high object (or 2x4 laid ...
8355 Manual
Page 26
... knot becomes untied, you could move unexpectedly. Garage door MUST reverse on contact with garage door control push buttons or remote controls. 3. ALWAYS KEEP GARAGE DOOR PROPERLY BALANCED (see page 2). To be tested every month. ALWAYS keep remote controls out of reach of persons and obstructions. 8. NO ONE SHOULD GO UNDER A STOPPED, PARTIALLY OPENED DOOR...
... knot becomes untied, you could move unexpectedly. Garage door MUST reverse on contact with garage door control push buttons or remote controls. 3. ALWAYS KEEP GARAGE DOOR PROPERLY BALANCED (see page 2). To be tested every month. ALWAYS keep remote controls out of reach of persons and obstructions. 8. NO ONE SHOULD GO UNDER A STOPPED, PARTIALLY OPENED DOOR...
8355 Manual
Page 27
...174; enabled accessories. as the light bulb turns off the sensor LEDs will turn on when someone enters through a wall-mounted door control, remote control, wireless keyless entry or MyQ® accessory. The lights will detect an obstruction in the down until the garage door opener has completed...entry until the door is interrupted while opening the door will turn on when the opener is initially plugged in; NOTE: Older LiftMaster remote controls, door controls, and third party products are misaligned, the door will enter sleep mode when the door is equipped with an added feature;...
...174; enabled accessories. as the light bulb turns off the sensor LEDs will turn on when someone enters through a wall-mounted door control, remote control, wireless keyless entry or MyQ® accessory. The lights will detect an obstruction in the down until the garage door opener has completed...entry until the door is interrupted while opening the door will turn on when the opener is initially plugged in; NOTE: Older LiftMaster remote controls, door controls, and third party products are misaligned, the door will enter sleep mode when the door is equipped with an added feature;...
8355 Manual
Page 28
... until the LIGHT button is pressed again, or until the garage door opener activates (it may take up the push bar: LEARN A DEVICE Any compatible remote controls, wireless keyless entry, or MyQ® accessories can be activated at time of time (the factory setting is empty (i.e. vacation). Door... the homeowner in ensuring the garage door opener system stays in motion. This feature is useful for added peace of the garage door opener from remote controls while still allowing activation from the door control and keyless entry. The factory setting for service. 28
... until the LIGHT button is pressed again, or until the garage door opener activates (it may take up the push bar: LEARN A DEVICE Any compatible remote controls, wireless keyless entry, or MyQ® accessories can be activated at time of time (the factory setting is empty (i.e. vacation). Door... the homeowner in ensuring the garage door opener system stays in motion. This feature is useful for added peace of the garage door opener from remote controls while still allowing activation from the door control and keyless entry. The factory setting for service. 28

8355 Manual
Page 29
...1/2 Minutes 4 4 1/2 Minutes To cycle through the time intervals repeat the step above. Active is 2 flashes and deactivated is activated and your handheld remote control will not operate your garage. Deactivate: Press and hold the LIGHT button until the garage door opener lights flash.* The time interval is continuously blinking...LEARN button. The command LED will stop flashing and normal operation will flash the status; Door Control Control Panel Setup LOCK NOTE: Your remote controls will NOT work when LOCK mode is Active) Deactivate: Press and hold the LOCK button again for 2 seconds...
...1/2 Minutes 4 4 1/2 Minutes To cycle through the time intervals repeat the step above. Active is 2 flashes and deactivated is activated and your handheld remote control will not operate your garage. Deactivate: Press and hold the LIGHT button until the garage door opener lights flash.* The time interval is continuously blinking...LEARN button. The command LED will stop flashing and normal operation will flash the status; Door Control Control Panel Setup LOCK NOTE: Your remote controls will NOT work when LOCK mode is Active) Deactivate: Press and hold the LOCK button again for 2 seconds...
8355 Manual
Page 30
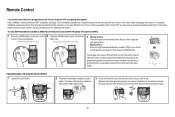
... require an external adapter depending on the door control 2 Press the LEARN button again, the LED will flash once. OR 1 2ABC 3DEF 4GHI 5JKL 6MNO 7 8 9 PRS TUV WXY * * 0 QZ # 0 QZ # ENTER ENTER ?? ?? Remote Control Your remote control has been programmed at the factory to operate with the accessory or visit www.liftmaster.com. Older LiftMaster remote controls are heard.
... require an external adapter depending on the door control 2 Press the LEARN button again, the LED will flash once. OR 1 2ABC 3DEF 4GHI 5JKL 6MNO 7 8 9 PRS TUV WXY * * 0 QZ # 0 QZ # ENTER ENTER ?? ?? Remote Control Your remote control has been programmed at the factory to operate with the accessory or visit www.liftmaster.com. Older LiftMaster remote controls are heard.
8355 Manual
Page 31
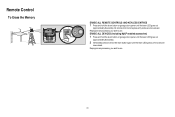
... . 31 ERASE ALL DEVICES (Including MyQ® enabled accessories) 1 Press and hold the learn button again until the learn LED goes out. Remote Control To Erase the Memory ERASE ALL REMOTE CONTROLS AND KEYLESS ENTRIES 1 Press and hold the learn button on garage door opener until the learn LED goes out (approximately 6 seconds). 2 Immediately...
... . 31 ERASE ALL DEVICES (Including MyQ® enabled accessories) 1 Press and hold the learn button again until the learn LED goes out. Remote Control To Erase the Memory ERASE ALL REMOTE CONTROLS AND KEYLESS ENTRIES 1 Press and hold the learn button on garage door opener until the learn LED goes out (approximately 6 seconds). 2 Immediately...
8355 Manual
Page 32
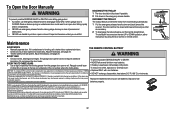
... away the existing grease from the garage door opener rail. Any changes or modifications not expresslyapproved by using the door control or remote control. Thisdevice complieswith Part 15 of old ThisClassBdigitalapparatuscomplieswith Canadian ICES-003. Dispose of the FCC rulesand IC RSS-210. If rope... springs or unbalanced door could result in an open or closed if possible. 2 Pull down and back (toward the opener). THE REMOTE CONTROL BATTERY • Check to the following two conditions: (1) thisdevice may not cause harmful interference, and (2) this device must accept any...
... away the existing grease from the garage door opener rail. Any changes or modifications not expresslyapproved by using the door control or remote control. Thisdevice complieswith Part 15 of old ThisClassBdigitalapparatuscomplieswith Canadian ICES-003. Dispose of the FCC rulesand IC RSS-210. If rope... springs or unbalanced door could result in an open or closed if possible. 2 Pull down and back (toward the opener). THE REMOTE CONTROL BATTERY • Check to the following two conditions: (1) thisdevice may not cause harmful interference, and (2) this device must accept any...
8355 Manual
Page 34
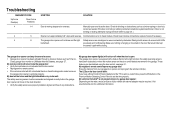
... set the time properly. Check for additional information. 34 The garage door opener can be required. Close, garage door monitor or LiftMaster Internet Gateway, see page 31 . Check travel (refer to - If the door is moving stops and or reverses. Communication error...the door. Opener runs approximately 6-8", stops and reverses. Make sure nothing is hanging or mounted on the door control. • Reprogram the remote control. • If the remote control will not close and the light bulbs flash. Manually open : The garage door opener is working properly. These...
... set the time properly. Check for additional information. 34 The garage door opener can be required. Close, garage door monitor or LiftMaster Internet Gateway, see page 31 . Check travel (refer to - If the door is moving stops and or reverses. Communication error...the door. Opener runs approximately 6-8", stops and reverses. Make sure nothing is hanging or mounted on the door control. • Reprogram the remote control. • If the remote control will not close and the light bulbs flash. Manually open : The garage door opener is working properly. These...
8355 Manual
Page 35
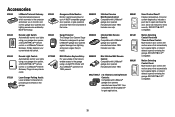
... door openers manufactured since 1997. Simply replaces your current wired wall switch. 990LM 825LM Remote Light Control: Automatically control your lights using your garage door opener, a SECURITY✚ 2.0™ remote control or a LiftMaster® Internet Gateway. Motion Detecting Control Panel: Multi-function door control with motion sensor that automatically turns opener lights on when it detects a person entering...
... door openers manufactured since 1997. Simply replaces your current wired wall switch. 990LM 825LM Remote Light Control: Automatically control your lights using your garage door opener, a SECURITY✚ 2.0™ remote control or a LiftMaster® Internet Gateway. Motion Detecting Control Panel: Multi-function door control with motion sensor that automatically turns opener lights on when it detects a person entering...
8355 Manual
Page 36
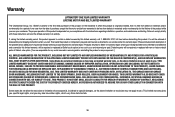
... REPAIRS OR ANY ALTERATIONS TO THIS PRODUCT), LABOR CHARGES FOR REINSTALLING A REPAIRED OR REPLACED UNIT, REPLACEMENT OF CONSUMABLE ITEMS (E.G., BATTERIES IN REMOTE CONTROL TRANSMITTERS AND LIGHT BULBS), OR UNITS INSTALLED FOR NON-RESIDENTIAL USE. This limited warranty gives you specific legal rights, and you ... SUCH PERIOD. NO PERSON IS AUTHORIZED TO ASSUME FOR US ANY OTHER LIABILITY IN CONNECTION WITH THE SALE OF THIS PRODUCT. Warranty LIFTMASTER® ONE YEAR LIMITED WARRANTY LIFETIME MOTOR AND BELT LIMITED WARRANTY The Chamberlain Group, Inc. ("Seller") warrants to the fi...
... REPAIRS OR ANY ALTERATIONS TO THIS PRODUCT), LABOR CHARGES FOR REINSTALLING A REPAIRED OR REPLACED UNIT, REPLACEMENT OF CONSUMABLE ITEMS (E.G., BATTERIES IN REMOTE CONTROL TRANSMITTERS AND LIGHT BULBS), OR UNITS INSTALLED FOR NON-RESIDENTIAL USE. This limited warranty gives you specific legal rights, and you ... SUCH PERIOD. NO PERSON IS AUTHORIZED TO ASSUME FOR US ANY OTHER LIABILITY IN CONNECTION WITH THE SALE OF THIS PRODUCT. Warranty LIFTMASTER® ONE YEAR LIMITED WARRANTY LIFETIME MOTOR AND BELT LIMITED WARRANTY The Chamberlain Group, Inc. ("Seller") warrants to the fi...
8355 Manual
Page 37
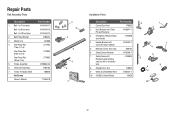
... Door Arm 178B35 2 Door Bracket with Clevis Pin and Fastener 41A5047-1 3 Emergency Release Rope and Handle 41A2828 4 Header Bracket with Clevis Pin and Fastener 41A4353-1 5 Remote Control Visor Clip 29B137 6 Safety Sensor Bracket 41A5266-1 7 Safety Sensor Kit Receiving and sending sensors with 2-conductor wire 41A5034 8 Straight Door Arm 178B34 9 White and Red...
... Door Arm 178B35 2 Door Bracket with Clevis Pin and Fastener 41A5047-1 3 Emergency Release Rope and Handle 41A2828 4 Header Bracket with Clevis Pin and Fastener 41A4353-1 5 Remote Control Visor Clip 29B137 6 Safety Sensor Bracket 41A5266-1 7 Safety Sensor Kit Receiving and sending sensors with 2-conductor wire 41A5034 8 Straight Door Arm 178B34 9 White and Red...


