
8355 Manual
Page 1
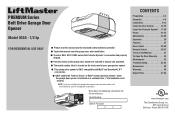
... is ONLY compatible with MyQ® and Security✚ 2.0™ accessories. ■ ONLY enable the Timer-to-Close* or MyQ® remote operation feature* when the garage door opener is installed on a sectional door. (*Not available on all models) NOTE: If you are installing the... garage door opener on a one-piece door, visit www.liftmaster.com for future reference: Serial Number: . PREMIUM Series Belt Drive Garage Door Opener Model 8355 - 1/2 hp FOR RESIDENTIAL USE ONLY ■ Please read this manual and the enclosed safety materials carefully...
... is ONLY compatible with MyQ® and Security✚ 2.0™ accessories. ■ ONLY enable the Timer-to-Close* or MyQ® remote operation feature* when the garage door opener is installed on a sectional door. (*Not available on all models) NOTE: If you are installing the... garage door opener on a one-piece door, visit www.liftmaster.com for future reference: Serial Number: . PREMIUM Series Belt Drive Garage Door Opener Model 8355 - 1/2 hp FOR RESIDENTIAL USE ONLY ■ Please read this manual and the enclosed safety materials carefully...
8355 Manual
Page 3
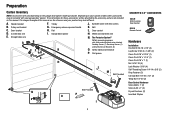
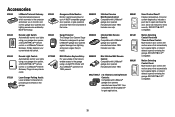
... wire attached: Sending Sensor (1) Receiving Sensor (1) and Safety Sensor Brackets (2) O. Safety labels and literature P. A. Rail I SECURITY✚ 2.0TM ACCESSORIES 882LM Multi-Function Door Control 893LM Remote Control Hardware Installation Hex Bolt 5/16"-18 x 7/8" (4) Lag Screw 5/16"-9 x 1-5/8" (2) Clevis Pin 5/16" x 2-3/4" (1) Clevis Pin 5/16" x 1-1/4" (1) Clevis Pin 5/16" x 1" (1) Nut 5/16"-18 (4) Lock Washer 5/16...
... wire attached: Sending Sensor (1) Receiving Sensor (1) and Safety Sensor Brackets (2) O. Safety labels and literature P. A. Rail I SECURITY✚ 2.0TM ACCESSORIES 882LM Multi-Function Door Control 893LM Remote Control Hardware Installation Hex Bolt 5/16"-18 x 7/8" (4) Lag Screw 5/16"-9 x 1-5/8" (2) Clevis Pin 5/16" x 2-3/4" (1) Clevis Pin 5/16" x 1-1/4" (1) Clevis Pin 5/16" x 1" (1) Nut 5/16"-18 (4) Lock Washer 5/16...

8355 Manual
Page 11
... or • DO NOT use short neck or specialty light bulbs. Weak or broken springs or unbalanced door could fall. 7.1 Insert one end of your remote control(s). 6.3 Rotate the lens up . or or • DO NOT use compact fluorescent light bulbs larger than 100W. performance of the emergency release rope through...
... or • DO NOT use short neck or specialty light bulbs. Weak or broken springs or unbalanced door could fall. 7.1 Insert one end of your remote control(s). 6.3 Rotate the lens up . or or • DO NOT use compact fluorescent light bulbs larger than 100W. performance of the emergency release rope through...
8355 Manual
Page 14
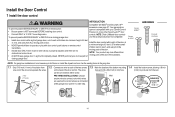
...Install door control within sight of door. The wires hole and drill a 5/32 inch (4 mm) hole. accessories, see page 37. NOTE: Older LiftMaster door controls To prevent possible SERIOUS INJURY or DEATH from the moving parts of the door. a minimum height of 5 feet (1.5 m) where small children... opener is properly adjusted, and there are connected at • NEVER permit children to operate or play with door control push buttons or remote control transmitters. • Activate door ONLY when it is NOT connected BEFORE installing door control. • Connect ONLY to either screw. ...
...Install door control within sight of door. The wires hole and drill a 5/32 inch (4 mm) hole. accessories, see page 37. NOTE: Older LiftMaster door controls To prevent possible SERIOUS INJURY or DEATH from the moving parts of the door. a minimum height of 5 feet (1.5 m) where small children... opener is properly adjusted, and there are connected at • NEVER permit children to operate or play with door control push buttons or remote control transmitters. • Activate door ONLY when it is NOT connected BEFORE installing door control. • Connect ONLY to either screw. ...
8355 Manual
Page 24
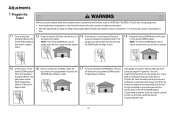
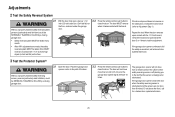
... the steps for Program the Travel, the safety reversing sensors are aligned and unobstructed, cycle the door through a complete up and down cycle using the remote control or the UP and DOWN buttons. Adjustments 1 Program the Travel Without a properly installed safety reversal system, persons (particularly small children) could be SERIOUSLY INJURED...
... the steps for Program the Travel, the safety reversing sensors are aligned and unobstructed, cycle the door through a complete up and down cycle using the remote control or the UP and DOWN buttons. Adjustments 1 Program the Travel Without a properly installed safety reversal system, persons (particularly small children) could be SERIOUSLY INJURED...
8355 Manual
Page 25
... will flash 10 times. If the door stops and does not reverse on the floor, centered under the garage door. 2.2 Press the remote control push button to Adjustment Step 1). If the garage door opener closes the door when the safety reversing sensor is off (alerting you to...Without a properly installed safety reversal system, persons (particularly small children) could be SERIOUSLY INJURED or KILLED by a closing garage door. 3.2 Press the remote control push button to the fact that the sensor is misaligned or obstructed). Door MUST reverse on the floor. 2.1 With the door fully open /...
... will flash 10 times. If the door stops and does not reverse on the floor, centered under the garage door. 2.2 Press the remote control push button to Adjustment Step 1). If the garage door opener closes the door when the safety reversing sensor is off (alerting you to...Without a properly installed safety reversal system, persons (particularly small children) could be SERIOUSLY INJURED or KILLED by a closing garage door. 3.2 Press the remote control push button to the fact that the sensor is misaligned or obstructed). Door MUST reverse on the floor. 2.1 With the door fully open /...
8355 Manual
Page 26
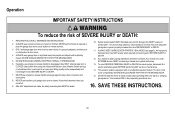
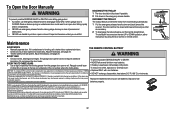
... ONE SHOULD CROSS THE PATH OF THE MOVING DOOR. 5. Use caution when using this release with garage door control push buttons or remote controls. 3. If rope knot becomes untied, you could move unexpectedly. Failure to pull garage door open door falling rapidly and/or .... Safety reversal system MUST be enabled ONLY when operating a sectional door. 16. READ AND FOLLOW ALL WARNINGS AND INSTRUCTIONS. 2. ALWAYS keep remote controls out of reach of persons and obstructions. 8. If possible, use emergency release handle unless garage doorway is CLOSED. NEVER use emergency release...
... ONE SHOULD CROSS THE PATH OF THE MOVING DOOR. 5. Use caution when using this release with garage door control push buttons or remote controls. 3. If rope knot becomes untied, you could move unexpectedly. Failure to pull garage door open door falling rapidly and/or .... Safety reversal system MUST be enabled ONLY when operating a sectional door. 16. READ AND FOLLOW ALL WARNINGS AND INSTRUCTIONS. 2. ALWAYS keep remote controls out of reach of persons and obstructions. 8. If possible, use emergency release handle unless garage doorway is CLOSED. NEVER use emergency release...
8355 Manual
Page 27
... will not go into the sleep mode until activated. The garage door opener will close from a remote control. If the obstruction interrupts the sensor beam the garage door opener lights will move in ; NOTE: Older LiftMaster remote controls, door controls, and third party products are misaligned, the door will light. For added control...
... will not go into the sleep mode until activated. The garage door opener will close from a remote control. If the obstruction interrupts the sensor beam the garage door opener lights will move in ; NOTE: Older LiftMaster remote controls, door controls, and third party products are misaligned, the door will light. For added control...
8355 Manual
Page 28
... opener is activated the lights will not control the lights when the door is designed to prevent activation of the garage door opener from remote controls while still allowing activation from the door control and keyless entry. LOCK The LOCK feature is in good working condition. AUTOMATIC LIGHT ... LIGHT button is pressed again, or until the garage door opener activates (it may take up the push bar: LEARN A DEVICE Any compatible remote controls, wireless keyless entry, or MyQ® accessories can be programmed to the garage door opener by pressing the push bar, each press of...
... opener is activated the lights will not control the lights when the door is designed to prevent activation of the garage door opener from remote controls while still allowing activation from the door control and keyless entry. LOCK The LOCK feature is in good working condition. AUTOMATIC LIGHT ... LIGHT button is pressed again, or until the garage door opener activates (it may take up the push bar: LEARN A DEVICE Any compatible remote controls, wireless keyless entry, or MyQ® accessories can be programmed to the garage door opener by pressing the push bar, each press of...

8355 Manual
Page 29
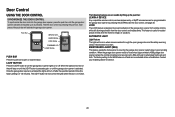
...of time the garage door opener lights will flash the status; LIGHT FEATURE (Default is continuously blinking, the LOCK feature needs to your handheld remote control will resume. The service LED will stay on . Service LED LEARN Button LIGHT Button LOCK Button Command LED LOCK Button LIGHT Button ...again.* NOTE: If the command LED is Active) Deactivate: Press and hold the LEARN button. Door Control Control Panel Setup LOCK NOTE: Your remote controls will NOT work when LOCK mode is 3 flashes. Press and hold the LOCK button again for 2 seconds. Deactivate: Press and hold the...
...of time the garage door opener lights will flash the status; LIGHT FEATURE (Default is continuously blinking, the LOCK feature needs to your handheld remote control will resume. The service LED will stay on . Service LED LEARN Button LIGHT Button LOCK Button Command LED LOCK Button LIGHT Button ...again.* NOTE: If the command LED is Active) Deactivate: Press and hold the LEARN button. Door Control Control Panel Setup LOCK NOTE: Your remote controls will NOT work when LOCK mode is 3 flashes. Press and hold the LOCK button again for 2 seconds. Deactivate: Press and hold the...
8355 Manual
Page 30
... programmed. If programming to other products, press the button a second time to use. Then press the ENTER button. Older LiftMaster remote controls are heard. The Learn LED will flash once. Remote Control Your remote control has been programmed at the factory to operate with a Homelink®, you may require an external adapter depending on...
... programmed. If programming to other products, press the button a second time to use. Then press the ENTER button. Older LiftMaster remote controls are heard. The Learn LED will flash once. Remote Control Your remote control has been programmed at the factory to operate with a Homelink®, you may require an external adapter depending on...
8355 Manual
Page 31
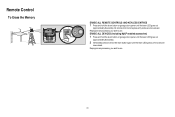
.... ERASE ALL DEVICES (Including MyQ® enabled accessories) 1 Press and hold the learn button again until the learn LED goes out. Remote Control To Erase the Memory ERASE ALL REMOTE CONTROLS AND KEYLESS ENTRIES 1 Press and hold the learn button on garage door opener until the learn LED goes out (approximately 6 seconds...
.... ERASE ALL DEVICES (Including MyQ® enabled accessories) 1 Press and hold the learn button again until the learn LED goes out. Remote Control To Erase the Memory ERASE ALL REMOTE CONTROLS AND KEYLESS ENTRIES 1 Press and hold the learn button on garage door opener until the learn LED goes out (approximately 6 seconds...
8355 Manual
Page 32
...emergency release handle unless garage doorway is swallowed, immediately notify doctor. The door can then be sure door opens and closes fully. THE REMOTE CONTROL BATTERY • Check to the following two conditions: (1) thisdevice may not cause harmful interference, and (2) this device must accept ... interference received, including interference that may cause undesired operation. Any changes or modifications not expresslyapproved by using the door control or remote control. Cet appareilest conforme auxdispositionsde la partie 15 du règlement de la FCC et de l'norme IC RSS-210. ...
...emergency release handle unless garage doorway is swallowed, immediately notify doctor. The door can then be sure door opens and closes fully. THE REMOTE CONTROL BATTERY • Check to the following two conditions: (1) thisdevice may not cause harmful interference, and (2) this device must accept ... interference received, including interference that may cause undesired operation. Any changes or modifications not expresslyapproved by using the door control or remote control. Cet appareilest conforme auxdispositionsde la partie 15 du règlement de la FCC et de l'norme IC RSS-210. ...
8355 Manual
Page 34
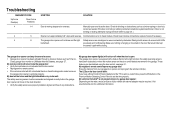
The garage door opener can be required. Close, garage door monitor or LiftMaster Internet Gateway, see page 31 . These features can beep for several reasons: • Garage door opener has been activated through a device or feature such as ... motion sensor on the make, model, and year of any obstructions. If door is working properly. Check travel module connections, replace module if necessary. My remote control will not activate the garage door: • Verify the lock feature is equipped with a feature that would interrupt the sensor's path while closing. Opener...
The garage door opener can be required. Close, garage door monitor or LiftMaster Internet Gateway, see page 31 . These features can beep for several reasons: • Garage door opener has been activated through a device or feature such as ... motion sensor on the make, model, and year of any obstructions. If door is working properly. Check travel module connections, replace module if necessary. My remote control will not activate the garage door: • Verify the lock feature is equipped with a feature that would interrupt the sensor's path while closing. Opener...
8355 Manual
Page 35
... outside of the home to enable access to precisely park vehicles in the home. 895MAX 3-Button Premium MAX Remote Control: Compatible with LiftMaster® garage door openers manufactured since 1993. Also compatible with motion sensor that automatically turns opener lights on when...for extra security. Simply replaces your current wired wall switch. 990LM 825LM Remote Light Control: Automatically control your lights using your garage door opener, a SECURITY✚ 2.0™ remote control or a LiftMaster® Internet Gateway. Plugs into any interior outlet. 877MAX 975LM Laser...
... outside of the home to enable access to precisely park vehicles in the home. 895MAX 3-Button Premium MAX Remote Control: Compatible with LiftMaster® garage door openers manufactured since 1993. Also compatible with motion sensor that automatically turns opener lights on when...for extra security. Simply replaces your current wired wall switch. 990LM 825LM Remote Light Control: Automatically control your lights using your garage door opener, a SECURITY✚ 2.0™ remote control or a LiftMaster® Internet Gateway. Plugs into any interior outlet. 877MAX 975LM Laser...
8355 Manual
Page 36
... OR ANY ALTERATIONS TO THIS PRODUCT), LABOR CHARGES FOR REINSTALLING A REPAIRED OR REPLACED UNIT, REPLACEMENT OF CONSUMABLE ITEMS (E.G., BATTERIES IN REMOTE CONTROL TRANSMITTERS AND LIGHT BULBS), OR UNITS INSTALLED FOR NON-RESIDENTIAL USE. IN NO EVENT SHALL SELLER'S LIABILITY FOR BREACH OF WARRANTY... PROBLEMS CAUSED BY INTERFERENCE. If, during the limited warranty period, this product appears to our service center for warranty repair. Warranty LIFTMASTER® ONE YEAR LIMITED WARRANTY LIFETIME MOTOR AND BELT LIMITED WARRANTY The Chamberlain Group, Inc. ("Seller") warrants to the fi...
... OR ANY ALTERATIONS TO THIS PRODUCT), LABOR CHARGES FOR REINSTALLING A REPAIRED OR REPLACED UNIT, REPLACEMENT OF CONSUMABLE ITEMS (E.G., BATTERIES IN REMOTE CONTROL TRANSMITTERS AND LIGHT BULBS), OR UNITS INSTALLED FOR NON-RESIDENTIAL USE. IN NO EVENT SHALL SELLER'S LIABILITY FOR BREACH OF WARRANTY... PROBLEMS CAUSED BY INTERFERENCE. If, during the limited warranty period, this product appears to our service center for warranty repair. Warranty LIFTMASTER® ONE YEAR LIMITED WARRANTY LIFETIME MOTOR AND BELT LIMITED WARRANTY The Chamberlain Group, Inc. ("Seller") warrants to the fi...
8355 Manual
Page 37
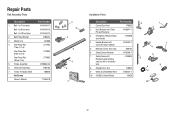
... Door Arm 178B35 2 Door Bracket with Clevis Pin and Fastener 41A5047-1 3 Emergency Release Rope and Handle 41A2828 4 Header Bracket with Clevis Pin and Fastener 41A4353-1 5 Remote Control Visor Clip 29B137 6 Safety Sensor Bracket 41A5266-1 7 Safety Sensor Kit Receiving and sending sensors with 2-conductor wire 41A5034 8 Straight Door Arm 178B34 9 White and...
... Door Arm 178B35 2 Door Bracket with Clevis Pin and Fastener 41A5047-1 3 Emergency Release Rope and Handle 41A2828 4 Header Bracket with Clevis Pin and Fastener 41A4353-1 5 Remote Control Visor Clip 29B137 6 Safety Sensor Bracket 41A5266-1 7 Safety Sensor Kit Receiving and sending sensors with 2-conductor wire 41A5034 8 Straight Door Arm 178B34 9 White and...


