Owners Manual - English French Spanish
Page 1
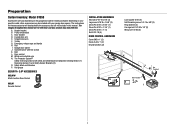
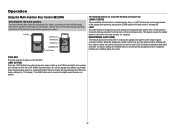
... ensure safe operation. • This garage door opener is connected and properly aligned. • Periodic checks of the garage door opener are to the location indicated on a one-piece door if using devices or features providing unattended close. LiftMaster 300 Windsor Drive Oak Brook, IL 60523 Wi-Fi® Garage Door Openers Chain Drive Models - 81600, 81602, 81640, 81650, 83650-267 Belt Drive Model - 81550 FOR RESIDENTIAL USE ONLY • Please read this manual and the safety materials...
... ensure safe operation. • This garage door opener is connected and properly aligned. • Periodic checks of the garage door opener are to the location indicated on a one-piece door if using devices or features providing unattended close. LiftMaster 300 Windsor Drive Oak Brook, IL 60523 Wi-Fi® Garage Door Openers Chain Drive Models - 81600, 81602, 81640, 81650, 83650-267 Belt Drive Model - 81550 FOR RESIDENTIAL USE ONLY • Please read this manual and the safety materials...
Owners Manual - English French Spanish
Page 4
... router specifications and help, visit WiFiHelp.LiftMaster.com. Before you see: Wi-Fi signal is a torsion spring or center bearing plate in place, supported entirely by its springs. 3. If you begin: 1. Disable locks and remove any ropes connected to a mobile device. If balanced, it may not work properly. 5. Any gap between the floor and the bottom of the door. The garage door opener...
... router specifications and help, visit WiFiHelp.LiftMaster.com. Before you see: Wi-Fi signal is a torsion spring or center bearing plate in place, supported entirely by its springs. 3. If you begin: 1. Disable locks and remove any ropes connected to a mobile device. If balanced, it may not work properly. 5. Any gap between the floor and the bottom of the door. The garage door opener...
Owners Manual - English French Spanish
Page 6
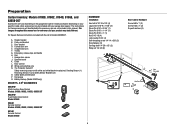
... door arm E. Sprocket cover K. Chain L. The Protector System® Safety reversing sensors with the rail kit model LMSSRKIT. Trolley G. Depending on the garage door opener model purchased. The instructions for reference and your product may be attached to the accessory and are not included in this manual are for these accessories will vary depending on your specific model, other accessories may look different. Straight door arm F. Safety labels and literature P. Door control M. Door bracket D. White and red/white wire...
... door arm E. Sprocket cover K. Chain L. The Protector System® Safety reversing sensors with the rail kit model LMSSRKIT. Trolley G. Depending on the garage door opener model purchased. The instructions for reference and your product may be attached to the accessory and are not included in this manual are for these accessories will vary depending on your specific model, other accessories may look different. Straight door arm F. Safety labels and literature P. Door control M. Door bracket D. White and red/white wire...
Owners Manual - English French Spanish
Page 7
... Pin 5/16" x 1" (1) Nut 5/16"-18 (4) DOOR CONTROL HARDWARE Screw 6AB x 1" (2) Screw 6-32 x 1" (2) Drywall anchors (2) AB CF G D E N Lock washer 5/16" (4) Self-threading screw 1/4"-14 x 5/8" (2) Ring fastener (3) Carriage bolt 1/4"-20 x 1/2" (2) Wing nut 1/4"-20 (2) K H L M Not Provided J Not Provided P O I . Straight door arm F. Emergency release rope and handle H. Door bracket D. Depending on the garage door opener model purchased. Sprocket cover with white and white/black wire attached: Sending Sensor (1) Receiving Sensor (1) and Safety Sensor Brackets (2) O. Belt L. Door...
... Pin 5/16" x 1" (1) Nut 5/16"-18 (4) DOOR CONTROL HARDWARE Screw 6AB x 1" (2) Screw 6-32 x 1" (2) Drywall anchors (2) AB CF G D E N Lock washer 5/16" (4) Self-threading screw 1/4"-14 x 5/8" (2) Ring fastener (3) Carriage bolt 1/4"-20 x 1/2" (2) Wing nut 1/4"-20 (2) K H L M Not Provided J Not Provided P O I . Straight door arm F. Emergency release rope and handle H. Door bracket D. Depending on the garage door opener model purchased. Sprocket cover with white and white/black wire attached: Sending Sensor (1) Receiving Sensor (1) and Safety Sensor Brackets (2) O. Belt L. Door...

Owners Manual - English French Spanish
Page 8
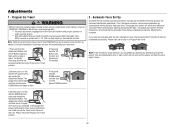
... a 1/2" above the base of the rail at the midpoint of the garage door opener. 2. Loosen the inner nut and lock washer on the trolley threaded shaft. 2. To avoid SERIOUS damage to finger from the rail, chain, and styrofoam. 3. During future maintenance, ALWAYS pull the emergency release handle to this manual for the installation instructions. Position the chain around the garage door opener sprocket. 5. Tighten the outer nut until the chain is closed.
... a 1/2" above the base of the rail at the midpoint of the garage door opener. 2. Loosen the inner nut and lock washer on the trolley threaded shaft. 2. To avoid SERIOUS damage to finger from the rail, chain, and styrofoam. 3. During future maintenance, ALWAYS pull the emergency release handle to this manual for the installation instructions. Position the chain around the garage door opener sprocket. 5. Tighten the outer nut until the chain is closed.

Owners Manual - English French Spanish
Page 9
... chain around the garage door opener sprocket. 5. By hand, thread the spring trolley nut on the threaded shaft until the spring releases and snaps the nut ring against the trolley. This sets the spring to optimum belt tension. 1 (To motor unit) Spring Trolley Nut NOTE: ONLY use the bolts removed from the top of the nut ring slots and brace it is finger tight against the trolley. 3. Fasten the rail with an adjustable...
... chain around the garage door opener sprocket. 5. By hand, thread the spring trolley nut on the threaded shaft until the spring releases and snaps the nut ring against the trolley. This sets the spring to optimum belt tension. 1 (To motor unit) Spring Trolley Nut NOTE: ONLY use the bolts removed from the top of the nut ring slots and brace it is finger tight against the trolley. 3. Fasten the rail with an adjustable...
Owners Manual - English French Spanish
Page 10
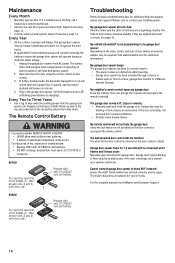
... clothing while installing or servicing opener. Place emergency release/safety reverse test label in a prominent location. 11. DO NOT install on the floor. 13. Disable ALL locks and remove ALL ropes connected to garage door BEFORE installing opener to be used ONLY with sectional doors. 15. They could result in garage door or opener mechanisms. 9. Upon completion of SEVERE INJURY or DEATH: 1. Unattended devices and features are to avoid entanglement. 5. Install wall-mounted garage door control: •...
... clothing while installing or servicing opener. Place emergency release/safety reverse test label in a prominent location. 11. DO NOT install on the floor. 13. Disable ALL locks and remove ALL ropes connected to garage door BEFORE installing opener to be used ONLY with sectional doors. 15. They could result in garage door or opener mechanisms. 9. Upon completion of SEVERE INJURY or DEATH: 1. Unattended devices and features are to avoid entanglement. 5. Install wall-mounted garage door control: •...
Owners Manual - English French Spanish
Page 30
... and release the Adjustment Button. During the Automatic Force Setup, the door will be used to flash and/or a beep is complete. Automatic Force Set Up Once both the up and down positions have not been set , the Safety Reversing Sensors will enter a force-sensing operation by a closing the door. The garage door opener will flash twice. The garage door opener lights will beep three times, confirming that the Automatic Force Setup completed successfully. Door MUST reverse on contact with proper operation of Program the Travel. Adjustment...
... and release the Adjustment Button. During the Automatic Force Setup, the door will be used to flash and/or a beep is complete. Automatic Force Set Up Once both the up and down positions have not been set , the Safety Reversing Sensors will enter a force-sensing operation by a closing the door. The garage door opener will flash twice. The garage door opener lights will beep three times, confirming that the Automatic Force Setup completed successfully. Door MUST reverse on contact with proper operation of Program the Travel. Adjustment...
Owners Manual - English French Spanish
Page 32
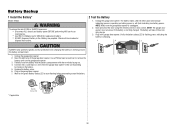
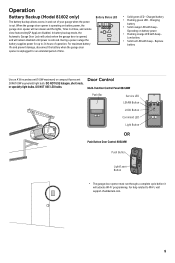
... the battery. * If applicable. Battery Status LED 32 Verify the battery status LED is flashing green, indicating the battery is unplugged. 2. Connect red (+) and black (-) wires from the garage door opener to remove the battery cover on battery power or will take 24 hours to fully charge. 3. NOTE: Make sure the garage door opener is charging. 1 2 3 ALWAYS wear protective gloves and eye protection when changing the battery or working around the battery compartment. 1. Unplug the garage door opener. 2. Battery Backup 1 Install the Battery* Model: 81602 To...
... the battery. * If applicable. Battery Status LED 32 Verify the battery status LED is flashing green, indicating the battery is unplugged. 2. Connect red (+) and black (-) wires from the garage door opener to remove the battery cover on battery power or will take 24 hours to fully charge. 3. NOTE: Make sure the garage door opener is charging. 1 2 3 ALWAYS wear protective gloves and eye protection when changing the battery or working around the battery compartment. 1. Unplug the garage door opener. 2. Battery Backup 1 Install the Battery* Model: 81602 To...

Owners Manual - English French Spanish
Page 35
... infrared beam while the door is closing the garage door opener lights will flash and the garage door opener will stop and reverse to full open . The safety reversing sensors do not affect the opening cycle. SECURITY+ 2.0 REMOTE CONTROLS AND DOOR CONTROLS Your garage door opener has already been programmed at the factory to operate with your remote control, which changes with each use, randomly accessing over your garage, even when the power is out. Security+ 2.0 Accessories Remote Controls Door Controls Keyless Entries MEMORY CAPACITY Up to 12 Up to 2 Smart Control Panels or...
... infrared beam while the door is closing the garage door opener lights will flash and the garage door opener will stop and reverse to full open . The safety reversing sensors do not affect the opening cycle. SECURITY+ 2.0 REMOTE CONTROLS AND DOOR CONTROLS Your garage door opener has already been programmed at the factory to operate with your remote control, which changes with each use, randomly accessing over your garage, even when the power is out. Security+ 2.0 Accessories Remote Controls Door Controls Keyless Entries MEMORY CAPACITY Up to 12 Up to 2 Smart Control Panels or...
Owners Manual - English French Spanish
Page 37
... is empty (i.e. LIGHT BUTTON Press the LIGHT button to turn off . The factory setting for service. Operation Using the Multi-Function Door Control 882LMW SYNCHRONIZE THE DOOR CONTROL To synchronize the door control to the garage door opener, press the push bar until the garage door opener is designed to prevent activation of the garage door opener from remote controls while still allowing activation from the door control and keyless entry. Test the door control by lifting up to 3 presses). Push Bar SERVICE LED LEARN Button LOCK Button COMMAND LED LIGHT Button The following...
... is empty (i.e. LIGHT BUTTON Press the LIGHT button to turn off . The factory setting for service. Operation Using the Multi-Function Door Control 882LMW SYNCHRONIZE THE DOOR CONTROL To synchronize the door control to the garage door opener, press the push bar until the garage door opener is designed to prevent activation of the garage door opener from remote controls while still allowing activation from the door control and keyless entry. Test the door control by lifting up to 3 presses). Push Bar SERVICE LED LEARN Button LOCK Button COMMAND LED LIGHT Button The following...
Owners Manual - English French Spanish
Page 44
... Flash(es) 4 1-4 Door is binding or sticking, contact a trained door systems technician. Opener beeps Manually open and closed) before the Wi-Fi LEARN mode can be activated. • If there has been a recent power outage, the garage door opener must complete a full cycle before the Wi-Fi LEARN mode can be required. door lock, correct as a broken spring or and lights flash. Safety reversing sensors are properly installed, aligned and free of your garage door opener and reprogram the remote control(s). My door...
... Flash(es) 4 1-4 Door is binding or sticking, contact a trained door systems technician. Opener beeps Manually open and closed) before the Wi-Fi LEARN mode can be activated. • If there has been a recent power outage, the garage door opener must complete a full cycle before the Wi-Fi LEARN mode can be required. door lock, correct as a broken spring or and lights flash. Safety reversing sensors are properly installed, aligned and free of your garage door opener and reprogram the remote control(s). My door...
Owners Manual - English French Spanish
Page 46
... REPLACED UNIT, REPLACEMENT OF CONSUMABLE ITEMS (E.G., BATTERIES IN REMOTE CONTROL TRANSMITTERS AND LIGHT BULBS), OR UNITS INSTALLED FOR NON-RESIDENTIAL USE. IN NO EVENT SHALL SELLER'S LIABILITY FOR BREACH OF WARRANTY, BREACH OF CONTRACT, NEGLIGENCE OR STRICT LIABILITY EXCEED THE COST OF THE PRODUCT COVERED HEREBY. THIS LIMITED WARRANTY DOES NOT COVER ANY PROBLEMS WITH, OR RELATING TO, THE GARAGE DOOR OR GARAGE DOOR HARDWARE, INCLUDING BUT NOT LIMITED TO THE DOOR SPRINGS, DOOR...
... REPLACED UNIT, REPLACEMENT OF CONSUMABLE ITEMS (E.G., BATTERIES IN REMOTE CONTROL TRANSMITTERS AND LIGHT BULBS), OR UNITS INSTALLED FOR NON-RESIDENTIAL USE. IN NO EVENT SHALL SELLER'S LIABILITY FOR BREACH OF WARRANTY, BREACH OF CONTRACT, NEGLIGENCE OR STRICT LIABILITY EXCEED THE COST OF THE PRODUCT COVERED HEREBY. THIS LIMITED WARRANTY DOES NOT COVER ANY PROBLEMS WITH, OR RELATING TO, THE GARAGE DOOR OR GARAGE DOOR HARDWARE, INCLUDING BUT NOT LIMITED TO THE DOOR SPRINGS, DOOR...
Users Guide - English French Spanish
Page 2
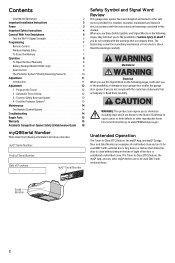
... to be used ONLY with the cautionary statements that accompany them carefully. Automatic Force Set Up 12 3 - Serial Number 2 Read them . Contents Unattended Operation 2 Important Installation Instructions 3 Power 3 Important Safety Instructions 4 Connect With Your Smartphone 5 Test the Wi-Fi® Signal Strength 5 Programming 7 Remote Control 7 Wireless Keyless Entry 7 To Erase the Memory 7 Operation 8 To Open the Door Manually 8 Battery Backup (Model 81602 only) 9 Door Control 9 The Protector System® (Safety Reversing Sensors) 10 Adjustment 11...
... to be used ONLY with the cautionary statements that accompany them carefully. Automatic Force Set Up 12 3 - Serial Number 2 Read them . Contents Unattended Operation 2 Important Installation Instructions 3 Power 3 Important Safety Instructions 4 Connect With Your Smartphone 5 Test the Wi-Fi® Signal Strength 5 Programming 7 Remote Control 7 Wireless Keyless Entry 7 To Erase the Memory 7 Operation 8 To Open the Door Manually 8 Battery Backup (Model 81602 only) 9 Door Control 9 The Protector System® (Safety Reversing Sensors) 10 Adjustment 11...
Users Guide - English French Spanish
Page 3
... battery power BEFORE performing ANY service or maintenance. 14. Option A - DO NOT run garage door opener at a minimum height of the door. 10. and the ground wire Black Wire Black Wire to avoid entanglement. 5. ALL repairs to local code): 1. NEVER connect garage door opener to power source until instructed to install the proper outlet. DO NOT install on the floor. 13. If the plug doesn't fit into a grounding type outlet. Remove the motor unit cover screws and set...
... battery power BEFORE performing ANY service or maintenance. 14. Option A - DO NOT run garage door opener at a minimum height of the door. 10. and the ground wire Black Wire Black Wire to avoid entanglement. 5. ALL repairs to local code): 1. NEVER connect garage door opener to power source until instructed to install the proper outlet. DO NOT install on the floor. 13. If the plug doesn't fit into a grounding type outlet. Remove the motor unit cover screws and set...
Users Guide - English French Spanish
Page 9
... Solid orange LED with beep - Battery Status LED • Solid green LED - DO NOT USE LED bulbs. Door Control Multi-Function Control Panel 882LMW Push Bar Service LED LEARN Button LOCK Button Command LED Light Button OR Push Button Door Control 883LMW Push Button Light/Learn Button • The garage door opener must run slower and the lights, Timer-to Wi-Fi, visit support.chamberlain.com. 9 Charged battery • Flashing green LED - Low battery • Solid red LED with beep - Operation Battery Backup (Model 81602 only) The battery backup allows access in and...
... Solid orange LED with beep - Battery Status LED • Solid green LED - DO NOT USE LED bulbs. Door Control Multi-Function Control Panel 882LMW Push Bar Service LED LEARN Button LOCK Button Command LED Light Button OR Push Button Door Control 883LMW Push Button Light/Learn Button • The garage door opener must run slower and the lights, Timer-to Wi-Fi, visit support.chamberlain.com. 9 Charged battery • Flashing green LED - Low battery • Solid red LED with beep - Operation Battery Backup (Model 81602 only) The battery backup allows access in and...
Users Guide - English French Spanish
Page 14
.... See page 10. The wall-mounted door control will not function: The wires for the door control are aligned and wired correctly. Replace with no movement and 5 flashes and 5 beeps occur: Manually open and close the door using the remote control or door control. 3. Verify the battery status LED is flashing green (battery is operating on battery power) or will operate during an electrical power outage. 1. To reduce risk of white lithium grease to be required. Garage door may be binding or there...
.... See page 10. The wall-mounted door control will not function: The wires for the door control are aligned and wired correctly. Replace with no movement and 5 flashes and 5 beeps occur: Manually open and close the door using the remote control or door control. 3. Verify the battery status LED is flashing green (battery is operating on battery power) or will operate during an electrical power outage. 1. To reduce risk of white lithium grease to be required. Garage door may be binding or there...
Users Guide - English French Spanish
Page 15
... INSTALLATION, OPERATION OR CARE (INCLUDING, BUT NOT LIMITED TO ABUSE, MISUSE, FAILURE TO PROVIDE REASONABLE AND NECESSARY MAINTENANCE, UNAUTHORIZED REPAIRS OR ANY ALTERATIONS TO THIS PRODUCT), LABOR CHARGES FOR REINSTALLING A REPAIRED OR REPLACED UNIT, REPLACEMENT OF CONSUMABLE ITEMS (E.G., BATTERIES IN REMOTE CONTROL TRANSMITTERS AND LIGHT BULBS), OR UNITS INSTALLED FOR NON-RESIDENTIAL USE. Some States and Provinces do not allow limitations on your garage door opener, identify the model number on the end panel of time...
... INSTALLATION, OPERATION OR CARE (INCLUDING, BUT NOT LIMITED TO ABUSE, MISUSE, FAILURE TO PROVIDE REASONABLE AND NECESSARY MAINTENANCE, UNAUTHORIZED REPAIRS OR ANY ALTERATIONS TO THIS PRODUCT), LABOR CHARGES FOR REINSTALLING A REPAIRED OR REPLACED UNIT, REPLACEMENT OF CONSUMABLE ITEMS (E.G., BATTERIES IN REMOTE CONTROL TRANSMITTERS AND LIGHT BULBS), OR UNITS INSTALLED FOR NON-RESIDENTIAL USE. Some States and Provinces do not allow limitations on your garage door opener, identify the model number on the end panel of time...

LiftMaster California Residential Garage Door Opener Comparison Chart - English
Page 1
... Battery Backup Heavy Duty Chain Drive Wi-Fi Yes Yes Yes - California Residential Garage Door Openers Comparison Chart SERIES Model Number Model Number Being Replaced 98022 8500W Description Lifts doors up to -Close Yes Rail Wall Mount Control Panel Motion Detection Light Activation LCD Programming Menu Light and Lock Functions myQ Diagnostics Pack-In Accessory Accessory Capacity Motor Warranty Parts Warranty Other Warranty Replacement Logic Board Rail Part Numbers 880LMW Smart Control Panel® Yes Yes Yes Yes 893MAX 3-Button Remote Control 40 Remote Controls, 4 Wireless Keyless...
... Battery Backup Heavy Duty Chain Drive Wi-Fi Yes Yes Yes - California Residential Garage Door Openers Comparison Chart SERIES Model Number Model Number Being Replaced 98022 8500W Description Lifts doors up to -Close Yes Rail Wall Mount Control Panel Motion Detection Light Activation LCD Programming Menu Light and Lock Functions myQ Diagnostics Pack-In Accessory Accessory Capacity Motor Warranty Parts Warranty Other Warranty Replacement Logic Board Rail Part Numbers 880LMW Smart Control Panel® Yes Yes Yes Yes 893MAX 3-Button Remote Control 40 Remote Controls, 4 Wireless Keyless...
LiftMaster Model 81602 Product Guide - English
Page 4
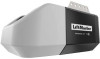
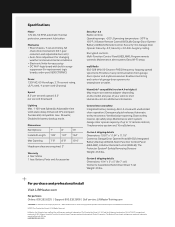
.... Garage Door Opener Battery (485LM); Program remote controls; Up safety stop; Specifications Motor 12V DC, 53 RPM, automatic thermal protection, permanent lubrication Mechanics ▪ Steel chassis, T-rail and trolley, full chain drive mechanism (63:1 gear reduction and adjustable door arm) ▪ Auto-force adjustment for changing weather and environmental conditions ▪ Electronic limits for easy setup ▪ DC Wi-Fi logic board with unattended close with built-in battery backup mode. Adjustable-time solid-state delay; Remote Control: Security+2.0; Maintenance...
.... Garage Door Opener Battery (485LM); Program remote controls; Up safety stop; Specifications Motor 12V DC, 53 RPM, automatic thermal protection, permanent lubrication Mechanics ▪ Steel chassis, T-rail and trolley, full chain drive mechanism (63:1 gear reduction and adjustable door arm) ▪ Auto-force adjustment for changing weather and environmental conditions ▪ Electronic limits for easy setup ▪ DC Wi-Fi logic board with unattended close with built-in battery backup mode. Adjustable-time solid-state delay; Remote Control: Security+2.0; Maintenance...


