3800 Manual
Page 2
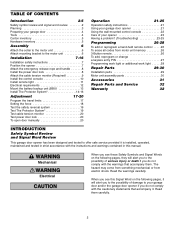
... door opener if you do not comply with the warnings that accompany it is installed, operated, maintained and tested in strict accordance with the instructions and warnings contained in this manual. Read the warnings carefully. WARNING Mechanical WCAAURTNIIONNG ... bracket to the motor unit 6 Installation 7-16 Installation safety instructions 7 Position the opener 7 Attach the emergency release rope and handle 8 Install the power door lock 8 Attach the cable tension monitor (Required 9 Install the control console 10 Install remote light 11 Electrical requirements 12 Mount...
... door opener if you do not comply with the warnings that accompany it is installed, operated, maintained and tested in strict accordance with the instructions and warnings contained in this manual. Read the warnings carefully. WARNING Mechanical WCAAURTNIIONNG ... bracket to the motor unit 6 Installation 7-16 Installation safety instructions 7 Position the opener 7 Attach the emergency release rope and handle 8 Install the power door lock 8 Attach the cable tension monitor (Required 9 Install the control console 10 Install remote light 11 Electrical requirements 12 Mount...
3800 Manual
Page 4
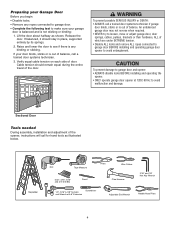
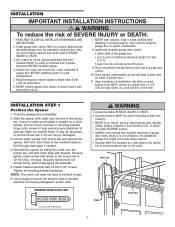
...door opener at 120V, 60 Hz to avoid entanglement. Sectional Door Tools needed During assembly, installation and adjustment of door. Release the door. Verify equal cable tension on each side of the opener, instructions will call a trained door systems technician. 3. Raise and lower the door to loosen,... the entire travel of which are under EXTREME tension. • Disable ALL locks and remove ALL ropes connected to garage door BEFORE installing and operating garage door WARNING opener to avoid malfunction and damage. An unbalanced garage door may not reverse when required. • NEVER...
...door opener at 120V, 60 Hz to avoid entanglement. Sectional Door Tools needed During assembly, installation and adjustment of door. Release the door. Verify equal cable tension on each side of the opener, instructions will call a trained door systems technician. 3. Raise and lower the door to loosen,... the entire travel of which are under EXTREME tension. • Disable ALL locks and remove ALL ropes connected to garage door BEFORE installing and operating garage door WARNING opener to avoid malfunction and damage. An unbalanced garage door may not reverse when required. • NEVER...
3800 Manual
Page 6
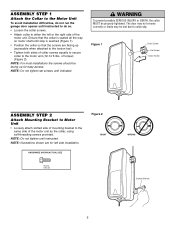
... Tighten both sides of mounting bracket to collar slip. ASSEMBLY STEP 1 Attach the Collar to the Motor Unit To avoid installation difficulties, do not run the garage door opener until instructed to do so. • Loosen the collar screws. • Attach collar to the motor unit (12-14 ft./...STEP 2 Attach Mounting Bracket to Motor Unit • Loosely attach slotted side of collar screws equally to secure collar to either the left side installation. of the motor unit as the collar, using self-threading screws provided. HARDWARE SHOWN ACTUAL SIZE Figure 2 RIGHT Screw #10-32 WRONG ...
... Tighten both sides of mounting bracket to collar slip. ASSEMBLY STEP 1 Attach the Collar to the Motor Unit To avoid installation difficulties, do not run the garage door opener until instructed to do so. • Loosen the collar screws. • Attach collar to the motor unit (12-14 ft./...STEP 2 Attach Mounting Bracket to Motor Unit • Loosely attach slotted side of collar screws equally to secure collar to either the left side installation. of the motor unit as the collar, using self-threading screws provided. HARDWARE SHOWN ACTUAL SIZE Figure 2 RIGHT Screw #10-32 WRONG ...
3800 Manual
Page 7
... tighten both set screws firmly, without damaging the jackshaft. 5. Check to prevent antenna from being entangled in plain view on the collar. WARNING INSTALLATION IMPORTANT INSTALLATION INSTRUCTIONS WARNING To reduce the risk of installation, test safety reversal system. Use a staple to secure the antenna wire to make sure bracket is too long or damaged. 3.
... tighten both set screws firmly, without damaging the jackshaft. 5. Check to prevent antenna from being entangled in plain view on the collar. WARNING INSTALLATION IMPORTANT INSTALLATION INSTRUCTIONS WARNING To reduce the risk of installation, test safety reversal system. Use a staple to secure the antenna wire to make sure bracket is too long or damaged. 3.
3800 Manual
Page 10
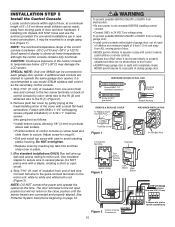
...wire to the quick-connect terminals on page 14. To prevent possible SERIOUS INJURY or DEATH from a closing garage door. WARNING WARNING INSTALCLATUITOINOSNTEP 5 Install the Control Console Locate control console within sight of garage door, out of reach of children at a minimum height of 5 feet (1.5 m)... temperatures although the control console remains fully functional. See Protector System Instructions beginning on the motor unit: white to white and white/red to cross path of closing garage door: • Install control console within sight of door, at the lower/middle portion ...
...wire to the quick-connect terminals on page 14. To prevent possible SERIOUS INJURY or DEATH from a closing garage door. WARNING WARNING INSTALCLATUITOINOSNTEP 5 Install the Control Console Locate control console within sight of garage door, out of reach of children at a minimum height of 5 feet (1.5 m)... temperatures although the control console remains fully functional. See Protector System Instructions beginning on the motor unit: white to white and white/red to cross path of closing garage door: • Install control console within sight of door, at the lower/middle portion ...
3800 Manual
Page 11
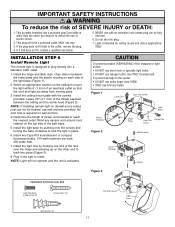
... still does not fit, contact a qualified electrician. 5. Install the hinge and latch clips. Wind any excess cord around cord retainer on drywall and a ceiling joist can be located, use halogen bulbs. IMPORTANT SAFETY INSTRUCTIONS WARNING To reduce the risk of the light base. ...5. Do not alter the plug. 7. WARNING INSTALLATION STEP 6 Install Remote Light The remote light is intended for wall anchors. 4. NOTE: If installing remote light on the top side of ...
... still does not fit, contact a qualified electrician. 5. Install the hinge and latch clips. Wind any excess cord around cord retainer on drywall and a ceiling joist can be located, use halogen bulbs. IMPORTANT SAFETY INSTRUCTIONS WARNING To reduce the risk of the light base. ...5. Do not alter the plug. 7. WARNING INSTALLATION STEP 6 Install Remote Light The remote light is intended for wall anchors. 4. NOTE: If installing remote light on the top side of ...

3800 Manual
Page 13
... the Battery Backup Unit (BBU) (not provided) If the optional 475LM battery backup unit is part of this installation it should be installed at this time. • The BBU can be mounted to either the ceiling or a wall within 3' (.9 m) of the motor unit. • Position the BBU as ... 1-1/2" lag screws (2) provided with the BBU unit. • Connect the BBU cord into the connector on the bottom of the motor unit. • Follow all instructions included with the 475LM unit to test for proper operation and testing of the BBU. BBU Cord 475LM Battery Backup Unit Connector 13
... the Battery Backup Unit (BBU) (not provided) If the optional 475LM battery backup unit is part of this installation it should be installed at this time. • The BBU can be mounted to either the ceiling or a wall within 3' (.9 m) of the motor unit. • Position the BBU as ... 1-1/2" lag screws (2) provided with the BBU unit. • Connect the BBU cord into the connector on the bottom of the motor unit. • Follow all instructions included with the 475LM unit to test for proper operation and testing of the BBU. BBU Cord 475LM Battery Backup Unit Connector 13
3800 Manual
Page 21
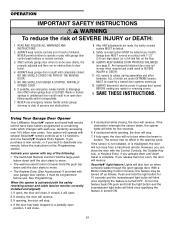
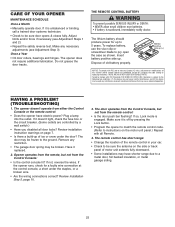
...completely closed , it will operate with the safety reversing sensor and cable tension monitor correctly installed and aligned): 1. If possible, use , randomly accessing over 100 billion new codes. ...improperly balanced door may be tested every month. Using Your Garage Door Opener Your LiftMaster Security✚® opener and hand-held remote control have been factory programmed to...to 12 functions, and one Security✚® Keyless Entry System. SAVE THESE INSTRUCTIONS. See Programming. If obstructed while opening, the door will reverse. NEVER permit ...
...completely closed , it will operate with the safety reversing sensor and cable tension monitor correctly installed and aligned): 1. If possible, use , randomly accessing over 100 billion new codes. ...improperly balanced door may be tested every month. Using Your Garage Door Opener Your LiftMaster Security✚® opener and hand-held remote control have been factory programmed to...to 12 functions, and one Security✚® Keyless Entry System. SAVE THESE INSTRUCTIONS. See Programming. If obstructed while opening, the door will reverse. NEVER permit ...
3800 Manual
Page 23
...may cause undesired operation. Opener operates from the remote, but not from the remote control: • Is the door push bar flashing? Review Installation Step 5, page 10. 3. Make any necessary adjustments (see Adjustment Steps 1 and 2). • Repeat the safety reverse test. The opener ...SERVICEABLE PARTS. Tested to pry open the case as shown. HAVING A PROBLEM? (TROUBLESHOOTING) 1. Plug a lamp into the outlet. Review installation instruction warnings on the side or back panel of this device must accept any restriction. • The garage door spring may have electric power?...
...may cause undesired operation. Opener operates from the remote, but not from the remote control: • Is the door push bar flashing? Review Installation Step 5, page 10. 3. Make any necessary adjustments (see Adjustment Steps 1 and 2). • Repeat the safety reverse test. The opener ...SERVICEABLE PARTS. Tested to pry open the case as shown. HAVING A PROBLEM? (TROUBLESHOOTING) 1. Plug a lamp into the outlet. Review installation instruction warnings on the side or back panel of this device must accept any restriction. • The garage door spring may have electric power?...
3800 Manual
Page 26
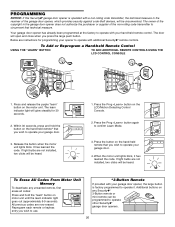
...your garage door. 3. Press the Prog button on the hand-held remote that you wish to confirm Learn Mode. 3. If light bulbs are instructions for 30 seconds. 2. The door will be heard. Reprogram each remote or keyless entry you press the large push button. Your garage door ...the code. If light bulbs are now erased. Press the Prog button again to operate your garage door. 4. All previous codes are not installed, two clicks will open and close when you wish to operate with additional Security✚® remote controls. Additional buttons on any unwanted remote,...
...your garage door. 3. Press the Prog button on the hand-held remote that you wish to confirm Learn Mode. 3. If light bulbs are instructions for 30 seconds. 2. The door will be heard. Reprogram each remote or keyless entry you press the large push button. Your garage door ...the code. If light bulbs are now erased. Press the Prog button again to operate your garage door. 4. All previous codes are not installed, two clicks will open and close when you wish to operate with additional Security✚® remote controls. Additional buttons on any unwanted remote,...
3800 Manual
Page 32
...OR STRICT LIABILITY EXCEED THE COST OF THE PRODUCT COVERED HEREBY. SIMPLY DIAL OUR TOLL FREE NUMBER: 1-800-528-9131 www.liftmaster.com For professional installation, parts and service, contact your area. Failure to our service center for a period of five years from the date of... limitation or exclusion may also have other rights which vary from state to the first retail purchaser of -purchase receipt with the instructions regarding installation, operation, maintenance and testing. Some States do not allow limitations on your compliance with any product returned for a period of ...
...OR STRICT LIABILITY EXCEED THE COST OF THE PRODUCT COVERED HEREBY. SIMPLY DIAL OUR TOLL FREE NUMBER: 1-800-528-9131 www.liftmaster.com For professional installation, parts and service, contact your area. Failure to our service center for a period of five years from the date of... limitation or exclusion may also have other rights which vary from state to the first retail purchaser of -purchase receipt with the instructions regarding installation, operation, maintenance and testing. Some States do not allow limitations on your compliance with any product returned for a period of ...


