
3255 Manual
Page 1
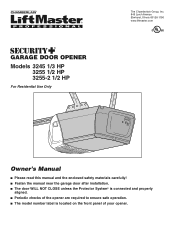
® GARAGE DOOR OPENER Models 3245 1/3 HP 3255 1/2 HP 3255-2 1/2 HP For Residential Use Only The Chamberlain Group, Inc. 845 Larch Avenue Elmhurst, Illinois 60126-1196 www.liftmaster.com Owner's Manual ■ Please read this manual and the enclosed safety materials carefully! ■ Fasten the manual near the garage door after installation. ■ The door WILL NOT...
® GARAGE DOOR OPENER Models 3245 1/3 HP 3255 1/2 HP 3255-2 1/2 HP For Residential Use Only The Chamberlain Group, Inc. 845 Larch Avenue Elmhurst, Illinois 60126-1196 www.liftmaster.com Owner's Manual ■ Please read this manual and the enclosed safety materials carefully! ■ Fasten the manual near the garage door after installation. ■ The door WILL NOT...

3255 Manual
Page 2
... Word Review This garage door opener has been designed and tested to offer safe service provided it is installed, operated, maintained and tested in this manual. TABLE OF CONTENTS Introduction 2-5 Safety symbol and signal word review 2 Preparing your garage door 3 Tools needed 3 Planning 4 Carton inventory 5 Hardware ...30 Operation safety instructions 26 Using your garage door opener 26 Using the wall-mounted door control 27 To open the door manually 27 Care of your garage door and/or the garage door opener if you do not comply with the instructions and warnings...
... Word Review This garage door opener has been designed and tested to offer safe service provided it is installed, operated, maintained and tested in this manual. TABLE OF CONTENTS Introduction 2-5 Safety symbol and signal word review 2 Preparing your garage door 3 Tools needed 3 Planning 4 Carton inventory 5 Hardware ...30 Operation safety instructions 26 Using your garage door opener 26 Using the wall-mounted door control 27 To open the door manually 27 Care of your garage door and/or the garage door opener if you do not comply with the instructions and warnings...

3255 Manual
Page 7
... of reach of children at its midpoint, re-tighten the inner nut to disconnect trolley before proceeding to do not re-adjust the chain. Place manual release/safety reverse test label in Figure 2 when the door is open, do so. 8. ASSEMBLY STEP 3 Tighten the Chain • Spin the inner nut and...
... of reach of children at its midpoint, re-tighten the inner nut to disconnect trolley before proceeding to do not re-adjust the chain. Place manual release/safety reverse test label in Figure 2 when the door is open, do so. 8. ASSEMBLY STEP 3 Tighten the Chain • Spin the inner nut and...
3255 Manual
Page 12
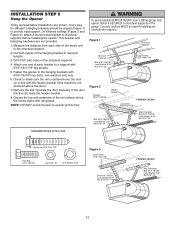
.... 5. Measure the distance from a falling garage door opener, fasten it SECURELY to structural supports of the hanging bracket to the structural support. 2. Operate the door manually. Hanging brackets should be angled (Figure 1) to the hanging brackets with rail grease. Fasten the opener to provide rigid support.
.... 5. Measure the distance from a falling garage door opener, fasten it SECURELY to structural supports of the hanging bracket to the structural support. 2. Operate the door manually. Hanging brackets should be angled (Figure 1) to the hanging brackets with rail grease. Fasten the opener to provide rigid support.
3255 Manual
Page 13
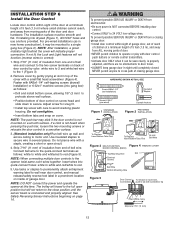
... connecting multiple door controls to red (Figure 5). If installing into quick-connect holes: white to white and red/white to wall near door control, and manual release/safety reverse test label in tab with a staple, creating a short or open position but will indicate proper connection. Remove cover by color: white wire...
... connecting multiple door controls to red (Figure 5). If installing into quick-connect holes: white to white and red/white to wall near door control, and manual release/safety reverse test label in tab with a staple, creating a short or open position but will indicate proper connection. Remove cover by color: white wire...

3255 Manual
Page 22
... the open position (parallel to the floor), and lift the door arm to the trolley. Press the Door Control push button. The trolley will travel . 3. Manually close the door and lift the door arm to the trolley. It may be adjusted. Figure 5 Inner Trolley Outer Trolley Door Arm Door Arm Connector...
... the open position (parallel to the floor), and lift the door arm to the trolley. Press the Door Control push button. The trolley will travel . 3. Manually close the door and lift the door arm to the trolley. It may be adjusted. Figure 5 Inner Trolley Outer Trolley Door Arm Door Arm Connector...

3255 Manual
Page 23
...: If the opener lights are flashing, the Safety Reversing Sensors are outlined below. One turn equals 2" (5 cm) of these tests, no visible interference to travel . Manually open door provides adequate clearance. Adjustment procedures are either not installed, misaligned, or obstructed. See Troubleshooting, page 18. To prevent damage to overheat and shut...
...: If the opener lights are flashing, the Safety Reversing Sensors are outlined below. One turn equals 2" (5 cm) of these tests, no visible interference to travel . Manually open door provides adequate clearance. Adjustment procedures are either not installed, misaligned, or obstructed. See Troubleshooting, page 18. To prevent damage to overheat and shut...
3255 Manual
Page 27
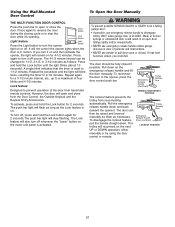
... Keylock and the Keyless Entry Accessories. Pull the emergency release handle down . Using the Wall-Mounted Door Control To Open the Door Manually THE MULTI-FUNCTION DOOR CONTROL Press the push bar to a maximum of four blinks and 4-1/2 minutes. Press again to turn off ...The trolley will flash as long as necessary. The push bar light will reconnect on the emergency release handle and lift the door manually. MANUAL DISCONNECT POSITION Trolley Release Arm Emergency Release Handle (Down and Back) NOTICE LOCKOUT POSITION 27 The door can be changed to stop ...
... Keylock and the Keyless Entry Accessories. Pull the emergency release handle down . Using the Wall-Mounted Door Control To Open the Door Manually THE MULTI-FUNCTION DOOR CONTROL Press the push bar to a maximum of four blinks and 4-1/2 minutes. Press again to turn off ...The trolley will flash as long as necessary. The push bar light will reconnect on the emergency release handle and lift the door manually. MANUAL DISCONNECT POSITION Trolley Release Arm Emergency Release Handle (Down and Back) NOTICE LOCKOUT POSITION 27 The door can be changed to stop ...
3255 Manual
Page 28
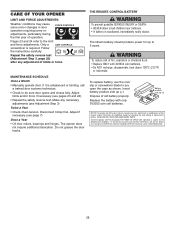
... limit and force adjustments. Follow the instructions carefully. To replace battery, use the visor clip or screwdriver blade to 5 years. MAINTENANCE SCHEDULE Once a Month • Manually operate door. The opener does not require additional lubrication. THERE ARE NO OTHER USER SERVICEABLE PARTS. The lithium battery should produce power for changing the...
... limit and force adjustments. Follow the instructions carefully. To replace battery, use the visor clip or screwdriver blade to 5 years. MAINTENANCE SCHEDULE Once a Month • Manually operate door. The opener does not require additional lubrication. THERE ARE NO OTHER USER SERVICEABLE PARTS. The lithium battery should produce power for changing the...
3255 Manual
Page 29
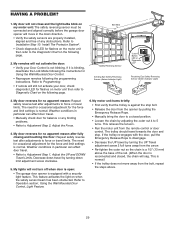
... can affect door travel by turning the UP Travel adjustment screw 2 full turns away from the opener by pulling the Emergency Release Rope. • Manually bring the door to a closed , the chain will not activate the door: • Verify your door, check diagnostic LED for balance or any...the bolt, repeat the steps above the base of any binding problems. • Refer to disengage. • Decrease the UP travel . • Manually check door for flashes on my motor unit: The safety reversing sensor must be connected and aligned correctly before the garage door opener will not...
... can affect door travel by turning the UP Travel adjustment screw 2 full turns away from the opener by pulling the Emergency Release Rope. • Manually bring the door to a closed , the chain will not activate the door: • Verify your door, check diagnostic LED for balance or any...the bolt, repeat the steps above the base of any binding problems. • Refer to disengage. • Decrease the UP travel . • Manually check door for flashes on my motor unit: The safety reversing sensor must be connected and aligned correctly before the garage door opener will not...
3255 Manual
Page 33
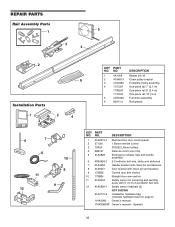
... and sending eyes) with 3' (.9 m) 2-conductor bell wire 12 41A5266-1 Safety sensor brackets (2) NOT SHOWN 41A2770-6 Installation hardware bag (includes hardware listed on page 5) 114A3080 Owner's manual 114A3080SP Owner's manual - NO. NO. REPAIR PARTS Rail Assembly Parts 5 1 3 4 2 Installation Parts KEY PART NO.
... and sending eyes) with 3' (.9 m) 2-conductor bell wire 12 41A5266-1 Safety sensor brackets (2) NOT SHOWN 41A2770-6 Installation hardware bag (includes hardware listed on page 5) 114A3080 Owner's manual 114A3080SP Owner's manual - NO. NO. REPAIR PARTS Rail Assembly Parts 5 1 3 4 2 Installation Parts KEY PART NO.

3255 Manual
Page 35
...Includes visor clip. Wireless Door Control: Push bar, light feature and auxiliary button. Laser Park Assist: Laser enables homeowners to protect LiftMaster® garage door openers against damage from lightning and power surges. 35 Surge Protector: The Garage Door Opener Surge Protector is ...1702LM 41A5281 Outside Quick Release: Required for visitors or service persons. Tells you if your home! Enables homeowner to open garage door manually from car, bedside, or anywhere in the garage. This temporary password can add a temporary password for a garage with Security✚...
...Includes visor clip. Wireless Door Control: Push bar, light feature and auxiliary button. Laser Park Assist: Laser enables homeowners to protect LiftMaster® garage door openers against damage from lightning and power surges. 35 Surge Protector: The Garage Door Opener Surge Protector is ...1702LM 41A5281 Outside Quick Release: Required for visitors or service persons. Tells you if your home! Enables homeowner to open garage door manually from car, bedside, or anywhere in the garage. This temporary password can add a temporary password for a garage with Security✚...


