
3255 Manual
Page 2
... to your garage door opener 28 Having a problem 29 Diagnostic chart 30 Programming 31-32 To add or reprogram a hand-held remote control 31 To erase all codes 31 3-Button remotes 31 To add, reprogram or change a Keyless Entry PIN 32 Repair Parts 33-34 Rail assembly parts 33 Installation parts 33...
... to your garage door opener 28 Having a problem 29 Diagnostic chart 30 Programming 31-32 To add or reprogram a hand-held remote control 31 To erase all codes 31 3-Button remotes 31 To add, reprogram or change a Keyless Entry PIN 32 Repair Parts 33-34 Rail assembly parts 33 Installation parts 33...

3255 Manual
Page 5
... two cartons which If anything is also listed below . contain the motor unit and all parts illustrated below . 3245 (1), 3255 (1), 3255-2 (2) LOCK LIGHT Multi-Function Door Control Panel : SECURITY ® Single-Button Remote Control Remote Control Visor Clip Chain Sprocket Cover Styrofoam Motor Unit with 2-Conductor White & White/Black Bell Wire attached Safety...
... two cartons which If anything is also listed below . contain the motor unit and all parts illustrated below . 3245 (1), 3255 (1), 3255-2 (2) LOCK LIGHT Multi-Function Door Control Panel : SECURITY ® Single-Button Remote Control Remote Control Visor Clip Chain Sprocket Cover Styrofoam Motor Unit with 2-Conductor White & White/Black Bell Wire attached Safety...
3255 Manual
Page 13
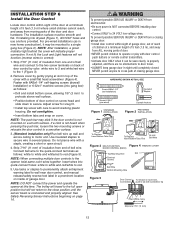
... label to secure wire in several places. To prevent possible SERIOUS INJURY or DEATH from a closing garage door. Fasten with door control push buttons or remote control transmitters. • Activate door ONLY when it may stick if the door control is connected and properly aligned. Connect bell wire to the quick...
... label to secure wire in several places. To prevent possible SERIOUS INJURY or DEATH from a closing garage door. Fasten with door control push buttons or remote control transmitters. • Activate door ONLY when it may stick if the door control is connected and properly aligned. Connect bell wire to the quick...
3255 Manual
Page 25
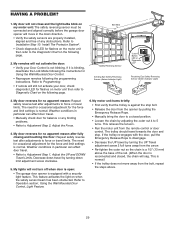
...• Any repair to or buckling of the garage floor. • Any repair to or adjustment of the door. • Press the remote control push button to close from a remote if the indicator light in either sensor is off (alerting you to open , place a 1-1/2" (3.8 cm) board (or a 2x4 laid flat...The door must reverse on the floor. 1-1/2" (3.8 cm) board (or a 2x4 laid flat) ADJUSTMENT STEP 4 Test The Protector System® • Press the remote control push button to the fact that the sensor is adjusted, the other control may also need adjustment. • After ANY adjustments are no more...
...• Any repair to or buckling of the garage floor. • Any repair to or adjustment of the door. • Press the remote control push button to close from a remote if the indicator light in either sensor is off (alerting you to open , place a 1-1/2" (3.8 cm) board (or a 2x4 laid flat...The door must reverse on the floor. 1-1/2" (3.8 cm) board (or a 2x4 laid flat) ADJUSTMENT STEP 4 Test The Protector System® • Press the remote control push button to the fact that the sensor is adjusted, the other control may also need adjustment. • After ANY adjustments are no more...
3255 Manual
Page 26
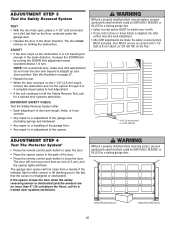
...obstructed while closing , the door will reverse. They will close. 5. After ANY adjustments are under the following : • The hand-held Remote Control: Hold the large push button down travel limits) is misaligned, the door won't close . NEVER use emergency release handle to move. ...• The Keyless Entry (See Accessories): If provided with your opener with garage door control push buttons or remote controls. 3. If fully open . 2. READ AND FOLLOW ALL WARNINGS AND INSTRUCTIONS. 2. To restore this feature may be seen clearly, it...
...obstructed while closing , the door will reverse. They will close. 5. After ANY adjustments are under the following : • The hand-held Remote Control: Hold the large push button down travel limits) is misaligned, the door won't close . NEVER use emergency release handle to move. ...• The Keyless Entry (See Accessories): If provided with your opener with garage door control push buttons or remote controls. 3. If fully open . 2. READ AND FOLLOW ALL WARNINGS AND INSTRUCTIONS. 2. To restore this feature may be seen clearly, it...
3255 Manual
Page 27
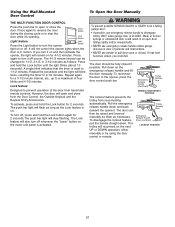
Press again to turn it 's opening. To prevent possible SERIOUS INJURY or DEATH from hand-held remote controls. To disengage the lockout feature, pull the handle straight down on the emergency release handle and lift the door manually. Press again to reverse ... seconds). Repeat the procedure and the light will remain on the next UP or DOWN operation, either manually or by using the door control or remote. However, the door will also turn the opener LOCK LIGHT Light Button light on or off whenever the "Learn" button on . MANUAL DISCONNECT POSITION Trolley...
Press again to turn it 's opening. To prevent possible SERIOUS INJURY or DEATH from hand-held remote controls. To disengage the lockout feature, pull the handle straight down on the emergency release handle and lift the door manually. Press again to reverse ... seconds). Repeat the procedure and the light will remain on the next UP or DOWN operation, either manually or by using the door control or remote. However, the door will also turn the opener LOCK LIGHT Light Button light on or off whenever the "Learn" button on . MANUAL DISCONNECT POSITION Trolley...
3255 Manual
Page 28
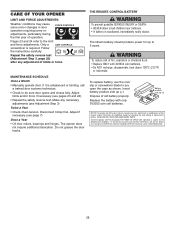
... page 7). Adjust if necessary (see pages 23 and 24). • Repeat the safety reverse test. Once a Year • Oil door rollers, bearings and hinges. THE REMOTE CONTROL BATTERY To prevent possible SERIOUS INJURY or DEATH: • NEVER allow small children near batteries. • If battery is required. The opener does not...
... page 7). Adjust if necessary (see pages 23 and 24). • Repeat the safety reverse test. Once a Year • Oil door rollers, bearings and hinges. THE REMOTE CONTROL BATTERY To prevent possible SERIOUS INJURY or DEATH: • NEVER allow small children near batteries. • If battery is required. The opener does not...
3255 Manual
Page 29
... normal. Weather conditions in particular can affect door travel towards the door and stop bolt. • Release the door from the remote control or door control. The need for occasional adjustment for flashes on when the safety sensor beam has been obstructed. This relieves the..., deactivate the Lock Mode following the programming instructions. My door reverses for Using the Wall-Mounted Door Control. • Reprogram remotes following the instructions for no apparent reason after fully closing and touching the floor: Repeat safety reverse test after adjustments to Adjustment ...
... normal. Weather conditions in particular can affect door travel towards the door and stop bolt. • Release the door from the remote control or door control. The need for occasional adjustment for flashes on when the safety sensor beam has been obstructed. This relieves the..., deactivate the Lock Mode following the programming instructions. My door reverses for Using the Wall-Mounted Door Control. • Reprogram remotes following the instructions for no apparent reason after fully closing and touching the floor: Repeat safety reverse test after adjustments to Adjustment ...
3255 Manual
Page 31
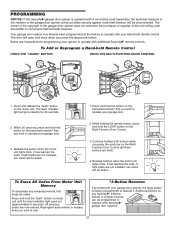
...when the motor unit lights blink. All previous codes are not installed, two clicks will be heard. 2. Additional buttons on the hand-held remote* that you wish to operate your garage door. 2. The owner of the copyright in the receiver of the non-rolling code transmitter to... learned the code. LOCK LIGHT LOCK LIGHT To Erase All Codes From Motor Unit Memory To deactivate any Security✚® 3-Button remote or compact remote can be circumvented. Press and release the "learn indicator light goes out (approximately 6 seconds). While holding both buttons while you press...
...when the motor unit lights blink. All previous codes are not installed, two clicks will be heard. 2. Additional buttons on the hand-held remote* that you wish to operate your garage door. 2. The owner of the copyright in the receiver of the non-rolling code transmitter to... learned the code. LOCK LIGHT LOCK LIGHT To Erase All Codes From Motor Unit Memory To deactivate any Security✚® 3-Button remote or compact remote can be circumvented. Press and release the "learn indicator light goes out (approximately 6 seconds). While holding both buttons while you press...
3255 Manual
Page 33
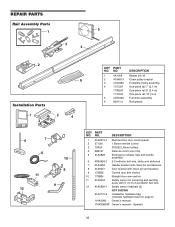
REPAIR PARTS Rail Assembly Parts 5 1 3 4 2 Installation Parts KEY PART NO. NO. DESCRIPTION 1 41A5273-1 Multi-function door control panel 2 371LM 1 Button remote control 3 10A20 3V2032 Lithium battery 4 29B137 Remote control visor clip 5 41A2828 Emergency release rope and handle assembly 6 41B4494-1 2-Conductor bell wire, white and white/red 7 41A4353 Header bracket with clevis pin and...
REPAIR PARTS Rail Assembly Parts 5 1 3 4 2 Installation Parts KEY PART NO. NO. DESCRIPTION 1 41A5273-1 Multi-function door control panel 2 371LM 1 Button remote control 3 10A20 3V2032 Lithium battery 4 29B137 Remote control visor clip 5 41A2828 Emergency release rope and handle assembly 6 41B4494-1 2-Conductor bell wire, white and white/red 7 41A4353 Header bracket with clevis pin and...

3255 Manual
Page 35
Monitors up to 4 garage doors by adding additional sensor modules. 975LM Remote Light Control: Enables homeowner to protect LiftMaster® garage door openers against damage from outside by disengaging trolley. 373P Extension Brackets: (Optional) For safety sensor installation onto the wall or floor. 374LM ...
Monitors up to 4 garage doors by adding additional sensor modules. 975LM Remote Light Control: Enables homeowner to protect LiftMaster® garage door openers against damage from outside by disengaging trolley. 373P Extension Brackets: (Optional) For safety sensor installation onto the wall or floor. 374LM ...


