

3255 Manual
Page 2
...remotes 31 To add, reprogram or change a Keyless Entry PIN 32 Repair Parts 33-34 Rail assembly parts 33 Installation parts 33 Motor unit assembly parts 34 Accessories 35 Repair Parts and Service 36 Warranty 36 INTRODUCTION Safety Symbol and Signal ...2-5 Safety symbol and signal word review 2 Preparing your garage door 3 Tools needed 3 Planning 4 Carton inventory 5 Hardware inventory 5 Assembly 6-7 Attach the rail to the motor unit 6 Attach the chain to the sprocket 6 Tighten the chain 7 Installation 7-22 Installation safety instructions 7 Determine the...
...remotes 31 To add, reprogram or change a Keyless Entry PIN 32 Repair Parts 33-34 Rail assembly parts 33 Installation parts 33 Motor unit assembly parts 34 Accessories 35 Repair Parts and Service 36 Warranty 36 INTRODUCTION Safety Symbol and Signal ...2-5 Safety symbol and signal word review 2 Preparing your garage door 3 Tools needed 3 Planning 4 Carton inventory 5 Hardware inventory 5 Assembly 6-7 Attach the rail to the motor unit 6 Attach the chain to the sprocket 6 Tighten the chain 7 Installation 7-22 Installation safety instructions 7 Determine the...
3255 Manual
Page 6
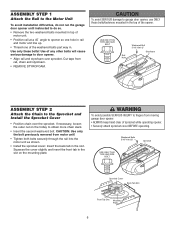
...the sprocket cover: Insert the back tab in the slot. CAUTION: Use only the bolt previously removed from rail, chain and styrofoam. • REMOVE STYROFOAM. ASSEMBLY STEP 1 Attach the Rail to the Motor Unit To avoid installation difficulties, do not run the garage door opener until instructed to do ...so. • Remove the two washered bolts mounted in top of motor unit. • Position rail at a 45˚ angle...
...the sprocket cover: Insert the back tab in the slot. CAUTION: Use only the bolt previously removed from rail, chain and styrofoam. • REMOVE STYROFOAM. ASSEMBLY STEP 1 Attach the Rail to the Motor Unit To avoid installation difficulties, do not run the garage door opener until instructed to do ...so. • Remove the two washered bolts mounted in top of motor unit. • Position rail at a 45˚ angle...

3255 Manual
Page 7
... 1. ALL repairs to do not re-adjust the chain. NEVER connect garage door opener to power source until instructed to cables, spring assemblies and other hardware MUST be caught in Figure 2 when the door is approximately 1/2" (13 mm) above the base of installation, test... disconnect trolley before proceeding to the installation section. INSTALLATION WARNING IMPORTANT INSTALLATION INSTRUCTIONS WARNING To reduce the risk of Rail You have now finished assembling your garage door opener. Install garage door opener only on wall next to secure the adjustment. An improperly balanced...
... 1. ALL repairs to do not re-adjust the chain. NEVER connect garage door opener to power source until instructed to cables, spring assemblies and other hardware MUST be caught in Figure 2 when the door is approximately 1/2" (13 mm) above the base of installation, test... disconnect trolley before proceeding to the installation section. INSTALLATION WARNING IMPORTANT INSTALLATION INSTRUCTIONS WARNING To reduce the risk of Rail You have now finished assembling your garage door opener. Install garage door opener only on wall next to secure the adjustment. An improperly balanced...
3255 Manual
Page 33
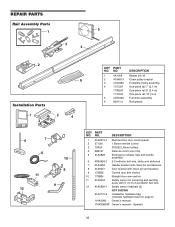
...control 3 10A20 3V2032 Lithium battery 4 29B137 Remote control visor clip 5 41A2828 Emergency release rope and handle assembly 6 41B4494-1 2-Conductor bell wire, white and white/red 7 41A4353 Header bracket with clevis pin and fastener...REPAIR PARTS Rail Assembly Parts 5 1 3 4 2 Installation Parts KEY PART NO. DESCRIPTION 1 4A1008 Master link kit 6 2 41A4813 Chain pulley bracket 3 41A3489 Complete trolley assembly 4 1707LM One-piece rail 7' (2.1 m) 1708LM One-piece rail 8' (2.4 m) 1710LM One-piece rail 10' (3 m) 5 41D3484 Full chain assembly 6 83A11-2 Rail grease 1...
...control 3 10A20 3V2032 Lithium battery 4 29B137 Remote control visor clip 5 41A2828 Emergency release rope and handle assembly 6 41B4494-1 2-Conductor bell wire, white and white/red 7 41A4353 Header bracket with clevis pin and fastener...REPAIR PARTS Rail Assembly Parts 5 1 3 4 2 Installation Parts KEY PART NO. DESCRIPTION 1 4A1008 Master link kit 6 2 41A4813 Chain pulley bracket 3 41A3489 Complete trolley assembly 4 1707LM One-piece rail 7' (2.1 m) 1708LM One-piece rail 8' (2.4 m) 1710LM One-piece rail 10' (3 m) 5 41D3484 Full chain assembly 6 83A11-2 Rail grease 1...


