User's Guide
Page 8
... the printer 135 Understanding the Maintenance menu 135 Installing print cartridges...135 Removing a used print cartridge...137 Refilling print cartridges...138 Using genuine Lexmark print cartridges 138 Aligning print cartridges...138 Cleaning the print cartridge nozzles 139 Wiping the print cartridge nozzles and contacts 139 Preserving the print cartridges...140 Cleaning the scanner glass...141 Cleaning the exterior of...
... the printer 135 Understanding the Maintenance menu 135 Installing print cartridges...135 Removing a used print cartridge...137 Refilling print cartridges...138 Using genuine Lexmark print cartridges 138 Aligning print cartridges...138 Cleaning the print cartridge nozzles 139 Wiping the print cartridge nozzles and contacts 139 Preserving the print cartridges...140 Cleaning the scanner glass...141 Cleaning the exterior of...
User's Guide
Page 9
... the edges of the page...161 Print speed is slow...163 Partial document or photo prints...163 Photo smudges or scratches ...163 Checking the print cartridges...163 Ink levels seem incorrect ...164 Ink levels seem to go down too quickly ...164 A blank or incorrect page prints...164 Characters on printout are...
... the edges of the page...161 Print speed is slow...163 Partial document or photo prints...163 Photo smudges or scratches ...163 Checking the print cartridges...163 Ink levels seem incorrect ...164 Ink levels seem to go down too quickly ...164 A blank or incorrect page prints...164 Characters on printout are...

User's Guide
Page 11
...Photo Ink Low 199 Clear Carrier Jam ...199 Cover Open ...200 Error 1104...200 Left Cartridge Error / Right Cartridge Error 200 Left Cartridge Incorrect / Right Cartridge Incorrect 200 Left Cartridge Missing / Right Cartridge Missing 201 Memory Failure...201 No images have been selected ...201 No photo/paper size ...by host 203 Problems reading the memory card ...203 Error messages on the computer screen 203 Clearing error messages ...203 Left/Right Cartridge Missing ...203 Communication not available ...203 General Printing Problem ...204 Ink Low ...204 Out of Memory...204 Out of Paper ...
...Photo Ink Low 199 Clear Carrier Jam ...199 Cover Open ...200 Error 1104...200 Left Cartridge Error / Right Cartridge Error 200 Left Cartridge Incorrect / Right Cartridge Incorrect 200 Left Cartridge Missing / Right Cartridge Missing 201 Memory Failure...201 No images have been selected ...201 No photo/paper size ...by host 203 Problems reading the memory card ...203 Error messages on the computer screen 203 Clearing error messages ...203 Left/Right Cartridge Missing ...203 Communication not available ...203 General Printing Problem ...204 Ink Low ...204 Out of Memory...204 Out of Paper ...
User's Guide
Page 17
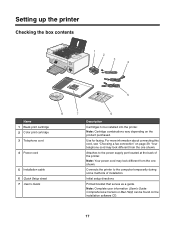
...up the printer Checking the box contents 1 2 3 4 1 2 3 5 8 Name 1 Black print cartridge 2 Color print cartridge 3 Telephone cord 4 Power cord 5 Installation cable 6 Quick Setup sheet 7 User's Guide 7 6 Description Cartridges to the power supply port located at the back of installation. Use for faxing. Your telephone cord may look ...cord, see "Choosing a fax connection" on the installation software CD. 17 Attaches to be found on page 29. Note: Cartridge combinations vary depending on the product purchased. Note: Your power cord may look different from the one shown.
...up the printer Checking the box contents 1 2 3 4 1 2 3 5 8 Name 1 Black print cartridge 2 Color print cartridge 3 Telephone cord 4 Power cord 5 Installation cable 6 Quick Setup sheet 7 User's Guide 7 6 Description Cartridges to the power supply port located at the back of installation. Use for faxing. Your telephone cord may look ...cord, see "Choosing a fax connection" on the installation software CD. 17 Attaches to be found on page 29. Note: Cartridge combinations vary depending on the product purchased. Note: Your power cord may look different from the one shown.
User's Guide
Page 19
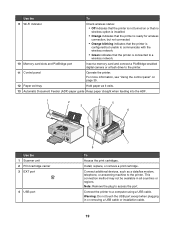
.... 13 Automatic Document Feeder (ADF) paper guide Keep paper straight when feeding into the ADF. 1 2 4 5 3 6 Use the 1 Scanner unit 2 Print cartridge carrier 3 EXT port 4 USB port 7 8 To Access the print cartridges. Note: Remove the plug to a computer using a USB cable. Use the To 9 Wi-Fi indicator Check wireless status: • Off indicates... Control panel Operate the printer. Warning: Do not touch the USB port except when plugging in all countries or regions. Install, replace, or remove a print cartridge.
.... 13 Automatic Document Feeder (ADF) paper guide Keep paper straight when feeding into the ADF. 1 2 4 5 3 6 Use the 1 Scanner unit 2 Print cartridge carrier 3 EXT port 4 USB port 7 8 To Access the print cartridges. Note: Remove the plug to a computer using a USB cable. Use the To 9 Wi-Fi indicator Check wireless status: • Off indicates... Control panel Operate the printer. Warning: Do not touch the USB port except when plugging in all countries or regions. Install, replace, or remove a print cartridge.

User's Guide
Page 24
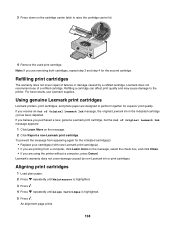
13 Open the printer. 14 Press down on the cartridge carrier levers. 15 Remove the tape from the black print cartridge, and insert the cartridge in the left carrier. 16 Close the black cartridge carrier lid. 24
13 Open the printer. 14 Press down on the cartridge carrier levers. 15 Remove the tape from the black print cartridge, and insert the cartridge in the left carrier. 16 Close the black cartridge carrier lid. 24

User's Guide
Page 25
An alignment page prints. 25 17 Remove the tape from the color print cartridge, and insert the cartridge in the right carrier. 18 Close the color cartridge carrier lid. 19 Close the printer. 20 Press .
An alignment page prints. 25 17 Remove the tape from the color print cartridge, and insert the cartridge in the right carrier. 18 Close the color cartridge carrier lid. 19 Close the printer. 20 Press .

User's Guide
Page 45
... : • In Windows Vista, click . • In Windows XP and earlier, click Start. 2 Click Programs or All Programs Œ Lexmark 7500 Series. 3 Select Solution Center. From here You can: How To • Learn how to change printer settings and troubleshooting. Use basic features... two Settings choices: Click To Printer Status and Maintenance • Open the Solution Center. • Check ink levels. • Order print cartridges. • Find maintenance information. • Select other Solution Center tabs for : • Dialing and Sending • Ringing and Answering &#...
... : • In Windows Vista, click . • In Windows XP and earlier, click Start. 2 Click Programs or All Programs Œ Lexmark 7500 Series. 3 Select Solution Center. From here You can: How To • Learn how to change printer settings and troubleshooting. Use basic features... two Settings choices: Click To Printer Status and Maintenance • Open the Solution Center. • Check ink levels. • Order print cartridges. • Find maintenance information. • Select other Solution Center tabs for : • Dialing and Sending • Ringing and Answering &#...
User's Guide
Page 46
... tells you use the printer. • Obtain software version information. • View ink levels and order new print cartridges. • Install a new print cartridge. Note: Wait until scanning is completed. From here Advanced Maintenance You can: • Change the appearance of the ...following: • In Windows Vista, click . • In Windows XP and earlier, click Start. 2 Click Programs or All Programs Œ Lexmark 7500 Series. 3...
... tells you use the printer. • Obtain software version information. • View ink levels and order new print cartridges. • Install a new print cartridge. Note: Wait until scanning is completed. From here Advanced Maintenance You can: • Change the appearance of the ...following: • In Windows Vista, click . • In Windows XP and earlier, click Start. 2 Click Programs or All Programs Œ Lexmark 7500 Series. 3...

User's Guide
Page 135
Clean the print cartridge nozzles of both cartridges to improve print quality. Align both cartridges. Run modem diagnostic routines. Installing print cartridges 1 Open the printer. 135 Print a test page to print cartridges. 1 From the control panel, press or repeatedly until Maintenance is functioning ... table explains the function of your previously defined user default settings to change print cartridges. Use this View Ink Levels Clean Cartridges Align Cartridges Change Print Cartridges Print Test Page Call Diagnostics Reset Defaults To See the current ink levels for ...
Clean the print cartridge nozzles of both cartridges to improve print quality. Align both cartridges. Run modem diagnostic routines. Installing print cartridges 1 Open the printer. 135 Print a test page to print cartridges. 1 From the control panel, press or repeatedly until Maintenance is functioning ... table explains the function of your previously defined user default settings to change print cartridges. Use this View Ink Levels Clean Cartridges Align Cartridges Change Print Cartridges Print Test Page Call Diagnostics Reset Defaults To See the current ink levels for ...

User's Guide
Page 136
...on the cartridge carrier levers. 3 Remove the used print cartridge" on page 137. 4 If you are installing new print cartridges, remove the tape from the back and bottom of the color cartridge, and insert the cartridge in the left carrier. For more information, see "Removing a used print cartridge or cartridges. Warning:... Do not touch the gold contact area on the back or the metal nozzles on the bottom of the black cartridge, and insert the cartridge in the right carrier. Warning: Do not touch the...
...on the cartridge carrier levers. 3 Remove the used print cartridge" on page 137. 4 If you are installing new print cartridges, remove the tape from the back and bottom of the color cartridge, and insert the cartridge in the left carrier. For more information, see "Removing a used print cartridge or cartridges. Warning:... Do not touch the gold contact area on the back or the metal nozzles on the bottom of the black cartridge, and insert the cartridge in the right carrier. Warning: Do not touch the...

User's Guide
Page 137
The control panel display will prompt you to load paper and press to start a new scan, print, or copy job. Note: The printer must be closed to print an alignment page. Removing a used print cartridge 1 Make sure the printer is busy. 137 The print cartridge carrier moves and stops at the loading position, unless the printer is on. 2 Lift the scanner unit. 7 Close the color cartridge carrier lid. 8 Close the printer, making sure to keep your hands out from underneath the scanner unit.
The control panel display will prompt you to load paper and press to start a new scan, print, or copy job. Note: The printer must be closed to print an alignment page. Removing a used print cartridge 1 Make sure the printer is busy. 137 The print cartridge carrier moves and stops at the loading position, unless the printer is on. 2 Lift the scanner unit. 7 Close the color cartridge carrier lid. 8 Close the printer, making sure to keep your hands out from underneath the scanner unit.
User's Guide
Page 138
... the printer. For best results, use of Original Lexmark Ink message, the original Lexmark ink in the indicated cartridge (s) has been depleted. Using genuine Lexmark print cartridges Lexmark printers, print cartridges, and photo paper are removing both cartridges, repeat step 3 and step 4 for the indicated cartridge(s): • Replace your cartridge(s) with new Lexmark print cartridge(s). • If you are printing from a computer...
... the printer. For best results, use of Original Lexmark Ink message, the original Lexmark ink in the indicated cartridge (s) has been depleted. Using genuine Lexmark print cartridges Lexmark printers, print cartridges, and photo paper are removing both cartridges, repeat step 3 and step 4 for the indicated cartridge(s): • Replace your cartridge(s) with new Lexmark print cartridge(s). • If you are printing from a computer...

User's Guide
Page 139
... 7 If print quality has not improved, try cleaning the nozzles up to improve print quality, print your document again. Wiping the print cartridge nozzles and contacts 1 Remove the print cartridges. 2 Dampen a clean, lint-free cloth with water, and place the cloth on a flat surface. 3 Gently hold the nozzles against... the cloth for about three seconds, and then wipe in the direction shown. 139 Cleaning the print cartridge nozzles 1 Load plain paper. 2 Press or repeatedly until Maintenance is highlighted. 3 Press . 4 Press or repeatedly until Clean...
... 7 If print quality has not improved, try cleaning the nozzles up to improve print quality, print your document again. Wiping the print cartridge nozzles and contacts 1 Remove the print cartridges. 2 Dampen a clean, lint-free cloth with water, and place the cloth on a flat surface. 3 Gently hold the nozzles against... the cloth for about three seconds, and then wipe in the direction shown. 139 Cleaning the print cartridge nozzles 1 Load plain paper. 2 Press or repeatedly until Maintenance is highlighted. 3 Press . 4 Press or repeatedly until Clean...

User's Guide
Page 140
... the contacts for an extended period of the cloth, repeat step 3 and step 4. 6 Let the nozzles and contacts dry completely. 7 Reinsert the print cartridges. 8 Print the document again. 9 If the print quality does not improve, clean the print nozzles. For more information, see "Cleaning the print... Repeat step 9 up to replace, clean, or store it in use. 140 Preserving the print cartridges • Keep a new cartridge in its own storage unit when not in an airtight container. The cartridges do not print correctly if left exposed for about three seconds, and then wipe in the direction shown...
... the contacts for an extended period of the cloth, repeat step 3 and step 4. 6 Let the nozzles and contacts dry completely. 7 Reinsert the print cartridges. 8 Print the document again. 9 If the print quality does not improve, clean the print nozzles. For more information, see "Cleaning the print... Repeat step 9 up to replace, clean, or store it in use. 140 Preserving the print cartridges • Keep a new cartridge in its own storage unit when not in an airtight container. The cartridges do not print correctly if left exposed for about three seconds, and then wipe in the direction shown...
User's Guide
Page 141
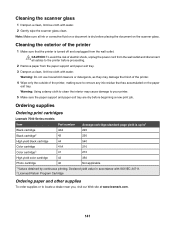
Ordering supplies Ordering print cartridges Lexmark 7500 Series models Item Part number Average cartridge standard page yield is dry before placing the document on the paper exit tray. Declared yield value in accordance with water. 2 Gently wipe the scanner ... the scanner glass 1 Dampen a clean, lint-free cloth with ISO/IEC 24711. 2 Licensed Return Program Cartridge Ordering paper and other supplies To order supplies or to locate a dealer near you, visit our Web site at www.lexmark.com. 141 Warning: Using a damp cloth to clean the interior may damage the finish of...
Ordering supplies Ordering print cartridges Lexmark 7500 Series models Item Part number Average cartridge standard page yield is dry before placing the document on the paper exit tray. Declared yield value in accordance with water. 2 Gently wipe the scanner ... the scanner glass 1 Dampen a clean, lint-free cloth with ISO/IEC 24711. 2 Licensed Return Program Cartridge Ordering paper and other supplies To order supplies or to locate a dealer near you, visit our Web site at www.lexmark.com. 141 Warning: Using a damp cloth to clean the interior may damage the finish of...

User's Guide
Page 142
... fingers or sharp objects. Your print cartridges are not compatible with this type of paper. • To prevent smudging or scratching, avoid touching the printed surface with an internal wireless print server already installed, installing the Lexmark N2050 in the printer lets you print... before stacking, displaying, or storing. Notes: • For best results, use only Lexmark print cartridges. • For best results when printing photos or other high-quality images, use Lexmark Premium Photo Paper. Do not use Lexmark Photo Paper or Lexmark PerfectfinishTM Photo Paper.
... fingers or sharp objects. Your print cartridges are not compatible with this type of paper. • To prevent smudging or scratching, avoid touching the printed surface with an internal wireless print server already installed, installing the Lexmark N2050 in the printer lets you print... before stacking, displaying, or storing. Notes: • For best results, use only Lexmark print cartridges. • For best results when printing photos or other high-quality images, use Lexmark Premium Photo Paper. Do not use Lexmark Photo Paper or Lexmark PerfectfinishTM Photo Paper.

User's Guide
Page 145
... the light is not on, make sure the printer is properly connected to the printer. Check ink Check the ink levels, and install new print cartridges if necessary. 145 Make sure the power cord is plugged into the wall outlet. 6 Press to turn the printer off. 2 Disconnect the power cord from...
... the light is not on, make sure the printer is properly connected to the printer. Check ink Check the ink levels, and install new print cartridges if necessary. 145 Make sure the power cord is plugged into the wall outlet. 6 Press to turn the printer off. 2 Disconnect the power cord from...

User's Guide
Page 146
... software, and then reinstall it. Solving printer communication problems The printer and the computer cannot exchange data. Check cartridges 1 Remove the print cartridges. 2 Make sure the sticker and tape have been removed. 1 2 3 Reinsert the cartridges. Try one of the following : • In Windows Vista, click ŒControl Panel. • In Windows XP, click...
... software, and then reinstall it. Solving printer communication problems The printer and the computer cannot exchange data. Check cartridges 1 Remove the print cartridges. 2 Make sure the sticker and tape have been removed. 1 2 3 Reinsert the cartridges. Try one of the following : • In Windows Vista, click ŒControl Panel. • In Windows XP, click...

User's Guide
Page 160
... to the next step. 2 Clean the print cartridge nozzles. If print quality has not improved, continue to choose the quality that is still not satisfactory, replace the print cartridges. Do not use Lexmark Photo Paper or Lexmark PerfectFinish Photo Paper. Try one or more information,... see "Aligning print cartridges" on page 137. For more information, see "Wiping the print cartridge nozzles and contacts" on page 139. For...
... to the next step. 2 Clean the print cartridge nozzles. If print quality has not improved, continue to choose the quality that is still not satisfactory, replace the print cartridges. Do not use Lexmark Photo Paper or Lexmark PerfectFinish Photo Paper. Try one or more information,... see "Aligning print cartridges" on page 137. For more information, see "Wiping the print cartridge nozzles and contacts" on page 139. For...


