User's Guide
Page 3
... 2 Introduction 13 Finding information about the printer...13 Operating system notice...16 Setting up the printer 17 Checking the box contents...17 Setting up the printer for standalone use...18 Understanding the parts of the printer...23 Getting the printer ready to fax...25 Using an RJ11 ... panel...35 Using the control panel ...35 Saving settings...39 Installing another language control panel...40 Installing the printer software...41 Understanding the printer software...41 Turning printing voice notification on or off...44 Security Information...44 General networking 45 Finding your MAC...
... 2 Introduction 13 Finding information about the printer...13 Operating system notice...16 Setting up the printer 17 Checking the box contents...17 Setting up the printer for standalone use...18 Understanding the parts of the printer...23 Getting the printer ready to fax...25 Using an RJ11 ... panel...35 Using the control panel ...35 Saving settings...39 Installing another language control panel...40 Installing the printer software...41 Understanding the printer software...41 Turning printing voice notification on or off...44 Security Information...44 General networking 45 Finding your MAC...
User's Guide
Page 4
Configure network printers...47 Connect to network printer...47 Loading paper and original documents 48 Loading paper...48 Using the automatic paper type sensor...48 Loading envelopes...49 Loading labels...49 Loading greeting ......58 Printing a booklet ...59 Assembling a booklet...59 Printing on custom-size paper...60 Printing iron-on transfers...60 Printing transparencies...60 Printing a banner ...60 Changing printer settings...61 Saving and deleting print settings ...61 Contents 4
Configure network printers...47 Connect to network printer...47 Loading paper and original documents 48 Loading paper...48 Using the automatic paper type sensor...48 Loading envelopes...49 Loading labels...49 Loading greeting ......58 Printing a booklet ...59 Assembling a booklet...59 Printing on custom-size paper...60 Printing iron-on transfers...60 Printing transparencies...60 Printing a banner ...60 Changing printer settings...61 Saving and deleting print settings ...61 Contents 4
User's Guide
Page 5
... factory default settings ...61 Resetting the printer to factory default settings...62 Working with photos 63 Retrieving and managing photos...63 Inserting a memory card ...63 Inserting a flash drive ...64 Understanding the Photo Card menu...65 Understanding the PictBridge menu...66 Transferring photos ...68 Changing the Lexmark Productivity Studio preferences 70 Editing photos...
... factory default settings ...61 Resetting the printer to factory default settings...62 Working with photos 63 Retrieving and managing photos...63 Inserting a memory card ...63 Inserting a flash drive ...64 Understanding the Photo Card menu...65 Understanding the PictBridge menu...66 Transferring photos ...68 Changing the Lexmark Productivity Studio preferences 70 Editing photos...

User's Guide
Page 7
... a fax automatically 111 Setting up Speed Dial...111 Printing fax activity reports...112 Maintaining the printer 113 Replacing print cartridges...113 Installing print cartridges...113 Removing a used print cartridge ...114 Refilling print cartridges...115 Using genuine Lexmark print cartridges...115 Aligning print cartridges...115 Cleaning the print cartridge nozzles...116 Wiping the...
... a fax automatically 111 Setting up Speed Dial...111 Printing fax activity reports...112 Maintaining the printer 113 Replacing print cartridges...113 Installing print cartridges...113 Removing a used print cartridge ...114 Refilling print cartridges...115 Using genuine Lexmark print cartridges...115 Aligning print cartridges...115 Cleaning the print cartridge nozzles...116 Wiping the...
User's Guide
Page 8
...appears on the display...121 Power button is not lit ...121 Software does not install...122 Page does not print...123 Solving printer communication problems ...124 Understanding Warning levels ...125 Removing and reinstalling the software ...125 Enabling the USB port...125 Print troubleshooting...126... appear in graphics or solid black areas ...136 Checking the printer status...136 Settings are not saved...137 Checking printer readiness ...137 Checking the Spool Settings for banner printing ...138 Resolving font problems...138 Printer is busy printing another job ...138 Ready or Busy Printing is...
...appears on the display...121 Power button is not lit ...121 Software does not install...122 Page does not print...123 Solving printer communication problems ...124 Understanding Warning levels ...125 Removing and reinstalling the software ...125 Enabling the USB port...125 Print troubleshooting...126... appear in graphics or solid black areas ...136 Checking the printer status...136 Settings are not saved...137 Checking printer readiness ...137 Checking the Spool Settings for banner printing ...138 Resolving font problems...138 Printer is busy printing another job ...138 Ready or Busy Printing is...
User's Guide
Page 9
... Jams and misfeeds troubleshooting...147 How to clear and avoid paper jams...147 Paper jam in the printer...147 Paper jam in the paper support...148 Paper or specialty media misfeeds...148 Printer does not feed paper, envelopes, or specialty media 149 Banner paper jams ...149 Paper continues to......155 Fax troubleshooting...155 Cannot send or receive a fax...155 Can send but not receive faxes...158 Can receive but not send faxes...158 Printer receives a blank fax...160 Received fax has poor print quality...160 Caller ID information is not displayed...160 Fax Error ...161 Fax Mode Unsupported...
... Jams and misfeeds troubleshooting...147 How to clear and avoid paper jams...147 Paper jam in the printer...147 Paper jam in the paper support...148 Paper or specialty media misfeeds...148 Printer does not feed paper, envelopes, or specialty media 149 Banner paper jams ...149 Paper continues to......155 Fax troubleshooting...155 Cannot send or receive a fax...155 Can send but not receive faxes...158 Can receive but not send faxes...158 Printer receives a blank fax...160 Received fax has poor print quality...160 Caller ID information is not displayed...160 Fax Error ...161 Fax Mode Unsupported...

User's Guide
Page 10
... General Printing Problem ...170 Ink Low ...170 Out of Memory...170 Out of Paper...170 Fixing a printing failure...170 Unsupported file types found on the printer display...163 Alignment Error...164 Cartridge Error (1102, 1203, 1204, or 120F)...164 Black Ink Low / Color Ink Low / Photo Ink Low ...165 Clear Carrier...
... General Printing Problem ...170 Ink Low ...170 Out of Memory...170 Out of Paper...170 Fixing a printing failure...170 Unsupported file types found on the printer display...163 Alignment Error...164 Cartridge Error (1102, 1203, 1204, or 120F)...164 Black Ink Low / Color Ink Low / Photo Ink Low ...165 Clear Carrier...
User's Guide
Page 13
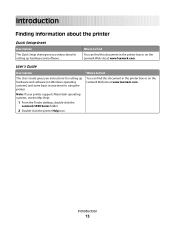
... Help: 1 From the Finder desktop, double-click the Lexmark 5300 Series folder. 2 Double-click the printer Help icon. Where to find You can find this document in the printer box or on the Lexmark Web site at www.lexmark.com. User's Guide Description The User's Guide gives you... instructions for using the printer. Introduction 13 Introduction Finding information about the printer Quick Setup sheet Description The Quick Setup ...
... Help: 1 From the Finder desktop, double-click the Lexmark 5300 Series folder. 2 Double-click the printer Help icon. Where to find You can find this document in the printer box or on the Lexmark Web site at www.lexmark.com. User's Guide Description The User's Guide gives you... instructions for using the printer. Introduction 13 Introduction Finding information about the printer Quick Setup sheet Description The Quick Setup ...
User's Guide
Page 14
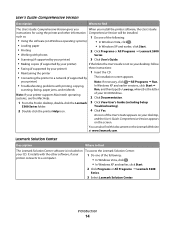
...find The User's Guide: Comprehensive Version gives you When you install the printer software, the User's Guide: instructions for using the printer and other software, if your printer connects to a computer. To access the Lexmark Solution Center: 1 Do one of the following : • Using ...; In Windows XP and earlier, click Start. • Printing 2 Click Programs or All Programs Œ Lexmark 5300 • Working with photos Series. • Scanning (if supported by your printer) 3 Click User's Guide. • Making copies (if supported by your desktop, and the User's Guide...
...find The User's Guide: Comprehensive Version gives you When you install the printer software, the User's Guide: instructions for using the printer and other software, if your printer connects to a computer. To access the Lexmark Solution Center: 1 Do one of the following : • Using ...; In Windows XP and earlier, click Start. • Printing 2 Click Programs or All Programs Œ Lexmark 5300 • Working with photos Series. • Scanning (if supported by your printer) 3 Click User's Guide. • Making copies (if supported by your desktop, and the User's Guide...
User's Guide
Page 15
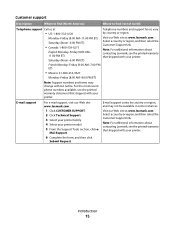
.... E-mail support varies by country or region. Note: For additional information about contacting Lexmark, see the printed warranty that shipped with your printer. Select a country or region, and then select the Customer Support link. Select a country or ...www.lexmark.com. Note: For additional information about contacting Lexmark, see the printed warranty statement that shipped with your printer. E-mail support For e-mail support, visit our Web site: www.lexmark.com. 1 Click CUSTOMER SUPPORT. 2 Click Technical Support. 3 Select your printer family. 4 Select your printer....
.... E-mail support varies by country or region. Note: For additional information about contacting Lexmark, see the printed warranty that shipped with your printer. Select a country or region, and then select the Customer Support link. Select a country or ...www.lexmark.com. Note: For additional information about contacting Lexmark, see the printed warranty statement that shipped with your printer. E-mail support For e-mail support, visit our Web site: www.lexmark.com. 1 Click CUSTOMER SUPPORT. 2 Click Technical Support. 3 Select your printer family. 4 Select your printer....
User's Guide
Page 16
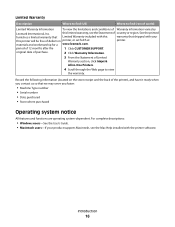
...with your product supports Macintosh, see the Statement of defects in printer, or set forth at printer. Record the following information (located on the store receipt and the back of Warranty information varies by Lexmark International, Inc. period of Limited Warranty section, click Inkjet ...& All-In-One Printers. 4 Scroll through the Web page to find (rest of world) Limited Warranty Information To view the limitations and conditions of the printer), and have it ready...
...with your product supports Macintosh, see the Statement of defects in printer, or set forth at printer. Record the following information (located on the store receipt and the back of Warranty information varies by Lexmark International, Inc. period of Limited Warranty section, click Inkjet ...& All-In-One Printers. 4 Scroll through the Web page to find (rest of world) Limited Warranty Information To view the limitations and conditions of the printer), and have it ready...

User's Guide
Page 17
... 4 Power cord Attaches to the power supply port located at the back of the printer 5 Quick Setup sheet Initial setup directions 6 Installation software CD • Installation software for the printer • User's Guide: Comprehensive Version in electronic format 7 User's Guide Printed booklet... that serves as a guide Note: Complete user information (User's Guide: Comprehensive Version) can be installed into the printer 2 Color print cartridge Note: Cartridge combinations vary depending on the installation software CD. Note: You may not support: • Memory...
... 4 Power cord Attaches to the power supply port located at the back of the printer 5 Quick Setup sheet Initial setup directions 6 Installation software CD • Installation software for the printer • User's Guide: Comprehensive Version in electronic format 7 User's Guide Printed booklet... that serves as a guide Note: Complete user information (User's Guide: Comprehensive Version) can be installed into the printer 2 Color print cartridge Note: Cartridge combinations vary depending on the installation software CD. Note: You may not support: • Memory...
User's Guide
Page 18
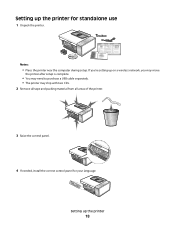
If you're setting up on a wireless network, you may move the printer after setup is complete. • You may need to purchase a USB cable separately. • The printer may ship with two CDs. 2 Remove all tape and packing material from all areas of the printer. 3 Raise the control panel. 4 If needed, install the correct control panel for standalone use 1 Unpack the printer. Notes: • Place the printer near the computer during setup. Setting up the printer for your language. Setting up the printer 18
If you're setting up on a wireless network, you may move the printer after setup is complete. • You may need to purchase a USB cable separately. • The printer may ship with two CDs. 2 Remove all tape and packing material from all areas of the printer. 3 Raise the control panel. 4 If needed, install the correct control panel for standalone use 1 Unpack the printer. Notes: • Place the printer near the computer during setup. Setting up the printer for your language. Setting up the printer 18
User's Guide
Page 19
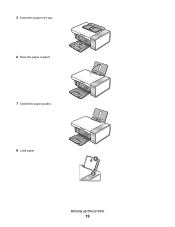
5 Extend the paper exit tray. 6 Raise the paper support. 7 Extend the paper guides. 8 Load paper. 1 2 Setting up the printer 19
5 Extend the paper exit tray. 6 Raise the paper support. 7 Extend the paper guides. 8 Load paper. 1 2 Setting up the printer 19
User's Guide
Page 20
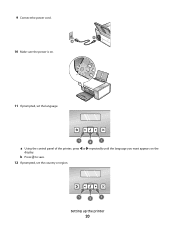
b Press to save. 12 If prompted, set the language. 1 2 1 a Using the control panel of the printer, press or repeatedly until the language you want appears on the display. 9 Connect the power cord. 10 Make sure the power is on. 11 If prompted, set the country or region. 1 2 1 Setting up the printer 20
b Press to save. 12 If prompted, set the language. 1 2 1 a Using the control panel of the printer, press or repeatedly until the language you want appears on the display. 9 Connect the power cord. 10 Make sure the power is on. 11 If prompted, set the country or region. 1 2 1 Setting up the printer 20
User's Guide
Page 21
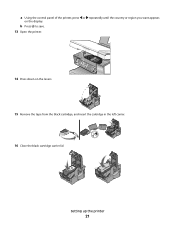
a Using the control panel of the printer, press or repeatedly until the country or region you want appears on the levers. 15 Remove the tape from the black cartridge, and insert the cartridge in the left carrier. 16 Close the black cartridge carrier lid Setting up the printer 21 b Press to save. 13 Open the printer. 14 Press down on the display.
a Using the control panel of the printer, press or repeatedly until the country or region you want appears on the levers. 15 Remove the tape from the black cartridge, and insert the cartridge in the left carrier. 16 Close the black cartridge carrier lid Setting up the printer 21 b Press to save. 13 Open the printer. 14 Press down on the display.
User's Guide
Page 22
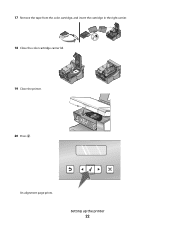
Setting up the printer 22 An alignment page prints. 17 Remove the tape from the color cartridge, and insert the cartridge in the right carrier. 18 Close the color cartridge carrier lid. 19 Close the printer. 20 Press .
Setting up the printer 22 An alignment page prints. 17 Remove the tape from the color cartridge, and insert the cartridge in the right carrier. 18 Close the color cartridge carrier lid. 19 Close the printer. 20 Press .

User's Guide
Page 23
... Top cover Access the scanner glass. 8 Scanner glass Copy, scan, fax, or remove an item. Understanding the parts of the printer 1 6 7 8 5 43 2 Use the To 1 Paper support Load paper. 2 PictBridge port Connect a PictBridge-enabled digital camera or a flash drive to ...the printer. 3 Memory card slots Insert a memory card. 4 Control panel Operate the printer. 21 Discard the alignment page. Setting up the printer 23 For more information, see "Using the control panel" on the alignment page are ...
... Top cover Access the scanner glass. 8 Scanner glass Copy, scan, fax, or remove an item. Understanding the parts of the printer 1 6 7 8 5 43 2 Use the To 1 Paper support Load paper. 2 PictBridge port Connect a PictBridge-enabled digital camera or a flash drive to ...the printer. 3 Memory card slots Insert a memory card. 4 Control panel Operate the printer. 21 Discard the alignment page. Setting up the printer 23 For more information, see "Using the control panel" on the alignment page are ...
User's Guide
Page 24
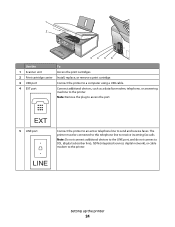
... Use the To 1 Scanner unit Access the print cartridges. 2 Print cartridge carrier Install, replace, or remove a print cartridge. 3 USB port Connect the printer to a computer using a USB cable. 4 EXT port Connect additional devices, such as a data/fax modem, telephone, or answering machine to send and ...receive faxes. EXT 5 LINE port Connect the printer to an active telephone line to the printer. The printer must be connected to this telephone line to the printer. Note: Do not connect additional devices to the LINE port, and do not connect...
... Use the To 1 Scanner unit Access the print cartridges. 2 Print cartridge carrier Install, replace, or remove a print cartridge. 3 USB port Connect the printer to a computer using a USB cable. 4 EXT port Connect additional devices, such as a data/fax modem, telephone, or answering machine to send and ...receive faxes. EXT 5 LINE port Connect the printer to an active telephone line to the printer. The printer must be connected to this telephone line to the printer. Note: Do not connect additional devices to the LINE port, and do not connect...

User's Guide
Page 25
...Norway • Denmark • Italy • Sweden • Netherlands • France • Portugal To connect your printer to a power source using . 3 If the light is not on the printer. 2 Plug the cord into an electrical outlet that other telecommunications equipment, use the fax feature during a lightning storm. ... power supply on , press . Use the To 6 Power supply with the printer. 1 Connect one end of the telephone cord into the Line port of the printer. Do not set up the printer 25 Setting up this product or make any electrical or cabling connections, such as...
...Norway • Denmark • Italy • Sweden • Netherlands • France • Portugal To connect your printer to a power source using . 3 If the light is not on the printer. 2 Plug the cord into an electrical outlet that other telecommunications equipment, use the fax feature during a lightning storm. ... power supply on , press . Use the To 6 Power supply with the printer. 1 Connect one end of the telephone cord into the Line port of the printer. Do not set up the printer 25 Setting up this product or make any electrical or cabling connections, such as...


