User's Guide
Page 57
...• Iron-On transfer-A type of media that has a reverse image printed on an envelope. 5 From the Envelope Size list, select the envelope size loaded. 6 Select Portrait or Landscape orientation. Printing 57 It is used specifically for printing professional quality photos with... and feathering even when the image is also selected in the software application. 7 Click OK to bond chemically with a glossy finish. Fast drying, it offers excellent image quality and outstanding value. • Lexmark Premium Photo Paper-A heavier photo paper specifically designed to close any printer...
...• Iron-On transfer-A type of media that has a reverse image printed on an envelope. 5 From the Envelope Size list, select the envelope size loaded. 6 Select Portrait or Landscape orientation. Printing 57 It is used specifically for printing professional quality photos with... and feathering even when the image is also selected in the software application. 7 Click OK to bond chemically with a glossy finish. Fast drying, it offers excellent image quality and outstanding value. • Lexmark Premium Photo Paper-A heavier photo paper specifically designed to close any printer...

User's Guide (Mac)
Page 18
... print jobs" on page 17 • "Canceling a print job" on page 17 Resuming print jobs 1 From the Finder desktop, choose Applications Œ Utilities Œ Print Center/Printer Setup Utility. 2 From the list of your paper size choices are limited. Note: When you want to resume a particular print job, select the document name...
... print jobs" on page 17 • "Canceling a print job" on page 17 Resuming print jobs 1 From the Finder desktop, choose Applications Œ Utilities Œ Print Center/Printer Setup Utility. 2 From the list of your paper size choices are limited. Note: When you want to resume a particular print job, select the document name...

User's Guide (Mac)
Page 39
... the Adjustment controls to the factory default settings. Start scanning. You can add, remove, or modify an application in the Customize list. 1 From the Finder desktop, double-click the Lexmark 5300 Series folder. 2 Double-click the Lexmark 5300 Series Center icon. 3 From the "Send scanned image to" pop-up menu. Clicking re-scans the...
... the Adjustment controls to the factory default settings. Start scanning. You can add, remove, or modify an application in the Customize list. 1 From the Finder desktop, double-click the Lexmark 5300 Series folder. 2 Double-click the Lexmark 5300 Series Center icon. 3 From the "Send scanned image to" pop-up menu. Clicking re-scans the...
User's Guide (Mac)
Page 40
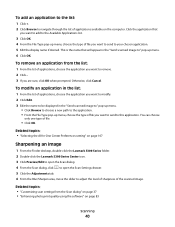
... the type of file you want to send to this application. Related topics: • "Selecting the All-In-One Center Preferences setting" on page 107 Sharpening an image 1 From the Finder desktop, double-click the Lexmark 5300 Series folder. 2 Double-click the Lexmark 5300 Series Center icon. 3 Click Preview/Edit to open the... the slider to adjust the level of sharpness of file. • Click OK. This is the name that you want to add to the Available Applications list. 3 Click OK. 4 From the File Type pop-up menu, choose the type of file you want to send to your chosen...
... the type of file you want to send to this application. Related topics: • "Selecting the All-In-One Center Preferences setting" on page 107 Sharpening an image 1 From the Finder desktop, double-click the Lexmark 5300 Series folder. 2 Double-click the Lexmark 5300 Series Center icon. 3 Click Preview/Edit to open the... the slider to adjust the level of sharpness of file. • Click OK. This is the name that you want to add to the Available Applications list. 3 Click OK. 4 From the File Type pop-up menu, choose the type of file you want to send to your chosen...
User's Guide (Mac)
Page 98
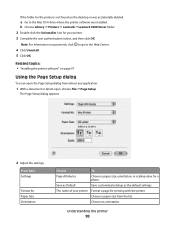
Choose an orientation. Understanding the printer 98 Save as Default Save customized settings as the default settings. b Choose Library ΠPrinters ΠLexmark ΠLexmark 5300 Series folder. 2 Double-click the Uninstaller icon for a photo. The Page Setup dialog appears. 2 Adjust the settings. If the folder for the printer is ... for printing with the printer. The name of your printer. 3 Complete the user authentication notice, and then click OK. Choose a paper size from almost any application: 1 With a document or photo open the Page Setup dialog from the...
Choose an orientation. Understanding the printer 98 Save as Default Save customized settings as the default settings. b Choose Library ΠPrinters ΠLexmark ΠLexmark 5300 Series folder. 2 Double-click the Uninstaller icon for a photo. The Page Setup dialog appears. 2 Adjust the settings. If the folder for the printer is ... for printing with the printer. The name of your printer. 3 Complete the user authentication notice, and then click OK. Choose a paper size from almost any application: 1 With a document or photo open the Page Setup dialog from the...

User's Guide (Mac)
Page 104
... File, to the Clipboard, or to send scanned images" on page 39. Resolution and other settings are scanning. For more information, see "Editing the Customize list" on page 36 Understanding the printer 104 Settings are optimized based on your selection: • To be printed • To be viewed on monitor/Web... page • To be faxed • To be used . To add, remove, or modify an application in the list, see "Choosing where to an application. From here You can What is being scanned?
... File, to the Clipboard, or to send scanned images" on page 39. Resolution and other settings are scanning. For more information, see "Editing the Customize list" on page 36 Understanding the printer 104 Settings are optimized based on your selection: • To be printed • To be viewed on monitor/Web... page • To be faxed • To be used . To add, remove, or modify an application in the list, see "Choosing where to an application. From here You can What is being scanned?
User's Guide (Mac)
Page 107
To modify the Preferences setting: 1 From the Finder desktop, double-click the Lexmark 5300 Series folder. 2 Double-click the Lexmark 5300 Series Center icon. 3 From the menu bar, click Lexmark All-In-One Center. 4 Choose Preferences. 5 Select or unselect Show preview when Scan button pressed on the printer to...control panel. With this option, you press Start Color or Start Black on the printer is sent straight to your selected application when you want the Scan dialog to edit the Available Applications list. Note: By default, Show preview when Scan button pressed on the control panel.
To modify the Preferences setting: 1 From the Finder desktop, double-click the Lexmark 5300 Series folder. 2 Double-click the Lexmark 5300 Series Center icon. 3 From the menu bar, click Lexmark All-In-One Center. 4 Choose Preferences. 5 Select or unselect Show preview when Scan button pressed on the printer to...control panel. With this option, you press Start Color or Start Black on the printer is sent straight to your selected application when you want the Scan dialog to edit the Available Applications list. Note: By default, Show preview when Scan button pressed on the control panel.
User's Guide (Mac)
Page 111
...printer on your specific network, see your network. • If you select the printer with other computers. If multiple printers appear in the list, make changes. 4 Select the printer(s) you want to search a remote subnet for supported printers, type any printer connected to your Macintosh ...printer(s) you want to share with other computers. 2 Select a printer from your local subnet or from a remote subnet. • The application searches for supported printers in the network or printers that are connected to your computer. • If you want to use. For more information...
...printer on your specific network, see your network. • If you select the printer with other computers. If multiple printers appear in the list, make changes. 4 Select the printer(s) you want to search a remote subnet for supported printers, type any printer connected to your Macintosh ...printer(s) you want to share with other computers. 2 Select a printer from your local subnet or from a remote subnet. • The application searches for supported printers in the network or printers that are connected to your computer. • If you want to use. For more information...
User's Guide (Mac)
Page 128
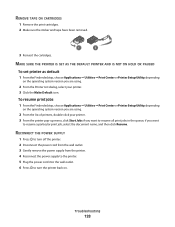
... SET AS THE DEFAULT PRINTER AND IS NOT ON HOLD OR PAUSED To set printer as default 1 From the Finder desktop, choose Applications ΠUtilities ΠPrint Center or Printer Setup Utility, depending on the operating system version you are using . 2 From the Printer... the printer back on the operating system version you are using . 2 From the list of printers, double-click your printer. 3 Click the Make Default icon. Troubleshooting 128 To resume print jobs 1 From the Finder desktop, choose Applications ΠUtilities ΠPrint Center or Printer Setup Utility, depending on . if...
... SET AS THE DEFAULT PRINTER AND IS NOT ON HOLD OR PAUSED To set printer as default 1 From the Finder desktop, choose Applications ΠUtilities ΠPrint Center or Printer Setup Utility, depending on the operating system version you are using . 2 From the Printer... the printer back on the operating system version you are using . 2 From the list of printers, double-click your printer. 3 Click the Make Default icon. Troubleshooting 128 To resume print jobs 1 From the Finder desktop, choose Applications ΠUtilities ΠPrint Center or Printer Setup Utility, depending on . if...
User's Guide (Mac)
Page 130
... 3 Make sure the sticker and tape are using a color cartridge, make sure it is properly installed in the left carrier. MAKE SURE THE LEXMARK PRINTER DRIVER IS SET AS THE DEFAULT PRINTER AND IS NOT ON HOLD OR PAUSED To set the printer as default 1 From the Finder desktop... from the bottom and back of the print cartridges. To resume print jobs 1 From the Finder desktop, choose Applications ΠUtilities ΠPrint Center or Printer Setup Utility. 2 From the list of the computer. CHECK YOUR USB CONNECTION 1 Check the USB cable for proper print cartridge installation. MAKE SURE ...
... 3 Make sure the sticker and tape are using a color cartridge, make sure it is properly installed in the left carrier. MAKE SURE THE LEXMARK PRINTER DRIVER IS SET AS THE DEFAULT PRINTER AND IS NOT ON HOLD OR PAUSED To set the printer as default 1 From the Finder desktop... from the bottom and back of the print cartridges. To resume print jobs 1 From the Finder desktop, choose Applications ΠUtilities ΠPrint Center or Printer Setup Utility. 2 From the list of the computer. CHECK YOUR USB CONNECTION 1 Check the USB cable for proper print cartridge installation. MAKE SURE ...

User's Guide (Mac)
Page 143
... AND IS NOT ON HOLD OR PAUSED To set printer as default: 1 From the Finder desktop, choose Applications ΠUtilities ΠPrint Center or Printer Setup Utility. 2 From the Printer List dialog, select your printer. 3 From the Printer pop-up menu, click Start Jobs if you selected. ... all print jobs in the upper left corner. To resume print jobs: 1 From the Finder desktop, choose Applications ΠUtilities ΠPrint Center or Printer Setup Utility. 2 From the list of printers, double-click the name of the following : CHECK DOCUMENT PLACEMENT Make sure the document or photo...
... AND IS NOT ON HOLD OR PAUSED To set printer as default: 1 From the Finder desktop, choose Applications ΠUtilities ΠPrint Center or Printer Setup Utility. 2 From the Printer List dialog, select your printer. 3 From the Printer pop-up menu, click Start Jobs if you selected. ... all print jobs in the upper left corner. To resume print jobs: 1 From the Finder desktop, choose Applications ΠUtilities ΠPrint Center or Printer Setup Utility. 2 From the list of printers, double-click the name of the following : CHECK DOCUMENT PLACEMENT Make sure the document or photo...

User's Guide (Mac)
Page 155
...for supported paper and specialty media REMOVE EACH PAGE AS IT IS PRINTED Remove each page as default: 1 From the Finder desktop, choose Applications Œ Utilities Œ Print Center or Printer Setup Utility, depending on the operating system version you are not sure which side is the... "Getting Started" section in the "Printing" chapter. ADJUST THE PAPER GUIDES Adjust the paper guides: • When using . 2 From the Printer List dialog, select your printer. Troubleshooting 155 CHECK MEDIA LOADING • Verify that came with the print side facing you. (If you are using media less...
...for supported paper and specialty media REMOVE EACH PAGE AS IT IS PRINTED Remove each page as default: 1 From the Finder desktop, choose Applications Œ Utilities Œ Print Center or Printer Setup Utility, depending on the operating system version you are not sure which side is the... "Getting Started" section in the "Printing" chapter. ADJUST THE PAPER GUIDES Adjust the paper guides: • When using . 2 From the Printer List dialog, select your printer. Troubleshooting 155 CHECK MEDIA LOADING • Verify that came with the print side facing you. (If you are using media less...
User's Guide (Mac)
Page 156
... Note: Do not force paper into the printer. Check the type of paper you are using . Banner paper jams These are using . 2 From the list of sheets needed for " pop-up menu, choose the printer. 4 From the Paper Size pop-up menu, choose A4 Banner or US Letter Banner. 5...to feed paper continuously without jamming: 1 With your printer. ARE YOU LOADING THE PAPER CORRECTLY? To resume print jobs: 1 From the Finder desktop, choose Applications ΠUtilities ΠPrint Center or Printer Setup Utility, depending on page 6. Try one or more of the following: CLEAR BANNER PAPER JAMS 1 Press...
... Note: Do not force paper into the printer. Check the type of paper you are using . Banner paper jams These are using . 2 From the list of sheets needed for " pop-up menu, choose the printer. 4 From the Paper Size pop-up menu, choose A4 Banner or US Letter Banner. 5...to feed paper continuously without jamming: 1 With your printer. ARE YOU LOADING THE PAPER CORRECTLY? To resume print jobs: 1 From the Finder desktop, choose Applications ΠUtilities ΠPrint Center or Printer Setup Utility, depending on page 6. Try one or more of the following: CLEAR BANNER PAPER JAMS 1 Press...


