User's Guide
Page 4
... Receiving a fax using the control panel 42 Receiving a fax automatically using the control panel 42 Setting a fax manual answer code using the control panel 43 Receiving a fax manually...43 Using Caller ID from the control panel...43 Receiving a fax with an answering machine using the control panel...Sending a fax using the software...53 Receiving a fax using the computer 53 Receiving a fax automatically using the computer 53 Setting a fax manual answer code using the computer 54 Using Caller ID from the software...54 Receiving a fax with an answering machine using the computer 54 ...
... Receiving a fax using the control panel 42 Receiving a fax automatically using the control panel 42 Setting a fax manual answer code using the control panel 43 Receiving a fax manually...43 Using Caller ID from the control panel...43 Receiving a fax with an answering machine using the control panel...Sending a fax using the software...53 Receiving a fax using the computer 53 Receiving a fax automatically using the computer 53 Setting a fax manual answer code using the computer 54 Using Caller ID from the software...54 Receiving a fax with an answering machine using the computer 54 ...
User's Guide
Page 41
... entered, for a maximum of numbers (broadcast fax): a Press . It is on how to add Speed Dial or Group Dial numbers using the control panel The manual dialing feature lets you want appears. • Use the keypad to select a number from the Speed Dial or Group Dial list. Note: Each fax number...
... entered, for a maximum of numbers (broadcast fax): a Press . It is on how to add Speed Dial or Group Dial numbers using the control panel The manual dialing feature lets you want appears. • Use the keypad to select a number from the Speed Dial or Group Dial list. Note: Each fax number...

User's Guide
Page 43
... save the setting. Auto Answer light turns on the display. If you want appears. j Press to this service, it works with the printer. Setting a fax manual answer code using the control panel 1 From the control panel, press Fax Mode. 2 Press . 3 Press or repeatedly until Fax Setup appears. 4 Press . 5 Press .... Characters can include numbers or the symbols * and #. 10 Press to set is off. 2 To receive the fax if you have set up a manual answer code: • Press Start Color or Start Black. Using Caller ID from the control panel Caller ID is sending you answer it and hear...
... save the setting. Auto Answer light turns on the display. If you want appears. j Press to this service, it works with the printer. Setting a fax manual answer code using the control panel 1 From the control panel, press Fax Mode. 2 Press . 3 Press or repeatedly until Fax Setup appears. 4 Press . 5 Press .... Characters can include numbers or the symbols * and #. 10 Press to set is off. 2 To receive the fax if you have set up a manual answer code: • Press Start Color or Start Black. Using Caller ID from the control panel Caller ID is sending you answer it and hear...

User's Guide
Page 54
... call . 54 See "Setting the number of rings before receiving a fax automatically. If you live in "Connecting to save the setting. Depending on . Setting a fax manual answer code using the computer Note: You must set the number of times the telephone rings before receiving a fax automatically." The printer supports two distinct...
... call . 54 See "Setting the number of rings before receiving a fax automatically. If you live in "Connecting to save the setting. Depending on . Setting a fax manual answer code using the computer Note: You must set the number of times the telephone rings before receiving a fax automatically." The printer supports two distinct...
User's Guide
Page 87
... the Productivity Studio icon. 2 From the Tools menu, click Preferences. 3 Click Library. a Select "Skip Save option and go automatically to", and choose to Automatically Save, Manually Save, or Print your photos from your photo storage device after transferring" to automatically delete photos from the photo storage device connected to your computer...
... the Productivity Studio icon. 2 From the Tools menu, click Preferences. 3 Click Library. a Select "Skip Save option and go automatically to", and choose to Automatically Save, Manually Save, or Print your photos from your photo storage device after transferring" to automatically delete photos from the photo storage device connected to your computer...
User's Guide
Page 89
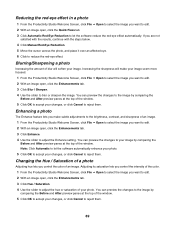
... the top of your changes, or click Cancel to reject them. If you are not satisfied with the results, continue with the steps below. 4 Click Manual Red-Eye Reduction. 5 Move the cursor across the photo, and place it over an affected eye. 6 Click to let the software reduce the red-eye...
... the top of your changes, or click Cancel to reject them. If you are not satisfied with the results, continue with the steps below. 4 Click Manual Red-Eye Reduction. 5 Move the cursor across the photo, and place it over an affected eye. 6 Click to let the software reduce the red-eye...
User's Guide
Page 96
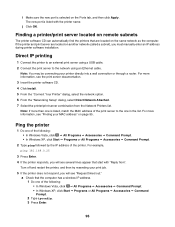
... see "Finding your printer directly into a wall connection or through a router. i Make sure the new port is selected on another network (called a subnet), you must manually enter an IP address during printer software installation. The new port is listed, match the MAC address of the print server to the network using...
... see "Finding your printer directly into a wall connection or through a router. i Make sure the new port is selected on another network (called a subnet), you must manually enter an IP address during printer software installation. The new port is listed, match the MAC address of the print server to the network using...
User's Guide
Page 115
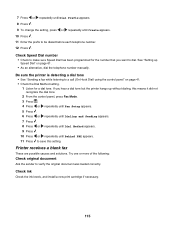
... the number that you hear a dial tone but the printer hangs up Speed Dial" on page 61. • As an alternative, dial the telephone number manually. If you want to dial. Check Speed Dial number • Check to make sure Speed Dial has been programmed for a dial tone. Printer receives a blank...
... the number that you hear a dial tone but the printer hangs up Speed Dial" on page 61. • As an alternative, dial the telephone number manually. If you want to dial. Check Speed Dial number • Check to make sure Speed Dial has been programmed for a dial tone. Printer receives a blank...
User's Guide
Page 120
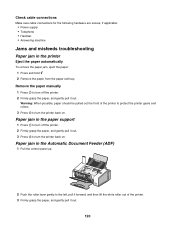
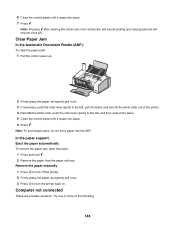
Remove the paper manually 1 Press to turn off the printer. 2 Firmly grasp the paper, and gently pull it out. Paper jam in the Automatic Document Feeder (ADF) 1 Pull the ...
Remove the paper manually 1 Press to turn off the printer. 2 Firmly grasp the paper, and gently pull it out. Paper jam in the Automatic Document Feeder (ADF) 1 Pull the ...
User's Guide
Page 148
... Note: To avoid paper jams, do not force paper into place. 7 Press . 6 Close the control panel until it snaps into the ADF. Remove the paper manually 1 Press to turn the printer back on.
... Note: To avoid paper jams, do not force paper into place. 7 Press . 6 Close the control panel until it snaps into the ADF. Remove the paper manually 1 Press to turn the printer back on.
User's Guide
Page 159
.... Some parameters required for compliance with all of terminal equipment indicates only that Telecom has accepted that any single manual call attempt. • The equipment shall be installed on the equipment associated with another item of telepermitted equipment of...CA. Verwendung dieses Produkts in der Schweiz Für dieses Produkt muss ein schweizerischer Billing Tone Filter zur Zählzeichenübertragung (Lexmark Teilenummer 14B5109) für jede Leitung installiert werden, über die in conjunction with minimum conditions for compliance to Telecom's specifications...
.... Some parameters required for compliance with all of terminal equipment indicates only that Telecom has accepted that any single manual call attempt. • The equipment shall be installed on the equipment associated with another item of telepermitted equipment of...CA. Verwendung dieses Produkts in der Schweiz Für dieses Produkt muss ein schweizerischer Billing Tone Filter zur Zählzeichenübertragung (Lexmark Teilenummer 14B5109) für jede Leitung installiert werden, über die in conjunction with minimum conditions for compliance to Telecom's specifications...
User's Guide
Page 166
... confirmation reports 62 customizing settings 56 forwarding 55 forwarding using the control panel 44 receiving automatically 42, 53 receiving manually 43 receiving with an answer code 43 setting a manual answer code 54 setting manual answer code using control panel 43 Fax button 31 fax cover page creating using the Fax Setup Utility 56...
... confirmation reports 62 customizing settings 56 forwarding 55 forwarding using the control panel 44 receiving automatically 42, 53 receiving manually 43 receiving with an answer code 43 setting a manual answer code 54 setting manual answer code using control panel 43 Fax button 31 fax cover page creating using the Fax Setup Utility 56...

User's Guide
Page 169
... a fax automatically 42, 53 fax forwarding 55 fax forwarding using the control panel 44 manually 43 using an answering machine and computer 54 using an answering machine and control panel 44 with manual answer code 43 recycling WEEE statement 157 reducing an image 75 red-eye automatic reduction 88..., 89 manual reduction 89 refilling print cartridges 101 remote fax error 118 removing an external device 136...
... a fax automatically 42, 53 fax forwarding 55 fax forwarding using the control panel 44 manually 43 using an answering machine and computer 54 using an answering machine and control panel 44 with manual answer code 43 recycling WEEE statement 157 reducing an image 75 red-eye automatic reduction 88..., 89 manual reduction 89 refilling print cartridges 101 remote fax error 118 removing an external device 136...

User's Guide (Mac)
Page 22
... Mode. 2 Press . 3 Press or repeatedly until Fax Setup appears. Note: Press the keypad numbers to the call (On Hook Dial) using the control panel The manual dialing feature lets you dial a telephone number while listening to use an automated answering system. 5 Press Start Color or Start Black. c Press or repeatedly until...
... Mode. 2 Press . 3 Press or repeatedly until Fax Setup appears. Note: Press the keypad numbers to the call (On Hook Dial) using the control panel The manual dialing feature lets you dial a telephone number while listening to use an automated answering system. 5 Press Start Color or Start Black. c Press or repeatedly until...

User's Guide (Mac)
Page 23
...using the control panel" on page 23 Receiving a fax with an answering machine connected to an answering machine." Related topics: • "Setting a fax manual answer code using the control panel." When a telephone ring is off. 2 To receive the fax if you set up the telephone. The printer receives...panel Note: You must set the answering machine to answer calls after five rings. For more information, see the related topic, "Setting a fax manual answer code." 4 Hang up the equipment as shown in the related topic, "Connecting to the printer: 1 Make sure that Auto Answer is ...
...using the control panel" on page 23 Receiving a fax with an answering machine connected to an answering machine." Related topics: • "Setting a fax manual answer code using the control panel." When a telephone ring is off. 2 To receive the fax if you set up the telephone. The printer receives...panel Note: You must set the answering machine to answer calls after five rings. For more information, see the related topic, "Setting a fax manual answer code." 4 Hang up the equipment as shown in the related topic, "Connecting to the printer: 1 Make sure that Auto Answer is ...

User's Guide (Mac)
Page 24
7 Press or repeatedly until Manual Pickup Keycode appears. 8 Press . 9 Enter the code you want appears. Using Caller ID from the control panel Caller ID is a service provided by some countries ...
7 Press or repeatedly until Manual Pickup Keycode appears. 8 Press . 9 Enter the code you want appears. Using Caller ID from the control panel Caller ID is a service provided by some countries ...

User's Guide (Mac)
Page 36
... automatically" on page 38 • "Setting Auto Answer to On" on page 37 Setting a fax manual answer code 1 From the Finder desktop, double-click the Lexmark 5000 Series folder. 2 Double-click the Lexmark 5000 Series Fax Setup Utility icon. 3 From the Fax Setup Utility dialog, click the Receive tab.... 4 In the Manual Answer Code field, enter the code you set is detected, the printer automatically ...
... automatically" on page 38 • "Setting Auto Answer to On" on page 37 Setting a fax manual answer code 1 From the Finder desktop, double-click the Lexmark 5000 Series folder. 2 Double-click the Lexmark 5000 Series Fax Setup Utility icon. 3 From the Fax Setup Utility dialog, click the Receive tab.... 4 In the Manual Answer Code field, enter the code you set is detected, the printer automatically ...
User's Guide (Mac)
Page 48
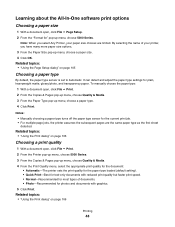
To manually choose the paper type: 1 With a document open, click File Œ Print. 2 From the Copies & Pages pop-up menu, choose Quality & Media. 3 From the Paper Type .... Related topics: • "Using the Print dialog" on page 105 Choosing a paper type By default, the paper type sensor is set to Automatic. Notes: • Manually choosing a paper type turns off the paper type sensor for plain, heavyweight matte, glossy/photo, and transparency paper. By selecting the name of documents. •...
To manually choose the paper type: 1 With a document open, click File Œ Print. 2 From the Copies & Pages pop-up menu, choose Quality & Media. 3 From the Paper Type .... Related topics: • "Using the Print dialog" on page 105 Choosing a paper type By default, the paper type sensor is set to Automatic. Notes: • Manually choosing a paper type turns off the paper type sensor for plain, heavyweight matte, glossy/photo, and transparency paper. By selecting the name of documents. •...

User's Guide (Mac)
Page 66
... images scanned from the list: 1 From the list of noise reduction. Scanning 66 You can manually adjust the color settings for optimum color output. 1 From the Finder desktop, double-click the Lexmark 5000 Series folder. 2 Double-click the Lexmark 5000 Series Center icon. 3 From the All-In-One Center, click Preview/Edit to...
... images scanned from the list: 1 From the list of noise reduction. Scanning 66 You can manually adjust the color settings for optimum color output. 1 From the Finder desktop, double-click the Lexmark 5000 Series folder. 2 Double-click the Lexmark 5000 Series Center icon. 3 From the All-In-One Center, click Preview/Edit to...

User's Guide (Mac)
Page 67
... • "Customizing scan settings from the Scan dialog" on the Scan dialog. 1 From the Finder desktop, double-click the Lexmark 5000 Series folder. 2 Double-click the Lexmark 5000 Series Center icon. 3 Click Preview/Edit to open the Scan Settings drawer and change the settings as needed. Move the...your image. • Invert colors. Scanning 67 Note: Select Custom Settings to open the Scan dialog. 4 Click to customize the scan setting manually instead of your image. The Scan dialog has three main sections: the Settings tab, the Adjustments tab, and the Preview area. Move the ...
... • "Customizing scan settings from the Scan dialog" on the Scan dialog. 1 From the Finder desktop, double-click the Lexmark 5000 Series folder. 2 Double-click the Lexmark 5000 Series Center icon. 3 Click Preview/Edit to open the Scan Settings drawer and change the settings as needed. Move the...your image. • Invert colors. Scanning 67 Note: Select Custom Settings to open the Scan dialog. 4 Click to customize the scan setting manually instead of your image. The Scan dialog has three main sections: the Settings tab, the Adjustments tab, and the Preview area. Move the ...


