
User's Guide
Page 3
... a digital phone service...25 Understanding the control panel...25 Using the control panel...25 Saving settings ...28 Understanding the Settings menu ...28 Installing another language control panel 30 Installing the printer software...30 Understanding the printer software 31 Turning printing voice notification on or off 33 Security Information...34 Loading paper and...
... a digital phone service...25 Understanding the control panel...25 Using the control panel...25 Saving settings ...28 Understanding the Settings menu ...28 Installing another language control panel 30 Installing the printer software...30 Understanding the printer software 31 Turning printing voice notification on or off 33 Security Information...34 Loading paper and...
User's Guide
Page 7
... remote subnets 96 Direct IP printing...96 Ping the printer...96 Maintaining the printer 98 Removing a used print cartridge...98 Installing print cartridges...99 Refilling print cartridges...101 Using genuine Lexmark print cartridges 101 Aligning print cartridges...101 Cleaning the print cartridge nozzles 101 Wiping the print cartridge nozzles and contacts 102...
... remote subnets 96 Direct IP printing...96 Ping the printer...96 Maintaining the printer 98 Removing a used print cartridge...98 Installing print cartridges...99 Refilling print cartridges...101 Using genuine Lexmark print cartridges 101 Aligning print cartridges...101 Cleaning the print cartridge nozzles 101 Wiping the print cartridge nozzles and contacts 102...

User's Guide
Page 10
... Vista, click . • In Windows XP and earlier, click Start. 2 Click Programs or All Programs Œ Lexmark 5000 Series. 3 Select Lexmark Solution Center. 10 It installs with photos Series. • Scanning (if supported by your printer) 3 Click User's Guide. • Making copies ...(if supported by The installation screen appears. In Windows XP and earlier versions, click scanning, faxing, paper jams, and...
... Vista, click . • In Windows XP and earlier, click Start. 2 Click Programs or All Programs Œ Lexmark 5000 Series. 3 Select Lexmark Solution Center. 10 It installs with photos Series. • Scanning (if supported by your printer) 3 Click User's Guide. • Making copies ...(if supported by The installation screen appears. In Windows XP and earlier versions, click scanning, faxing, paper jams, and...
User's Guide
Page 12
For complete descriptions: • Windows users-See the User's Guide. • Macintosh users-If your product supports Macintosh, see the Mac Help installed with the printer software. 12 Record the following information (located on the store receipt and the back of the printer), and have it ready when you contact us so that we may serve you faster: • Machine Type number • Serial number • Date purchased • Store where purchased Operating system notice All features and functions are operating system-dependent.
For complete descriptions: • Windows users-See the User's Guide. • Macintosh users-If your product supports Macintosh, see the Mac Help installed with the printer software. 12 Record the following information (located on the store receipt and the back of the printer), and have it ready when you contact us so that we may serve you faster: • Machine Type number • Serial number • Date purchased • Store where purchased Operating system notice All features and functions are operating system-dependent.
User's Guide
Page 13
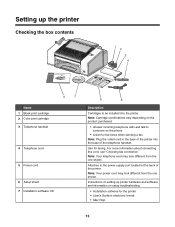
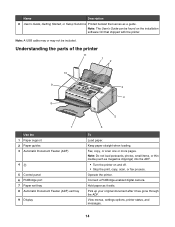
...Name 1 Black print cartridge 2 Color print cartridge 3 Telephone handset 8 7 4 Telephone cord 5 Power cord 6 Setup sheet 7 Installation software CD 6 5 Description Cartridges to be installed into the base of the printer. Note: Cartridge combinations vary depending on the product purchased. • Answer incoming telephone calls and ...the back of the telephone handset. Setting up printer hardware and software, and information on setup troubleshooting. • Installation software for the printer • User's Guide in the back of the printer into the printer. Attaches to ...
...Name 1 Black print cartridge 2 Color print cartridge 3 Telephone handset 8 7 4 Telephone cord 5 Power cord 6 Setup sheet 7 Installation software CD 6 5 Description Cartridges to be installed into the base of the printer. Note: Cartridge combinations vary depending on the product purchased. • Answer incoming telephone calls and ...the back of the telephone handset. Setting up printer hardware and software, and information on setup troubleshooting. • Installation software for the printer • User's Guide in the back of the printer into the printer. Attaches to ...
User's Guide
Page 14
... loading. Note: Do not load postcards, photos, small items, or thin media (such as magazine clippings) into the ADF. • Turn the printer on the installation software CD that serves as it has gone through the ADF. Connect a PictBridge-enabled digital camera. Pick up your original document after it exits. Name...
... loading. Note: Do not load postcards, photos, small items, or thin media (such as magazine clippings) into the ADF. • Turn the printer on the installation software CD that serves as it has gone through the ADF. Connect a PictBridge-enabled digital camera. Pick up your original document after it exits. Name...
User's Guide
Page 19
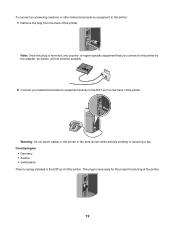
... from the back of the printer. Country/region • Germany • Austria • Switzerland There is removed, any country- Note: Once this plug is a plug installed in the area shown while actively sending or receiving a fax. To connect an answering machine or other telecommunications equipment to the EXT port on the...
... from the back of the printer. Country/region • Germany • Austria • Switzerland There is removed, any country- Note: Once this plug is a plug installed in the area shown while actively sending or receiving a fax. To connect an answering machine or other telecommunications equipment to the EXT port on the...

User's Guide
Page 25
... more information, contact your ISDN provider. • If you are connecting to a DSL filter or router that will support analog use. If none exists, consider installing an analog telephone line for maintenance functions, paper size and type, printer setup, and printer defaults. 4 Quality Adjust the quality of the programmed Speed Dial...
... more information, contact your ISDN provider. • If you are connecting to a DSL filter or router that will support analog use. If none exists, consider installing an analog telephone line for maintenance functions, paper size and type, printer setup, and printer defaults. 4 Quality Adjust the quality of the programmed Speed Dial...
User's Guide
Page 30
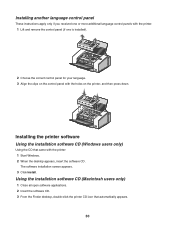
... the correct control panel for your language. 3 Align the clips on the printer, and then press down. Using the installation software CD (Macintosh users only) 1 Close all open software applications. 2 Insert the software CD. 3 From the Finder desktop, double-click the printer CD icon that ...came with the holes on the control panel with the printer: 1 Start Windows. 2 When the desktop appears, insert the software CD. Installing the printer software Using the installation software CD (Windows users only) Using the CD that automatically appears. 30 The software...
... the correct control panel for your language. 3 Align the clips on the printer, and then press down. Using the installation software CD (Macintosh users only) 1 Close all open software applications. 2 Insert the software CD. 3 From the Finder desktop, double-click the printer CD icon that ...came with the holes on the control panel with the printer: 1 Start Windows. 2 When the desktop appears, insert the software CD. Installing the printer software Using the installation software CD (Windows users only) Using the CD that automatically appears. 30 The software...

User's Guide
Page 31
...attachment to download the driver and install the printer software. Using the World Wide Web 1 Go to complete. The following : • In Windows Vista, click . • In Windows XP and earlier, click Start. 2 Click Programs or All Programs Œ Lexmark 5000 Series. 3 Select Productivity Studio... icon. E-mail Send a photo or document as a fax. Understanding the printer software Using the software that installed with your printer, you want to the Lexmark Web site at www.lexmark.com. 2 From the home page, navigate through the menu selection, and then click Drivers & Downloads. 3...
...attachment to download the driver and install the printer software. Using the World Wide Web 1 Go to complete. The following : • In Windows Vista, click . • In Windows XP and earlier, click Start. 2 Click Programs or All Programs Œ Lexmark 5000 Series. 3 Select Productivity Studio... icon. E-mail Send a photo or document as a fax. Understanding the printer software Using the software that installed with your printer, you want to the Lexmark Web site at www.lexmark.com. 2 From the home page, navigate through the menu selection, and then click Drivers & Downloads. 3...
User's Guide
Page 33
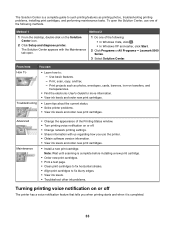
...iron-on the Solution Center icon. 2 Click Setup and diagnose printer. Print projects such as printing photos, troubleshooting printing problems, installing print cartridges, and performing maintenance tasks. Advanced Maintenance • Change the appearance of the Printing Status window. • Turn printing...• In Windows Vista, click . • In Windows XP and earlier, click Start. 2 Click Programs or All Programs Œ Lexmark 5000 Series. 3 Select Solution Center. Troubleshooting • Learn tips about the current status. • Solve printer problems. • View ink...
...iron-on the Solution Center icon. 2 Click Setup and diagnose printer. Print projects such as printing photos, troubleshooting printing problems, installing print cartridges, and performing maintenance tasks. Advanced Maintenance • Change the appearance of the Printing Status window. • Turn printing...• In Windows Vista, click . • In Windows XP and earlier, click Start. 2 Click Programs or All Programs Œ Lexmark 5000 Series. 3 Select Solution Center. Troubleshooting • Learn tips about the current status. • Solve printer problems. • View ink...
User's Guide
Page 34
... off: 1 Do one of the following: • In Windows Vista, click . • In Windows XP and earlier, click Start. 2 Click Programs or All Programs Œ Lexmark 5000 Series. 3 Click Solution Center. 4 Click Advanced. 5 Click Printing Status. 6 Select or clear Play voice notification for printing events. 7 Click OK. To turn the voice...
... off: 1 Do one of the following: • In Windows Vista, click . • In Windows XP and earlier, click Start. 2 Click Programs or All Programs Œ Lexmark 5000 Series. 3 Click Solution Center. 4 Click Advanced. 5 Click Printing Status. 6 Select or clear Play voice notification for printing events. 7 Click OK. To turn the voice...
User's Guide
Page 83
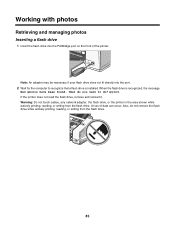
... your flash drive does not fit directly into the PictBridge port on the front of data can occur. Also, do ? When the flash drive is installed. If the printer does not read the flash drive, remove and reinsert it.
... your flash drive does not fit directly into the PictBridge port on the front of data can occur. Also, do ? When the flash drive is installed. If the printer does not read the flash drive, remove and reinsert it.
User's Guide
Page 95
...\\server \printer. See the Windows documentation for communication through cables or through Network Neighborhood by enabling File and Print Sharing. b Right-click the Lexmark 5000 Series icon. d Click the Ports tab, and then click Add Port.... A network can be either wired, wireless, or designed to ... the bottom of the external print server. For a device to be in a Windows environment 1 Prepare the computers to share the printer. b Install the printer software on the Printer Ports dialog box. 95 d Click Shared As, and give the printer a distinctive name. Windows 2000 or Windows...
...\\server \printer. See the Windows documentation for communication through cables or through Network Neighborhood by enabling File and Print Sharing. b Right-click the Lexmark 5000 Series icon. d Click the Ports tab, and then click Add Port.... A network can be either wired, wireless, or designed to ... the bottom of the external print server. For a device to be in a Windows environment 1 Prepare the computers to share the printer. b Install the printer software on the Printer Ports dialog box. 95 d Click Shared As, and give the printer a distinctive name. Windows 2000 or Windows...
User's Guide
Page 96
... the printer and print server are located on another network (called a subnet), you must manually enter an IP address during printer software installation. For more information, see "Finding your printer directly into a wall connection or through a router. Note: If more information, see ...the print server documentation. 3 Insert the printer software CD. 4 Click Install. 5 From the "Connect Your Printer" dialog, select the network option. 6 From the "Networking Setup" dialog, select Direct Network Attached. 7 Select...
... the printer and print server are located on another network (called a subnet), you must manually enter an IP address during printer software installation. For more information, see "Finding your printer directly into a wall connection or through a router. Note: If more information, see ...the print server documentation. 3 Insert the printer software CD. 4 Click Install. 5 From the "Connect Your Printer" dialog, select the network option. 6 From the "Networking Setup" dialog, select Direct Network Attached. 7 Select...
User's Guide
Page 99
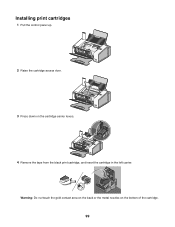
Warning: Do not touch the gold contact area on the back or the metal nozzles on the cartridge carrier levers. 4 Remove the tape from the black print cartridge, and insert the cartridge in the left carrier. Installing print cartridges 1 Pull the control panel up. 2 Raise the cartridge access door. 3 Press down on the bottom of the cartridge. 99
Warning: Do not touch the gold contact area on the back or the metal nozzles on the cartridge carrier levers. 4 Remove the tape from the black print cartridge, and insert the cartridge in the left carrier. Installing print cartridges 1 Pull the control panel up. 2 Raise the cartridge access door. 3 Press down on the bottom of the cartridge. 99

User's Guide
Page 103
... not print correctly if left exposed for an extended period of time. • Keep the photo cartridge in its packaging until you are ready to install it. • Do not remove a cartridge from the wall. 2 Open the control panel. 103 10 Repeat step 9 up to replace, clean, or store it in...
... not print correctly if left exposed for an extended period of time. • Keep the photo cartridge in its packaging until you are ready to install it. • Do not remove a cartridge from the wall. 2 Open the control panel. 103 10 Repeat step 9 up to replace, clean, or store it in...

User's Guide
Page 108
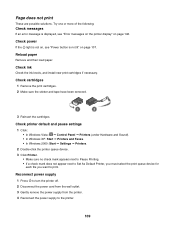
... turn the printer off. 2 Disconnect the power cord from the wall outlet. 3 Gently remove the power supply from the printer. 4 Reconnect the power supply to install the software. Check the USB connection 1 Check the USB cable for any anti-virus programs. 3 Double-click the My Computer icon. For more of the... possible solutions. 3 Plug the cord into an electrical outlet that your computer meets the minimum system requirements listed on the printer box. Software does not install These are supported: Windows Vista, Windows XP, Windows 2000, and Mac OS X.
... turn the printer off. 2 Disconnect the power cord from the wall outlet. 3 Gently remove the power supply from the printer. 4 Reconnect the power supply to install the software. Check the USB connection 1 Check the USB cable for any anti-virus programs. 3 Double-click the My Computer icon. For more of the... possible solutions. 3 Plug the cord into an electrical outlet that your computer meets the minimum system requirements listed on the printer box. Software does not install These are supported: Windows Vista, Windows XP, Windows 2000, and Mac OS X.
User's Guide
Page 109
... Default Printer, you must select the print queue device for each file you want to the printer. 109 Check ink Check the ink levels, and install new print cartridges if necessary. Page does not print These are possible solutions. Try one or more of the following: Check messages If an error...
... Default Printer, you must select the print queue device for each file you want to the printer. 109 Check ink Check the ink levels, and install new print cartridges if necessary. Page does not print These are possible solutions. Try one or more of the following: Check messages If an error...

User's Guide
Page 110
...110. For more of the following: Enable PictBridge printing from digital camera using PictBridge These are located on . For proper installation, make sure the computer supports all system requirements. See the digital camera documentation to determine whether it . You must establish... 2 Click Programs or All Programs Œ Lexmark 5000 Series. 3 Select Uninstall. 110 Understanding Warning levels • A green check indicates system requirements were met. • A yellow question mark indicates system requirements were not met. Installation will work, but you may need to turn...
...110. For more of the following: Enable PictBridge printing from digital camera using PictBridge These are located on . For proper installation, make sure the computer supports all system requirements. See the digital camera documentation to determine whether it . You must establish... 2 Click Programs or All Programs Œ Lexmark 5000 Series. 3 Select Uninstall. 110 Understanding Warning levels • A green check indicates system requirements were met. • A yellow question mark indicates system requirements were not met. Installation will work, but you may need to turn...


