
User's Guide
Page 3
... Finding more information 9 Finding information about the printer 9 Operating system notice...12 Setting up the printer 13 Checking the box contents...13 Understanding the parts of the printer 14 Getting the printer ready to fax...16 Choosing a fax connection ...16 Using an RJ11 adapter...17 Connecting ...25 Saving settings ...28 Understanding the Settings menu ...28 Installing another language control panel 30 Installing the printer software...30 Understanding the printer software 31 Turning printing voice notification on or off 33 Security Information...34 Loading paper and original ...
... Finding more information 9 Finding information about the printer 9 Operating system notice...12 Setting up the printer 13 Checking the box contents...13 Understanding the parts of the printer 14 Getting the printer ready to fax...16 Choosing a fax connection ...16 Using an RJ11 adapter...17 Connecting ...25 Saving settings ...28 Understanding the Settings menu ...28 Installing another language control panel 30 Installing the printer software...30 Understanding the printer software 31 Turning printing voice notification on or off 33 Security Information...34 Loading paper and original ...
User's Guide
Page 5
...60 Setting the distinctive ring...60 Setting the number of rings before receiving a fax automatically 60 Setting up Speed Dial...61 Setting up to fax while behind a PBX ...61 Printing fax activity reports...62 Printing...63 Printing basic documents...63 Printing a document...63 Printing ...paper ...69 Printing transparencies...70 Printing a banner ...70 Watermark ...70 Changing printer settings...70 Saving and deleting print settings...70 Resetting printer software to factory default settings 71 Resetting the printer to factory default settings 71 Copying...73 Making a copy...73 Adjusting copy...
...60 Setting the distinctive ring...60 Setting the number of rings before receiving a fax automatically 60 Setting up Speed Dial...61 Setting up to fax while behind a PBX ...61 Printing fax activity reports...62 Printing...63 Printing basic documents...63 Printing a document...63 Printing ...paper ...69 Printing transparencies...70 Printing a banner ...70 Watermark ...70 Changing printer settings...70 Saving and deleting print settings...70 Resetting printer software to factory default settings 71 Resetting the printer to factory default settings 71 Copying...73 Making a copy...73 Adjusting copy...
User's Guide
Page 7
...on remote subnets 96 Direct IP printing...96 Ping the printer...96 Maintaining the printer 98 Removing a used print cartridge...98 Installing print cartridges...99 Refilling print cartridges...101 Using genuine Lexmark print cartridges 101 Aligning print cartridges...101 Cleaning the print...lens and white roller 103 Cleaning the exterior of the printer 104 Ordering supplies...105 Ordering print cartridges...105 Ordering paper and other supplies ...105 Troubleshooting...107 Setup Troubleshooting...107 Fax troubleshooting...111 Jams and misfeeds troubleshooting 120 Print troubleshooting......
...on remote subnets 96 Direct IP printing...96 Ping the printer...96 Maintaining the printer 98 Removing a used print cartridge...98 Installing print cartridges...99 Refilling print cartridges...101 Using genuine Lexmark print cartridges 101 Aligning print cartridges...101 Cleaning the print...lens and white roller 103 Cleaning the exterior of the printer 104 Ordering supplies...105 Ordering print cartridges...105 Ordering paper and other supplies ...105 Troubleshooting...107 Setup Troubleshooting...107 Fax troubleshooting...111 Jams and misfeeds troubleshooting 120 Print troubleshooting......

User's Guide
Page 10
... desktop, • Faxing (if supported by The installation screen appears. systems, see the Mac Help: 2 Click Documentation. 1 From the Finder desktop, double-click the Lexmark 3 Click View User's Guide (including Setup 5000 Series folder. Troubleshooting). 2 Double-click the printer Help icon. 4 Click... Yes. It installs with printing, copying, Run. You can also find this document on To access the Lexmark Solution Center: your CD-ROM drive. Lexmark Solution Center Description Where to find The ...
... desktop, • Faxing (if supported by The installation screen appears. systems, see the Mac Help: 2 Click Documentation. 1 From the Finder desktop, double-click the Lexmark 3 Click View User's Guide (including Setup 5000 Series folder. Troubleshooting). 2 Double-click the printer Help icon. 4 Click... Yes. It installs with printing, copying, Run. You can also find this document on To access the Lexmark Solution Center: your CD-ROM drive. Lexmark Solution Center Description Where to find The ...
User's Guide
Page 13
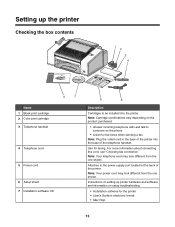
For more information about connecting this cord, see "Choosing fax connection." Attaches to someone on the phone • Listen for fax tones when sending a fax Note: Plug the coiled cord in electronic format • Mac Help 13 Note: Your telephone cord ... at the back of the telephone handset. Use for faxing. Setting up printer hardware and software, and information on setup troubleshooting. • Installation software for the printer • User's Guide in the back of the printer into the printer. Instructions on setting up the printer Checking the box contents 1 2 3 4 1 2...
For more information about connecting this cord, see "Choosing fax connection." Attaches to someone on the phone • Listen for fax tones when sending a fax Note: Plug the coiled cord in electronic format • Mac Help 13 Note: Your telephone cord ... at the back of the telephone handset. Use for faxing. Setting up printer hardware and software, and information on setup troubleshooting. • Installation software for the printer • User's Guide in the back of the printer into the printer. Instructions on setting up the printer Checking the box contents 1 2 3 4 1 2...
User's Guide
Page 14
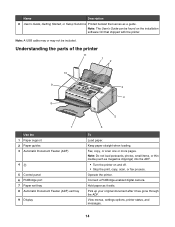
... found on and off. • Stop the print, copy, scan, or fax process. Operate the printer. Connect a PictBridge-enabled digital camera. View menus, settings options, printer status, and messages. 14 Keep paper straight when loading. Understanding the parts of the printer 11 1 2 10 9 3 4 8 5 7 Use the 1 Paper ... Guide, Getting Started, or Setup Solutions Printed booklet that shipped with the printer. Note: The User's Guide can be included. Hold paper as a guide. Pick up your original document after it exits. Fax, copy, or scan one or more pages. Note: Do not load ...
... found on and off. • Stop the print, copy, scan, or fax process. Operate the printer. Connect a PictBridge-enabled digital camera. View menus, settings options, printer status, and messages. 14 Keep paper straight when loading. Understanding the parts of the printer 11 1 2 10 9 3 4 8 5 7 Use the 1 Paper ... Guide, Getting Started, or Setup Solutions Printed booklet that shipped with the printer. Note: The User's Guide can be included. Hold paper as a guide. Pick up your original document after it exits. Fax, copy, or scan one or more pages. Note: Do not load ...
User's Guide
Page 15
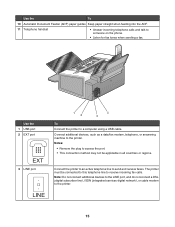
Use the 1 USB port 2 EXT port EXT 3 LINE port LINE 12 4 3 To Connect the printer to someone on the phone. • Listen for fax tones when sending a fax. Use the To 10 Automatic Document Feeder (ADF) paper guides Keep paper straight when feeding into the ADF. 11 Telephone ... incoming telephone calls and talk to a computer using a USB cable. Connect the printer to an active telephone line to the printer. Connect additional devices, such as a data/fax modem, telephone, or answering machine to send and receive faxes. Notes: • Remove the plug to access the port. • This ...
Use the 1 USB port 2 EXT port EXT 3 LINE port LINE 12 4 3 To Connect the printer to someone on the phone. • Listen for fax tones when sending a fax. Use the To 10 Automatic Document Feeder (ADF) paper guides Keep paper straight when feeding into the ADF. 11 Telephone ... incoming telephone calls and talk to a computer using a USB cable. Connect the printer to an active telephone line to the printer. Connect additional devices, such as a data/fax modem, telephone, or answering machine to send and receive faxes. Notes: • Remove the plug to access the port. • This ...
User's Guide
Page 16
...when directly connected to the wall jack. • Other devices (such as a telephone or answering machine) can connect the printer to send and receive faxes. Equipment Benefits See this product or make any electrical or cabling connections, such as the power supply cord or telephone, ... line to other equipment. telephone wall jack" on page 25. Notes: • The printer is required. Choosing a fax connection You can connect the printer with port Connect the printer to set up the printer. See the following table to determine the best way to a power source. Do not...
...when directly connected to the wall jack. • Other devices (such as a telephone or answering machine) can connect the printer to send and receive faxes. Equipment Benefits See this product or make any electrical or cabling connections, such as the power supply cord or telephone, ... line to other equipment. telephone wall jack" on page 25. Notes: • The printer is required. Choosing a fax connection You can connect the printer with port Connect the printer to set up the printer. See the following table to determine the best way to a power source. Do not...
User's Guide
Page 17
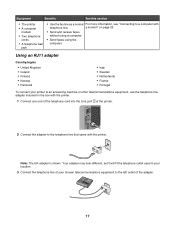
...23. • Send and receive faxes without using a computer. • Send faxes using the computer. Your adapter may look different, but it will fit the telephone outlet used in your location. 3 Connect the telephone line of your printer to an answering machine or other ... To connect your chosen telecommunications equipment to a computer with the printer. Equipment Benefits See this section • The printer • A computer modem • Two telephone cords • A telephone wall jack • Use the fax line as a normal For more information, see "Connecting to the...
...23. • Send and receive faxes without using a computer. • Send faxes using the computer. Your adapter may look different, but it will fit the telephone outlet used in your location. 3 Connect the telephone line of your printer to an answering machine or other ... To connect your chosen telecommunications equipment to a computer with the printer. Equipment Benefits See this section • The printer • A computer modem • Two telephone cords • A telephone wall jack • Use the fax line as a normal For more information, see "Connecting to the...
User's Guide
Page 18
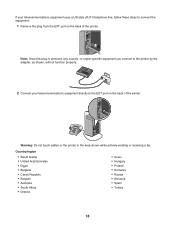
.... 2 Connect your telecommunications equipment uses a US-style (RJ11) telephone line, follow these steps to the EXT port on the back of the printer. Note: Once this plug is removed, any country- Country/region • Saudi Arabia • United Arab Emirates • Egypt • Bulgaria... • Russia • Slovenia • Spain • Turkey 18 Warning: Do not touch cables or the printer in the area shown while actively sending or receiving a fax. If your telecommunications equipment directly to connect the equipment: 1 Remove the plug from the EXT port on the back...
.... 2 Connect your telecommunications equipment uses a US-style (RJ11) telephone line, follow these steps to the EXT port on the back of the printer. Note: Once this plug is removed, any country- Country/region • Saudi Arabia • United Arab Emirates • Egypt • Bulgaria... • Russia • Slovenia • Spain • Turkey 18 Warning: Do not touch cables or the printer in the area shown while actively sending or receiving a fax. If your telecommunications equipment directly to connect the equipment: 1 Remove the plug from the EXT port on the back...
User's Guide
Page 19
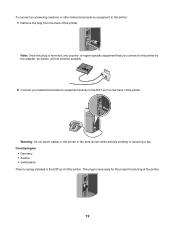
...the proper functioning of the printer. or region-specific equipment that you connect to the printer by the adapter, as shown, will not function properly. 2 Connect your telecommunications equipment directly to the printer: 1 Remove the plug from the back of the printer. To connect an answering ...machine or other telecommunications equipment to the EXT port on the back of the printer. Warning: Do not touch cables or the printer in the EXT port of the printer. 19 Country/region • Germany • Austria • Switzerland There is a plug installed...
...the proper functioning of the printer. or region-specific equipment that you connect to the printer by the adapter, as shown, will not function properly. 2 Connect your telecommunications equipment directly to the printer: 1 Remove the plug from the back of the printer. To connect an answering ...machine or other telecommunications equipment to the EXT port on the back of the printer. Warning: Do not touch cables or the printer in the EXT port of the printer. 19 Country/region • Germany • Austria • Switzerland There is a plug installed...
User's Guide
Page 20
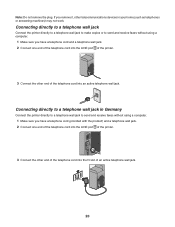
...to make copies or to send and receive faxes without using a computer. 1 Make sure you have a telephone cord (provided with the product) and a telephone wall jack. 2 Connect one end of the telephone cord into the LINE port of the printer. 3 Connect the other end of an active...(such as telephones or answering machines) may not work. If you remove it, other telecommunications devices in Germany Connect the printer directly to a telephone wall jack to send and receive faxes without using a computer. 1 Make sure you have a telephone cord and a telephone wall jack. 2 Connect one end...
...to make copies or to send and receive faxes without using a computer. 1 Make sure you have a telephone cord (provided with the product) and a telephone wall jack. 2 Connect one end of the telephone cord into the LINE port of the printer. 3 Connect the other end of an active...(such as telephones or answering machines) may not work. If you remove it, other telecommunications devices in Germany Connect the printer directly to a telephone wall jack to send and receive faxes without using a computer. 1 Make sure you have a telephone cord and a telephone wall jack. 2 Connect one end...
User's Guide
Page 21
... and the other N slot of the telephone wall jack. Connecting to a telephone Connect a telephone to the printer to use the same line for recording messages on connecting the printer to telecommunications equipment, see the related topic, "Using an RJ11 adapter." 1 Make sure you would like to... send and receive faxes without using a computer. Note: Setup steps may vary depending on your telephone is located ...
... and the other N slot of the telephone wall jack. Connecting to a telephone Connect a telephone to the printer to use the same line for recording messages on connecting the printer to telecommunications equipment, see the related topic, "Using an RJ11 adapter." 1 Make sure you would like to... send and receive faxes without using a computer. Note: Setup steps may vary depending on your telephone is located ...
User's Guide
Page 22
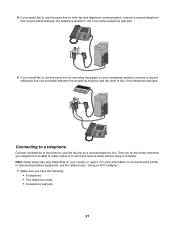
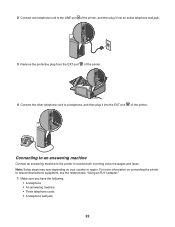
...LINE port of the printer, and then plug it into an active telephone wall jack. 3 Remove the protective plug from the EXT port of the printer. Note: Setup steps may vary depending on connecting the printer to a telephone,... and then plug it into the EXT port of the printer. 4 Connect the other telephone cord to telecommunications... jack 22 Connecting to an answering machine Connect an answering machine to the printer to receive both incoming voice messages and...
...LINE port of the printer, and then plug it into an active telephone wall jack. 3 Remove the protective plug from the EXT port of the printer. Note: Setup steps may vary depending on connecting the printer to a telephone,... and then plug it into the EXT port of the printer. 4 Connect the other telephone cord to telecommunications... jack 22 Connecting to an answering machine Connect an answering machine to the printer to receive both incoming voice messages and...
User's Guide
Page 23
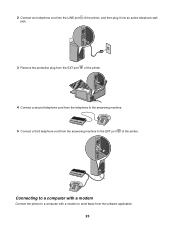
Connecting to a computer with a modem Connect the printer to a computer with a modem to send faxes from the answering machine to the EXT port of the printer. 4 Connect a second telephone cord from the telephone to the answering machine. 5 Connect a third telephone cord from the software application. 23 2 Connect one telephone cord into the LINE port of the printer, and then plug it into an active telephone wall jack. 3 Remove the protective plug from the EXT port of the printer.
Connecting to a computer with a modem Connect the printer to a computer with a modem to send faxes from the answering machine to the EXT port of the printer. 4 Connect a second telephone cord from the telephone to the answering machine. 5 Connect a third telephone cord from the software application. 23 2 Connect one telephone cord into the LINE port of the printer, and then plug it into an active telephone wall jack. 3 Remove the protective plug from the EXT port of the printer.

User's Guide
Page 25
... If none exists, consider installing an analog telephone line for maintenance functions, paper size and type, printer setup, and printer defaults. 4 Quality Adjust the quality of a fax, copy, or scan. 5 Display the Fax, Copy, or Scan menu, depending on the PBX. For more information, contact your ISDN provider... device. Using a digital phone service The fax modem is selected. 25 Certain devices can be used. • If you are using an ISDN telephone service, connect the printer to an analog telephone port (an R-interface port) on faxing when using a PBX telephone service, make ...
... If none exists, consider installing an analog telephone line for maintenance functions, paper size and type, printer setup, and printer defaults. 4 Quality Adjust the quality of a fax, copy, or scan. 5 Display the Fax, Copy, or Scan menu, depending on the PBX. For more information, contact your ISDN provider... device. Using a digital phone service The fax modem is selected. 25 Certain devices can be used. • If you are using an ISDN telephone service, connect the printer to an analog telephone port (an R-interface port) on faxing when using a PBX telephone service, make ...
User's Guide
Page 27
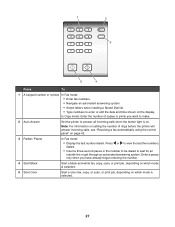
..., or scan, or print job, depending on page 42. 3 Redial / Pause In Fax mode: • Display the last number dialed. Enter a pause only when you want to make. 2 Auto Answer Set the printer to answer all incoming calls when the button light is selected. 27 1 2 3 5 4 Press ...To 1 A keypad number or symbol In Fax mode: • Enter fax numbers. • Navigate an automated answering system. • Select letters when...
..., or scan, or print job, depending on page 42. 3 Redial / Pause In Fax mode: • Display the last number dialed. Enter a pause only when you want to make. 2 Auto Answer Set the printer to answer all incoming calls when the button light is selected. 27 1 2 3 5 4 Press ...To 1 A keypad number or symbol In Fax mode: • Enter fax numbers. • Navigate an automated answering system. • Select letters when...
User's Guide
Page 28
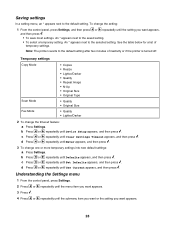
... settings. Saving settings In a setting menu, an * appears next to the default setting after two minutes of temporary settings. Note: The printer reverts to the default setting. b Press or repeatedly until Use Current appears, and then press . d Press or repeatedly until Device Setup ...appears, and then press . An * appears next to the selected setting. Temporary settings Copy Mode Scan Mode Fax Mode • Copies • Resize • Lighter/Darker • Quality • Repeat Image • N-Up • Original Size • ...
... settings. Saving settings In a setting menu, an * appears next to the default setting after two minutes of temporary settings. Note: The printer reverts to the default setting. b Press or repeatedly until Use Current appears, and then press . d Press or repeatedly until Device Setup ...appears, and then press . An * appears next to the selected setting. Temporary settings Copy Mode Scan Mode Fax Mode • Copies • Resize • Lighter/Darker • Quality • Repeat Image • N-Up • Original Size • ...

User's Guide
Page 29
...the previous menus and make changes in your country use two detection patterns, call your fax settings. • Button Beep to set the date and time. • Host Fax Settings to choose whether to allow the fax software from the computer to determine their subscribed pattern. - If phones in your ...to the factory default settings. Select the size and type of photo(s) to print. • Set Defaults to change the timeout feature before the printer, if left unused, resets to either On or Off. From here Maintenance Paper Setup Device Setup Defaults You can Select: • Ink Level ...
...the previous menus and make changes in your country use two detection patterns, call your fax settings. • Button Beep to set the date and time. • Host Fax Settings to choose whether to allow the fax software from the computer to determine their subscribed pattern. - If phones in your ...to the factory default settings. Select the size and type of photo(s) to print. • Set Defaults to change the timeout feature before the printer, if left unused, resets to either On or Off. From here Maintenance Paper Setup Device Setup Defaults You can Select: • Ink Level ...

User's Guide
Page 31
... this software may not be applicable. Fax Send a photo or document as an attachment to the Lexmark Web site at www.lexmark.com. 2 From the home page, navigate through the menu selection, and then click Drivers & Downloads. 3 Choose the printer and the printer driver for the task you can edit... photos, send faxes, maintain your operating system. 4 ...
... this software may not be applicable. Fax Send a photo or document as an attachment to the Lexmark Web site at www.lexmark.com. 2 From the home page, navigate through the menu selection, and then click Drivers & Downloads. 3 Choose the printer and the printer driver for the task you can edit... photos, send faxes, maintain your operating system. 4 ...


