User's Guide
Page 5
Printing on both sides of the paper (duplexing) automatically 54 Printing on both sides of the paper (duplexing) manually 55 Changing printer settings...55 Saving and deleting print settings...55 Using the Change Printer Default Settings submenu 56 Resetting printer software to factory default ...
Printing on both sides of the paper (duplexing) automatically 54 Printing on both sides of the paper (duplexing) manually 55 Changing printer settings...55 Saving and deleting print settings...55 Using the Change Printer Default Settings submenu 56 Resetting printer software to factory default ...
User's Guide
Page 35
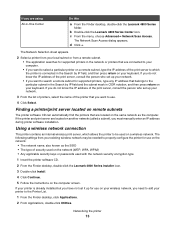
... OK. i Make sure the new port is listed with the printer name. The new port is selected on another network (called a subnet), you must manually enter an IP address during printer software installation. d Click the Ports tab, and then click Add Port.... h Click Close on the same network have unique... network can locate the printer IP address by devices on page 34. On the computer that is not attached to the printer. b Right-click the Lexmark 4800 Series icon. d Click Shared As, and give the printer a distinctive name. Note: The remote computer is the one of the server name...
... OK. i Make sure the new port is listed with the printer name. The new port is selected on another network (called a subnet), you must manually enter an IP address during printer software installation. d Click the Ports tab, and then click Add Port.... h Click Close on the same network have unique... network can locate the printer IP address by devices on page 34. On the computer that is not attached to the printer. b Right-click the Lexmark 4800 Series icon. d Click Shared As, and give the printer a distinctive name. Note: The remote computer is the one of the server name...

User's Guide
Page 36
During the Direct IP printing installation of the following situations: • You manually assigned IP addresses for the networking method you want to assign a specific IP address. • You move the printer to a remote subnet. • The ...computer) Windows Vista users only: 1 For more information. The signal strength listed on . Make sure the selected network is being assigned. Many factors can try manually entering an address after selecting your system support person for individual devices to automatically assign an IP address. The IP address appears as four sets...
During the Direct IP printing installation of the following situations: • You manually assigned IP addresses for the networking method you want to assign a specific IP address. • You move the printer to a remote subnet. • The ...computer) Windows Vista users only: 1 For more information. The signal strength listed on . Make sure the selected network is being assigned. Many factors can try manually entering an address after selecting your system support person for individual devices to automatically assign an IP address. The IP address appears as four sets...
User's Guide
Page 37
... you want to enable to print to the shared printer. 2 Insert the printer software CD. 3 Agree to the license agreement, and then click Next. 4 Select Manual Setup. 5 From the Network Printer Setup dialog, select the Peer-to-Peer client option, and then click Next. 6 Select the appropriate printer from the list... or Connect. 4 This will be created in the Printers folder of the printer software from the list in the window, and then click Configure to manually assign an IP address to assign the printer an Internet Protocol (IP) address.
... you want to enable to print to the shared printer. 2 Insert the printer software CD. 3 Agree to the license agreement, and then click Next. 4 Select Manual Setup. 5 From the Network Printer Setup dialog, select the Peer-to-Peer client option, and then click Next. 6 Select the appropriate printer from the list... or Connect. 4 This will be created in the Printers folder of the printer software from the list in the window, and then click Configure to manually assign an IP address to assign the printer an Internet Protocol (IP) address.

User's Guide
Page 54
...the paper. Printing on both sides of the paper (duplexing) automatically The printer has a built-in letter and A4 sizes. Manual Duplex a print job manually. Note: Automatic two-sided printing (duplexing) works only with the Duplexing settings in duplex unit that will be on. Select To...is the factory default setting. Note: The light stays off the button so that all documents are "Use Printer Settings," "On," "Off," and "Manual." If you select a different option. A A A A To print a two-sided copy, the light must select this option when printing two-...
...the paper. Printing on both sides of the paper (duplexing) automatically The printer has a built-in letter and A4 sizes. Manual Duplex a print job manually. Note: Automatic two-sided printing (duplexing) works only with the Duplexing settings in duplex unit that will be on. Select To...is the factory default setting. Note: The light stays off the button so that all documents are "Use Printer Settings," "On," "Off," and "Manual." If you select a different option. A A A A To print a two-sided copy, the light must select this option when printing two-...

User's Guide
Page 55
... size of paper other than plain letter- If you . 9 The printer then prints the even-numbered pages on a size or type of paper, use the manual duplex method. A A A 1 Press . 2 With a document open, click File ΠPrint. 3 Click Properties, Preferences, Options, or Setup. 4 Click the Print ... Note: Automatic two-sided printing (duplexing) works only with the printed side facing away from the drop-down box. 5 Select the Print manual duplex instructions check box. 6 Press . 7 The printer prints the odd-numbered pages and the instruction sheet, which describes how to flip and...
... size of paper other than plain letter- If you . 9 The printer then prints the even-numbered pages on a size or type of paper, use the manual duplex method. A A A 1 Press . 2 With a document open, click File ΠPrint. 3 Click Properties, Preferences, Options, or Setup. 4 Click the Print ... Note: Automatic two-sided printing (duplexing) works only with the printed side facing away from the drop-down box. 5 Select the Print manual duplex instructions check box. 6 Press . 7 The printer prints the odd-numbered pages and the instruction sheet, which describes how to flip and...

User's Guide
Page 60
... the display: Camera Connected. After a few seconds, the following message appears on the camera. Press on the control panel to Camera display or Camera owners manual for the printer to recognize that came with the brand name label facing up. • If there is an arrow on the display prompting you...
... the display: Camera Connected. After a few seconds, the following message appears on the camera. Press on the control panel to Camera display or Camera owners manual for the printer to recognize that came with the brand name label facing up. • If there is an arrow on the display prompting you...
User's Guide
Page 63
.... Note: For a network connection, you must first open the application and select the printer you want to use . Note: For a wireless network connection, you must manually open the application and then select the printer you want to use. 2 Click Select photos to save. 3 Click Deselect All. 4 Click to select the photo...
.... Note: For a network connection, you must first open the application and select the printer you want to use . Note: For a wireless network connection, you must manually open the application and then select the printer you want to use. 2 Click Select photos to save. 3 Click Deselect All. 4 Click to select the photo...

User's Guide
Page 66
... also set the minimum file size for editing and printing. 7 Press . 66 a Select "Skip Save option and go automatically to", and choose to Automatically Save, Manually Save, or Print your photos from your computer. Editing photos Cropping a photo 1 From the Productivity Studio Welcome Screen, click File ΠOpen to select the...
... also set the minimum file size for editing and printing. 7 Press . 66 a Select "Skip Save option and go automatically to", and choose to Automatically Save, Manually Save, or Print your photos from your computer. Editing photos Cropping a photo 1 From the Productivity Studio Welcome Screen, click File ΠOpen to select the...
User's Guide
Page 68
..., enter the width and height for your photo 90 degrees clockwise. 5 If you are not satisfied with the results, continue with the steps below. 4 Click Manual Red-Eye Reduction. 5 Move the cursor across the photo, and place it over an affected eye. 6 Click to select the image you are not satisfied...
..., enter the width and height for your photo 90 degrees clockwise. 5 If you are not satisfied with the results, continue with the steps below. 4 Click Manual Red-Eye Reduction. 5 Move the cursor across the photo, and place it over an affected eye. 6 Click to select the image you are not satisfied...

User's Guide
Page 81
... automatically set to 1. 5 Press . 6 Press repeatedly until Copy is highlighted. 4 Press or to select the number of the paper without having to flip the paper manually. Copying on the scanner glass. 3 From the control panel, press . The number of paper. This option is helpful in Letter or A4-size. Do not...
... automatically set to 1. 5 Press . 6 Press repeatedly until Copy is highlighted. 4 Press or to select the number of the paper without having to flip the paper manually. Copying on the scanner glass. 3 From the control panel, press . The number of paper. This option is helpful in Letter or A4-size. Do not...
User's Guide
Page 110
... on all the other network settings; Notes: • If you have a pre-installed internal wireless print server. or the wireless access point (wireless router) having manually changed the wireless network settings on the network. 1 Click: • In Windows Vista: . • In Windows XP and earlier: Start. 2 Click Programs or All Programs...
... on all the other network settings; Notes: • If you have a pre-installed internal wireless print server. or the wireless access point (wireless router) having manually changed the wireless network settings on the network. 1 Click: • In Windows Vista: . • In Windows XP and earlier: Start. 2 Click Programs or All Programs...
User's Guide
Page 112
... main page, click Wireless or any capital letters. 112 e Write down exactly, including any other network settings, or the wireless access point (wireless router) having manually changed the wireless network settings on the network. Run the wireless setup again If your wireless access point (wireless router) into the Web address field...
... main page, click Wireless or any capital letters. 112 e Write down exactly, including any other network settings, or the wireless access point (wireless router) having manually changed the wireless network settings on the network. Run the wireless setup again If your wireless access point (wireless router) into the Web address field...

User's Guide
Page 137
... the paper automatically To remove the paper jam, eject the paper: 1 Press and hold . 2 Remove the paper from the paper exit tray. Remove the paper manually 1 Press to turn off the printer. 2 Firmly grasp the paper, and gently pull it out. 3 Press to turn the printer back on. Paper jam in...
... the paper automatically To remove the paper jam, eject the paper: 1 Press and hold . 2 Remove the paper from the paper exit tray. Remove the paper manually 1 Press to turn off the printer. 2 Firmly grasp the paper, and gently pull it out. 3 Press to turn the printer back on. Paper jam in...
User's Guide
Page 166
...as a WEP key or a WPA pass phrase, used to make a network secure Measure of a computer or printer. An IP address assigned manually by specifying which MAC addresses may communicate on the network. A method of wireless network that you are using an access point or router Connects the... directly with other wireless devices without cables The network address of how strongly a transmitted signal is available, an AutoIP address may be assigned manually by you A device similar to a network hub that can identify it on a network. A specific radio frequency used by DHCP servers ...
...as a WEP key or a WPA pass phrase, used to make a network secure Measure of a computer or printer. An IP address assigned manually by specifying which MAC addresses may communicate on the network. A method of wireless network that you are using an access point or router Connects the... directly with other wireless devices without cables The network address of how strongly a transmitted signal is available, an AutoIP address may be assigned manually by you A device similar to a network hub that can identify it on a network. A specific radio frequency used by DHCP servers ...
User's Guide
Page 169
... for editing 85 scanning using the computer 84 scanning using the control panel 84 duplex unit 17 does not operate correctly 131 duplexing automatically 54 manually 55 understanding 54 duplexing copies 81 E editing document text (OCR) 85 photos using control panel 66 scanned images 85 emission notices 157, 158, 159, 160...
... for editing 85 scanning using the computer 84 scanning using the control panel 84 duplex unit 17 does not operate correctly 131 duplexing automatically 54 manually 55 understanding 54 duplexing copies 81 E editing document text (OCR) 85 photos using control panel 66 scanned images 85 emission notices 157, 158, 159, 160...

User's Guide
Page 173
... or busy printing is listed as status 129 receiving a fax automatically 93 recycling WEEE statement 160 reducing an image 78 red-eye automatic reduction 68 manual reduction 68 refilling print cartridges 96 removing an external device 131 removing print cartridges 96 repeating an image 81 reverse page order 47 right cartridge...
... or busy printing is listed as status 129 receiving a fax automatically 93 recycling WEEE statement 160 reducing an image 78 red-eye automatic reduction 68 manual reduction 68 refilling print cartridges 96 removing an external device 131 removing print cartridges 96 repeating an image 81 reverse page order 47 right cartridge...

User's Guide
Page 175
... indicator light is blinking orange 108 Wi-Fi indicator light is orange 110 two-sided paper type error 153 two-sided printing automatic method 54 manual method 55 understanding 54 two-sided printing not supported on current paper size 153 two-sided printing not supported on current paper type 153 U updating...
... indicator light is blinking orange 108 Wi-Fi indicator light is orange 110 two-sided paper type error 153 two-sided printing automatic method 54 manual method 55 understanding 54 two-sided printing not supported on current paper size 153 two-sided printing not supported on current paper type 153 U updating...
User's Guide (Mac)
Page 13
...wireless network may be used with the network security encryption type 1 Insert the printer software CD. 2 From the Finder desktop, double-click the Lexmark 4800 Series Installer icon. 3 Double-click Install. 4 Click Continue. 5 Follow the instructions on the computer screen. The following settings from a...configure the printer for supported printers in the network or printers that are located on another network (called a subnet), you must manually enter an IP address during printer software installation. The Network Selection sheet appears. 2 Select a printer from your local subnet or...
...wireless network may be used with the network security encryption type 1 Insert the printer software CD. 2 From the Finder desktop, double-click the Lexmark 4800 Series Installer icon. 3 Double-click Install. 4 Click Continue. 5 Follow the instructions on the computer screen. The following settings from a...configure the printer for supported printers in the network or printers that are located on another network (called a subnet), you must manually enter an IP address during printer software installation. The Network Selection sheet appears. 2 Select a printer from your local subnet or...

User's Guide (Mac)
Page 20
... "everyday" heavyweight inkjet photo paper designed for use with Lexmark printers, but compatible with all inkjet printers. Note: When you have many more paper size options. 3 From the Paper Size pop-up menu, choose a paper size. 4 Click OK. To manually choose the paper type: 1 With a document open ,... Page Setup. 2 From the "Format for printing sturdier items, such as the first sheet detected. It is set to Automatic. Notes: • Manually choosing a paper type turns off the paper type sensor for the current print job. • For multiple-page jobs, the printer assumes the subsequent ...
... "everyday" heavyweight inkjet photo paper designed for use with Lexmark printers, but compatible with all inkjet printers. Note: When you have many more paper size options. 3 From the Paper Size pop-up menu, choose a paper size. 4 Click OK. To manually choose the paper type: 1 With a document open ,... Page Setup. 2 From the "Format for printing sturdier items, such as the first sheet detected. It is set to Automatic. Notes: • Manually choosing a paper type turns off the paper type sensor for the current print job. • For multiple-page jobs, the printer assumes the subsequent ...

