
User's Guide
Page 2
...between objects such as the power supply cord or telephone, during a lightning storm. Refer service or repairs, other replacement parts. Lexmark is misused, a risk of some parts may not always be obvious. Connect the power supply cord to an electrical outlet that is designed, tested, and approved... the electrical outlet before inspecting it. Safety information Use only the power supply and power supply cord provided with the use of specific Lexmark components. CAUTION: Do not twist, bind, crush, or place heavy objects on the power cord. SAVE THESE INSTRUCTIONS. The safety...
...between objects such as the power supply cord or telephone, during a lightning storm. Refer service or repairs, other replacement parts. Lexmark is misused, a risk of some parts may not always be obvious. Connect the power supply cord to an electrical outlet that is designed, tested, and approved... the electrical outlet before inspecting it. Safety information Use only the power supply and power supply cord provided with the use of specific Lexmark components. CAUTION: Do not twist, bind, crush, or place heavy objects on the power cord. SAVE THESE INSTRUCTIONS. The safety...

User's Guide
Page 3
...Finding information about the printer 11 Wireless network compatibility...14 Setting up the printer 15 Checking the box contents...15 Understanding the parts of the printer 16 Standalone setup...18 Understanding the printer software 23 Understanding the control panel...26 Using the control panel...26 ...Navigating the control panel menus ...27 Saving settings...28 Installing the printer software...29 What do the Wi-Fi indicator lights mean 29 Turning printing voice notification on...
...Finding information about the printer 11 Wireless network compatibility...14 Setting up the printer 15 Checking the box contents...15 Understanding the parts of the printer 16 Standalone setup...18 Understanding the printer software 23 Understanding the control panel...26 Using the control panel...26 ...Navigating the control panel menus ...27 Saving settings...28 Installing the printer software...29 What do the Wi-Fi indicator lights mean 29 Turning printing voice notification on...
User's Guide
Page 16
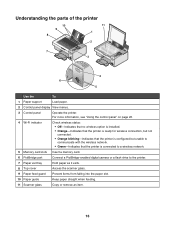
... from falling into the paper slot. 10 Paper guide Keep paper straight when feeding. 11 Scanner glass Copy or remove an item. 16 Understanding the parts of the printer 10 9 8 11 1 2 7 WI F I PRINTING 3 WI F I PRINTING 4 6 5 Use the To 1 Paper support Load paper. 2 Control panel display View menus. 3 Control panel Operate the...
... from falling into the paper slot. 10 Paper guide Keep paper straight when feeding. 11 Scanner glass Copy or remove an item. 16 Understanding the parts of the printer 10 9 8 11 1 2 7 WI F I PRINTING 3 WI F I PRINTING 4 6 5 Use the To 1 Paper support Load paper. 2 Control panel display View menus. 3 Control panel Operate the...

User's Guide
Page 39
... or SSID for use that the computer is already enabled. 4 Right-click the Wireless Network Connection icon. 5 Click Properties. 6 Click the Wireless Networks tab. As part of your printer for the network between the computer and your wireless settings. Windows Vista will appear in the "Connect to a network" dialog under available...
... or SSID for use that the computer is already enabled. 4 Right-click the Wireless Network Connection icon. 5 Click Properties. 6 Click the Wireless Networks tab. As part of your printer for the network between the computer and your wireless settings. Windows Vista will appear in the "Connect to a network" dialog under available...

User's Guide
Page 40
...: For more information about passwords (security keys), see "Check your computer to an existing ad hoc wireless network using the installation cable as part of the setup process. 23 Follow the prompts on the computer screen. 24 Store your network: a Right-click the Wireless Network Connections icon... 7 Select the Use Windows to be prompted to connect the printer to the computer again using Windows 1 Click Programs or All Programs ΠLexmark 4800 Series. 2 Click Wireless Setup. 3 Follow the instructions on the status of your network name and security code in a security code. 16...
...: For more information about passwords (security keys), see "Check your computer to an existing ad hoc wireless network using the installation cable as part of the setup process. 23 Follow the prompts on the computer screen. 24 Store your network: a Right-click the Wireless Network Connections icon... 7 Select the Use Windows to be prompted to connect the printer to the computer again using Windows 1 Click Programs or All Programs ΠLexmark 4800 Series. 2 Click Wireless Setup. 3 Follow the instructions on the status of your network name and security code in a security code. 16...

User's Guide
Page 99
... off and unplugged from the paper support and paper exit tray. 3 Dampen a clean, lint-free cloth with water. Ordering supplies Ordering print cartridges Lexmark 4800 Series models Item Part number Average cartridge standard page yield is dry before proceeding. 2 Remove paper from the wall outlet. Warning: Do not use household cleaners or...
... off and unplugged from the paper support and paper exit tray. 3 Dampen a clean, lint-free cloth with water. Ordering supplies Ordering print cartridges Lexmark 4800 Series models Item Part number Average cartridge standard page yield is dry before proceeding. 2 Remove paper from the wall outlet. Warning: Do not use household cleaners or...

User's Guide
Page 100
... may vary by country or region. For best results, remove each printed sheet individually from the paper exit tray, and allow the sheets to www.lexmark.com. 100 Item Part Number USB cable 1021294 For more information, go to dry at least 24 hours before stacking, displaying, or storing. Do not use...
... may vary by country or region. For best results, remove each printed sheet individually from the paper exit tray, and allow the sheets to www.lexmark.com. 100 Item Part Number USB cable 1021294 For more information, go to dry at least 24 hours before stacking, displaying, or storing. Do not use...
User's Guide
Page 102
.... The USB port is not on, press . For more of the following operating systems are possible solutions. Try one or more information, see "Understanding the parts of the computer. Disconnect and reconnect the power cord 1 Disconnect the power cord from the wall outlet, and then from the printer. 2 Plug the cord...
.... The USB port is not on, press . For more of the following operating systems are possible solutions. Try one or more information, see "Understanding the parts of the computer. Disconnect and reconnect the power cord 1 Disconnect the power cord from the wall outlet, and then from the printer. 2 Plug the cord...
User's Guide
Page 110
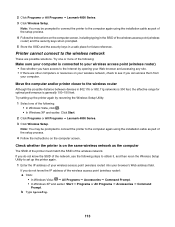
Note: If the computer is connected to your network does not have the same name as part of the following: Check cable Make sure the installation cable is orange These are not using the installation cable as another network near you. c Right-... process. 4 Follow the instructions on the network. 1 Click: • In Windows Vista: . • In Windows XP and earlier: Start. 2 Click Programs or All Programs Œ Lexmark 4800 Series. 3 Click Wireless Setup. Configure the optional internal wireless print server Note: This solution does not apply to set up, see them on the...
Note: If the computer is connected to your network does not have the same name as part of the following: Check cable Make sure the installation cable is orange These are not using the installation cable as another network near you. c Right-... process. 4 Follow the instructions on the network. 1 Click: • In Windows Vista: . • In Windows XP and earlier: Start. 2 Click Programs or All Programs Œ Lexmark 4800 Series. 3 Click Wireless Setup. Configure the optional internal wireless print server Note: This solution does not apply to set up, see them on the...
User's Guide
Page 113
... optimal performance is on your wireless network, check to see if you have access to the computer again using the installation cable as part of the setup process. 4 Follow the instructions on the computer screen, including typing in the SSID of your wireless access point (...802.11g networks is connected to the computer again using the installation cable as part of the following : • In Windows Vista, click . • In Windows XP and earlier: Click Start. 2 Click Programs or All Programs Œ Lexmark 4800 Series. 3 Click Wireless Setup. b Type ipconfig. 113 2 Click ...
... optimal performance is on your wireless network, check to see if you have access to the computer again using the installation cable as part of the setup process. 4 Follow the instructions on the computer screen, including typing in the SSID of your wireless access point (...802.11g networks is connected to the computer again using the installation cable as part of the following : • In Windows Vista, click . • In Windows XP and earlier: Click Start. 2 Click Programs or All Programs Œ Lexmark 4800 Series. 3 Click Wireless Setup. b Type ipconfig. 113 2 Click ...
User's Guide
Page 116
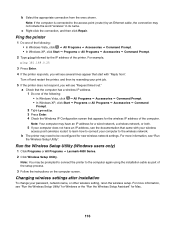
...the computer screen. Turn off and restart the printer, and then try resending your computer to the computer again using the installation cable as part of the computer. Note: You may need to be prompted to connect the printer to the wireless network. b Select the appropriate connection ...from ". a Check that appears for Mac. 116 Run the Wireless Setup Utility (Windows users only) 1 Click Programs or All Programs ΠLexmark 4800 Series. 2 Click Wireless Setup Utility. Note: If the computer is connected to connect your print job. 5 If the printer does not respond, you...
...the computer screen. Turn off and restart the printer, and then try resending your computer to the computer again using the installation cable as part of the computer. Note: You may need to be prompted to connect the printer to the wireless network. b Select the appropriate connection ...from ". a Check that appears for Mac. 116 Run the Wireless Setup Utility (Windows users only) 1 Click Programs or All Programs ΠLexmark 4800 Series. 2 Click Wireless Setup Utility. Note: If the computer is connected to connect your print job. 5 If the printer does not respond, you...

User's Guide
Page 157
...CAUTION: This type of CAUTION indicates a hot surface. This equipment generates, uses, and can be directed to: Director of Lexmark Technology & Services Lexmark International, Inc. 740 West New Circle Road Lexington, KY 40550 (859) 232-3000 Exposure to satisfy the RF exposure requirements... turning the equipment off and on electromagnetic interference for a Class B computing device, use a properly shielded and grounded cable such as Lexmark part number 1021294 for a Class B digital device, pursuant to radio or television reception, which the receiver is operated in accordance with FCC...
...CAUTION: This type of CAUTION indicates a hot surface. This equipment generates, uses, and can be directed to: Director of Lexmark Technology & Services Lexmark International, Inc. 740 West New Circle Road Lexington, KY 40550 (859) 232-3000 Exposure to satisfy the RF exposure requirements... turning the equipment off and on electromagnetic interference for a Class B computing device, use a properly shielded and grounded cable such as Lexmark part number 1021294 for a Class B digital device, pursuant to radio or television reception, which the receiver is operated in accordance with FCC...

User's Guide
Page 162
...purchase and this statement to present the feature or option with the product for which perform like new parts -Is, during the warranty period, contact a Remarketer or Lexmark for the remainder of the warranty period. Replacement is not free of all print cartridges, programs, ... repair, or if the product is not available to in this statement as ink) not furnished by Lexmark -Products, components, parts, materials, software, or interfaces not furnished by a Lexmark warranty, technical support may be required to the Remarketer or the designated location. For further explanation of ...
...purchase and this statement to present the feature or option with the product for which perform like new parts -Is, during the warranty period, contact a Remarketer or Lexmark for the remainder of the warranty period. Replacement is not free of all print cartridges, programs, ... repair, or if the product is not available to in this statement as ink) not furnished by Lexmark -Products, components, parts, materials, software, or interfaces not furnished by a Lexmark warranty, technical support may be required to the Remarketer or the designated location. For further explanation of ...

User's Guide
Page 164
...visual appearance of such license. 4 TRANSFER. d Freeware. If you have such statutory rights, you fail to do so by Lexmark as follows: Lexmark will notify Lexmark in this License Agreement. THE FOREGOING LIMITATIONS APPLY EVEN IF THE ABOVE-STATED REMEDIES FAIL OF THEIR ESSENTIAL PURPOSE. 10 TERM. c...unless necessary for the legitimate Use of the Software Program, your money will not Use the Software Program, in whole or in part, in any portion of the Software Program that is the subject matter of the original Software Program's proprietary notices. You may no...
...visual appearance of such license. 4 TRANSFER. d Freeware. If you have such statutory rights, you fail to do so by Lexmark as follows: Lexmark will notify Lexmark in this License Agreement. THE FOREGOING LIMITATIONS APPLY EVEN IF THE ABOVE-STATED REMEDIES FAIL OF THEIR ESSENTIAL PURPOSE. 10 TERM. c...unless necessary for the legitimate Use of the Software Program, your money will not Use the Software Program, in whole or in part, in any portion of the Software Program that is the subject matter of the original Software Program's proprietary notices. You may no...

User's Guide
Page 171
.... (10x15cm) photo prints when using PictBridge 117 partial document or photo copies 144 partial document or photo prints 121 partial document or photo scans 146 parts control panel 16 duplex unit 17 memory card slots 16 paper exit tray 16 paper feed guard 16 paper guide 16 paper support 16 PictBridge...
.... (10x15cm) photo prints when using PictBridge 117 partial document or photo copies 144 partial document or photo prints 121 partial document or photo scans 146 parts control panel 16 duplex unit 17 memory card slots 16 paper exit tray 16 paper feed guard 16 paper guide 16 paper support 16 PictBridge...
User's Guide (Mac)
Page 3
... storage devices...56 Working with photos using the control panel 59 Working with photos using the computer 66 Understanding the printer 75 Understanding the printer parts...75 Understanding the software...83 Maintaining the printer 95 Print cartridges...95 Improving print quality...100 Ordering supplies...101 Cleaning the scanner glass...102 Cleaning...
... storage devices...56 Working with photos using the control panel 59 Working with photos using the computer 66 Understanding the printer 75 Understanding the printer parts...75 Understanding the software...83 Maintaining the printer 95 Print cartridges...95 Improving print quality...100 Ordering supplies...101 Cleaning the scanner glass...102 Cleaning...

User's Guide (Mac)
Page 5
...to an electrical outlet that is not responsible for signs of some parts may not always be obvious. Safety information Use only the power supply and power supply cord provided with the use of specific Lexmark components. Connect the power supply cord to meet strict global safety ...product or the manufacturer's authorized replacement power supply and power supply cord. Do not subject the power cord to a professional service person. Lexmark is near the product and easily accessible. Do not pinch the power cord between objects such as the power supply cord or telephone, during...
...to an electrical outlet that is not responsible for signs of some parts may not always be obvious. Safety information Use only the power supply and power supply cord provided with the use of specific Lexmark components. Connect the power supply cord to meet strict global safety ...product or the manufacturer's authorized replacement power supply and power supply cord. Do not subject the power cord to a professional service person. Lexmark is near the product and easily accessible. Do not pinch the power cord between objects such as the power supply cord or telephone, during...

User's Guide (Mac)
Page 33
Related topics: • "Understanding the parts of the printer" on page 76 • "Making a copy" on page 33 • "Scanning a document" on page 46 Performing copying and related tasks Making a copy 1 ...
Related topics: • "Understanding the parts of the printer" on page 76 • "Making a copy" on page 33 • "Scanning a document" on page 46 Performing copying and related tasks Making a copy 1 ...

User's Guide (Mac)
Page 40
...about the All-In-One Center scan options Choosing where to send scanned images 1 From the Finder desktop, double-click the Lexmark 4800 Series folder. 2 Double-click the Lexmark 4800 Series Center icon. 3 From the "Send scanned image to" pop-up menu, choose the scan destination. •... glass WI F I PRINTING WI F I PRINTING WI F I PRINTING You can paste it into another document. Related topics: • "Understanding the parts of system memory and drastically affects system performance. • An application-Opens the scanned image in the lower right corner. 4 Close the top cover to...
...about the All-In-One Center scan options Choosing where to send scanned images 1 From the Finder desktop, double-click the Lexmark 4800 Series folder. 2 Double-click the Lexmark 4800 Series Center icon. 3 From the "Send scanned image to" pop-up menu, choose the scan destination. •... glass WI F I PRINTING WI F I PRINTING WI F I PRINTING You can paste it into another document. Related topics: • "Understanding the parts of system memory and drastically affects system performance. • An application-Opens the scanned image in the lower right corner. 4 Close the top cover to...

User's Guide (Mac)
Page 45
... 42 • "Adjusting color settings when scanning" on page 41 Sharpening an image 1 From the Finder desktop, double-click the Lexmark 4800 Series folder. 2 Double-click the Lexmark 4800 Series Center icon. 3 Click Preview/Edit to open the Scan dialog. 4 From the Scan dialog, click to open the Scan... Settings drawer. 5 Select the Adjustments tab. 6 From the Brightness area, move the slider to a part of the image. Note: The slider ...
... 42 • "Adjusting color settings when scanning" on page 41 Sharpening an image 1 From the Finder desktop, double-click the Lexmark 4800 Series folder. 2 Double-click the Lexmark 4800 Series Center icon. 3 Click Preview/Edit to open the Scan dialog. 4 From the Scan dialog, click to open the Scan... Settings drawer. 5 Select the Adjustments tab. 6 From the Brightness area, move the slider to a part of the image. Note: The slider ...
