
Getting Started
Page 1
Jams and misfeeds troubleshooting - Recycling Lexmark products • Troubleshooting - Print, copy, scan, and fax troubleshooting - Ordering supplies - Error messages troubleshooting • Notices Contents Setup troubleshooting 3 Removing and reinstalling the software 3 Checking the printer status 3 Using the control panel 4 Printing 4...; Working with photos 5 Copying 4 x 6 photos 5 Using a PictBridge-enabled camera to print photos 5 Understanding the software 5 Using the Imaging Studio 5 Using the All-In-One Center 5 Using the Solution Center 6 Using Print Properties 6...
Jams and misfeeds troubleshooting - Recycling Lexmark products • Troubleshooting - Print, copy, scan, and fax troubleshooting - Ordering supplies - Error messages troubleshooting • Notices Contents Setup troubleshooting 3 Removing and reinstalling the software 3 Checking the printer status 3 Using the control panel 4 Printing 4...; Working with photos 5 Copying 4 x 6 photos 5 Using a PictBridge-enabled camera to print photos 5 Understanding the software 5 Using the Imaging Studio 5 Using the All-In-One Center 5 Using the Solution Center 6 Using Print Properties 6...

Getting Started
Page 2
..., contact your point of the information you . Evaluation and verification of publications related to this agreement are commercial computer software and documentation developed exclusively at any time. Edition: February 2006 The following two conditions: (1) this device may not ... apply to you supply in China UNITED STATES GOVERNMENT RIGHTS This software and any accompanying documentation provided under this product by the manufacturer, are the user's responsibility. © 2006 Lexmark International, Inc. Federal Communications Commission (FCC) compliance information statement This...
..., contact your point of the information you . Evaluation and verification of publications related to this agreement are commercial computer software and documentation developed exclusively at any time. Edition: February 2006 The following two conditions: (1) this device may not ... apply to you supply in China UNITED STATES GOVERNMENT RIGHTS This software and any accompanying documentation provided under this product by the manufacturer, are the user's responsibility. © 2006 Lexmark International, Inc. Federal Communications Commission (FCC) compliance information statement This...
Getting Started
Page 3
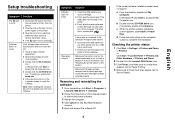
... sure to access the My Computer icon. 4 Double-click the CD-ROM drive icon. Removing and reinstalling the software 1 From the desktop, click Start Æ Programs Æ Lexmark 2400 Series Æ Uninstall. 2 Follow the instructions on the computer screen to the computer through another device: 1... Disconnect the USB cable from any Add New Hardware screens. 5 Eject and reinsert the software CD. Page does not print If the ...
... sure to access the My Computer icon. 4 Double-click the CD-ROM drive icon. Removing and reinstalling the software 1 From the desktop, click Start Æ Programs Æ Lexmark 2400 Series Æ Uninstall. 2 Follow the instructions on the computer screen to the computer through another device: 1... Disconnect the USB cable from any Add New Hardware screens. 5 Eject and reinsert the software CD. Page does not print If the ...

Getting Started
Page 5
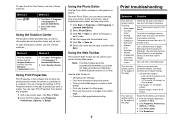
... 5 From the "Send scanned image to:" menu, select a program. 6 Click Scan Now. 2 Load 4 x 6 photo paper. 3 Press . Understanding the software Using the Imaging Studio English 3 Press . The All-In-One Center appears on the camera to select and print your photos. Using a PictBridge-enabled camera...these methods: Method 1 From the desktop, double-click the Imaging Studio icon. Method 2 1 Click Start Æ Programs or All programs Æ Lexmark 2400 Series. 2 Select Imaging Studio. Scanning Scanning an item 1 Make sure the printer is connected to a computer, and both the printer and the...
... 5 From the "Send scanned image to:" menu, select a program. 6 Click Scan Now. 2 Load 4 x 6 photo paper. 3 Press . Understanding the software Using the Imaging Studio English 3 Press . The All-In-One Center appears on the camera to select and print your photos. Using a PictBridge-enabled camera...these methods: Method 1 From the desktop, double-click the Imaging Studio icon. Method 2 1 Click Start Æ Programs or All programs Æ Lexmark 2400 Series. 2 Select Imaging Studio. Scanning Scanning an item 1 Make sure the printer is connected to a computer, and both the printer and the...
Getting Started
Page 6
...the printer status and ink level. Transparencies may take up to 15 minutes to a computer. Each paper brand accepts ink differently. Use Lexmark Premium Photo Paper if you browse the Web using the borderless feature, use these minimum print margin settings: • Left and right ...size paper • Top margin: 1.7 mm (0.067 inches) • Bottom margin: 19 mm (0.75 inches) Select the Borderless print feature. 1 From the software application, click File Æ Print. 2 Click Properties, Preferences, Options, or Setup. 3 Click Print Layout. 4 Click Borderless. Note: The Web Toolbar launches...
...the printer status and ink level. Transparencies may take up to 15 minutes to a computer. Each paper brand accepts ink differently. Use Lexmark Premium Photo Paper if you browse the Web using the borderless feature, use these minimum print margin settings: • Left and right ...size paper • Top margin: 1.7 mm (0.067 inches) • Bottom margin: 19 mm (0.75 inches) Select the Borderless print feature. 1 From the software application, click File Æ Print. 2 Click Properties, Preferences, Options, or Setup. 3 Click Print Layout. 4 Click Borderless. Note: The Web Toolbar launches...
Getting Started
Page 8
... cartridges, programs, data, and removable storage media (unless directed otherwise by you present this statement as ink) not furnished by Lexmark • Products, components, parts, materials, software, or interfaces not furnished by a Lexmark warranty, technical support may be available for a fee. The replacement may not be available or only be a new or repaired...
... cartridges, programs, data, and removable storage media (unless directed otherwise by you present this statement as ink) not furnished by Lexmark • Products, components, parts, materials, software, or interfaces not furnished by a Lexmark warranty, technical support may be available for a fee. The replacement may not be available or only be a new or repaired...

User's Guide
Page 2
... this product or make these changes will be addressed to Lexmark International, Inc., Department F95/032-2, 740 West New Circle Road, Lexington, Kentucky 40550, U.S.A. UNITED STATES GOVERNMENT RIGHTS This software and any accompanying documentation provided under this agreement are the ...user's responsibility. © 2006 Lexmark International, Inc. Edition notice February 2006 The following paragraph does not apply to...
... this product or make these changes will be addressed to Lexmark International, Inc., Department F95/032-2, 740 West New Circle Road, Lexington, Kentucky 40550, U.S.A. UNITED STATES GOVERNMENT RIGHTS This software and any accompanying documentation provided under this agreement are the ...user's responsibility. © 2006 Lexmark International, Inc. Edition notice February 2006 The following paragraph does not apply to...
User's Guide
Page 3
... the box contents...9 Learning about the printer 10 Understanding the parts of the printer 10 Using the control panel...11 Learning about the software 12 Using the printer software...12 Using the Imaging Studio...12 Using the All-In-One Center...13 Opening the All-In-One Center...13 Using the Scanning...
... the box contents...9 Learning about the printer 10 Understanding the parts of the printer 10 Using the control panel...11 Learning about the software 12 Using the printer software...12 Using the Imaging Studio...12 Using the All-In-One Center...13 Opening the All-In-One Center...13 Using the Scanning...

User's Guide
Page 4
... text for editing...37 Scanning images for editing...37 Scanning clear images from magazines or newspapers 38 Faxing...39 Sending a fax using the software...39 Receiving a fax using the software...40 Networking the printer 41 Shared printing...41 Maintaining the printer 42 Changing a print cartridge...42 Removing a used print cartridge...42 Installing...
... text for editing...37 Scanning images for editing...37 Scanning clear images from magazines or newspapers 38 Faxing...39 Sending a fax using the software...39 Receiving a fax using the software...40 Networking the printer 41 Shared printing...41 Maintaining the printer 42 Changing a print cartridge...42 Removing a used print cartridge...42 Installing...
User's Guide
Page 5
Preserving the print cartridge...46 Cleaning the scanner glass...46 Ordering supplies...46 Using genuine Lexmark print cartridges 46 Refilling a print cartridge...47 Recycling Lexmark products...47 Troubleshooting...48 Setup troubleshooting...48 Power button is not lit...48 Software does not install...48 Page does not print...49 Cannot print from digital camera using...
Preserving the print cartridge...46 Cleaning the scanner glass...46 Ordering supplies...46 Using genuine Lexmark print cartridges 46 Refilling a print cartridge...47 Recycling Lexmark products...47 Troubleshooting...48 Setup troubleshooting...48 Power button is not lit...48 Software does not install...48 Page does not print...49 Cannot print from digital camera using...
User's Guide
Page 7
... You can find this document on To access the Lexmark Solution Center: your CD if your Sheet for using the software if While in any Lexmark software program, click Help, your operating system. Lexmark Solution Center Description Where to find The Lexmark Solution Center software is included on the Lexmark Web site. Finding information about the printer and...
... You can find this document on To access the Lexmark Solution Center: your CD if your Sheet for using the software if While in any Lexmark software program, click Help, your operating system. Lexmark Solution Center Description Where to find The Lexmark Solution Center software is included on the Lexmark Web site. Finding information about the printer and...

User's Guide
Page 9
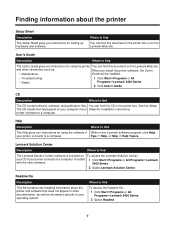
Setting up the printer Checking the box contents Name 1 Color print cartridge 2 Power supply cord 3 Installation software CD 4 Getting Started or Setup Solutions 5 Setup Sheet Description Cartridge to be installed in the printer Attaches to the power supply port located at the back of the printer • Installation software for the printer • Help • User's Guide in electronic format Additional information depending on your country or region Instructions on setting up printer hardware and software, and information on setup troubleshooting 9
Setting up the printer Checking the box contents Name 1 Color print cartridge 2 Power supply cord 3 Installation software CD 4 Getting Started or Setup Solutions 5 Setup Sheet Description Cartridge to be installed in the printer Attaches to the power supply port located at the back of the printer • Installation software for the printer • Help • User's Guide in electronic format Additional information depending on your country or region Instructions on setting up printer hardware and software, and information on setup troubleshooting 9

User's Guide
Page 12
... these methods: Method 1 Method 2 From the desktop, double-click the Imaging Studio icon. 1 Click StartŒPrograms or All ProgramsŒLexmark 2400 Series. 2 Select Imaging Studio. Click To Browse and print photos Details • View photos saved on the computer. • Print...and editing text using OCR • Scanning, copying, or faxing • Finding our Web site • Finding tips on using the software • Finding maintenance and troubleshooting information To open the Imaging Studio, use one of Web pages. Using the Imaging Studio The Imaging Studio...
... these methods: Method 1 Method 2 From the desktop, double-click the Imaging Studio icon. 1 Click StartŒPrograms or All ProgramsŒLexmark 2400 Series. 2 Select Imaging Studio. Click To Browse and print photos Details • View photos saved on the computer. • Print...and editing text using OCR • Scanning, copying, or faxing • Finding our Web site • Finding tips on using the software • Finding maintenance and troubleshooting information To open the Imaging Studio, use one of Web pages. Using the Imaging Studio The Imaging Studio...
User's Guide
Page 13
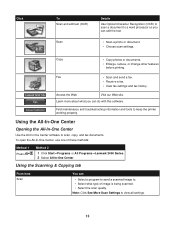
...Press Method 2 . 1 Click StartŒPrograms or All ProgramsŒLexmark 2400 Series. 2 Select All-In-One Center. Using the All-In-One Center Opening the All-In-One Center Use the All-In-One Center software to keep the printer working properly. Find maintenance and troubleshooting information and...; Choose scan settings. Access the Web Visit our Web site. Note: Click See More Scan Settings to . • Select what you can do with this software. Fax • Scan and send a fax. • Receive a fax. • View fax settings and fax history. Copy • Copy photos or ...
...Press Method 2 . 1 Click StartŒPrograms or All ProgramsŒLexmark 2400 Series. 2 Select All-In-One Center. Using the All-In-One Center Opening the All-In-One Center Use the All-In-One Center software to keep the printer working properly. Find maintenance and troubleshooting information and...; Choose scan settings. Access the Web Visit our Web site. Note: Click See More Scan Settings to . • Select what you can do with this software. Fax • Scan and send a fax. • Receive a fax. • View fax settings and fax history. Copy • Copy photos or ...

User's Guide
Page 15
...• Device status and ink level • More printing ideas and how to's • Contact information • Advanced • View the software version and copyright information Using the Solution Center The Solution Center provides help, as well as a multiple-page poster. • Share - Note.../Troubleshoot link The Maintain/Troubleshoot link provides you with direct links to the Solution Center. 1 Click StartŒPrograms or All ProgramsŒLexmark 2400 Series. 2 Select All-In-One Center. 3 Click Maintain/Troubleshoot. 4 Select from these methods: Method 1 Method 2 From the...
...• Device status and ink level • More printing ideas and how to's • Contact information • Advanced • View the software version and copyright information Using the Solution Center The Solution Center provides help, as well as a multiple-page poster. • Share - Note.../Troubleshoot link The Maintain/Troubleshoot link provides you with direct links to the Solution Center. 1 Click StartŒPrograms or All ProgramsŒLexmark 2400 Series. 2 Select All-In-One Center. 3 Click Maintain/Troubleshoot. 4 Select from these methods: Method 1 Method 2 From the...

User's Guide
Page 16
... such as banners, photos, envelopes, cards, iron-on the World Wide Web. Learn how to contact us regarding how you use the printer. • Obtain software version information. Note: For more information. • Learn tips about the current status. • Solve printer problems. Maintenance Contact Information • Install a print cartridge...
... such as banners, photos, envelopes, cards, iron-on the World Wide Web. Learn how to contact us regarding how you use the printer. • Obtain software version information. Note: For more information. • Learn tips about the current status. • Solve printer problems. Maintenance Contact Information • Install a print cartridge...
User's Guide
Page 17
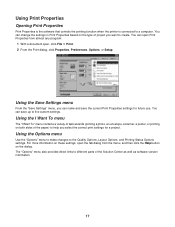
You can change the settings in Print Properties based on the type of the Solution Center as well as software version information. 17 Using the Save Settings menu From the "Save Settings" menu, you want to five custom settings. For more information...File ΠPrint. 2 From the Print dialog, click Properties, Preferences, Options, or Setup. Using Print Properties Opening Print Properties Print Properties is the software that controls the printing function when the printer is connected to the Quality Options, Layout Options, and Printing Status Options settings. You can save the...
You can change the settings in Print Properties based on the type of the Solution Center as well as software version information. 17 Using the Save Settings menu From the "Save Settings" menu, you want to five custom settings. For more information...File ΠPrint. 2 From the Print dialog, click Properties, Preferences, Options, or Setup. Using Print Properties Opening Print Properties Print Properties is the software that controls the printing function when the printer is connected to the Quality Options, Layout Options, and Printing Status Options settings. You can save the...
User's Guide
Page 18
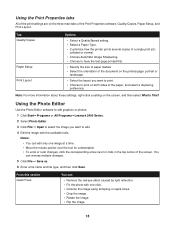
Using the Photo Editor Use the Photo Editor software to edit graphics or photos. 1 Click StartŒPrograms or All ProgramsŒLexmark 2400 Series. 2 Select Photo Editor. 3 Click File Œ Open to select the image you want to edit. 4 Edit the image with one image at a time. &#... printed page: portrait or landscape. • Select the layout you want to print. • Choose to Undo in the top center of the Print Properties software: Quality/Copies, Paper Setup, and Print Layout. You can • Remove the red-eye effect caused by light reflection. • Fix the photo with the...
Using the Photo Editor Use the Photo Editor software to edit graphics or photos. 1 Click StartŒPrograms or All ProgramsŒLexmark 2400 Series. 2 Select Photo Editor. 3 Click File Œ Open to select the image you want to edit. 4 Edit the image with one image at a time. &#... printed page: portrait or landscape. • Select the layout you want to print. • Choose to Undo in the top center of the Print Properties software: Quality/Copies, Paper Setup, and Print Layout. You can • Remove the red-eye effect caused by light reflection. • Fix the photo with the...
User's Guide
Page 28
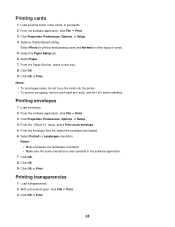
...click File ΠPrint. 3 Click OK or Print. 28 Printing cards 1 Load greeting cards, index cards, or postcards. 2 From the software application, click File ΠPrint. 3 Click Properties, Preferences, Options, or Setup. 4 Select a Quality/Speed setting. Printing envelopes 1 Load envelopes. 2 From the... software application, click File ΠPrint. 3 Click Properties, Preferences, Options, or Setup. 4 From the "I Want To" menu, select Print on an...
...click File ΠPrint. 3 Click OK or Print. 28 Printing cards 1 Load greeting cards, index cards, or postcards. 2 From the software application, click File ΠPrint. 3 Click Properties, Preferences, Options, or Setup. 4 Select a Quality/Speed setting. Printing envelopes 1 Load envelopes. 2 From the... software application, click File ΠPrint. 3 Click Properties, Preferences, Options, or Setup. 4 From the "I Want To" menu, select Print on an...
User's Guide
Page 36
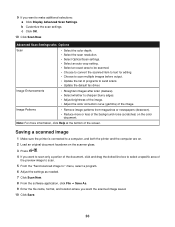
... of the preview image to scan. 5 From the "Send scanned image to:" menu, select a program. 6 Adjust the settings as needed. 7 Click Scan Now. 8 From the software application, click File ΠSave As. 9 Enter the file name, format, and location where you want to select a specific area of the background noise (scratches...
... of the preview image to scan. 5 From the "Send scanned image to:" menu, select a program. 6 Adjust the settings as needed. 7 Click Scan Now. 8 From the software application, click File ΠSave As. 9 Enter the file name, format, and location where you want to select a specific area of the background noise (scratches...


