User Guide
Page 2
...Installing an Internal Solutions Port...23 Installing a printer hard disk ...29 Installing hardware options...33 Order of installation...33 Installing paper drawers ...33 Installing an optional duplex unit (T650 only 34 Attaching cables...36 Verifying printer setup...37 Printing a menu settings page ......37 Printing a network setup page...37 Setting up the printer software...38 Installing printer software ...38 Updating available options in the printer driver 38 Setting...
...Installing an Internal Solutions Port...23 Installing a printer hard disk ...29 Installing hardware options...33 Order of installation...33 Installing paper drawers ...33 Installing an optional duplex unit (T650 only 34 Attaching cables...36 Verifying printer setup...37 Printing a menu settings page ......37 Printing a network setup page...37 Setting up the printer software...38 Installing printer software ...38 Updating available options in the printer driver 38 Setting...
User Guide
Page 4
... and locations 83 200 and 201 paper jams...83 202 and 203 paper jams...84 230 paper jam...85 231-239 paper jams (optional external duplex unit 87 241-245 paper jams...89 250 paper jam...89 260 paper jam...90 271-279 paper jams...91 280 paper jams...91 281... paper jam...92 282 paper jam...92 283 staple jam...93 Understanding printer menus 95 Menus list...95 Paper menu...96 Default Source menu ...96 Paper Size/Type menu ...96 Configure MP menu...99 Envelope Enhance...100 Substitute...
... and locations 83 200 and 201 paper jams...83 202 and 203 paper jams...84 230 paper jam...85 231-239 paper jams (optional external duplex unit 87 241-245 paper jams...89 250 paper jam...89 260 paper jam...90 271-279 paper jams...91 280 paper jams...91 281... paper jam...92 282 paper jam...92 283 staple jam...93 Understanding printer menus 95 Menus list...95 Paper menu...96 Default Source menu ...96 Paper Size/Type menu ...96 Configure MP menu...99 Envelope Enhance...100 Substitute...

User Guide
Page 6
... a fuser wiper...171 Ordering pick rollers ...172 Ordering staple cartridges ...172 Ordering a transfer roller...172 Recycling Lexmark products...172 Moving the printer...172 Before moving the printer ...172 Moving the printer to another location...173 Shipping the printer ...173 Administrative support 174 Finding advanced networking and administrator information 174 Using the Embedded Web Server...174... problems...181 Option does not operate correctly or quits after it is installed 181 Paper trays...182 2000‑sheet tray...182 Envelope feeder...183 Duplex unit...183
... a fuser wiper...171 Ordering pick rollers ...172 Ordering staple cartridges ...172 Ordering a transfer roller...172 Recycling Lexmark products...172 Moving the printer...172 Before moving the printer ...172 Moving the printer to another location...173 Shipping the printer ...173 Administrative support 174 Finding advanced networking and administrator information 174 Using the Embedded Web Server...174... problems...181 Option does not operate correctly or quits after it is installed 181 Paper trays...182 2000‑sheet tray...182 Envelope feeder...183 Duplex unit...183
User Guide
Page 9
... the wall outlet and disconnect all cables from the printer before proceeding. SAVE THESE INSTRUCTIONS. If you purchased a multifunction printer (MFP) that scans, copies, and faxes, you are using a high-capacity input tray, a duplex unit and an input option, or more information, see www.lexmark.com/multifunctionprinters. For more than those described in the...
... the wall outlet and disconnect all cables from the printer before proceeding. SAVE THESE INSTRUCTIONS. If you purchased a multifunction printer (MFP) that scans, copies, and faxes, you are using a high-capacity input tray, a duplex unit and an input option, or more information, see www.lexmark.com/multifunctionprinters. For more than those described in the...
User Guide
Page 11
... some instances. Visit our Web site at www.lexmark.com. Learning about contacting Lexmark, see www.lexmark.com/multifunctionprinters. Select a country or region, and then select the Customer Support link. You must use either a printer stand or printer base if you are using a high-capacity input tray, a duplex unit and an input option, or more information...
... some instances. Visit our Web site at www.lexmark.com. Learning about contacting Lexmark, see www.lexmark.com/multifunctionprinters. Select a country or region, and then select the Customer Support link. You must use either a printer stand or printer base if you are using a high-capacity input tray, a duplex unit and an input option, or more information...

User Guide
Page 12
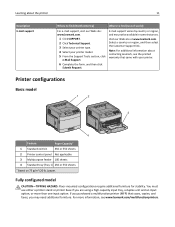
... a 250‑sheet standard tray. Learning about the printer 4 5 12 1 2 3 6 7 8 9 Feature/Option Paper Capacity1 1 5‑bin mailbox2 500 sheets 2 5‑bin mailbox 500 sheets 3 Envelope feeder 85 envelopes 4 Standard tray (Tray 1) 250 or 550 sheets 5 Duplex unit3 Not applicable 6 Optional tray (Tray 2) 250 ...on 75 g/m2 (20 lb.) paper. 2 The printer supports up to three output expander units, two 5-bin mailboxes, one high capacity output expander (not depicted), or one stapler unit (not depicted). 3 An optional duplex unit is available for basic models with a 550‑...
... a 250‑sheet standard tray. Learning about the printer 4 5 12 1 2 3 6 7 8 9 Feature/Option Paper Capacity1 1 5‑bin mailbox2 500 sheets 2 5‑bin mailbox 500 sheets 3 Envelope feeder 85 envelopes 4 Standard tray (Tray 1) 250 or 550 sheets 5 Duplex unit3 Not applicable 6 Optional tray (Tray 2) 250 ...on 75 g/m2 (20 lb.) paper. 2 The printer supports up to three output expander units, two 5-bin mailboxes, one high capacity output expander (not depicted), or one stapler unit (not depicted). 3 An optional duplex unit is available for basic models with a 550‑...
User Guide
Page 33
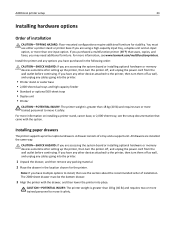
... • Standard or optional 500‑sheet trays • Duplex unit • Printer CAUTION-POTENTIAL INJURY: The printer weight is greater than 18 kg (40 lb) and requires two or more information on installing a printer stand, caster base, or 2,000‑sheet tray, see www.lexmark.com/multifunctionprinters. If you have any other devices attached...
... • Standard or optional 500‑sheet trays • Duplex unit • Printer CAUTION-POTENTIAL INJURY: The printer weight is greater than 18 kg (40 lb) and requires two or more information on installing a printer stand, caster base, or 2,000‑sheet tray, see www.lexmark.com/multifunctionprinters. If you have any other devices attached...

User Guide
Page 34
To remove an optional drawer, push in the safety latches could damage the latches. Additional printer setup 34 Removing an optional drawer Warning-Potential Damage: Lifting the printer from a drawer without pushing in the safety latches on both sides of the drawer until they click and stay recessed, and then lift the printer. Installing an optional duplex unit (T650 only) The optional duplex unit for the T650 model attaches under the printer, below the standard tray and above any optional drawers.
To remove an optional drawer, push in the safety latches could damage the latches. Additional printer setup 34 Removing an optional drawer Warning-Potential Damage: Lifting the printer from a drawer without pushing in the safety latches on both sides of the drawer until they click and stay recessed, and then lift the printer. Installing an optional duplex unit (T650 only) The optional duplex unit for the T650 model attaches under the printer, below the standard tray and above any optional drawers.

User Guide
Page 35
... as well, and unplug any packing material. 2 Place the duplex unit in the printer. • T652n and T654n models do not support an optional duplex unit. CAUTION-SHOCK HAZARD: If you have an internal duplex unit installed in the location chosen for the printer. Additional printer setup 35 Notes: • T652dn and T654dn models have any other...
... as well, and unplug any packing material. 2 Place the duplex unit in the printer. • T652n and T654n models do not support an optional duplex unit. CAUTION-SHOCK HAZARD: If you have an internal duplex unit installed in the location chosen for the printer. Additional printer setup 35 Notes: • T652dn and T654dn models have any other...
User Guide
Page 52
...Specify the paper height and width Defining a specific height and width measurement for the Universal paper size (in the portrait orientation) allows the printer to support the size, including support for loading paper. Submitting Selection appears, followed by the Universal Setup menu. Submitting Selection appears, followed... 250-sheet tray and the 550-sheet tray are different in appearance, they require the same process for standard features such as duplex printing and printing multiple pages on the display. Loading paper and specialty media 52 5 Press the arrow buttons until Units of ...
...Specify the paper height and width Defining a specific height and width measurement for the Universal paper size (in the portrait orientation) allows the printer to support the size, including support for loading paper. Submitting Selection appears, followed by the Universal Setup menu. Submitting Selection appears, followed... 250-sheet tray and the 550-sheet tray are different in appearance, they require the same process for standard features such as duplex printing and printing multiple pages on the display. Loading paper and specialty media 52 5 Press the arrow buttons until Units of ...
User Guide
Page 54
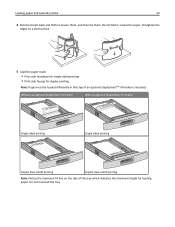
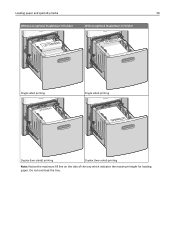
Without an optional StapleSmart II Finisher With an optional StapleSmart II Finisher LETTERHEAD Single‑sided printing LETTERHEAD Single‑sided printing Duplex (two‑sided) printing Duplex (two‑sided) printing Note: Notice the maximum fill line on a level surface. LETTERHEAD LETTERHEAD 5 Load the paper...loosen them, and then fan them. Straighten the edges on the side of the tray which indicates the maximum height for duplex printing Note: Paper must be loaded differently in the trays if an optional StapleSmartTM II Finisher is installed. Do not overload ...
Without an optional StapleSmart II Finisher With an optional StapleSmart II Finisher LETTERHEAD Single‑sided printing LETTERHEAD Single‑sided printing Duplex (two‑sided) printing Duplex (two‑sided) printing Note: Notice the maximum fill line on a level surface. LETTERHEAD LETTERHEAD 5 Load the paper...loosen them, and then fan them. Straighten the edges on the side of the tray which indicates the maximum height for duplex printing Note: Paper must be loaded differently in the trays if an optional StapleSmartTM II Finisher is installed. Do not overload ...
User Guide
Page 57
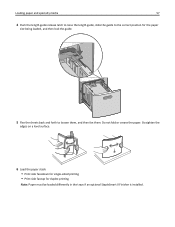
Do not fold or crease the paper. Straighten the edges on a level surface. 6 Load the paper stack: • Print side facedown for single‑sided printing • Print side faceup for the paper size being loaded, and then lock the guide. 5 Flex the sheets back and forth to loosen them, and then fan them. Loading paper and specialty media 57 4 Push the length guide release latch to raise the length guide, slide the guide to the correct position for duplex printing Note: Paper must be loaded differently in the trays if an optional StapleSmart II Finisher is installed.
Do not fold or crease the paper. Straighten the edges on a level surface. 6 Load the paper stack: • Print side facedown for single‑sided printing • Print side faceup for the paper size being loaded, and then lock the guide. 5 Flex the sheets back and forth to loosen them, and then fan them. Loading paper and specialty media 57 4 Push the length guide release latch to raise the length guide, slide the guide to the correct position for duplex printing Note: Paper must be loaded differently in the trays if an optional StapleSmart II Finisher is installed.
User Guide
Page 58
Do not overload the tray. LETTERHEAD LETTERHEAD Loading paper and specialty media 58 Without an optional StapleSmart II Finisher With an optional StapleSmart II Finisher LETTERHEAD Single‑sided printing LETTERHEAD Single‑sided printing Duplex (two‑sided) printing Duplex (two‑sided) printing Note: Notice the maximum fill line on the side of the tray which indicates the maximum height for loading paper.
Do not overload the tray. LETTERHEAD LETTERHEAD Loading paper and specialty media 58 Without an optional StapleSmart II Finisher With an optional StapleSmart II Finisher LETTERHEAD Single‑sided printing LETTERHEAD Single‑sided printing Duplex (two‑sided) printing Duplex (two‑sided) printing Note: Notice the maximum fill line on the side of the tray which indicates the maximum height for loading paper.
User Guide
Page 61
... With an optional StapleSmart II Finisher LETTERHEAD LETTERHEAD LETTERHEAD Single‑sided printing Single‑sided printing LETTERHEAD Duplex (two‑sided) printing Duplex (two‑sided) printing Notes: • Do not exceed the maximum stack height by forcing paper... under the stack height limiter. • Do not load or close the printer while a job is printing. • Load only one size and type of transparencies. These envelopes may severely damage the printer...
... With an optional StapleSmart II Finisher LETTERHEAD LETTERHEAD LETTERHEAD Single‑sided printing Single‑sided printing LETTERHEAD Duplex (two‑sided) printing Duplex (two‑sided) printing Notes: • Do not exceed the maximum stack height by forcing paper... under the stack height limiter. • Do not load or close the printer while a job is printing. • Load only one size and type of transparencies. These envelopes may severely damage the printer...

User Guide
Page 69
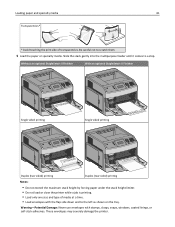
...labels, see the Card Stock & Label... Guide on standard and optional paper sources and the types of individual paper packages. Universal length must be between 148 mm (5.8 in) and 216 mm (8.5 in cartons when possible, on top of paper they support. Paper sizes supported by the software application. 4 To support duplexing..., the Universal width must be between 182 mm (7.2 in) and 356 mm (14 in). Most label...optional) Optional 2000‑sheet tray Multipurpose feeder Duplex unit A4 210 x 297 mm (8.3 x...size is specified by the printer Note: An optional 250‑...
...labels, see the Card Stock & Label... Guide on standard and optional paper sources and the types of individual paper packages. Universal length must be between 148 mm (5.8 in) and 216 mm (8.5 in cartons when possible, on top of paper they support. Paper sizes supported by the software application. 4 To support duplexing..., the Universal width must be between 182 mm (7.2 in) and 356 mm (14 in). Most label...optional) Optional 2000‑sheet tray Multipurpose feeder Duplex unit A4 210 x 297 mm (8.3 x...size is specified by the printer Note: An optional 250‑...

User Guide
Page 70
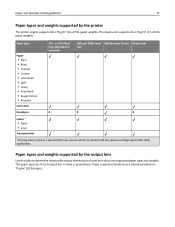
... and specialty media guidelines 70 Paper size Dimensions 250‑ or 550‑sheet trays (standard or optional) Optional 2000‑sheet tray Multipurpose feeder Duplex unit Legal 216 x 356 mm (8.5 x 14 in.) Executive 184 x 267 mm X (7.3 x 10.5 in.) Oficio1 216 x 340 mm X (8.5 x 13.4 in.) Folio1 216 x 330 mm X (8.5 x 13 in... 176 x 250 mm (6.9 x 9.8 in.) 1 This size appears in the Paper Size menu only when Tray Size Sensing is specified by the software application. 4 To support duplexing, the Universal width must be between 182 mm (7.2 in) and 356 mm (14 in).
... and specialty media guidelines 70 Paper size Dimensions 250‑ or 550‑sheet trays (standard or optional) Optional 2000‑sheet tray Multipurpose feeder Duplex unit Legal 216 x 356 mm (8.5 x 14 in.) Executive 184 x 267 mm X (7.3 x 10.5 in.) Oficio1 216 x 340 mm X (8.5 x 13.4 in.) Folio1 216 x 330 mm X (8.5 x 13 in... 176 x 250 mm (6.9 x 9.8 in.) 1 This size appears in the Paper Size menu only when Tray Size Sensing is specified by the software application. 4 To support duplexing, the Universal width must be between 182 mm (7.2 in) and 356 mm (14 in).
User Guide
Page 71
...(standard or optional) Optional 2000‑sheet Multipurpose feeder Duplex unit tray Envelopes X X X Labels 1 • Paper • Vinyl Transparencies 1 Printing labels requires a special label fuser cleaner which use supported paper types and weights. The duplex unit supports 63-170 g/m2 (17-45 lb) ...paper weights. The paper capacity of print jobs which is listed in parentheses. Paper types and weights supported by the printer The printer...
...(standard or optional) Optional 2000‑sheet Multipurpose feeder Duplex unit tray Envelopes X X X Labels 1 • Paper • Vinyl Transparencies 1 Printing labels requires a special label fuser cleaner which use supported paper types and weights. The duplex unit supports 63-170 g/m2 (17-45 lb) ...paper weights. The paper capacity of print jobs which is listed in parentheses. Paper types and weights supported by the printer The printer...
User Guide
Page 75
...; Paper, dual‑web paper, polyester, and vinyl labels are supported. • When using the duplex unit, specially‑designed, integrated, and dual‑web paper labels are supported. • Printing labels requires a special label fuser cleaner which is Card Stock. • Select the...Use labels designed specifically for laser printers. Adhesive material contaminates the printer and could void the printer and cartridge warranties. • Do not use labels with slick backing material. • Use full label sheets. Printing 75 Tips on using labels Print samples on the labels ...
...; Paper, dual‑web paper, polyester, and vinyl labels are supported. • When using the duplex unit, specially‑designed, integrated, and dual‑web paper labels are supported. • Printing labels requires a special label fuser cleaner which is Card Stock. • Select the...Use labels designed specifically for laser printers. Adhesive material contaminates the printer and could void the printer and cartridge warranties. • Do not use labels with slick backing material. • Use full label sheets. Printing 75 Tips on using labels Print samples on the labels ...
User Guide
Page 83
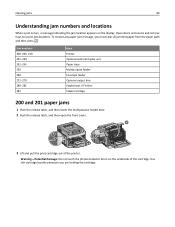
Jam numbers 200-203, 230 231-239 241-245 250 260 271-279 280-282 283 Area Printer Optional external duplex unit Paper trays Multipurpose feeder Envelope feeder Optional output bins StapleSmart II Finisher Staple cartridge 200 and 201 paper jams 1 Push the release latch, and ... holding the cartridge. Clearing jams 83 Understanding jam numbers and locations When a jam occurs, a message indicating the jam location appears on the underside of the printer.
Jam numbers 200-203, 230 231-239 241-245 250 260 271-279 280-282 283 Area Printer Optional external duplex unit Paper trays Multipurpose feeder Envelope feeder Optional output bins StapleSmart II Finisher Staple cartridge 200 and 201 paper jams 1 Push the release latch, and ... holding the cartridge. Clearing jams 83 Understanding jam numbers and locations When a jam occurs, a message indicating the jam location appears on the underside of the printer.
User Guide
Page 87
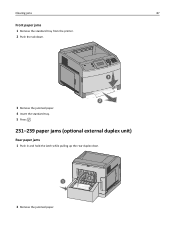
Clearing jams 87 Front paper jams 1 Remove the standard tray from the printer. 2 Push the tab down. 1 2 3 Remove the jammed paper. 4 Insert the standard tray. 5 Press . 231-239 paper jams (optional external duplex unit) Rear paper jams 1 Push in and hold the latch while pulling up the rear duplex door. 2 1 2 Remove the jammed paper.
Clearing jams 87 Front paper jams 1 Remove the standard tray from the printer. 2 Push the tab down. 1 2 3 Remove the jammed paper. 4 Insert the standard tray. 5 Press . 231-239 paper jams (optional external duplex unit) Rear paper jams 1 Push in and hold the latch while pulling up the rear duplex door. 2 1 2 Remove the jammed paper.


