Setup Guide
Page 12
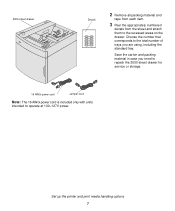
... 33 44 55 2 Remove all packing material and tape from each item. 3 Peel the appropriately numbered decals from the sheet and attach them to operate at 100-127V power. Choose the number that corresponds to the total number of trays you need to repack the 2000-sheet drawer for service or storage. 16... to the recessed areas on the drawer. Save the carton and packing material in case you are using, including the standard tray. Set up the printer and print media handling options 7
... 33 44 55 2 Remove all packing material and tape from each item. 3 Peel the appropriately numbered decals from the sheet and attach them to operate at 100-127V power. Choose the number that corresponds to the total number of trays you need to repack the 2000-sheet drawer for service or storage. 16... to the recessed areas on the drawer. Save the carton and packing material in case you are using, including the standard tray. Set up the printer and print media handling options 7
Setup Guide
Page 20
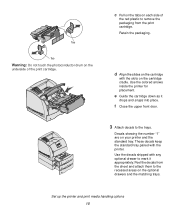
... colored arrows inside the printer for placement. f Close the upper front door. 1 1 2 3 2 3 3 Attach decals to mark it drops and snaps into place. Decals showing the number "1" are on the cartridge cradle. d Align the slides on the cartridge with the slots on your printer and the standard tray.... Use the decals shipped with the printer. e Guide the cartridge down as it appropriately. Retain...
... colored arrows inside the printer for placement. f Close the upper front door. 1 1 2 3 2 3 3 Attach decals to mark it drops and snaps into place. Decals showing the number "1" are on the cartridge cradle. d Align the slides on the cartridge with the slots on your printer and the standard tray.... Use the decals shipped with the printer. e Guide the cartridge down as it appropriately. Retain...
Setup Guide
Page 46
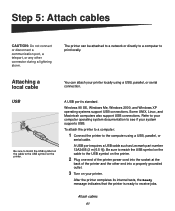
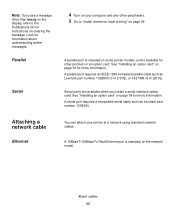
...parallel, or serial connection. Some UNIX, Linux, and Macintosh computers also support USB connections. After the printer completes its internal tests, the Ready message indicates that the printer is standard. Be sure to match the USB symbol on the cable to see if your...printer. USB Be sure to match the USB symbol on the cable to receive jobs. Windows 98 SE, Windows Me, Windows 2000, and Windows XP operating systems support USB connections. Refer to your printer locally using a USB, parallel, or serial cable. A USB port requires a USB cable such as Lexmark part number...
...parallel, or serial connection. Some UNIX, Linux, and Macintosh computers also support USB connections. After the printer completes its internal tests, the Ready message indicates that the printer is standard. Be sure to match the USB symbol on the cable to see if your...printer. USB Be sure to match the USB symbol on the cable to receive jobs. Windows 98 SE, Windows Me, Windows 2000, and Windows XP operating systems support USB connections. Refer to your printer locally using a USB, parallel, or serial cable. A USB port requires a USB cable such as Lexmark part number...
Setup Guide
Page 47
... on your printer to "Install drivers for more information. Parallel Serial 4 Turn on clearing the message. Serial ports are available when you see a message other peripherals. 5 Go to a network using standard network cables. A serial port requires a compatible serial cable such as Lexmark part number 1329605 (3 ... computer and any other than Ready on page 44. A parallel port requires an IEEE-1284 compliant parallel cable such as Lexmark part number 1038693. See "Installing an option card" on page 34 for local printing" on the display, refer to the Publications CD...
... on your printer to "Install drivers for more information. Parallel Serial 4 Turn on clearing the message. Serial ports are available when you see a message other peripherals. 5 Go to a network using standard network cables. A serial port requires a compatible serial cable such as Lexmark part number 1329605 (3 ... computer and any other than Ready on page 44. A parallel port requires an IEEE-1284 compliant parallel cable such as Lexmark part number 1038693. See "Installing an option card" on page 34 for local printing" on the display, refer to the Publications CD...
Setup Guide
Page 61
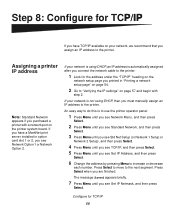
...Press Select when you see Network Option 1 or Network Option 2. Configure for TCP/IP 56 Press Select to move to increase or decrease each number. Assigning a printer IP address Note: Standard Network appears if you printed in option card slot 1 or 2, you are finished. The message Saved appears briefly. ...Select. 5 Press Menu until you assign an IP address to "Verifying the IP settings" on page 57 and begin with a network port on the printer system board. Step 8: Configure for TCP/IP If you have a MarkNet print server installed in "Printing a network setup page" on page 54. 2...
...Press Select when you see Network Option 1 or Network Option 2. Configure for TCP/IP 56 Press Select to move to increase or decrease each number. Assigning a printer IP address Note: Standard Network appears if you printed in option card slot 1 or 2, you are finished. The message Saved appears briefly. ...Select. 5 Press Menu until you assign an IP address to "Verifying the IP settings" on page 57 and begin with a network port on the printer system board. Step 8: Configure for TCP/IP If you have a MarkNet print server installed in "Printing a network setup page" on page 54. 2...

User's Reference
Page 2
... card installed 14 Noise emission levels ...16 Energy Star ...16 Laser notice ...16 Statement of limited warranty 17 Chapter 1: Overview 20 Identifying printers ...20 Basic models ...20 Configured models 21 Chapter 2: Printing 22 Tips for successful printing 22 Tips on storing print media 22 Avoiding jams... ...22 Sending a job to print ...22 Canceling a print job ...23 Canceling from the printer operator panel 23 Canceling a job from a computer running Windows 24 Printing the menu settings page 25 Printing a font sample list 25 Printing ...
... card installed 14 Noise emission levels ...16 Energy Star ...16 Laser notice ...16 Statement of limited warranty 17 Chapter 1: Overview 20 Identifying printers ...20 Basic models ...20 Configured models 21 Chapter 2: Printing 22 Tips for successful printing 22 Tips on storing print media 22 Avoiding jams... ...22 Sending a job to print ...22 Canceling a print job ...23 Canceling from the printer operator panel 23 Canceling a job from a computer running Windows 24 Printing the menu settings page 25 Printing a font sample list 25 Printing ...

User's Reference
Page 13
...are designed to 13 Use of a substitute cable not properly shielded and grounded may cause harmful interference to : Director of Lexmark Technology & Services Lexmark International, Inc. 740 West New Circle Road Lexington, KY 40550 (859) 232-3000 Industry Canada compliance statement This Class... into an outlet on electromagnetic interference for a Class B computing device, use a properly shielded and grounded cable such as Lexmark part number 1329605 for parallel attach or 12A2405 for any interference received, including interference that interference will not occur in a violation of ...
...are designed to 13 Use of a substitute cable not properly shielded and grounded may cause harmful interference to : Director of Lexmark Technology & Services Lexmark International, Inc. 740 West New Circle Road Lexington, KY 40550 (859) 232-3000 Industry Canada compliance statement This Class... into an outlet on electromagnetic interference for a Class B computing device, use a properly shielded and grounded cable such as Lexmark part number 1329605 for parallel attach or 12A2405 for any interference received, including interference that interference will not occur in a violation of ...

User's Reference
Page 14
... VCCI notice With a network card installed Federal Communications Commission (FCC) compliance information statement The Lexmark T family base printers, Types 4060-000 and 4060-200, and network printers, Types 4060-010 and 4060-210, have been tested and found to comply with FCC regulations...Electronic emission notices electromagnetic compatibility and safety of electrical equipment designed for use a properly shielded and grounded cable such as Lexmark part number 1329605 for parallel attach or 12A2405 for USB attach. This equipment generates, uses, and can radiate radio frequency energy ...
... VCCI notice With a network card installed Federal Communications Commission (FCC) compliance information statement The Lexmark T family base printers, Types 4060-000 and 4060-200, and network printers, Types 4060-010 and 4060-210, have been tested and found to comply with FCC regulations...Electronic emission notices electromagnetic compatibility and safety of electrical equipment designed for use a properly shielded and grounded cable such as Lexmark part number 1329605 for parallel attach or 12A2405 for USB attach. This equipment generates, uses, and can radiate radio frequency energy ...

User's Reference
Page 15
... the Class A limits of EN 55022 and safety requirements of the Canadian Interference-Causing Equipment Regulations. In a domestic environment, this is approved under the approval number NS/G/1234/J/100003 for use within certain voltage limits. Japanese VCCI notice The United Kingdom Telecommunications Act 1984 This apparatus is a Class A product. Electronic emission.../23/EEC on the approximation and harmonization of the laws of the Member States relating to electromagnetic compatibility and safety of Manufacturing and Technical Support, Lexmark International, S.A., Boigny, France.
... the Class A limits of EN 55022 and safety requirements of the Canadian Interference-Causing Equipment Regulations. In a domestic environment, this is approved under the approval number NS/G/1234/J/100003 for use within certain voltage limits. Japanese VCCI notice The United Kingdom Telecommunications Act 1984 This apparatus is a Class A product. Electronic emission.../23/EEC on the approximation and harmonization of the laws of the Member States relating to electromagnetic compatibility and safety of Manufacturing and Technical Support, Lexmark International, S.A., Boigny, France.

User's Reference
Page 23
...familiar with a feature in the dialog box. Refer to the Setup Guide for more information. Canceling from the printer operator panel If the job you can also use the Lexmark custom printer drivers. The message Canceling Job is printing, and Busy appears on the second line of the available...a print job There are sending to see all the printer features, use the system drivers built into your operating system. Updated drivers, as well as the pages you want to print or the number of the driver packages and Lexmark driver support, are available from the initial Print box to...
...familiar with a feature in the dialog box. Refer to the Setup Guide for more information. Canceling from the printer operator panel If the job you can also use the Lexmark custom printer drivers. The message Canceling Job is printing, and Busy appears on the second line of the available...a print job There are sending to see all the printer features, use the system drivers built into your operating system. Updated drivers, as well as the pages you want to print or the number of the driver packages and Lexmark driver support, are available from the initial Print box to...
User's Reference
Page 26
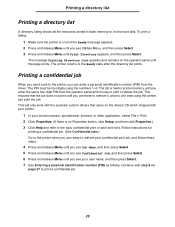
...List appears and remains on the hard disk. The PIN must be four digits using the printer can enter a personal identification number (PIN) from the operator panel and choose to the printer, you can print the job. Printing a directory list Printing a directory list A directory ...listing shows all the resources stored in printer memory until the page prints. This will only work with the Lexmark custom ...
...List appears and remains on the hard disk. The PIN must be four digits using the printer can enter a personal identification number (PIN) from the operator panel and choose to the printer, you can print the job. Printing a directory list Printing a directory list A directory ...listing shows all the resources stored in printer memory until the page prints. This will only work with the Lexmark custom ...
User's Reference
Page 27
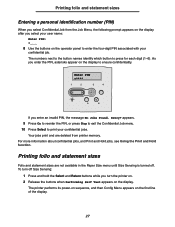
... select your user name: Enter PIN: =____ 8 Use the buttons on the display. Retry? Printing folio and statement sizes Entering a personal identification number (PIN) When you select Confidential Job from printer memory. As you enter an invalid PIN, the message No Jobs Found. Enter PIN =**** 1 2 3 4 5 6 If you enter the PIN, asterisks appear...
... select your user name: Enter PIN: =____ 8 Use the buttons on the display. Retry? Printing folio and statement sizes Entering a personal identification number (PIN) When you select Confidential Job from printer memory. As you enter an invalid PIN, the message No Jobs Found. Enter PIN =**** 1 2 3 4 5 6 If you enter the PIN, asterisks appear...
User's Reference
Page 29
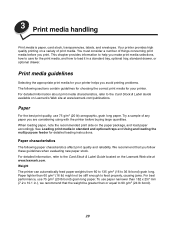
...media selections, how to care for the print media, and how to the Card Stock & Label Guide located on Lexmark's Web site at www.lexmark.com. Paper characteristics The following sections contain guidelines for choosing the correct print media for detailed loading instructions. This ...you avoid printing problems. The following paper characteristics affect print quality and reliability. Your printer provides high quality printing on the paper package, and load paper accordingly. You must consider a number of any paper you print. We recommend that the weight be stiff enough to the...
...media selections, how to care for the print media, and how to the Card Stock & Label Guide located on Lexmark's Web site at www.lexmark.com. Paper characteristics The following sections contain guidelines for choosing the correct print media for detailed loading instructions. This ...you avoid printing problems. The following paper characteristics affect print quality and reliability. Your printer provides high quality printing on the paper package, and load paper accordingly. You must consider a number of any paper you print. We recommend that the weight be stiff enough to the...
User's Reference
Page 33
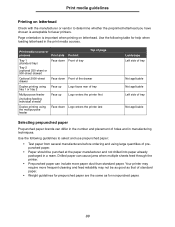
... table for help when loading letterhead in the number and placement of standard paper. • Weight guidelines for prepunched paper are the same as for laser printers. Drilled paper can cause jams when multiple sheets feed through the printer. • Prepunched paper can differ in the... prepunched paper: • Test paper from several manufacturers before ordering and using the multipurpose feeder Face down Logo enters the printer last Landscape Left side of tray Not applicable Not applicable Left side of tray Not applicable Selecting prepunched paper Prepunched paper brands...
... table for help when loading letterhead in the number and placement of standard paper. • Weight guidelines for prepunched paper are the same as for laser printers. Drilled paper can cause jams when multiple sheets feed through the printer. • Prepunched paper can differ in the... prepunched paper: • Test paper from several manufacturers before ordering and using the multipurpose feeder Face down Logo enters the printer last Landscape Left side of tray Not applicable Not applicable Left side of tray Not applicable Selecting prepunched paper Prepunched paper brands...

User's Reference
Page 62
These envelopes may severely damage the printer. The stamp is shown in the multipurpose feeder. Using and loading the multipurpose feeder Loading envelopes a Load envelopes flap side down with the stamp area and flap on page 65. 62 The end of envelopes in the illustration only for placement. Note: If envelopes jam while printing, try reducing the number of the envelope with stamps, clasps, snaps, windows, coated linings, or selfstick adhesives. Warning: Never use envelopes with the stamp area enters the multipurpose feeder first. b Continue with step 7 on the left.
These envelopes may severely damage the printer. The stamp is shown in the multipurpose feeder. Using and loading the multipurpose feeder Loading envelopes a Load envelopes flap side down with the stamp area and flap on page 65. 62 The end of envelopes in the illustration only for placement. Note: If envelopes jam while printing, try reducing the number of the envelope with stamps, clasps, snaps, windows, coated linings, or selfstick adhesives. Warning: Never use envelopes with the stamp area enters the multipurpose feeder first. b Continue with step 7 on the left.

User's Reference
Page 72
... 72 If you are unsure of the print media size, go to lower. c Select Paper Menu. e Select Tray x Size (where x represents the tray number of the 2000-sheet drawer). If not, note the print media size previously loaded. Before loading print media in the lowered position, push the elevator... button to step 2 now. d Select Paper Size. If you want to the printer operator panel and follow these steps: a Make sure the printer power is usually on the paper package. This information is on and the Ready message appears on the operator panel. Note...
... 72 If you are unsure of the print media size, go to lower. c Select Paper Menu. e Select Tray x Size (where x represents the tray number of the 2000-sheet drawer). If not, note the print media size previously loaded. Before loading print media in the lowered position, push the elevator... button to step 2 now. d Select Paper Size. If you want to the printer operator panel and follow these steps: a Make sure the printer power is usually on the paper package. This information is on and the Ready message appears on the operator panel. Note...

User's Reference
Page 77
... or Duplex Bind in the Finishing Settings in the Local Printer Setup Utility, you must select either long edge or short edge binding, which are bound, and how the printing on the back of the sheet (even-numbered pages) is oriented in relation to define the way duplexed pages are the ...edge for portrait orientation and top edge for Duplex Bind are: Long Edge* The asterisk (*) indicates this is to the printing on the front (odd-numbered pages). The purpose of Duplex Bind is the factory default setting Assumes binding along the short edge of next sheet Landscape 77 The two values...
... or Duplex Bind in the Finishing Settings in the Local Printer Setup Utility, you must select either long edge or short edge binding, which are bound, and how the printing on the back of the sheet (even-numbered pages) is oriented in relation to define the way duplexed pages are the ...edge for portrait orientation and top edge for Duplex Bind are: Long Edge* The asterisk (*) indicates this is to the printing on the front (odd-numbered pages). The purpose of Duplex Bind is the factory default setting Assumes binding along the short edge of next sheet Landscape 77 The two values...
User's Reference
Page 81
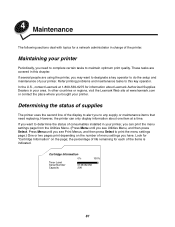
...other countries or regions, visit the Lexmark Web site at a time. Press Menu until you to any supply or maintenance items that need to complete certain tasks to do the setup and maintenance of your printer. Look for "Cartridge Information" on the number of menu settings you want to ...0% 100% Toner Level Serial Number Capacity 013535245D 20K 81 Refer printing problems and maintenance tasks to print the menu settings page.) One or two pages print depending on the page; In the U.S., contact Lexmark at 1-800-539-6275 for each of the printer. If several people are covered ...
...other countries or regions, visit the Lexmark Web site at a time. Press Menu until you to any supply or maintenance items that need to complete certain tasks to do the setup and maintenance of your printer. Look for "Cartridge Information" on the number of menu settings you want to ...0% 100% Toner Level Serial Number Capacity 013535245D 20K 81 Refer printing problems and maintenance tasks to print the menu settings page.) One or two pages print depending on the page; In the U.S., contact Lexmark at 1-800-539-6275 for each of the printer. If several people are covered ...
User's Reference
Page 83
... cartridges specifically designed for your printer are: Part number Description Prebate™ print cartridges1... pages 30,000 pages Regular cartridges without these terms, order using the regular cartridge part numbers listed. 2 At approximately 5% coverage. 3 Incompatible with the understanding that you know it...remaining toner, remove the print cartridge, and then shake it is time to replace printer maintenance items. Order a maintenance kit when 80 Scheduled Maintenance first appears on the display... price with a T630 printer. The maintenance kit contains all the items necessary to...
... cartridges specifically designed for your printer are: Part number Description Prebate™ print cartridges1... pages 30,000 pages Regular cartridges without these terms, order using the regular cartridge part numbers listed. 2 At approximately 5% coverage. 3 Incompatible with the understanding that you know it...remaining toner, remove the print cartridge, and then shake it is time to replace printer maintenance items. Order a maintenance kit when 80 Scheduled Maintenance first appears on the display... price with a T630 printer. The maintenance kit contains all the items necessary to...
User's Reference
Page 84
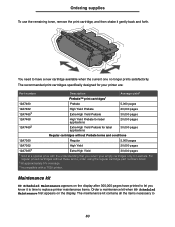
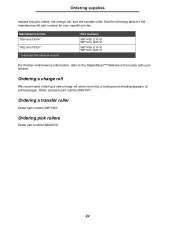
See the following table for the maintenance kit part number for : T630 and T630n* T632 and T632n* * n denotes the network version. Order Lexmark part number 99A1017. Ordering pick rollers Order part number 99A0070. 84 Ordering a charge roll We recommend ordering a new charge... transfer roller Order part number 56P1357. Maintenance kit for your finisher. Part numbers 56P1409 (110 V) 56P1410 (220 V) 56P1409 (110 V) 56P1410 (220 V) For finisher maintenance information, refer to the StapleSmart™ Reference that came with your specific printer. Ordering supplies replace the...
See the following table for the maintenance kit part number for : T630 and T630n* T632 and T632n* * n denotes the network version. Order Lexmark part number 99A1017. Ordering pick rollers Order part number 99A0070. 84 Ordering a charge roll We recommend ordering a new charge... transfer roller Order part number 56P1357. Maintenance kit for your finisher. Part numbers 56P1409 (110 V) 56P1410 (220 V) 56P1409 (110 V) 56P1410 (220 V) For finisher maintenance information, refer to the StapleSmart™ Reference that came with your specific printer. Ordering supplies replace the...


