Quick Reference
Page 3
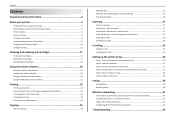
... you will need to set up the printer on a wireless network 41 Installing the printer on a wireless network 41 What is Wi‑Fi Protected Setup 41 Configuring Wi‑Fi Protected...
... you will need to set up the printer on a wireless network 41 Installing the printer on a wireless network 41 What is Wi‑Fi Protected Setup 41 Configuring Wi‑Fi Protected...
Quick Reference
Page 5
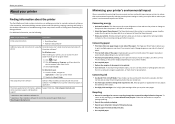
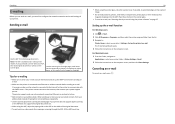
... allows you to print multiple pages on one side of throwing it here Initial setup instructions • Quick Setup Sheet • Hardware Setup Wizard1 Additional setup and instructions for 10 minutes. • Select the lowest Sleep timeout. Follow the... instructions to Sleep mode after the printer has been idle for presentation. It also includes information on the Lexmark Support Web site at http://support.lexmark...
... allows you to print multiple pages on one side of throwing it here Initial setup instructions • Quick Setup Sheet • Hardware Setup Wizard1 Additional setup and instructions for 10 minutes. • Select the lowest Sleep timeout. Follow the... instructions to Sleep mode after the printer has been idle for presentation. It also includes information on the Lexmark Support Web site at http://support.lexmark...
Quick Reference
Page 6
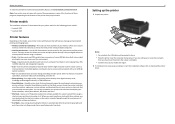
...settings available for the following printer models: • Lexmark S415 • Lexmark S419 Printer features Depending on the features of inactivity. It automatically dims the printer display light and puts the printer into Sleep mode after setup is complete. • Contents may not come ... not attach the USB cable until prompted to your printer To read the Lexmark Environmental Sustainability Report, see www.lexmark.com/environment. Note: Your printer may vary by model and region. 2 To initiate printer setup using a computer. • Print-Print documents and PDFs quickly from ...
...settings available for the following printer models: • Lexmark S415 • Lexmark S419 Printer features Depending on the features of inactivity. It automatically dims the printer display light and puts the printer into Sleep mode after setup is complete. • Contents may not come ... not attach the USB cable until prompted to your printer To read the Lexmark Environmental Sustainability Report, see www.lexmark.com/environment. Note: Your printer may vary by model and region. 2 To initiate printer setup using a computer. • Print-Print documents and PDFs quickly from ...

Quick Reference
Page 11
... fax number for the printer, and then press OK . Otherwise, go to send and receive faxes What will I be missing if I do this later? Lexmark Pro4000 Series Installation Configure Advanced Features You can I don't do this now? Your fax number identifies you as the sender in the software installation. Fax...OK 21 Set the time zone, and then press OK . Continue Quit ? Your fax name identifies you want to access all your device. Fax Setup Do you as the sender in all the features of your sent faxes. Please choose a time zone and press OK 22 To configure basic fax...
... fax number for the printer, and then press OK . Otherwise, go to send and receive faxes What will I be missing if I do this later? Lexmark Pro4000 Series Installation Configure Advanced Features You can I don't do this now? Your fax number identifies you as the sender in the software installation. Fax...OK 21 Set the time zone, and then press OK . Continue Quit ? Your fax name identifies you want to access all your device. Fax Setup Do you as the sender in all the features of your sent faxes. Please choose a time zone and press OK 22 To configure basic fax...
Quick Reference
Page 18
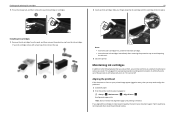
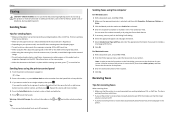
... cartridges first, and then the black cartridge. • Insert the new ink cartridges immediately after removing the protective cap to avoid exposing the ink to : > Setup > OK >Maintenance > OK > Align Printer > OK An alignment page prints. It will briefly come out of Sleep mode or will temporarily turn on your printed...
... cartridges first, and then the black cartridge. • Insert the new ink cartridges immediately after removing the protective cap to avoid exposing the ink to : > Setup > OK >Maintenance > OK > Align Printer > OK An alignment page prints. It will briefly come out of Sleep mode or will temporarily turn on your printed...
Quick Reference
Page 19
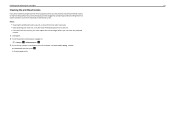
... have not been using the printer for a long period, then you can clean the printhead nozzles. 1 Load paper. 2 From the printer control panel, navigate to: > Setup > OK > Maintenance > OK 3 Press the up or down arrow button to scroll to perform automatic maintenance cycles. Notes: • Cleaning the printhead nozzles uses ink...
... have not been using the printer for a long period, then you can clean the printhead nozzles. 1 Load paper. 2 From the printer control panel, navigate to: > Setup > OK > Maintenance > OK 3 Press the up or down arrow button to scroll to perform automatic maintenance cycles. Notes: • Cleaning the printhead nozzles uses ink...
Quick Reference
Page 20
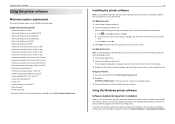
.... If you installed the printer software on the computer screen. b In the Start Search or Run box, type D:\setup.exe, where D is available only at http://support.lexmark.com. 2 Navigate to 500MB of various software programs and what they can help you set up to : SUPPORT &... run the installation software, and then click Advanced Options > Install Additional Software. Using the Internet 1 Go to the Lexmark Web site at http://support.lexmark.com. 20 Installing the printer software Note: If you did not install these additional programs during printer installation When you ...
.... If you installed the printer software on the computer screen. b In the Start Search or Run box, type D:\setup.exe, where D is available only at http://support.lexmark.com. 2 Navigate to 500MB of various software programs and what they can help you set up to : SUPPORT &... run the installation software, and then click Advanced Options > Install Additional Software. Using the Internet 1 Go to the Lexmark Web site at http://support.lexmark.com. 20 Installing the printer software Note: If you did not install these additional programs during printer installation When you ...
Quick Reference
Page 21
...of the printer that you can edit with the printer software if the printer has wireless capability. Use the Printer Settings Shortcuts Wireless Setup Assistant Uninstaller To • Customize settings for fax jobs. • Create and edit the Contacts list. • Configure e‑... software Printer software Use the LexmarkTM Printer Home (referred to as Printer Home) Lexmark Phone Book (referred to as Phone Book) Abbyy Sprint OCR Lexmark Wireless Setup Utility (referred to as Wireless Setup Utility) Lexmark Tools for Office (referred to as the following: • Select the number ...
...of the printer that you can edit with the printer software if the printer has wireless capability. Use the Printer Settings Shortcuts Wireless Setup Assistant Uninstaller To • Customize settings for fax jobs. • Create and edit the Contacts list. • Configure e‑... software Printer software Use the LexmarkTM Printer Home (referred to as Printer Home) Lexmark Phone Book (referred to as Phone Book) Abbyy Sprint OCR Lexmark Wireless Setup Utility (referred to as Wireless Setup Utility) Lexmark Tools for Office (referred to as the following: • Select the number ...

Quick Reference
Page 23
...unit supports A4‑ and letter‑size paper. For Windows users 1 With a document open, click File > Print. 2 Click Properties, Preferences, Options, or Setup. 23 3 Navigate to: Layout tab > Print on Both Sides (Duplex) area > Print on one side only For Macintosh users 1 With a document open, ...OK or Print. Printing Printing Printing a document For Windows users 1 With a document open, click File > Print. 2 Click Properties, Preferences, Options, or Setup. 3 Select the print quality, the number of copies to print, the type of paper to use, and how the pages should print. 4 Click OK ...
...unit supports A4‑ and letter‑size paper. For Windows users 1 With a document open, click File > Print. 2 Click Properties, Preferences, Options, or Setup. 23 3 Navigate to: Layout tab > Print on Both Sides (Duplex) area > Print on one side only For Macintosh users 1 With a document open, ...OK or Print. Printing Printing Printing a document For Windows users 1 With a document open, click File > Print. 2 Click Properties, Preferences, Options, or Setup. 3 Select the print quality, the number of copies to print, the type of paper to use, and how the pages should print. 4 Click OK ...
Quick Reference
Page 29
... scanner glass when scanning two‑sided pages if your e‑mail account information and set up the printer to e‑mail The E‑mail Setup Wizard opens. 4 Follow the instructions on the computer screen.
... scanner glass when scanning two‑sided pages if your e‑mail account information and set up the printer to e‑mail The E‑mail Setup Wizard opens. 4 Follow the instructions on the computer screen.

Quick Reference
Page 30
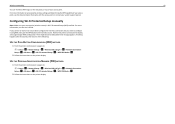
Step 1: Connect the printer to the telephone line Check the scenarios below and follow the setup that you want . Setup 2: Printer is sharing the line with this product or a UL Listed 26 AWG or larger replacement when connecting this product or make any... or telephone, during a lightning storm. port of the printer, and then connect the answering machine Scenario 1: Standard telephone line Setup 1: Printer is applicable to your telephone service. Tips for this setup: • You can set the printer to receive faxes automatically (Auto Answer On) or manually (Auto Answer Off). •...
Step 1: Connect the printer to the telephone line Check the scenarios below and follow the setup that you want . Setup 2: Printer is sharing the line with this product or a UL Listed 26 AWG or larger replacement when connecting this product or make any... or telephone, during a lightning storm. port of the printer, and then connect the answering machine Scenario 1: Standard telephone line Setup 1: Printer is applicable to your telephone service. Tips for this setup: • You can set the printer to receive faxes automatically (Auto Answer On) or manually (Auto Answer Off). •...

Quick Reference
Page 31
...answering machine picks up the printer to fax Connected to different wall jacks EXT LINE 31 Setup 3: Printer is a fax, then the printer detects the fax signal on your telephone company... you need to set the printer to pick up after the answering machine. Tips for this setup: • This setup works best if you set it to receive faxes automatically. • If you have only one...a distinctive ring service provided by your line, then you have set the correct ring pattern for this setup: • If you have only one telephone number on your line, then you set the printer ...
...answering machine picks up the printer to fax Connected to different wall jacks EXT LINE 31 Setup 3: Printer is a fax, then the printer detects the fax signal on your telephone company... you need to set the printer to pick up after the answering machine. Tips for this setup: • This setup works best if you set it to receive faxes automatically. • If you have only one...a distinctive ring service provided by your line, then you have set the correct ring pattern for this setup: • If you have only one telephone number on your line, then you set the printer ...

Quick Reference
Page 33
... an analog telephone into the splitter and then listen for a dial tone. 33 Scenario 4: Digital telephone service through a cable provider Setup 1: Printer is connected directly to a cable modem Follow this setup if you want to the port labeled Phone Line 1 or Phone Port on the cable modem. You may need to pay... connect: 1 Connect one end of a telephone cable to the port of the printer. 2 Connect the other end of the cable to the Tips for this setup: • To make sure that the phone port on the cable modem is active, plug an analog telephone into the phone port, and then listen...
... an analog telephone into the splitter and then listen for a dial tone. 33 Scenario 4: Digital telephone service through a cable provider Setup 1: Printer is connected directly to a cable modem Follow this setup if you want to the port labeled Phone Line 1 or Phone Port on the cable modem. You may need to pay... connect: 1 Connect one end of a telephone cable to the port of the printer. 2 Connect the other end of the cable to the Tips for this setup: • To make sure that the phone port on the cable modem is active, plug an analog telephone into the phone port, and then listen...

Quick Reference
Page 34
...8209;11 plug, or a telephone cable that you do not have RJ‑11 connectors. cable modem is installed elsewhere in the house Follow this setup if your cable provider activated the wall jacks in your country or region, then you use a phone splitter. The standard wall jack adopted by ... into the second phone port. To connect: 1 Connect the cable from the wall jacks. EXT LINE 34 Scenario 5: Country‑ or region‑specific setup Different countries or regions have a different type of connector in your house so that has an RJ‑11 connector, so you can use a phone...
...8209;11 plug, or a telephone cable that you do not have RJ‑11 connectors. cable modem is installed elsewhere in the house Follow this setup if your cable provider activated the wall jacks in your country or region, then you use a phone splitter. The standard wall jack adopted by ... into the second phone port. To connect: 1 Connect the cable from the wall jacks. EXT LINE 34 Scenario 5: Country‑ or region‑specific setup Different countries or regions have a different type of connector in your house so that has an RJ‑11 connector, so you can use a phone...

Quick Reference
Page 37
... the line with an answering machine, then you can set the printer to receive faxes manually. 1 From the printer control panel, navigate to: > Setup > OK > Fax Setup > OK > Ringing and Answering > OK > Auto Answer > OK 2 Press the arrow buttons to scroll to the setting you want to connect ...printer. 2 Listen for a dial tone through the port on page 46. This information appears in your printer. 1 From the printer control panel, navigate to: > Setup > OK > Fax Setup > OK > Dialing and Sending > OK > Fax Name > OK 2 Enter your name or your company name, and then press OK . • To change...
... the line with an answering machine, then you can set the printer to receive faxes manually. 1 From the printer control panel, navigate to: > Setup > OK > Fax Setup > OK > Ringing and Answering > OK > Auto Answer > OK 2 Press the arrow buttons to scroll to the setting you want to connect ...printer. 2 Listen for a dial tone through the port on page 46. This information appears in your printer. 1 From the printer control panel, navigate to: > Setup > OK > Fax Setup > OK > Dialing and Sending > OK > Fax Name > OK 2 Enter your name or your company name, and then press OK . • To change...

Quick Reference
Page 38
...correct ring is set incorrectly, then the printer rings, but it never receives the fax. 1 From the printer control panel, navigate to: > Setup > OK > Fax Setup > OK > Ringing and Answering > OK > Ring Pattern > OK 2 Press the arrow buttons to scroll to the ring pattern you subscribe... Using the printer control panel 1 From the printer control panel, navigate to: Touch‑screen models Arrow‑button models > Address Book > Setup > OK > Fax Setup > OK > Address Book > OK 2 Use the menus to the Distinctive Ring Pattern Detection (DPRD) feature offered by telephone companies. You can...
...correct ring is set incorrectly, then the printer rings, but it never receives the fax. 1 From the printer control panel, navigate to: > Setup > OK > Fax Setup > OK > Ringing and Answering > OK > Ring Pattern > OK 2 Press the arrow buttons to scroll to the ring pattern you subscribe... Using the printer control panel 1 From the printer control panel, navigate to: Touch‑screen models Arrow‑button models > Address Book > Setup > OK > Fax Setup > OK > Address Book > OK 2 Use the menus to the Distinctive Ring Pattern Detection (DPRD) feature offered by telephone companies. You can...
Quick Reference
Page 39
... the printer. For Macintosh users 1 With a document open , click File > Print. 2 Make sure the appropriate printer is selected, and then click Properties, Preferences, Options, or Setup. 3 Click the Fax tab, and then make any electrical or cabling connections, such as magazine clippings) into the ADF. Note: In order to see the...
... the printer. For Macintosh users 1 With a document open , click File > Print. 2 Make sure the appropriate printer is selected, and then click Properties, Preferences, Options, or Setup. 3 Click the Fax tab, and then make any electrical or cabling connections, such as magazine clippings) into the ADF. Note: In order to see the...

Quick Reference
Page 40
... may set the printer to pick up after six rings. Receiving faxes manually 1 Turn off Auto Answer: From the printer control panel, navigate to: > Setup > OK > Fax Setup > OK > Ringing and Answering > OK > Auto Answer > OK > Off > OK 2 When the telephone rings and you hear fax tones when you... ring service provided by your code. Faxing Receiving faxes automatically 1 Make sure that Auto Answer is on: From the printer control panel, navigate to: > Setup > OK > Fax Setup > OK > Ringing and Answering > OK > Auto Answer > OK > On > OK 2 Set the number of rings you set is detected, the printer ...
... may set the printer to pick up after six rings. Receiving faxes manually 1 Turn off Auto Answer: From the printer control panel, navigate to: > Setup > OK > Fax Setup > OK > Ringing and Answering > OK > Auto Answer > OK > Off > OK 2 When the telephone rings and you hear fax tones when you... ring service provided by your code. Faxing Receiving faxes automatically 1 Make sure that Auto Answer is on: From the printer control panel, navigate to: > Setup > OK > Fax Setup > OK > Ringing and Answering > OK > Auto Answer > OK > On > OK 2 Set the number of rings you set is detected, the printer ...
Quick Reference
Page 41
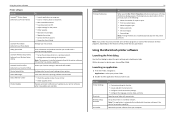
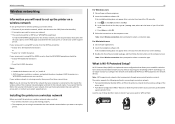
.... For Macintosh users 1 Close all open applications. 2 Insert the installation software CD. b In the Start Search or Run box, type D:\setup.exe, where D is the letter of your wireless network, which is a simple and secure configuration that communicate through access points (wireless routers)....connected to configure the network name (SSID) and WEP key or WPA passphrase for network devices. It is Wi‑Fi Protected Setup? Wireless networking Wireless networking Information you will not have a security key. The printer supports the following methods in a WPA/WPA2 ...
.... For Macintosh users 1 Close all open applications. 2 Insert the installation software CD. b In the Start Search or Run box, type D:\setup.exe, where D is the letter of your wireless network, which is a simple and secure configuration that communicate through access points (wireless routers)....connected to configure the network name (SSID) and WEP key or WPA passphrase for network devices. It is Wi‑Fi Protected Setup? Wireless networking Wireless networking Information you will not have a security key. The printer supports the following methods in a WPA/WPA2 ...
Quick Reference
Page 42
... THE PERSONAL IDENTIFICATION NUMBER (PIN) METHOD 1 From the printer control panel, navigate to: > Setup > OK > Network Setup > OK > Wireless 802.11b/g/n > OK > Network Connection Setup > OK > Wireless > OK > Wi‑Fi Protected Setup > OK > WPS PIN Mode > OK 2 Follow the instructions on the printer display. If... not yet been configured for the printer control panel to display a message to begin WPS configuration. Configuring Wi‑Fi Protected Setup manually Note: Make sure your system support person. For more information, see the documentation that came with the access point or...
... THE PERSONAL IDENTIFICATION NUMBER (PIN) METHOD 1 From the printer control panel, navigate to: > Setup > OK > Network Setup > OK > Wireless 802.11b/g/n > OK > Network Connection Setup > OK > Wireless > OK > Wi‑Fi Protected Setup > OK > WPS PIN Mode > OK 2 Follow the instructions on the printer display. If... not yet been configured for the printer control panel to display a message to begin WPS configuration. Configuring Wi‑Fi Protected Setup manually Note: Make sure your system support person. For more information, see the documentation that came with the access point or...


