Quick Reference
Page 3
...Scanning to a PDF...28 Canceling scan jobs...28 E-mailing 29 Sending e-mail...29 Canceling an e‑mail...29 Setting up the printer to fax 30 Step 1: Connect the printer to the telephone line 30 Step 2: Check the dial tone 37 Step 3: Set your fax name and fax number 37 Step... 38 Step 6: Create a contact list 38 Faxing 39 Sending faxes...39 Receiving faxes...39 Wireless networking 41 Information you will need to set up the printer on a wireless network 41 Installing the printer on a wireless network 41 What is Wi‑Fi Protected Setup 41 Configuring Wi‑Fi Protected Setup ...
...Scanning to a PDF...28 Canceling scan jobs...28 E-mailing 29 Sending e-mail...29 Canceling an e‑mail...29 Setting up the printer to fax 30 Step 1: Connect the printer to the telephone line 30 Step 2: Check the dial tone 37 Step 3: Set your fax name and fax number 37 Step... 38 Step 6: Create a contact list 38 Faxing 39 Sending faxes...39 Receiving faxes...39 Wireless networking 41 Information you will need to set up the printer on a wireless network 41 Installing the printer on a wireless network 41 What is Wi‑Fi Protected Setup 41 Configuring Wi‑Fi Protected Setup ...
Quick Reference
Page 5
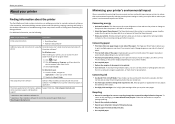
... you looking for using less ink than one page image on the Lexmark Support Web site at http://support.lexmark.com. 5 Minimizing your printer. To return an ink cartridge, go to : Applications > select your printer to a wireless network, setting up to share a single printer among multiple computers, thus conserving energy and other resources. The Sleep feature...
... you looking for using less ink than one page image on the Lexmark Support Web site at http://support.lexmark.com. 5 Minimizing your printer. To return an ink cartridge, go to : Applications > select your printer to a wireless network, setting up to share a single printer among multiple computers, thus conserving energy and other resources. The Sleep feature...
Quick Reference
Page 6
...wireless network, then you often perform, apply your custom settings, and download them to your online calendars, online photo albums, RSS feeds, and more. • Shortcuts-Save a set of frequently used printer settings available for the following printer models: • Lexmark S415 • Lexmark S419 Printer... features Depending on the model, your printer comes with some of these programs or some of the functions of ...
...wireless network, then you often perform, apply your custom settings, and download them to your online calendars, online photo albums, RSS feeds, and more. • Shortcuts-Save a set of frequently used printer settings available for the following printer models: • Lexmark S415 • Lexmark S419 Printer... features Depending on the model, your printer comes with some of these programs or some of the functions of ...
Quick Reference
Page 16
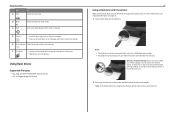
... idle for a PictBridge camera cable. • An adapter may be necessary if your printer Use 12 Color To Switch to color mode. 13 Black 14 Start Switch to previous settings. 16 Wi‑Fi indicator Check the wireless status of data can occur. 2 Follow the instructions or select from the memory device...
... idle for a PictBridge camera cable. • An adapter may be necessary if your printer Use 12 Color To Switch to color mode. 13 Black 14 Start Switch to previous settings. 16 Wi‑Fi indicator Check the wireless status of data can occur. 2 Follow the instructions or select from the memory device...
Quick Reference
Page 21
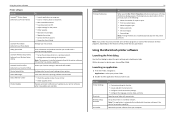
Using the printer software Printer software Use the LexmarkTM Printer Home (referred to as Printer Home) Lexmark Phone Book (referred to as Phone Book) Abbyy Sprint OCR Lexmark Wireless Setup Utility (referred to as Wireless Setup Utility) Lexmark Tools for Office (referred to as the following: • Select the number of your printer. Manage your computer. Configure the fax and e‑...
Using the printer software Printer software Use the LexmarkTM Printer Home (referred to as Printer Home) Lexmark Phone Book (referred to as Phone Book) Abbyy Sprint OCR Lexmark Wireless Setup Utility (referred to as Wireless Setup Utility) Lexmark Tools for Office (referred to as the following: • Select the number of your printer. Manage your computer. Configure the fax and e‑...

Quick Reference
Page 24
... print jobs to the same wireless network. It lets you print Web pages, photos from a mobile device What is connected. To check if your printer model supports these features, visit www.lexmark.com/lexprint. • For other Lexmark printers, your printer as long as Rendezvous in ...the queue, then click Printer > Cancel All Documents. Note: For best results, allow the prints ...
... print jobs to the same wireless network. It lets you print Web pages, photos from a mobile device What is connected. To check if your printer model supports these features, visit www.lexmark.com/lexprint. • For other Lexmark printers, your printer as long as Rendezvous in ...the queue, then click Printer > Cancel All Documents. Note: For best results, allow the prints ...
Quick Reference
Page 29
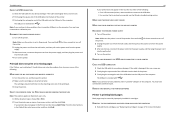
...Use the scanner glass for multiple‑page documents. The printer supports only one active network connection (Ethernet or wireless) at a time. • Add contacts to : Applications > select your printer. When sending an e‑mail, you purchased a printer without an ADF, then load original documents or photos on... the ADF to an Ethernet or wireless network before sending an e‑mail. • Make sure the printer is available only in select printer models. Canceling an e‑mail To cancel an e‑mail, press . Note: ...
...Use the scanner glass for multiple‑page documents. The printer supports only one active network connection (Ethernet or wireless) at a time. • Add contacts to : Applications > select your printer. When sending an e‑mail, you purchased a printer without an ADF, then load original documents or photos on... the ADF to an Ethernet or wireless network before sending an e‑mail. • Make sure the printer is available only in select printer models. Canceling an e‑mail To cancel an e‑mail, press . Note: ...
Quick Reference
Page 41
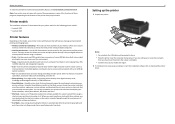
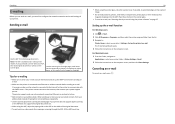
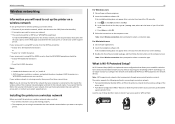
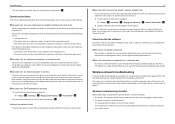
...) • If encryption was used to , then launch the wireless utility of your access point is connected to the same wireless network where you will need to set up the printer on a wireless network To set up the printer for wireless printing, you need to know the SSID of the network that your...to configure the network name (SSID) and WEP key or WPA passphrase for any of Wi‑Fi technology. Installing the printer on a wireless network Before you install the printer on a wireless network, make sure that allows you do not know : • The name of time. If your access point is ...
...) • If encryption was used to , then launch the wireless utility of your access point is connected to the same wireless network where you will need to set up the printer on a wireless network To set up the printer for wireless printing, you need to know the SSID of the network that your...to configure the network name (SSID) and WEP key or WPA passphrase for any of Wi‑Fi technology. Installing the printer on a wireless network Before you install the printer on a wireless network, make sure that allows you do not know : • The name of time. If your access point is ...
Quick Reference
Page 42
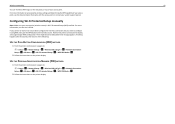
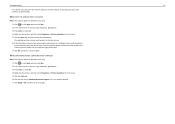
...then do one of the following: USE THE PUSH BUTTON CONFIGURATION (PBC) METHOD 1 From the printer control panel, navigate to : > Setup > OK > Network Setup > OK > Wireless 802.11b/g/n > OK > Network Connection Setup > OK > Wireless > OK > Wi‑Fi Protected Setup > OK > WPS PIN Mode > OK 2 ... or top of your access point. USE THE PERSONAL IDENTIFICATION NUMBER (PIN) METHOD 1 From the printer control panel, navigate to : > Setup > OK > Network Setup > OK > Wireless 802.11b/g/n > OK > Network Connection Setup > OK > Wireless > OK > Wi‑Fi Protected Setup > OK > WPS PBC Mode > OK 2 Follow...
...then do one of the following: USE THE PUSH BUTTON CONFIGURATION (PBC) METHOD 1 From the printer control panel, navigate to : > Setup > OK > Network Setup > OK > Wireless 802.11b/g/n > OK > Network Connection Setup > OK > Wireless > OK > Wi‑Fi Protected Setup > OK > WPS PIN Mode > OK 2 ... or top of your access point. USE THE PERSONAL IDENTIFICATION NUMBER (PIN) METHOD 1 From the printer control panel, navigate to : > Setup > OK > Network Setup > OK > Wireless 802.11b/g/n > OK > Network Connection Setup > OK > Wireless > OK > Wi‑Fi Protected Setup > OK > WPS PBC Mode > OK 2 Follow...
Quick Reference
Page 44
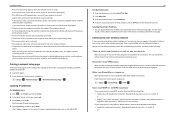
...the following : MAKE SURE THE INK CARTRIDGES ARE INSERTED CORRECTLY 1 Turn the printer on the printer. Press and hold for three seconds to a defective port. Print job does not print or is wirelessly connected, see "Replacing ink cartridges" on the computer. You may have problems,... appear in Sleep mode. RECONNECT THE PRINTER POWER SUPPLY 1 Turn off the printer. Note: Make sure the printer is marked with . REINSTALL THE INK CARTRIDGES AND DEEP CLEAN AND ALIGN THE PRINTHEAD 1 Reinstall the ink cartridges, see the Wireless troubleshooting section. You may be caused by...
...the following : MAKE SURE THE INK CARTRIDGES ARE INSERTED CORRECTLY 1 Turn the printer on the printer. Press and hold for three seconds to a defective port. Print job does not print or is wirelessly connected, see "Replacing ink cartridges" on the computer. You may have problems,... appear in Sleep mode. RECONNECT THE PRINTER POWER SUPPLY 1 Turn off the printer. Note: Make sure the printer is marked with . REINSTALL THE INK CARTRIDGES AND DEEP CLEAN AND ALIGN THE PRINTHEAD 1 Reinstall the ink cartridges, see the Wireless troubleshooting section. You may be caused by...
Quick Reference
Page 47
...OK 2 Press the arrow buttons to scroll to the Internet over a wireless connection. • Your SSID is full, then the printer may need to connect the printer to your wireless network. Also, make sure that the printer can open the fax software and configure the fax settings. Troubleshooting 3 ... its own fax line or shares the line with the PostScript driver or the Universal Fax Driver. Wireless troubleshooting checklist Before beginning to troubleshoot the wireless printer, verify the following : MAKE SURE THAT YOU HAVE CONFIGURED THE CORRECT SETTINGS FOR YOUR SETUP The...
...OK 2 Press the arrow buttons to scroll to the Internet over a wireless connection. • Your SSID is full, then the printer may need to connect the printer to your wireless network. Also, make sure that the printer can open the fax software and configure the fax settings. Troubleshooting 3 ... its own fax line or shares the line with the PostScript driver or the Universal Fax Driver. Wireless troubleshooting checklist Before beginning to troubleshoot the wireless printer, verify the following : MAKE SURE THAT YOU HAVE CONFIGURED THE CORRECT SETTINGS FOR YOUR SETUP The...
Quick Reference
Page 48
... From the Contents pane, choose Network. 4 If you will not be able to access the printer over a wireless network, choose AirPort from which you encountered problems while installing, or if your printer does not appear in a WEP key are not available when Demo Mode is like a password....or WPA2 security, then the WPA passphrase should be : • Exactly 64 hexadecimal characters. Many devices can interfere with the wireless signal. Locating the printer IP address • You can sometimes refresh network connections and resolve connectivity issues. See the User's Guide on a keyboard....
... From the Contents pane, choose Network. 4 If you will not be able to access the printer over a wireless network, choose AirPort from which you encountered problems while installing, or if your printer does not appear in a WEP key are not available when Demo Mode is like a password....or WPA2 security, then the WPA passphrase should be : • Exactly 64 hexadecimal characters. Many devices can interfere with the wireless signal. Locating the printer IP address • You can sometimes refresh network connections and resolve connectivity issues. See the User's Guide on a keyboard....
Quick Reference
Page 49
...AirPort base station In Mac OS X version 10.5 or later 1 From the Apple menu, navigate to : a From the printer, print a network setup page. CHECK THE WIRELESS SIGNAL QUALITY Print a network setup page and check the signal quality. If the signal quality is connected to : System Preferences >...filtering to limit access to the list of these devices. If you to press an association/registration button when adding the printer to the wireless network. Check the Wireless Network Connection section: • The "Default Gateway" entry is already connected to your system support person. b Type ...
...AirPort base station In Mac OS X version 10.5 or later 1 From the Apple menu, navigate to : a From the printer, print a network setup page. CHECK THE WIRELESS SIGNAL QUALITY Print a network setup page and check the signal quality. If the signal quality is connected to : System Preferences >...filtering to limit access to the list of these devices. If you to press an association/registration button when adding the printer to the wireless network. Check the Wireless Network Connection section: • The "Default Gateway" entry is already connected to your system support person. b Type ...
Quick Reference
Page 50
...Type your user name and password when prompted, and then click OK. 3 In the Wireless settings section, look for Address. • View the printer settings. In the TCP/IP section, look for the printer and the laptop to attach to the network, then there may see the "Communication not... and have waited long enough for the SSID. 4 Write down the SSID. MAKE SURE YOUR OS IS COMPATIBLE WITH WIRELESS PRINTING THROUGH AIRPORT The printer supports wireless printing only through AirPort base stations for future reference. This can occur if the laptop hard drive has powered down exactly...
...Type your user name and password when prompted, and then click OK. 3 In the Wireless settings section, look for Address. • View the printer settings. In the TCP/IP section, look for the printer and the laptop to attach to the network, then there may see the "Communication not... and have waited long enough for the SSID. 4 Write down the SSID. MAKE SURE YOUR OS IS COMPATIBLE WITH WIRELESS PRINTING THROUGH AIRPORT The printer supports wireless printing only through AirPort base stations for future reference. This can occur if the laptop hard drive has powered down exactly...
Quick Reference
Page 51
... SURE THE WIRELESS PORT IS SELECTED Note: This solution applies to Windows users only. 1 Click , or click Start and then click Run. 2 In the Start Search or Run box, type control printers. 3 Press Enter, or click OK. 4 Right‑click the printer, and then select Properties or Printer properties from the... 1 Click , or click Start and then click Run. 2 In the Start Search or Run box, type control printers. 3 Press Enter, or click OK. 4 Right‑click the printer, and then select Properties or Printer properties from the menu. 5 Click the Ports tab, and then locate the selected port.
... SURE THE WIRELESS PORT IS SELECTED Note: This solution applies to Windows users only. 1 Click , or click Start and then click Run. 2 In the Start Search or Run box, type control printers. 3 Press Enter, or click OK. 4 Right‑click the printer, and then select Properties or Printer properties from the... 1 Click , or click Start and then click Run. 2 In the Start Search or Run box, type control printers. 3 Press Enter, or click OK. 4 Right‑click the printer, and then select Properties or Printer properties from the menu. 5 Click the Ports tab, and then locate the selected port.
Quick Reference
Page 53
...scanning to 27 G Group List 38 53 I incorrect language appears on display 43 information finding 5 information needed for setting up printer on wireless network 41 ink conserving 5 ink cartridge access area 14 ink cartridges installing 17 ordering 17 removing 17 replacing 17 inserting a ...flash drive 16 installation screen did not appear automatically 43 installing printer on wireless network (Macintosh) 41 on wireless network (Windows) 41 installing printer software 20 J jam clearance cover 14 L language changing 43 LexPrint 24 line filter 32 LINE port...
...scanning to 27 G Group List 38 53 I incorrect language appears on display 43 information finding 5 information needed for setting up printer on wireless network 41 ink conserving 5 ink cartridge access area 14 ink cartridges installing 17 ordering 17 removing 17 replacing 17 inserting a ...flash drive 16 installation screen did not appear automatically 43 installing printer on wireless network (Macintosh) 41 on wireless network (Windows) 41 installing printer software 20 J jam clearance cover 14 L language changing 43 LexPrint 24 line filter 32 LINE port...

User's Guide
Page 7
... impact. This feature sets the screen brightness to low and sets the printer to change to share a single printer among multiple computers, thus conserving energy and other resources. Wireless/network printers allow you to Sleep mode after the printer has been idle for choosing this printer! We're committed to delivering performance and value with the...
... impact. This feature sets the screen brightness to low and sets the printer to change to share a single printer among multiple computers, thus conserving energy and other resources. Wireless/network printers allow you to Sleep mode after the printer has been idle for choosing this printer! We're committed to delivering performance and value with the...

User's Guide
Page 97
...;Fi Protected Setup manually Note: Make sure your PIN. • To use WPS to configure the printer wirelessly, all eight digits when you are automatically detected and configured for wireless connection and you type all of the following: USE THE PUSH BUTTON CONFIGURATION (PBC) METHOD 1 From...short delay before the message appears. Configuring the printer wirelessly using WPS (Windows only) With Wi‑Fi Protected Setup (WPS), it using WPS, then push the WPS button on your printer using the PIN method to add your wireless network must type the SSID and security information ...
...;Fi Protected Setup manually Note: Make sure your PIN. • To use WPS to configure the printer wirelessly, all eight digits when you are automatically detected and configured for wireless connection and you type all of the following: USE THE PUSH BUTTON CONFIGURATION (PBC) METHOD 1 From...short delay before the message appears. Configuring the printer wirelessly using WPS (Windows only) With Wi‑Fi Protected Setup (WPS), it using WPS, then push the WPS button on your printer using the PIN method to add your wireless network must type the SSID and security information ...

User's Guide
Page 98
... for Ethernet 1 Unplug the Ethernet cable from the printer. 2 Place the printer close enough to the computer for one active network connection (Ethernet or wireless) at the same time. Using the printer wirelessly Select the connection type that describes how you currently access your printer > Settings tab > Wireless setup utility 4 Follow the instructions on the computer screen...
... for Ethernet 1 Unplug the Ethernet cable from the printer. 2 Place the printer close enough to the computer for one active network connection (Ethernet or wireless) at the same time. Using the printer wirelessly Select the connection type that describes how you currently access your printer > Settings tab > Wireless setup utility 4 Follow the instructions on the computer screen...

User's Guide
Page 100
...you do not want to use to configure the printer for wireless access. Remove the Ethernet queue if you do not want to switch back to accessing the printer over an Ethernet connection. Networking 100 Using the printer wirelessly Select the connection type that describes how you currently...of the computer. 3 Add the printer. See "Adding the printer" on page 101. 4 A second print queue will be created. If the installation dialog does not appear after a minute, then click the CD icon on the desktop. 3 Double‑click Lexmark Extras > Lexmark Setup Assistant. 4 Follow the ...
...you do not want to use to configure the printer for wireless access. Remove the Ethernet queue if you do not want to switch back to accessing the printer over an Ethernet connection. Networking 100 Using the printer wirelessly Select the connection type that describes how you currently...of the computer. 3 Add the printer. See "Adding the printer" on page 101. 4 A second print queue will be created. If the installation dialog does not appear after a minute, then click the CD icon on the desktop. 3 Double‑click Lexmark Extras > Lexmark Setup Assistant. 4 Follow the ...


