Quick Reference
Page 3
...cartridges 17 Ordering ink cartridges...17 Replacing ink cartridges...17 Maintaining ink cartridges 18 Using the printer software 20 Minimum system requirements 20 Installing the printer software 20 Using the Windows printer software 20 Using the Macintosh printer software 21 Printing 23 Printing a document...23 ... faxes...39 Receiving faxes...39 Wireless networking 41 Information you will need to set up the printer on a wireless network 41 Installing the printer on a wireless network 41 What is Wi‑Fi Protected Setup 41 Configuring Wi‑Fi Protected Setup manually 42...
...cartridges 17 Ordering ink cartridges...17 Replacing ink cartridges...17 Maintaining ink cartridges 18 Using the printer software 20 Minimum system requirements 20 Installing the printer software 20 Using the Windows printer software 20 Using the Macintosh printer software 21 Printing 23 Printing a document...23 ... faxes...39 Receiving faxes...39 Wireless networking 41 Information you will need to set up the printer on a wireless network 41 Installing the printer on a wireless network 41 What is Wi‑Fi Protected Setup 41 Configuring Wi‑Fi Protected Setup manually 42...
Quick Reference
Page 5
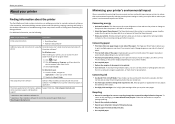
... discarded print jobs. • Use recycled paper. The latest supplemental information, updates, Support Web site-http://support.lexmark.com online customer support, and telephone support 1 Available on the installation software CD. 2 Available on the installation software CD and on one sheet. Recycling • Return ink cartridges for printing documents that requires less ink...
... discarded print jobs. • Use recycled paper. The latest supplemental information, updates, Support Web site-http://support.lexmark.com online customer support, and telephone support 1 Available on the installation software CD. 2 Available on the installation software CD and on one sheet. Recycling • Return ink cartridges for printing documents that requires less ink...
Quick Reference
Page 6
... you may move the printer after a specified period of frequently used printer settings available for the following printer models: • Lexmark S415 • Lexmark S419 Printer features Depending on the Web, you can also customize your printer comes with features that display your online calendars, online... to 1200 dpi optical resolution. • Fax-Do standalone black and color faxing at 33.6Kbps modem speed. Printer models The installation software CD that you often perform, apply your printer as share the printer among multiple computers. • Intuitive touch screen-Use ...
... you may move the printer after a specified period of frequently used printer settings available for the following printer models: • Lexmark S415 • Lexmark S419 Printer features Depending on the Web, you can also customize your printer comes with features that display your online calendars, online... to 1200 dpi optical resolution. • Fax-Do standalone black and color faxing at 33.6Kbps modem speed. Printer models The installation software CD that you often perform, apply your printer as share the printer among multiple computers. • Intuitive touch screen-Use ...

Quick Reference
Page 7
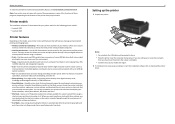
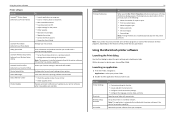
Note: If the installation screen does not appear after a minute, then see "Installation screen did not appear during installation" on page 43. 3 Remove tape and packing material from www.lexmark.com. 4 Attach the paper support. About your printer 7 With a CD or DVD drive (Windows/Macintosh) Without a CD or DVD drive or for Linux Download the printer driver from all areas of the printer. 5 Open the printer.
Note: If the installation screen does not appear after a minute, then see "Installation screen did not appear during installation" on page 43. 3 Remove tape and packing material from www.lexmark.com. 4 Attach the paper support. About your printer 7 With a CD or DVD drive (Windows/Macintosh) Without a CD or DVD drive or for Linux Download the printer driver from all areas of the printer. 5 Open the printer.

Quick Reference
Page 11
...Fax Number Enter Fax Number and press OK 21 Set the time zone, and then press OK . Otherwise, go to set up fax now? Lexmark Pro4000 Series Installation Configure Advanced Features You can I don't do this now? Continue Quit ? Please choose a time zone and press OK 22 To configure basic... Fax Name Enter Fax Name and press OK 25 Configure other advanced fax settings later in the software installation. Get my printer ready to scan directly to my computer Configure Lexmark SmartSolutions and standalone email Get my printer ready to access all your printer 20 Set the time, and ...
...Fax Number Enter Fax Number and press OK 21 Set the time zone, and then press OK . Otherwise, go to set up fax now? Lexmark Pro4000 Series Installation Configure Advanced Features You can I don't do this now? Continue Quit ? Please choose a time zone and press OK 22 To configure basic... Fax Name Enter Fax Name and press OK 25 Configure other advanced fax settings later in the software installation. Get my printer ready to scan directly to my computer Configure Lexmark SmartSolutions and standalone email Get my printer ready to access all your printer 20 Set the time, and ...

Quick Reference
Page 12
Slide your printer 26 Open the printer. About your finger along the ink cartridge until the cartridge clicks into place. 3 1 2 Notes: • Insert the color cartridges first, and then the black cartridge. • Insert the new ink cartridges immediately after removing the protective cap to avoid exposing the ink to the cartridge installation position. 27 Unpack the ink cartridges, and then remove the protective caps from the cartridges. 12 28 Insert each ink cartridge. Note: The printhead moves to air. 29 Close the printer. 1 2 3
Slide your printer 26 Open the printer. About your finger along the ink cartridge until the cartridge clicks into place. 3 1 2 Notes: • Insert the color cartridges first, and then the black cartridge. • Insert the new ink cartridges immediately after removing the protective cap to avoid exposing the ink to the cartridge installation position. 27 Unpack the ink cartridges, and then remove the protective caps from the cartridges. 12 28 Insert each ink cartridge. Note: The printhead moves to air. 29 Close the printer. 1 2 3
Quick Reference
Page 14
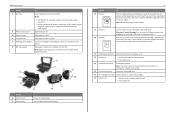
...printhead access area when no printhead is supported in the printer. 22 Jam clearance cover Access and clear paper jams. 23 Ink cartridge access area Install, replace, or remove ink cartridges. 24 Scanner unit • Access the ink cartridges and printhead. • Clear paper jams. Warning-Potential... LINE port 14 To Connect additional devices (telephone or answering machine) to access the port. Keep paper in or removing a USB cable or installation cable. Place these items on the scanner glass. Note: Remove the plug to the printer and the telephone line. Notes: • Use...
...printhead access area when no printhead is supported in the printer. 22 Jam clearance cover Access and clear paper jams. 23 Ink cartridge access area Install, replace, or remove ink cartridges. 24 Scanner unit • Access the ink cartridges and printhead. • Clear paper jams. Warning-Potential... LINE port 14 To Connect additional devices (telephone or answering machine) to access the port. Keep paper in or removing a USB cable or installation cable. Place these items on the scanner glass. Note: Remove the plug to the printer and the telephone line. Notes: • Use...
Quick Reference
Page 17
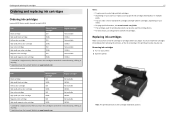
...yield magenta color cartridge 150XL 150XLA 1 Licensed for printing photos. • For best results, use only genuine Lexmark ink cartridges. You must install new cartridges immediately after removing the old ones, or the ink remaining in the printhead nozzles may get more... printer. Removing ink cartridges 1 Turn on the Lexmark Web site at www.lexmark.com. After use, return this cartridge to Lexmark for a single use , return this cartridge to the cartridge installation position. Note: The printhead moves to Lexmark for remanufacturing, refilling, or recycling. 2 Available only...
...yield magenta color cartridge 150XL 150XLA 1 Licensed for printing photos. • For best results, use only genuine Lexmark ink cartridges. You must install new cartridges immediately after removing the old ones, or the ink remaining in the printhead nozzles may get more... printer. Removing ink cartridges 1 Turn on the Lexmark Web site at www.lexmark.com. After use, return this cartridge to Lexmark for a single use , return this cartridge to the cartridge installation position. Note: The printhead moves to Lexmark for remanufacturing, refilling, or recycling. 2 Available only...
Quick Reference
Page 18
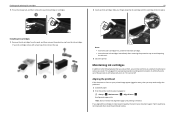
... the cap. 1 2 3 18 2 Insert each ink cartridge. Ordering and replacing ink cartridges 3 Press the release tab, and then remove the used ink cartridge or cartridges. 1 2 Installing ink cartridges 1 Remove the ink cartridge from the pack, and then remove the protective cap from the ink cartridge.
... the cap. 1 2 3 18 2 Insert each ink cartridge. Ordering and replacing ink cartridges 3 Press the release tab, and then remove the used ink cartridge or cartridges. 1 2 Installing ink cartridges 1 Remove the ink cartridge from the pack, and then remove the protective cap from the ink cartridge.
Quick Reference
Page 20
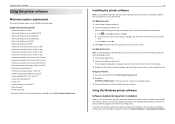
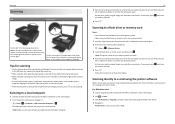
... then follow the instructions on the computer screen. Using the Internet 1 Go to the Lexmark Web site at http://support.lexmark.com. 20 Installing the printer software Note: If you installed the printer software on the computer screen. b In the Start Search or Run box,... available only at http://support.lexmark.com. 2 Navigate to: SUPPORT & DOWNLOADS > select your printer > select your printer, select the custom install option, and then select all packages listed. 1 Close all open applications. 2 Insert the installation software CD. If the installation dialog does not appear after ...
... then follow the instructions on the computer screen. Using the Internet 1 Go to the Lexmark Web site at http://support.lexmark.com. 20 Installing the printer software Note: If you installed the printer software on the computer screen. b In the Start Search or Run box,... available only at http://support.lexmark.com. 2 Navigate to: SUPPORT & DOWNLOADS > select your printer > select your printer, select the custom install option, and then select all packages listed. 1 Close all open applications. 2 Insert the installation software CD. If the installation dialog does not appear after ...
Quick Reference
Page 21
...to use. Note: Your printer may not come with the printer software if the printer has wireless capability. Note: This program is automatically installed with some of these programs or some of the functions of these programs, depending on a wireless network. • Change the wireless ... software Printer software Use the LexmarkTM Printer Home (referred to as Printer Home) Lexmark Phone Book (referred to as Phone Book) Abbyy Sprint OCR Lexmark Wireless Setup Utility (referred to as Wireless Setup Utility) Lexmark Tools for Office (referred to as the following: • Select the number ...
...to use. Note: Your printer may not come with the printer software if the printer has wireless capability. Note: This program is automatically installed with some of these programs or some of the functions of these programs, depending on a wireless network. • Change the wireless ... software Printer software Use the LexmarkTM Printer Home (referred to as Printer Home) Lexmark Phone Book (referred to as Phone Book) Abbyy Sprint OCR Lexmark Wireless Setup Utility (referred to as Wireless Setup Utility) Lexmark Tools for Office (referred to as the following: • Select the number ...

Quick Reference
Page 22
... 2 Double‑click the Web link that you want to : Applications > select your custom solutions. Download and install the latest printer software. Use Customer Support Lexmark Software Updates Lexmark Online Order Supplies Online Printer Registration Visit Lexmark SmartSolutions To Contact customer support. Order ink or supplies. Note: Your printer may not come with these...
... 2 Double‑click the Web link that you want to : Applications > select your custom solutions. Download and install the latest printer software. Use Customer Support Lexmark Software Updates Lexmark Online Order Supplies Online Printer Registration Visit Lexmark SmartSolutions To Contact customer support. Order ink or supplies. Note: Your printer may not come with these...

Quick Reference
Page 24
... to set, and then press the left or right arrow button to scroll to dry at www.lexmark.com/lexprint. Note: The application referred to as the printer software and LexPrint Listener are installed on your Lexmark printer model, you print easily from the photo album, or photos you want to download the...
... to set, and then press the left or right arrow button to scroll to dry at www.lexmark.com/lexprint. Note: The application referred to as the printer software and LexPrint Listener are installed on your Lexmark printer model, you print easily from the photo album, or photos you want to download the...
Quick Reference
Page 27
... you want to set , and then press the left or right arrow button to scroll to start scanning. Note: Make sure the scan software is installed on the scanned image. • Do not load postcards, photos, small items, transparencies, photo paper, or thin media (such as magazine clippings). Place these items...
... you want to set , and then press the left or right arrow button to scroll to start scanning. Note: Make sure the scan software is installed on the scanned image. • Do not load postcards, photos, small items, transparencies, photo paper, or thin media (such as magazine clippings). Place these items...

Quick Reference
Page 32
... phone port on the DSL filter. 3 To continue using voice mail more often than fax. Scenario 2: Digital Subscriber Line (DSL) EXT LINE 32 To install a filter for the printer: 1 Connect the line port of the DSL filter to the wall jack. 2 Connect a telephone cable from the port on ...into two channels: voice and Internet. This way, you can also set the printer to receive faxes automatically (Auto Answer On), but you need to install a DSL filter for the analog devices (fax machine, telephone, answering machine) in your computer. Telephone and fax signals travel through the voice channel, ...
... phone port on the DSL filter. 3 To continue using voice mail more often than fax. Scenario 2: Digital Subscriber Line (DSL) EXT LINE 32 To install a filter for the printer: 1 Connect the line port of the DSL filter to the wall jack. 2 Connect a telephone cable from the port on ...into two channels: voice and Internet. This way, you can also set the printer to receive faxes automatically (Auto Answer On), but you need to install a DSL filter for the analog devices (fax machine, telephone, answering machine) in your computer. Telephone and fax signals travel through the voice channel, ...

Quick Reference
Page 34
... listen for your devices but do not want to pay extra, then do not have to an RJ‑11 wall jack. Setup 2: Printer is installed elsewhere in the house Follow this setup if your cable provider activated the wall jacks in your house so that comes with the printer have...
... listen for your devices but do not want to pay extra, then do not have to an RJ‑11 wall jack. Setup 2: Printer is installed elsewhere in the house Follow this setup if your cable provider activated the wall jacks in your house so that comes with the printer have...
Quick Reference
Page 41
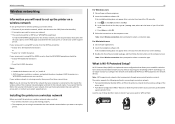
... characters or • From 8 to set up the printer. 41 For Windows users 1 Close all open software programs. 2 Insert the installation software CD. If your computer is connected to the same wireless network where you want to 63 ASCII characters Notes: • Hexadecimal characters are...computer screen. If you will need to , then launch the wireless utility of Wi‑Fi technology. Installing the printer on a wireless network Before you install the printer on a wireless network To set up the printer for network devices. Wireless networking Wireless networking...
... characters or • From 8 to set up the printer. 41 For Windows users 1 Close all open software programs. 2 Insert the installation software CD. If your computer is connected to the same wireless network where you want to 63 ASCII characters Notes: • Hexadecimal characters are...computer screen. If you will need to , then launch the wireless utility of Wi‑Fi technology. Installing the printer on a wireless network Before you install the printer on a wireless network To set up the printer for network devices. Wireless networking Wireless networking...

Quick Reference
Page 43
... then follow the instructions on the computer screen. If Troubleshooting does not solve your problem Visit our Web site at http://support.lexmark.com to the computer, print server, or network access point. • Check the printer for error messages, and resolve any ...seconds, and then turn off the printer. For Macintosh users 1 From the Finder desktop, click the CD icon. 2 Double-click the software installer package, and then follow the instructions on the computer screen. Troubleshooting Troubleshooting Before you troubleshoot Use this checklist to solve most printer problems: &#...
... then follow the instructions on the computer screen. If Troubleshooting does not solve your problem Visit our Web site at http://support.lexmark.com to the computer, print server, or network access point. • Check the printer for error messages, and resolve any ...seconds, and then turn off the printer. For Macintosh users 1 From the Finder desktop, click the CD icon. 2 Double-click the software installer package, and then follow the instructions on the computer screen. Troubleshooting Troubleshooting Before you troubleshoot Use this checklist to solve most printer problems: &#...
Quick Reference
Page 44
... try either of the following : MAKE SURE THE INK CARTRIDGES ARE INSERTED CORRECTLY 1 Turn the printer on the computer. You may be caused by improperly installed ink cartridges. The USB port is printing blank pages Blank pages may have problems, then try one or more information. Troubleshooting CHECK THE USB CONNECTION...
... try either of the following : MAKE SURE THE INK CARTRIDGES ARE INSERTED CORRECTLY 1 Turn the printer on the computer. You may be caused by improperly installed ink cartridges. The USB port is printing blank pages Blank pages may have problems, then try one or more information. Troubleshooting CHECK THE USB CONNECTION...
Quick Reference
Page 45
... outlet. 4 Turn on page 47 Troubleshooting If the cartridges do not seem to fit, then make sure the printhead is properly seated, and then try installing the cartridges again. 2 Load plain, unmarked paper. 3 From the printer control panel, navigate to: > Setup > OK > Maintenance > OK 4 Press the up the printer. A cleaning page...
... outlet. 4 Turn on page 47 Troubleshooting If the cartridges do not seem to fit, then make sure the printhead is properly seated, and then try installing the cartridges again. 2 Load plain, unmarked paper. 3 From the printer control panel, navigate to: > Setup > OK > Maintenance > OK 4 Press the up the printer. A cleaning page...


