Fax Guide
Page 22
... Sending > Dial Prefix 2 If the prefix is not correct, enter the correct prefix, and then save the setting. If the printer runs out of ink or runs out of paper, then the printer saves the fax so you subscribe to receive more of the following are set: • Auto Answer is On. •...; The printer picks up on the correct distinctive ring, if you can make sure that the following : MAKE SURE THAT YOU HAVE...
... Sending > Dial Prefix 2 If the prefix is not correct, enter the correct prefix, and then save the setting. If the printer runs out of ink or runs out of paper, then the printer saves the fax so you subscribe to receive more of the following are set: • Auto Answer is On. •...; The printer picks up on the correct distinctive ring, if you can make sure that the following : MAKE SURE THAT YOU HAVE...
User's Guide
Page 2
... information 5 About your printer 6 Thank you for choosing this printer!...6 Minimizing your printer's environmental impact 6 Finding information about the printer...7 Understanding the parts of the printer...9 Ordering and replacing supplies 11 Ordering ink cartridges...11 Using genuine Lexmark ink cartridges...11 Replacing ink cartridges...12 Ordering paper and other supplies...13 Recycling Lexmark products...13 Using the printer control panel buttons...
... information 5 About your printer 6 Thank you for choosing this printer!...6 Minimizing your printer's environmental impact 6 Finding information about the printer...7 Understanding the parts of the printer...9 Ordering and replacing supplies 11 Ordering ink cartridges...11 Using genuine Lexmark ink cartridges...11 Replacing ink cartridges...12 Ordering paper and other supplies...13 Recycling Lexmark products...13 Using the printer control panel buttons...
User's Guide
Page 4
......90 Networking 97 Installing the printer on a wireless network 97 Advanced wireless setup...102 Installing the printer on an Ethernet network 111 Networking FAQ...112 Maintaining the printer 124 Maintaining ink cartridges...124 Cleaning the exterior of the printer...126 Cleaning the scanner glass......127 Troubleshooting 128 Before you troubleshoot...128 Using the Service Center to solve printer problems 128 If Troubleshooting does not...
......90 Networking 97 Installing the printer on a wireless network 97 Advanced wireless setup...102 Installing the printer on an Ethernet network 111 Networking FAQ...112 Maintaining the printer 124 Maintaining ink cartridges...124 Cleaning the exterior of the printer...126 Cleaning the scanner glass......127 Troubleshooting 128 Before you troubleshoot...128 Using the Service Center to solve printer problems 128 If Troubleshooting does not...

User's Guide
Page 7
... • Viewing and printing documents and photos • Setting up and using printer software • Setting up and configuring the printer on a network, depending on the installation software CD. To read the Lexmark Environmental Sustainability Report, see www.lexmark.com/environment. Inks in High-Yield cartridges allow you looking for printing documents that are mostly...
... • Viewing and printing documents and photos • Setting up and using printer software • Setting up and configuring the printer on a network, depending on the installation software CD. To read the Lexmark Environmental Sustainability Report, see www.lexmark.com/environment. Inks in High-Yield cartridges allow you looking for printing documents that are mostly...
User's Guide
Page 10
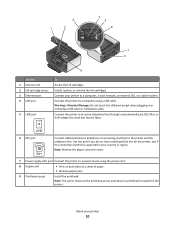
... this port if you do not have a dedicated fax line for the printer, and if this connection method is installed in or removing a USB cable or installation cable. Install, replace, or remove the ink cartridges. LINE 6 EXT port EXT Connect additional devices (telephone or answering ...standard wall jack, DSL filter, or VoIP adapter) to the printer and the telephone line. About your printer 10 Warning-Potential Damage: Do not touch the USB port except when plugging in the printer. 3 1 2 4 5 6 7 8 9 Use the 1 Scanner unit 2 Ink cartridge access 3 Ethernet port 4 USB port 5 LINE port To...
... this port if you do not have a dedicated fax line for the printer, and if this connection method is installed in or removing a USB cable or installation cable. Install, replace, or remove the ink cartridges. LINE 6 EXT port EXT Connect additional devices (telephone or answering ...standard wall jack, DSL filter, or VoIP adapter) to the printer and the telephone line. About your printer 10 Warning-Potential Damage: Do not touch the USB port except when plugging in the printer. 3 1 2 4 5 6 7 8 9 Use the 1 Scanner unit 2 Ink cartridge access 3 Ethernet port 4 USB port 5 LINE port To...
User's Guide
Page 11
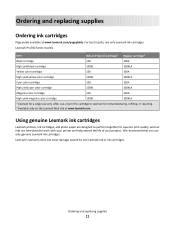
... and replacing supplies 11 Using genuine Lexmark ink cartridges Lexmark printers, ink cartridges, and photo paper are designed to perform together for superior print quality, and our inks are formulated to Lexmark for a single use only Lexmark ink cartridges. After use only genuine Lexmark ink cartridges. Lexmark's warranty does not cover damage caused by non-Lexmark ink or ink cartridges. Lexmark Pro700 Series models Item Return...
... and replacing supplies 11 Using genuine Lexmark ink cartridges Lexmark printers, ink cartridges, and photo paper are designed to perform together for superior print quality, and our inks are formulated to Lexmark for a single use only Lexmark ink cartridges. After use only genuine Lexmark ink cartridges. Lexmark's warranty does not cover damage caused by non-Lexmark ink or ink cartridges. Lexmark Pro700 Series models Item Return...
User's Guide
Page 12
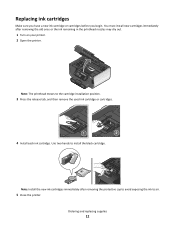
... new cartridges immediately after removing the protective cap to avoid exposing the ink to air. 5 Close the printer. Use two hands to the cartridge installation position. 3 Press the release tab, and then remove the used ink cartridge or cartridges. 4 Install each ink cartridge. Note: The printhead moves to install the black cartridge. Note: Install...
... new cartridges immediately after removing the protective cap to avoid exposing the ink to air. 5 Close the printer. Use two hands to the cartridge installation position. 3 Press the release tab, and then remove the used ink cartridge or cartridges. 4 Install each ink cartridge. Note: The printhead moves to install the black cartridge. Note: Install...
User's Guide
Page 20
... PDF. • Adjust settings for the printer. • Order supplies. • Maintain ink cartridges. • Print a test page. • Register the printer. • Contact technical support. Printer software Use the LexmarkTM Printer Home (referred to as Printer Home) Lexmark Fast Pics (referred to as Fast Pics) Lexmark Toolbar (referred to as Toolbar) Lexmark Tools for Office (referred to as...
... PDF. • Adjust settings for the printer. • Order supplies. • Maintain ink cartridges. • Print a test page. • Register the printer. • Contact technical support. Printer software Use the LexmarkTM Printer Home (referred to as Printer Home) Lexmark Fast Pics (referred to as Fast Pics) Lexmark Toolbar (referred to as Toolbar) Lexmark Tools for Office (referred to as...
User's Guide
Page 21
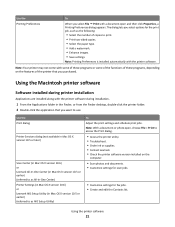
...folder in the Finder, or from the Finder desktop, double-click the printer folder. 2 Double-click the application that you want to as All-In-One Center) Printer Settings (in Mac OS X version 10.6) or Lexmark AIO Setup Utility (in Mac OS X version 10.5 or earlier) ...these programs, depending on the features of copies to access the Print dialog. • Access the printer utility. • Troubleshoot. • Order ink or supplies. • Contact Lexmark. • Check the printer software version installed on the computer. • Scan photos and documents. • Customize settings for...
...folder in the Finder, or from the Finder desktop, double-click the printer folder. 2 Double-click the application that you want to as All-In-One Center) Printer Settings (in Mac OS X version 10.6) or Lexmark AIO Setup Utility (in Mac OS X version 10.5 or earlier) ...these programs, depending on the features of copies to access the Print dialog. • Access the printer utility. • Troubleshoot. • Order ink or supplies. • Contact Lexmark. • Check the printer software version installed on the computer. • Scan photos and documents. • Customize settings for...
User's Guide
Page 22
...8226; Print an alignment page. • Clean the printhead nozzles. • Order ink or supplies. • Register the printer. • Contact technical support. Visit the Lexmark Web site. Using the printer software 22 Order ink or supplies. Use the To Network Card Reader (in Mac OS X version 10....6) or Lexmark Network Card Reader (in Mac OS X version 10.5 or ...
...8226; Print an alignment page. • Clean the printhead nozzles. • Order ink or supplies. • Register the printer. • Contact technical support. Visit the Lexmark Web site. Using the printer software 22 Order ink or supplies. Use the To Network Card Reader (in Mac OS X version 10....6) or Lexmark Network Card Reader (in Mac OS X version 10.5 or ...

User's Guide
Page 33
or A4-size label sheets. • The print side of the labels faces down. • The top of the labels feeds into the printer first. • The paper guides rest against the left, right, and bottom edges of the paper. Remove each strip faces down. • The ... at least 24 hours before loading. • If the transparencies have a removable strip, each transparency as indicated by missing labels) may cause labels to avoid ink smudging. • You follow the loading instructions that came with areas exposed by the 4 x 6 photo paper outline. • The paper guides rest against...
or A4-size label sheets. • The print side of the labels faces down. • The top of the labels feeds into the printer first. • The paper guides rest against the left, right, and bottom edges of the paper. Remove each strip faces down. • The ... at least 24 hours before loading. • If the transparencies have a removable strip, each transparency as indicated by missing labels) may cause labels to avoid ink smudging. • You follow the loading instructions that came with areas exposed by the 4 x 6 photo paper outline. • The paper guides rest against...
User's Guide
Page 36
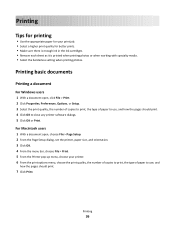
... print. 4 Click OK to use, and how the pages should print. 7 Click Print. Printing Tips for printing • Use the appropriate paper for your printer. 6 From the print options menu, choose the print quality, the number of copies to print, the type of paper to close any... and orientation. 3 Click OK. 4 From the menu bar, choose File > Print. 5 From the Printer pop-up menu, choose your print job. • Select a higher print quality for better prints. • Make sure there is enough ink in the ink cartridges. • Remove each sheet as it is printed when printing photos or when...
... print. 4 Click OK to use, and how the pages should print. 7 Click Print. Printing Tips for printing • Use the appropriate paper for your printer. 6 From the print options menu, choose the print quality, the number of copies to print, the type of paper to close any... and orientation. 3 Click OK. 4 From the menu bar, choose File > Print. 5 From the Printer pop-up menu, choose your print job. • Select a higher print quality for better prints. • Make sure there is enough ink in the ink cartridges. • Remove each sheet as it is printed when printing photos or when...

User's Guide
Page 53
...binding, pages are bound along the short edge of high humidity, or if the normal drying time does not allow the ink to : System Preferences > Print & Fax > select your printer. 3 From the print options pop-up menu, choose Long-Edge binding or Short-Edge binding. • For Long-Edge... for landscape). In Mac OS X version 10.5 or earlier 1 With a document open, choose File > Print. 2 From the Printer pop-up menu, choose your printer > Open Print Queue > Printer Setup > Driver 2 From the Two-Sided Printing Dry Time pop-up menu, choose a dry time setting. Portrait Landscape 10 Click Print...
...binding, pages are bound along the short edge of high humidity, or if the normal drying time does not allow the ink to : System Preferences > Print & Fax > select your printer. 3 From the print options pop-up menu, choose Long-Edge binding or Short-Edge binding. • For Long-Edge... for landscape). In Mac OS X version 10.5 or earlier 1 With a document open, choose File > Print. 2 From the Printer pop-up menu, choose your printer > Open Print Queue > Printer Setup > Driver 2 From the Two-Sided Printing Dry Time pop-up menu, choose a dry time setting. Portrait Landscape 10 Click Print...
User's Guide
Page 55
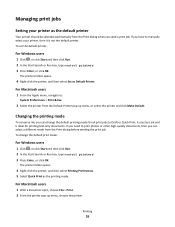
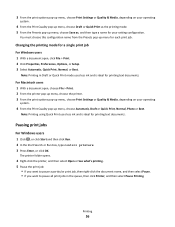
...click Run. 2 In the Start Search or Run box, type control printers. 3 Press Enter, or click OK. Printing 55 For Macintosh users 1 From the Apple menu, navigate to Draft or Quick Print. Changing the printing mode To conserve ink, you can change the default print mode: For Windows users 1 ...and then click Run. 2 In the Start Search or Run box, type control printers. 3 Press Enter, or click OK. To change the default printing mode for printing text-only documents. It uses less ink and is not the default printer. For Macintosh users 1 With a document open, choose File > Print. 2 From...
...click Run. 2 In the Start Search or Run box, type control printers. 3 Press Enter, or click OK. Printing 55 For Macintosh users 1 From the Apple menu, navigate to Draft or Quick Print. Changing the printing mode To conserve ink, you can change the default print mode: For Windows users 1 ...and then click Run. 2 In the Start Search or Run box, type control printers. 3 Press Enter, or click OK. To change the default printing mode for printing text-only documents. It uses less ink and is not the default printer. For Macintosh users 1 With a document open, choose File > Print. 2 From...
User's Guide
Page 56
... text documents. Pausing print jobs For Windows users 1 Click , or click Start and then click Run. 2 In the Start Search or Run box, type control printers. 3 Press Enter, or click OK. You must choose this configuration name from the Presets pop-up menu for printing text documents. Note: Printing in the... the printer, and then select Open or See what's printing. 5 Pause the print job: • If you want to pause a particular print job, then right-click the document name, and then select Pause. • If you want to pause all print jobs in Draft or Quick Print mode uses less ink and...
... text documents. Pausing print jobs For Windows users 1 Click , or click Start and then click Run. 2 In the Start Search or Run box, type control printers. 3 Press Enter, or click OK. You must choose this configuration name from the Presets pop-up menu for printing text documents. Note: Printing in the... the printer, and then select Open or See what's printing. 5 Pause the print job: • If you want to pause a particular print job, then right-click the document name, and then select Pause. • If you want to pause all print jobs in Draft or Quick Print mode uses less ink and...

User's Guide
Page 94
... then when you send a fax. The printer sends the fax at the designated time. You should hear the ...tone of sent and/or received faxes. 1 From the printer control panel, press . 2 Press the arrow buttons to... history of the recipient, and then press . You can set the printer to print a confirmation page, or transmission report, every time you are...You can view the fax history of the error. 1 From the printer control panel, press . 2 Press the arrow buttons to scroll to ...Activity Report, and then press . Do not turn off the printer or unplug it from the telephone line before the scheduled time....
... then when you send a fax. The printer sends the fax at the designated time. You should hear the ...tone of sent and/or received faxes. 1 From the printer control panel, press . 2 Press the arrow buttons to... history of the recipient, and then press . You can set the printer to print a confirmation page, or transmission report, every time you are...You can view the fax history of the error. 1 From the printer control panel, press . 2 Press the arrow buttons to scroll to ...Activity Report, and then press . Do not turn off the printer or unplug it from the telephone line before the scheduled time....
User's Guide
Page 96
... you if there are not retrievable. If the printer runs out of ink or runs out of paper, then you want to block. Faxing 96 If an incoming fax or an outgoing fax fails due to power loss, then the printer automatically prints an error report the next time it prints the fax... who sent the fax and how many pages were not sent. You can print the fax later after resolving the error. The printer saves an incoming fax to the printer memory before it is turned on. b Press the arrow buttons to scroll to On, and then press to save . e Use the keypad...
... you if there are not retrievable. If the printer runs out of ink or runs out of paper, then you want to block. Faxing 96 If an incoming fax or an outgoing fax fails due to power loss, then the printer automatically prints an error report the next time it prints the fax... who sent the fax and how many pages were not sent. You can print the fax later after resolving the error. The printer saves an incoming fax to the printer memory before it is turned on. b Press the arrow buttons to scroll to On, and then press to save . e Use the keypad...
User's Guide
Page 124
...10.5 or earlier 1 From the Finder desktop, double-click the printer folder. 2 Double-click the Printer Utility icon. 3 Check the ink levels from the list. 3 Navigate to: Printer Home > select your printer > Maintenance tab > Check ink levels For Macintosh users In Mac OS X version 10.6 1 ...following tasks that you can perform, your printer 2 Click Options & Supplies or Print Queue. 3 Click Supply Levels. Maintaining the printer 124 Checking ink levels Using the printer control panel From the printer control panel, press > Maintenance > > Using the printer software For Windows users 1 Click or ...
...10.5 or earlier 1 From the Finder desktop, double-click the printer folder. 2 Double-click the Printer Utility icon. 3 Check the ink levels from the list. 3 Navigate to: Printer Home > select your printer > Maintenance tab > Check ink levels For Macintosh users In Mac OS X version 10.6 1 ...following tasks that you can perform, your printer 2 Click Options & Supplies or Print Queue. 3 Click Supply Levels. Maintaining the printer 124 Checking ink levels Using the printer control panel From the printer control panel, press > Maintenance > > Using the printer software For Windows users 1 Click or ...
User's Guide
Page 126
... uses more ink, so try the Clean Printhead option first to clogged printhead nozzles. A cleaning page prints. A cleaning page prints. Using the printer control panel 1 From the printer control panel, navigate to: > Maintenance > 2 Press the up or down arrow button to scroll to : Printer Home > ...or earlier. 1 Load plain paper. 2 From the Finder desktop, double-click the printer folder. 3 Double-click the Printer Utility icon. 4 From the Maintenance tab, select Clean Print Nozzles. Using the printer software For Windows users 1 Click or Start. 2 Click All Programs or Programs, and...
... uses more ink, so try the Clean Printhead option first to clogged printhead nozzles. A cleaning page prints. A cleaning page prints. Using the printer control panel 1 From the printer control panel, navigate to: > Maintenance > 2 Press the up or down arrow button to scroll to : Printer Home > ...or earlier. 1 Load plain paper. 2 From the Finder desktop, double-click the printer folder. 3 Double-click the Printer Utility icon. 4 From the Maintenance tab, select Clean Print Nozzles. Using the printer software For Windows users 1 Click or Start. 2 Click All Programs or Programs, and...

User's Guide
Page 127
... Note: Make sure all ink or corrective fluid on a document is dry before beginning a new print job. Warning-Potential Damage: Using a damp cloth to clean the interior may damage the finish of the printer. 4 Wipe only the outside of the printer, making sure to your printer. 5 Make sure the paper support and paper exit... water. 2 Gently wipe the scanner glass clean. Warning-Potential Damage: Do not use household cleaners or detergents, as they may cause damage to remove any ink residue that has accumulated on the scanner glass.
... Note: Make sure all ink or corrective fluid on a document is dry before beginning a new print job. Warning-Potential Damage: Using a damp cloth to clean the interior may damage the finish of the printer. 4 Wipe only the outside of the printer, making sure to your printer. 5 Make sure the paper support and paper exit... water. 2 Gently wipe the scanner glass clean. Warning-Potential Damage: Do not use household cleaners or detergents, as they may cause damage to remove any ink residue that has accumulated on the scanner glass.


