
User's Guide (7.1 MB)
Page 3
Table of Contents Table of Contents Introduction xi Trademarks xiii Getting Started Setting Up Your Printer 1 Identifying Your Printer, Features, and Options 1 Optra S 1255 and Optra S 1625 2 Optra S 1855 3 Optra S 2455 4 Unpacking the Printer 5 Determining What to Install Next 7 Installing the Dual 500-Sheet Drawer 7 Attaching the Decals 11 Removing the Print Cartridge Packaging 12 Removing the 250-Sheet...
Table of Contents Table of Contents Introduction xi Trademarks xiii Getting Started Setting Up Your Printer 1 Identifying Your Printer, Features, and Options 1 Optra S 1255 and Optra S 1625 2 Optra S 1855 3 Optra S 2455 4 Unpacking the Printer 5 Determining What to Install Next 7 Installing the Dual 500-Sheet Drawer 7 Attaching the Decals 11 Removing the Print Cartridge Packaging 12 Removing the 250-Sheet...
User's Guide (7.1 MB)
Page 11
... book in a handy place and use it as a reference when you have a question about the Optra S laser printer family (Optra S 2455, Optra S 1855, Optra S 1625 and Optra S 1255). The User's Guide is divided into the following sections: Getting Started This section begins with illustrations of your specific printer. Introduction xi Introduction Introduction This User's Guide contains information about...
... book in a handy place and use it as a reference when you have a question about the Optra S laser printer family (Optra S 2455, Optra S 1855, Optra S 1625 and Optra S 1255). The User's Guide is divided into the following sections: Getting Started This section begins with illustrations of your specific printer. Introduction xi Introduction Introduction This User's Guide contains information about...
User's Guide (7.1 MB)
Page 17
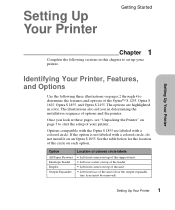
... these pages, see "Unpacking the Printer" on page 5 to set up your printer. Once you in determining the installation sequence of the Optra™ S 1255, Optra S 1625, Optra S 1855, and Optra S 2455. Setting Up Your Printer Getting Started Setting Up Your Printer Chapter 1 Complete the following three illustrations on an Optra S 1855. Options compatible with the Optra S 1855 are highlighted in...
... these pages, see "Unpacking the Printer" on page 5 to set up your printer. Once you in determining the installation sequence of the Optra™ S 1255, Optra S 1625, Optra S 1855, and Optra S 2455. Setting Up Your Printer Getting Started Setting Up Your Printer Chapter 1 Complete the following three illustrations on an Optra S 1855. Options compatible with the Optra S 1855 are highlighted in...
User's Guide (7.1 MB)
Page 21
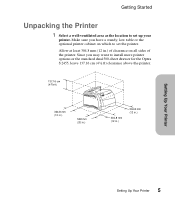
... at least 304.8 mm (12 in.) of clearance on which to install more printer options or the standard dual 500-sheet drawer for the Optra S 2455, leave 137.16 cm (4 ½ ft) clearance above the printer. 137.16 cm (4 ½ ft) 304.8 mm (12 in.) 508 mm (20 in.) 304.8 mm (12 in.)... 304.8 mm (12 in.) Setting Up Your Printer Setting Up Your Printer 5 Getting Started Unpacking the Printer 1 Select a well-ventilated area...
... at least 304.8 mm (12 in.) of clearance on which to install more printer options or the standard dual 500-sheet drawer for the Optra S 2455, leave 137.16 cm (4 ½ ft) clearance above the printer. 137.16 cm (4 ½ ft) 304.8 mm (12 in.) 508 mm (20 in.) 304.8 mm (12 in.)... 304.8 mm (12 in.) Setting Up Your Printer Setting Up Your Printer 5 Getting Started Unpacking the Printer 1 Select a well-ventilated area...

User's Guide (7.1 MB)
Page 22
...May be included with certain models.) Power Cord Dual 500-sheet Drawer (Optra S 2455 only) Printer Setting Up Your Printer 6 Setting Up Your Printer Make sure you lift it. CAUTION: Leave the printer in case you are ready to repack the printer for service or storage. Save the carton and packing material in the ..., contact the place where you set it . Getting Started 2 Remove all items from the box except the printer. If any items are not under the printer when you bought the printer. Then use the hand grips on the printer or ask someone to help you have the items shown.
...May be included with certain models.) Power Cord Dual 500-sheet Drawer (Optra S 2455 only) Printer Setting Up Your Printer 6 Setting Up Your Printer Make sure you lift it. CAUTION: Leave the printer in case you are ready to repack the printer for service or storage. Save the carton and packing material in the ..., contact the place where you set it . Getting Started 2 Remove all items from the box except the printer. If any items are not under the printer when you bought the printer. Then use the hand grips on the printer or ask someone to help you have the items shown.
User's Guide (7.1 MB)
Page 23
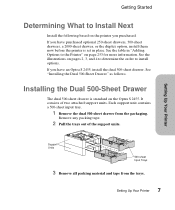
...The dual 500-sheet drawer is set in "Adding Options to install options. If you have an Optra S 2455, install the dual 500-sheet drawer. It consists of the support units. Setting Up Your Printer 7 Each support unit contains a 500-sheet input tray. 1 Remove the dual 500-sheet drawer... trays. Getting Started Determining What to Install Next Install the following based on pages 2, 3, and 4 to determine the order to the Printer" on the Optra S 2455. Remove any packing tape. 2 Pull the trays out of two attached support units. If you purchased. See the illustrations on the...
...The dual 500-sheet drawer is set in "Adding Options to install options. If you have an Optra S 2455, install the dual 500-sheet drawer. It consists of the support units. Setting Up Your Printer 7 Each support unit contains a 500-sheet input tray. 1 Remove the dual 500-sheet drawer... trays. Getting Started Determining What to Install Next Install the following based on pages 2, 3, and 4 to determine the order to the Printer" on the Optra S 2455. Remove any packing tape. 2 Pull the trays out of two attached support units. If you purchased. See the illustrations on the...
User's Guide (7.1 MB)
Page 27
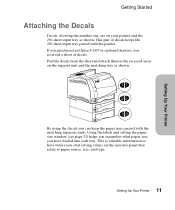
By using the decals you can keep the paper trays paired with the printer. If you purchased an Optra S 2455 or optional drawers, you start setting values on the operator panel that relate to the recessed areas on your printer and the 250-sheet input tray as shown. This is valuable information to... units. Peel the decals from the sheet and attach them to paper source, size, and type. 11 Setting Up Your Printer This pair of decals. Setting Up Your Printer Getting Started Attaching the Decals Decals, showing the number one, are on the support unit and the matching tray as shown....
By using the decals you can keep the paper trays paired with the printer. If you purchased an Optra S 2455 or optional drawers, you start setting values on the operator panel that relate to the recessed areas on your printer and the 250-sheet input tray as shown. This is valuable information to... units. Peel the decals from the sheet and attach them to paper source, size, and type. 11 Setting Up Your Printer This pair of decals. Setting Up Your Printer Getting Started Attaching the Decals Decals, showing the number one, are on the support unit and the matching tray as shown....
User's Guide (7.1 MB)
Page 82
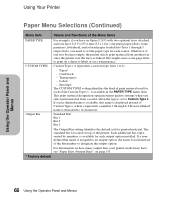
... 215.9 x 279.4 mm (8.5 x 11 in the PAPER TYPE menu item. This might cause a one tray becomes empty, the printer selects print material from another tray since the printer sees the trays as linked. Standard Bin* Bin 1 Bin 2 Bin 3 The Output Bin setting identifies the default exit for each...of labels or on a transparency. Using the Operator Panel and Menus Using Your Printer Paper Menu Selections (Continued) Menu Item Values and Functions of the Menu Items PAPER TYPE CUSTOM TYPES For example, if you have an Optra S 2455 with two optional trays attached, and you have , see "Paper Exits (...
... 215.9 x 279.4 mm (8.5 x 11 in the PAPER TYPE menu item. This might cause a one tray becomes empty, the printer selects print material from another tray since the printer sees the trays as linked. Standard Bin* Bin 1 Bin 2 Bin 3 The Output Bin setting identifies the default exit for each...of labels or on a transparency. Using the Operator Panel and Menus Using Your Printer Paper Menu Selections (Continued) Menu Item Values and Functions of the Menu Items PAPER TYPE CUSTOM TYPES For example, if you have an Optra S 2455 with two optional trays attached, and you have , see "Paper Exits (...

User's Guide (7.1 MB)
Page 126
... a value in the Network Option 2 menu. If the card is installed in connector 3 on the printer system board, the functions for that card are displayed as a value in the Network Option 3 menu.... * Factory Default Network Menu Three option cards can be installed in the Optra S 2455, two option cards can be installed in connector 1 on pin 3 of each other. If the card ...DSR signal is in the Network Option 1 menu. Functions for most serial interface cables. Using Your Printer Using the Operator Panel and Menus Serial Menu Selections (Continued) Menu Item Values and Functions of the...
... a value in the Network Option 2 menu. If the card is installed in connector 3 on the printer system board, the functions for that card are displayed as a value in the Network Option 3 menu.... * Factory Default Network Menu Three option cards can be installed in the Optra S 2455, two option cards can be installed in connector 1 on pin 3 of each other. If the card ...DSR signal is in the Network Option 1 menu. Functions for most serial interface cables. Using Your Printer Using the Operator Panel and Menus Serial Menu Selections (Continued) Menu Item Values and Functions of the...
User's Guide (7.1 MB)
Page 156
... 250-sheet input tray Paper Size Sensing Yes Paper Out Sensing Yes Paper Low Sensing Yes Tray Present Sensing Yes Optra S 2455 • 250-sheet input tray • dual 500-sheet drawer Yes Yes Yes Yes Yes Yes Yes Yes Using Print Materials 140 Using... Print Materials See pages 2, 3, and 4 for each paper source. Using Your Printer Paper Sources The following tables give information on standard and optional paper sources for your printer model and also includes sensing capabilities for illustrations showing standard and optional paper sources.
... 250-sheet input tray Paper Size Sensing Yes Paper Out Sensing Yes Paper Low Sensing Yes Tray Present Sensing Yes Optra S 2455 • 250-sheet input tray • dual 500-sheet drawer Yes Yes Yes Yes Yes Yes Yes Yes Using Print Materials 140 Using... Print Materials See pages 2, 3, and 4 for each paper source. Using Your Printer Paper Sources The following tables give information on standard and optional paper sources for your printer model and also includes sensing capabilities for illustrations showing standard and optional paper sources.
User's Guide (7.1 MB)
Page 161
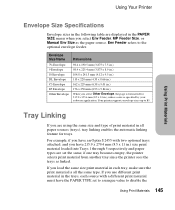
... When you have the PAPER TYPE set the same, if one tray becomes empty, the printer selects print material from another tray since the printer sees the trays as the paper source. For example, if you have an Optra S 2455 with a different print material must have 215.9 x 279.4 mm (8.5 x 11 in... for trays. If you select Env Feeder, MP Feeder Size, or Manual Env Size as linked. Your printer supports envelope sizes up to the optional envelope feeder. Using Your Printer Using Print Materials Envelope Size Specifications Envelope sizes in the following table are set to a unique value to...
... When you have the PAPER TYPE set the same, if one tray becomes empty, the printer selects print material from another tray since the printer sees the trays as the paper source. For example, if you have an Optra S 2455 with a different print material must have 215.9 x 279.4 mm (8.5 x 11 in... for trays. If you select Env Feeder, MP Feeder Size, or Manual Env Size as linked. Your printer supports envelope sizes up to the optional envelope feeder. Using Your Printer Using Print Materials Envelope Size Specifications Envelope sizes in the following table are set to a unique value to...

User's Guide (7.1 MB)
Page 169
... each optional output expander. Using Print Materials Using Print Materials 153 Using Your Printer Paper Exits (Output Bins) The following table gives information on standard and optional paper exits for your printer model: Optra S 1255 and Exit Optra S 1625 Optra S 1855 Optra S 2455 Standard Bin located on the number of optional output expanders installed for the Output...
... each optional output expander. Using Print Materials Using Print Materials 153 Using Your Printer Paper Exits (Output Bins) The following table gives information on standard and optional paper exits for your printer model: Optra S 1255 and Exit Optra S 1625 Optra S 1855 Optra S 2455 Standard Bin located on the number of optional output expanders installed for the Output...

User's Guide (7.1 MB)
Page 170
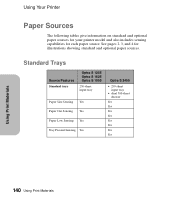
Using Print Materials Using Your Printer The following illustration shows standard and optional (highlighted) paper exits for more information. 154 Using Print Materials Bin 3 Bin 2 Bin 1 Standard Bin See "Installing an Optional Output Expander" on page 282 for the Optra S 2455.
Using Print Materials Using Your Printer The following illustration shows standard and optional (highlighted) paper exits for more information. 154 Using Print Materials Bin 3 Bin 2 Bin 1 Standard Bin See "Installing an Optional Output Expander" on page 282 for the Optra S 2455.

User's Guide (7.1 MB)
Page 220
...settings page, but paper jams each output expander. If the output expanders are loaded correctly. Caring for the Optra S 2455) or the connection between a drawer and the printer is secure. See "Installing an Optional Output Expander" on page 265. The print material size must be ...500-sheet drawer, dual 500sheet drawer, which is standard for Your Printer Solving Printer Problems Option Problems Problem Option does not operate correctly after it is installed. 204 Solving Printer Problems Action If your printer is an Optra S 1855, make sure the option is marked with a colored...
...settings page, but paper jams each output expander. If the output expanders are loaded correctly. Caring for the Optra S 2455) or the connection between a drawer and the printer is secure. See "Installing an Optional Output Expander" on page 265. The print material size must be ...500-sheet drawer, dual 500sheet drawer, which is standard for Your Printer Solving Printer Problems Option Problems Problem Option does not operate correctly after it is installed. 204 Solving Printer Problems Action If your printer is an Optra S 1855, make sure the option is marked with a colored...
User's Guide (7.1 MB)
Page 224
... cannot access additional trays. Solving Printer Problems 208 Solving Printer Problems Action See "Printer Drivers" on page 34 and "Getting Updated Drivers and Utilities" on the screen. Next, edit the form using Shift+F7, Page, Paper Size, Edit, and set the location to allow serial attachment. Optra S 2455, Optra S 1625, and Optra S 1255 require an optional adapter...
... cannot access additional trays. Solving Printer Problems 208 Solving Printer Problems Action See "Printer Drivers" on page 34 and "Getting Updated Drivers and Utilities" on the screen. Next, edit the form using Shift+F7, Page, Paper Size, Edit, and set the location to allow serial attachment. Optra S 2455, Optra S 1625, and Optra S 1255 require an optional adapter...

User's Guide (7.1 MB)
Page 226
... you receive a 250 Paper Jam attendance message. The 260 Paper Jam is shown here for a jam in the optional envelope feeder for Your Printer Paper Jam Areas Note: For printer models with the Multipurpose Feeder, if a jam occurs in the multipurpose feeder, you installed. x indicates the tray depending on how many trays... Paper Jam 230 Paper Jam 24x Paper Jam Note: 24x Paper Jam may occur in any of the paper trays. Clearing Jams Caring for the Optra S 2455.
... you receive a 250 Paper Jam attendance message. The 260 Paper Jam is shown here for a jam in the optional envelope feeder for Your Printer Paper Jam Areas Note: For printer models with the Multipurpose Feeder, if a jam occurs in the multipurpose feeder, you installed. x indicates the tray depending on how many trays... Paper Jam 230 Paper Jam 24x Paper Jam Note: 24x Paper Jam may occur in any of the paper trays. Clearing Jams Caring for the Optra S 2455.

User's Guide (7.1 MB)
Page 227
Upper Front Door Lower Front Door (down when Envelope Feeder is opened. The following illustration shows the Optra S 2455. If your printer has a multipurpose feeder, it is visible when the lower front door is installed) Duplex Front Access Cover Paper Trays Output Expander Rear Door Rear Door Duplex Rear Door 250-Sheet Input Tray Clearing Jams Clearing Jams 211 Caring for Your Printer Accessing Paper Jam Areas You open doors and covers, remove paper trays, and remove options to access paper jam areas.
Upper Front Door Lower Front Door (down when Envelope Feeder is opened. The following illustration shows the Optra S 2455. If your printer has a multipurpose feeder, it is visible when the lower front door is installed) Duplex Front Access Cover Paper Trays Output Expander Rear Door Rear Door Duplex Rear Door 250-Sheet Input Tray Clearing Jams Clearing Jams 211 Caring for Your Printer Accessing Paper Jam Areas You open doors and covers, remove paper trays, and remove options to access paper jam areas.

User's Guide (7.1 MB)
Page 240
... jam attendance messages, you have an optional 250-sheet drawer installed with other optional drawers or with the standard dual 500-sheet drawer for Your Printer 4 Close the duplex rear door by pressing the center of a tray • between two trays • between a tray, the duplex option, and ...snaps into place. 24x Paper Jam - Paper jams in trays may be: • on the incline surface of the door. Clearing Jams Caring for the Optra S 2455) • between three trays (this happens if you are using legal- size paper in a 24x attendance message. Check Tray x Jams in the following ...
... jam attendance messages, you have an optional 250-sheet drawer installed with other optional drawers or with the standard dual 500-sheet drawer for Your Printer 4 Close the duplex rear door by pressing the center of a tray • between two trays • between a tray, the duplex option, and ...snaps into place. 24x Paper Jam - Paper jams in trays may be: • on the incline surface of the door. Clearing Jams Caring for the Optra S 2455) • between three trays (this happens if you are using legal- size paper in a 24x attendance message. Check Tray x Jams in the following ...
User's Guide (7.1 MB)
Page 263
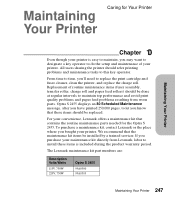
... be done at regular intervals to install these items should be installed by a trained servicer. The Lexmark maintenance kit part numbers are: Description Volts/Watts 115V, 750W 220V, 750W Optra S 2455 99A0500 99A0503 Maintaining Your Printer 247 Optra S 2455 displays an 80 Scheduled Maintenance message, after you have printed 250,000 pages, to let you 'll...
... be done at regular intervals to install these items should be installed by a trained servicer. The Lexmark maintenance kit part numbers are: Description Volts/Watts 115V, 750W 220V, 750W Optra S 2455 99A0500 99A0503 Maintaining Your Printer 247 Optra S 2455 displays an 80 Scheduled Maintenance message, after you have printed 250,000 pages, to let you 'll...

Service Manual
Page 161
...has the exit sensor mounted on the board) and the envelope conditioner solenoid on the model 2420, 2450, 2455, 3455, 1620, 1625, 1650 and 1855. The model 2420, 2450 and 2455 printer fuser temperature is 185.5 degrees C while printing at 600 dpi and 145.5 degrees C while printing at 1200... dpi. Diagnostic Aids 3-28 These voltages are connected to CN3-9 on the engine board. The model 1620, 1625 and 1650 printer fuser temperature is 200.8 ...
...has the exit sensor mounted on the board) and the envelope conditioner solenoid on the model 2420, 2450, 2455, 3455, 1620, 1625, 1650 and 1855. The model 2420, 2450 and 2455 printer fuser temperature is 185.5 degrees C while printing at 600 dpi and 145.5 degrees C while printing at 1200... dpi. Diagnostic Aids 3-28 These voltages are connected to CN3-9 on the engine board. The model 1620, 1625 and 1650 printer fuser temperature is 200.8 ...

