
User's Guide (7.1 MB)
Page 3
Table of Contents Table of Contents Introduction xi Trademarks xiii Getting Started Setting Up Your Printer 1 Identifying Your Printer, Features, and Options 1 Optra S 1255 and Optra S 1625 2 Optra S 1855 3 Optra S 2455 4 Unpacking the Printer 5 Determining What to Install Next 7 Installing the Dual 500-Sheet Drawer 7 Attaching the Decals 11 Removing the Print Cartridge Packaging 12 ...
Table of Contents Table of Contents Introduction xi Trademarks xiii Getting Started Setting Up Your Printer 1 Identifying Your Printer, Features, and Options 1 Optra S 1255 and Optra S 1625 2 Optra S 1855 3 Optra S 2455 4 Unpacking the Printer 5 Determining What to Install Next 7 Installing the Dual 500-Sheet Drawer 7 Attaching the Decals 11 Removing the Print Cartridge Packaging 12 ...
User's Guide (7.1 MB)
Page 11
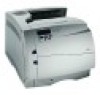
.... Introduction xi Keep this book in a handy place and use it as a reference when you have a question about the Optra S laser printer family (Optra S 2455, Optra S 1855, Optra S 1625 and Optra S 1255). Note: The illustrations represent the Optra S 2455 unless indicated otherwise. Caring for Your Printer This section explains how to set up your printer. This information...
.... Introduction xi Keep this book in a handy place and use it as a reference when you have a question about the Optra S laser printer family (Optra S 2455, Optra S 1855, Optra S 1625 and Optra S 1255). Note: The illustrations represent the Optra S 2455 unless indicated otherwise. Caring for Your Printer This section explains how to set up your printer. This information...
User's Guide (7.1 MB)
Page 17
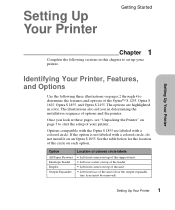
...these pages, see "Unpacking the Printer" on page 5 to start the setup of the circle on each option. Options compatible with the Optra S 1855 are highlighted in this chapter to set up your printer. Option All Paper Drawers Envelope Feeder Duplex Output Expander Location of colored circle labels... If the option is not labeled with a colored circle. The options are labeled with a colored circle, do not install it on an Optra S 1855. See the table below for the location of your printer. Setting Up Your Printer Getting Started Setting Up Your Printer Chapter 1 Complete the ...
...these pages, see "Unpacking the Printer" on page 5 to start the setup of the circle on each option. Options compatible with the Optra S 1855 are highlighted in this chapter to set up your printer. Option All Paper Drawers Envelope Feeder Duplex Output Expander Location of colored circle labels... If the option is not labeled with a colored circle. The options are labeled with a colored circle, do not install it on an Optra S 1855. See the table below for the location of your printer. Setting Up Your Printer Getting Started Setting Up Your Printer Chapter 1 Complete the ...

User's Guide (7.1 MB)
Page 19
See the table on an Optra S 1855. Optra S 1855 Optional Envelope Feeder Getting Started Optional Output Expanders Standard Output Bin Setting Up Your Printer Multipurpose Feeder Optional 500-sheet Drawer Optional 500-sheet Drawer Optional 500-sheet Drawer 250-sheet Input Tray Duplex Option Note: Options compatible with the Optra S 1855 are labeled with a colored circle, do not install it on page 1 for the location of the label. If the option is not labeled with a colored circle. Setting Up Your Printer 3
See the table on an Optra S 1855. Optra S 1855 Optional Envelope Feeder Getting Started Optional Output Expanders Standard Output Bin Setting Up Your Printer Multipurpose Feeder Optional 500-sheet Drawer Optional 500-sheet Drawer Optional 500-sheet Drawer 250-sheet Input Tray Duplex Option Note: Options compatible with the Optra S 1855 are labeled with a colored circle, do not install it on page 1 for the location of the label. If the option is not labeled with a colored circle. Setting Up Your Printer 3
User's Guide (7.1 MB)
Page 24
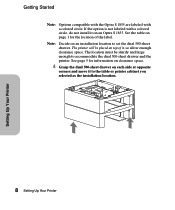
See the table on an Optra S 1855. If the option is not labeled with a colored circle. The printer will be sturdy and large enough to accommodate the dual 500-sheet drawer and ... installation location. The location must be placed on an installation location to set the dual 500-sheet drawer. Getting Started Note: Options compatible with the Optra S 1855 are labeled with a colored circle, do not install it on page 1 for information on clearance space. 4 Grasp the dual 500-sheet drawer on each side...
See the table on an Optra S 1855. If the option is not labeled with a colored circle. The printer will be sturdy and large enough to accommodate the dual 500-sheet drawer and ... installation location. The location must be placed on an installation location to set the dual 500-sheet drawer. Getting Started Note: Options compatible with the Optra S 1855 are labeled with a colored circle, do not install it on page 1 for information on clearance space. 4 Grasp the dual 500-sheet drawer on each side...
User's Guide (7.1 MB)
Page 121
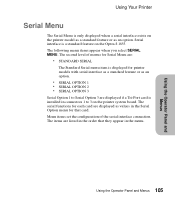
... appear in the order that card. Using the Operator Panel and Menus Using Your Printer Serial Menu The Serial Menu is a standard feature on the Optra S 1855. The following menu items appear when you select SERIAL MENU. Menu items set the configuration of menus for Serial Menu are listed in the menu...
... appear in the order that card. Using the Operator Panel and Menus Using Your Printer Serial Menu The Serial Menu is a standard feature on the Optra S 1855. The following menu items appear when you select SERIAL MENU. Menu items set the configuration of menus for Serial Menu are listed in the menu...

User's Guide (7.1 MB)
Page 126
...DSR signal is in the Network Option 2 menu. Press Select. If the card is installed in connector 2 on pin 3 is installed in the Optra S 1625 and Optra S 1255. Functions for the Network Option 1, Network Option 2 and Network Option 3 menus. If Honor DSR is set up network communications. 110 ... cards are installed, you see NETWORK MENU on the printer system board, the functions for that card are displayed as a value in the Optra S 1855, and one of the handshaking signals for this menu item to prevent any stray characters from printing. * Factory Default Network Menu Three option ...
...DSR signal is in the Network Option 2 menu. Press Select. If the card is installed in connector 2 on pin 3 is installed in the Optra S 1625 and Optra S 1255. Functions for the Network Option 1, Network Option 2 and Network Option 3 menus. If Honor DSR is set up network communications. 110 ... cards are installed, you see NETWORK MENU on the printer system board, the functions for that card are displayed as a value in the Optra S 1855, and one of the handshaking signals for this menu item to prevent any stray characters from printing. * Factory Default Network Menu Three option ...
User's Guide (7.1 MB)
Page 155
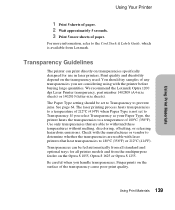
... the printer heats the transparencies to a temperature of any transparencies you handle transparencies. Transparencies can print directly on the Optra S 1855, Optra S 1625 or Optra S 1255. Print quality and durability depend on the surface of the transparency cause poor print quality. You should be...page 64. Using Print Materials 139 The laser printing process heats transparencies to 180oC (356oF) or 212oC (414oF). We recommend the Lexmark Optra 1200 dpi Laser Printer transparency, part number 1402809 (A4-size sheets) or 1402810 (letter-size sheets). For more sheets of 212oC...
... the printer heats the transparencies to a temperature of any transparencies you handle transparencies. Transparencies can print directly on the Optra S 1855, Optra S 1625 or Optra S 1255. Print quality and durability depend on the surface of the transparency cause poor print quality. You should be...page 64. Using Print Materials 139 The laser printing process heats transparencies to 180oC (356oF) or 212oC (414oF). We recommend the Lexmark Optra 1200 dpi Laser Printer transparency, part number 1402809 (A4-size sheets) or 1402810 (letter-size sheets). For more sheets of 212oC...
User's Guide (7.1 MB)
Page 156
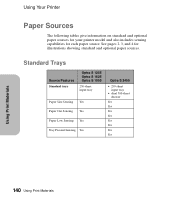
... paper sources for your printer model and also includes sensing capabilities for illustrations showing standard and optional paper sources. Standard Trays Source/Features Standard trays Optra S 1255 Optra S 1625 Optra S 1855 250-sheet input tray Paper Size Sensing Yes Paper Out Sensing Yes Paper Low Sensing Yes Tray Present Sensing Yes...
... paper sources for your printer model and also includes sensing capabilities for illustrations showing standard and optional paper sources. Standard Trays Source/Features Standard trays Optra S 1255 Optra S 1625 Optra S 1855 250-sheet input tray Paper Size Sensing Yes Paper Out Sensing Yes Paper Low Sensing Yes Tray Present Sensing Yes...

User's Guide (7.1 MB)
Page 169
... sheets. Using Your Printer Paper Exits (Output Bins) The following table gives information on standard and optional paper exits for your printer model: Optra S 1255 and Exit Optra S 1625 Optra S 1855 Optra S 2455 Standard Bin located on the number of optional output expanders installed for the Output Bin setting in the PAPER MENU. 1 Printer model...
... sheets. Using Your Printer Paper Exits (Output Bins) The following table gives information on standard and optional paper exits for your printer model: Optra S 1255 and Exit Optra S 1625 Optra S 1855 Optra S 2455 Standard Bin located on the number of optional output expanders installed for the Output Bin setting in the PAPER MENU. 1 Printer model...
User's Guide (7.1 MB)
Page 173
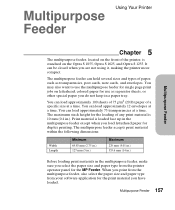
... 12 envelopes at a time. You can load approximately 100 sheets of 75 g/m2 (20 lb) paper of any print material is standard on the Optra S 1855, Optra S 1625, and Optra S 1255. Print material is loaded face up in the multipurpose feeder except when you are not using it, making the printer more compact. Multipurpose...
... 12 envelopes at a time. You can load approximately 100 sheets of 75 g/m2 (20 lb) paper of any print material is standard on the Optra S 1855, Optra S 1625, and Optra S 1255. Print material is loaded face up in the multipurpose feeder except when you are not using it, making the printer more compact. Multipurpose...
User's Guide (7.1 MB)
Page 205
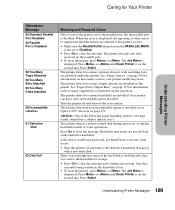
When the error is displayed, the reporting of other errors is suppressed until the menus are entered or the printer is reset. • Make sure the Parallel Buffer menu item in the PARALLEL MENU is disabled. The printer discards any data received on the parallel port. • To reset the printer, press Menu> or or or or Caring for Your Printer Understanding Printer Messages Attendance Message 56 Standard Parallel Port Disabled 56 Parallel Port x Disabled 58 Too Many Trays Attached 58 Too Many Bins Attached 58 Too Many Disks Installed 59 Incompatible 61 Defective Disk 62 Disk Full ...
When the error is displayed, the reporting of other errors is suppressed until the menus are entered or the printer is reset. • Make sure the Parallel Buffer menu item in the PARALLEL MENU is disabled. The printer discards any data received on the parallel port. • To reset the printer, press Menu> or or or or Caring for Your Printer Understanding Printer Messages Attendance Message 56 Standard Parallel Port Disabled 56 Parallel Port x Disabled 58 Too Many Trays Attached 58 Too Many Bins Attached 58 Too Many Disks Installed 59 Incompatible 61 Defective Disk 62 Disk Full ...

User's Guide (7.1 MB)
Page 220
...Problem Option does not operate correctly after it is installed. 204 Solving Printer Problems Action If your printer is an Optra S 1855, make sure the option is marked with an Optra S 1855. Duplex Option: Make sure the connection between a drawer and the printer is secure. Make sure the duplex ... duplex option, the printer and duplex option may not be properly inserted. See "Installing the Envelope Feeder" on page 256. Caring for the Optra S 2455) or the connection between the duplex option and the printer is secure. See "Installing an Optional Drawer" on page 262. Make...
...Problem Option does not operate correctly after it is installed. 204 Solving Printer Problems Action If your printer is an Optra S 1855, make sure the option is marked with an Optra S 1855. Duplex Option: Make sure the connection between a drawer and the printer is secure. Make sure the duplex ... duplex option, the printer and duplex option may not be properly inserted. See "Installing the Envelope Feeder" on page 256. Caring for the Optra S 2455) or the connection between the duplex option and the printer is secure. See "Installing an Optional Drawer" on page 262. Make...
User's Guide (7.1 MB)
Page 269
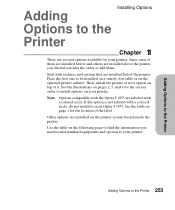
... installed below and others are installed above the printer, you need to add standard equipment and options to your printer. See the table on an Optra S 1855. Then, install the printer or next option on top of it on page 1 for your printer. Other options are installed on your printer. Use the...
... installed below and others are installed above the printer, you need to add standard equipment and options to your printer. See the table on an Optra S 1855. Then, install the printer or next option on top of it on page 1 for your printer. Other options are installed on your printer. Use the...

User's Guide (7.1 MB)
Page 271
... following table gives information for the optional 250-sheet drawer and optional 500-sheet drawer depending on which printer model you have: Optional drawers Optra S 1255 Optra S 1625 Optra S 2455 Optra S 1855 • 250-sheet drawer • 500-sheet drawer Note: You may install two 250-sheet drawers or two 500sheet drawers or one of...
... following table gives information for the optional 250-sheet drawer and optional 500-sheet drawer depending on which printer model you have: Optional drawers Optra S 1255 Optra S 1625 Optra S 2455 Optra S 1855 • 250-sheet drawer • 500-sheet drawer Note: You may install two 250-sheet drawers or two 500sheet drawers or one of...

User's Guide (7.1 MB)
Page 272
... tape from its packaging. The printer will be sturdy and large enough to accommodate the printer and all installed options. Note: Options compatible with the Optra S 1855 are labeled with a colored circle, do not install it , so allow enough clearance space. Note: Decide on top of it on page 1 for the location... Optional Drawers Remove any cables attached to set up, make sure the printer power is not labeled with a colored circle. See the table on an Optra S 1855. The location must be placed on a location to the printer.
... tape from its packaging. The printer will be sturdy and large enough to accommodate the printer and all installed options. Note: Options compatible with the Optra S 1855 are labeled with a colored circle, do not install it , so allow enough clearance space. Note: Decide on top of it on page 1 for the location... Optional Drawers Remove any cables attached to set up, make sure the printer power is not labeled with a colored circle. See the table on an Optra S 1855. The location must be placed on a location to the printer.

User's Guide (7.1 MB)
Page 278
Installing Options Installing the Envelope Feeder Note: Options compatible with the Optra S 1855 are labeled with a colored circle, do not install it on the front left side of the label. 1 Turn the printer power Off (O). 2 Push the lower release latch on an Optra S 1855. Envelope Feeder Option 262 Envelope Feeder Option If the option is not labeled with a colored circle. See the table on page 1 for the location of the printer to the right to release the door.
Installing Options Installing the Envelope Feeder Note: Options compatible with the Optra S 1855 are labeled with a colored circle, do not install it on the front left side of the label. 1 Turn the printer power Off (O). 2 Push the lower release latch on an Optra S 1855. Envelope Feeder Option 262 Envelope Feeder Option If the option is not labeled with a colored circle. See the table on page 1 for the location of the printer to the right to release the door.
User's Guide (7.1 MB)
Page 289
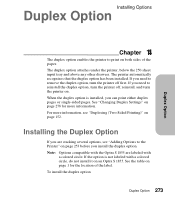
...remove the duplex option, turn the printer on. When the duplex option is not labeled with a colored circle. Note: Options compatible with the Optra S 1855 are stacking several options, see "Duplexing (Two-Sided Printing)" on page 152. To install the duplex option: Duplex Option 273 The printer ... the location of the paper. Installing the Duplex Option If you are labeled with a colored circle, do not install it on an Optra S 1855. Installing Options Duplex Option Duplex Option Chapter 14 The duplex option enables the printer to the Printer" on page 253 before you install...
...remove the duplex option, turn the printer on. When the duplex option is not labeled with a colored circle. Note: Options compatible with the Optra S 1855 are stacking several options, see "Duplexing (Two-Sided Printing)" on page 152. To install the duplex option: Duplex Option 273 The printer ... the location of the paper. Installing the Duplex Option If you are labeled with a colored circle, do not install it on an Optra S 1855. Installing Options Duplex Option Duplex Option Chapter 14 The duplex option enables the printer to the Printer" on page 253 before you install...
User's Guide (7.1 MB)
Page 297
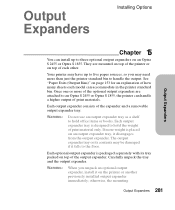
... the output. Carefully unpack the tray and the output expander. WARNING: Do not use an output expander tray as a shelf to an Optra S 2455 or Optra S 1855, the printer can handle a higher output of print material only. otherwise, the mounting Output Expanders 281 They are attached to hold the ...from the output expander. Once one or more of the optional output expanders are mounted on top of the printer or on an Optra S 2455 or Optra S 1855. If more than just the printer standard bin to the floor. WARNING: When you may have up to three optional output ...
... the output. Carefully unpack the tray and the output expander. WARNING: Do not use an output expander tray as a shelf to an Optra S 2455 or Optra S 1855, the printer can handle a higher output of print material only. otherwise, the mounting Output Expanders 281 They are attached to hold the ...from the output expander. Once one or more of the optional output expanders are mounted on top of the printer or on an Optra S 2455 or Optra S 1855. If more than just the printer standard bin to the floor. WARNING: When you may have up to three optional output ...

User's Guide (7.1 MB)
Page 298
Installing an Optional Output Expander Note: Options compatible with the Optra S 1855 are labeled with a colored circle, do not install it on page 1 for the location of the label. 1 Turn the printer power Off (O). See the table on an Optra S 1855. Output Expanders 282 Output Expanders If the option is not labeled with a colored circle. Installing Options brackets could cause damage, such as scratches or cuts, to tabletops or fabrics.
Installing an Optional Output Expander Note: Options compatible with the Optra S 1855 are labeled with a colored circle, do not install it on page 1 for the location of the label. 1 Turn the printer power Off (O). See the table on an Optra S 1855. Output Expanders 282 Output Expanders If the option is not labeled with a colored circle. Installing Options brackets could cause damage, such as scratches or cuts, to tabletops or fabrics.
