Service Manual
Page 4
... Output Bin Sensor Test 3-16 Output Bin X Sensor Test 3-16 Base Sensor Test 3-17 Print Registration 3-18 Printer Setup 3-19 Setting the Page Count 3-19 Viewing the Permanent Page Count 3-19 Maintenance Page Count (2420/2450/2455/3455) . . . . . 3-20 Setting Configuration ID 3-20 Restore EP Factory Defaults 3-21 iv 4059 Service Manual...
... Output Bin Sensor Test 3-16 Output Bin X Sensor Test 3-16 Base Sensor Test 3-17 Print Registration 3-18 Printer Setup 3-19 Setting the Page Count 3-19 Viewing the Permanent Page Count 3-19 Maintenance Page Count (2420/2450/2455/3455) . . . . . 3-20 Setting Configuration ID 3-20 Restore EP Factory Defaults 3-21 iv 4059 Service Manual...

Service Manual
Page 47
... Go to maintain the print quality and reliability of the messages in the engine flash code module has failed a CRC check. If any of the printer. This error displays when toner low occurs and the toner low alarm is necessary to replace the fuser assembly, transfer roller, compensator pick-rolls and... 2 is discarded and must be programmed in the table are available as a maintenance kit. It is activated. For more information, go to "Scheduled Maintenance (2420/2450/2455/ 3455)" on page 6-2.
... Go to maintain the print quality and reliability of the messages in the engine flash code module has failed a CRC check. If any of the printer. This error displays when toner low occurs and the toner low alarm is necessary to replace the fuser assembly, transfer roller, compensator pick-rolls and... 2 is discarded and must be programmed in the table are available as a maintenance kit. It is activated. For more information, go to "Scheduled Maintenance (2420/2450/2455/ 3455)" on page 6-2.

Service Manual
Page 51
... starts blinking. 12. "Performing Self Test" appears on . The output expander option exit rollers turn . 11. "Busy" appears on . 2. Models 2420, 2450 2455 and 3455 only - Diagnostic Information 2-24 The LED comes on the display. 6. Diamonds scroll across the display, then clear. 4. The main fan turns ...on . 9. 4059-XXX Power-On Self Test (POST) When you turn the printer On, it performs a Power-On Self Test. The operator panel displays one and a half row of the base printer by observing the following: 1. The 2000 sheet high capacity option elevator tray moves to ...
... starts blinking. 12. "Performing Self Test" appears on . The output expander option exit rollers turn . 11. "Busy" appears on . 2. Models 2420, 2450 2455 and 3455 only - Diagnostic Information 2-24 The LED comes on the display. 6. Diamonds scroll across the display, then clear. 4. The main fan turns ...on . 9. 4059-XXX Power-On Self Test (POST) When you turn the printer On, it performs a Power-On Self Test. The operator panel displays one and a half row of the base printer by observing the following: 1. The 2000 sheet high capacity option elevator tray moves to ...

Service Manual
Page 52
...Service Check" on page 2-86. Go to the "Fuser Envelope Conditioner Solenoid Service Check" on page 2-35. Dead Machine Operator Panel - Printer does not emit 5 beeps. Go to the "Duplex Option Service Check" on page 2-51. Go to operate. Paper jams at exit... Assembly - Blank page Print quality - 4059-XXX Symptom Tables Symptom Table - Base Printer Symptom Auxiliary Fan (2420/2450/2455/ 3455) fails to "Print Quality - One or more buttons do not work. Printer sounds 5 beeps. Operator Panel - No Duplex Option installed. Black page Print quality ...
...Service Check" on page 2-86. Go to the "Fuser Envelope Conditioner Solenoid Service Check" on page 2-35. Dead Machine Operator Panel - Printer does not emit 5 beeps. Go to the "Duplex Option Service Check" on page 2-51. Go to operate. Paper jams at exit... Assembly - Blank page Print quality - 4059-XXX Symptom Tables Symptom Table - Base Printer Symptom Auxiliary Fan (2420/2450/2455/ 3455) fails to "Print Quality - One or more buttons do not work. Printer sounds 5 beeps. Operator Panel - No Duplex Option installed. Black page Print quality ...

Service Manual
Page 74
...make sure the auxiliary fan cable is running, the voltage measures approximately +24 V dc. Fan does not run or is in models 2420, 2450, 2455 and 3455. If correct, replace the fan assembly. 4059-XXX Fan Service Check Auxiliary Fan Service Check The auxiliary fan is noisy. If... incorrect, replace the engine board. When the printer is seated on connector J7 on the engine board and at J7-1 measures approximately +12 V dc. Check to Engine Board Cable Action Manually ...
...make sure the auxiliary fan cable is running, the voltage measures approximately +24 V dc. Fan does not run or is in models 2420, 2450, 2455 and 3455. If correct, replace the fan assembly. 4059-XXX Fan Service Check Auxiliary Fan Service Check The auxiliary fan is noisy. If... incorrect, replace the engine board. When the printer is seated on connector J7 on the engine board and at J7-1 measures approximately +12 V dc. Check to Engine Board Cable Action Manually ...
Service Manual
Page 78
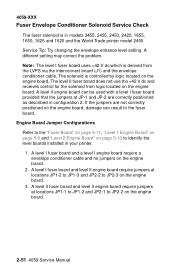
... board require jumpers at locations JP1-1 to JP1-2 and JP2-1 to identify the level boards installed in models 3455, 2455, 2450, 2420, 1855, 1650, 1625 and 1620 and the World Trade printer model 2450. A level I engine board require a envelope conditioner cable and no jumpers on the engine board. A level II fuser board and...
... board require jumpers at locations JP1-1 to JP1-2 and JP2-1 to identify the level boards installed in models 3455, 2455, 2450, 2420, 1855, 1650, 1625 and 1620 and the World Trade printer model 2450. A level I engine board require a envelope conditioner cable and no jumpers on the engine board. A level II fuser board and...

Service Manual
Page 103
This condition causes the printer to fail POST displaying all diamonds, 5 Beeps Action Check to see if the option you have a problem with...Service Check Service Tip: When you are checking is correctly installed not broken or damaged then run the "Flash Test" on a 2450 or 1650 (the 1250 has only one slot), switch the non operating option to one of the test page and check to...not broken or damaged. The voltage measures approximately +5 V dc. If the problem continues, replace the controller board. The printer does not recognize the option being installed if the option is not listed.
This condition causes the printer to fail POST displaying all diamonds, 5 Beeps Action Check to see if the option you have a problem with...Service Check Service Tip: When you are checking is correctly installed not broken or damaged then run the "Flash Test" on a 2450 or 1650 (the 1250 has only one slot), switch the non operating option to one of the test page and check to...not broken or damaged. The voltage measures approximately +5 V dc. If the problem continues, replace the controller board. The printer does not recognize the option being installed if the option is not listed.
Service Manual
Page 104
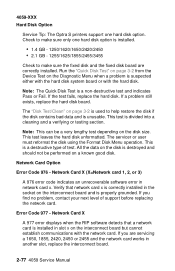
... still exists, replace the hard disk board. Check to make sure the fixed disk and the fixed disk board are servicing a 1650, 1855, 2420, 2450 or 2455 and the network card works in network card x. Note: The Quick Disk Test is properly grounded. If you find no problem, contact your... next level of test. 4059-XXX Hard Disk Option Service Tip: The Optra S printers support one hard disk option is installed. • 1.4 GB - 1250/1620/1650/2420/2450 • 2.1 GB - 1255/1625/1855/2455/3455 Check to make sure only one hard disk option. Run ...
... still exists, replace the hard disk board. Check to make sure the fixed disk and the fixed disk board are servicing a 1650, 1855, 2420, 2450 or 2455 and the network card works in network card x. Note: The Quick Disk Test is properly grounded. If you find no problem, contact your... next level of test. 4059-XXX Hard Disk Option Service Tip: The Optra S printers support one hard disk option is installed. • 1.4 GB - 1250/1620/1650/2420/2450 • 2.1 GB - 1255/1625/1855/2455/3455 Check to make sure only one hard disk option. Run ...
Service Manual
Page 132
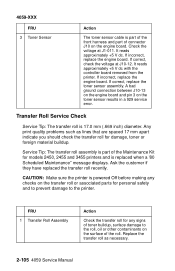
...to the roll, oil or other contaminants on the surface of the roll. It reads approximately +5 V dc with the controller board removed from the printer. Service Tip: The transfer roll assembly is replaced when a '80 Scheduled Maintenance" message displays. Ask the customer if they have replaced the transfer roll... material buildup. Replace the transfer roll as lines that are spaced 17 mm apart indicate you should check the transfer roll for models 2450, 2455 and 3455 printers and is part of connector J10 on the toner sensor results in a 929 service error. It reads approximately +5 V dc.
...to the roll, oil or other contaminants on the surface of the roll. It reads approximately +5 V dc with the controller board removed from the printer. Service Tip: The transfer roll assembly is replaced when a '80 Scheduled Maintenance" message displays. Ask the customer if they have replaced the transfer roll... material buildup. Replace the transfer roll as lines that are spaced 17 mm apart indicate you should check the transfer roll for models 2450, 2455 and 3455 printers and is part of connector J10 on the toner sensor results in a 929 service error. It reads approximately +5 V dc.
Service Manual
Page 153
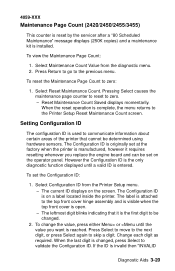
...- Reset Maintenance Count Saved displays momentarily. Select Configuration ID from the diagnostic menu. 2. The Configuration ID is used to the Printer Setup Reset Maintenance Count screen. The label is attached to the top front cover hinge assembly and is visible when the top front ... manufactured, however it is originally set the Configuration ID: 1. The current ID displays on a label located inside the printer. 4059-XXX Maintenance Page Count (2420/2450/2455/3455) This counter is reset by the servicer after a "80 Scheduled Maintenance" message displays (250K copies) and a ...
...- Reset Maintenance Count Saved displays momentarily. Select Configuration ID from the diagnostic menu. 2. The Configuration ID is used to the Printer Setup Reset Maintenance Count screen. The label is attached to the top front cover hinge assembly and is visible when the top front ... manufactured, however it is originally set the Configuration ID: 1. The current ID displays on a label located inside the printer. 4059-XXX Maintenance Page Count (2420/2450/2455/3455) This counter is reset by the servicer after a "80 Scheduled Maintenance" message displays (250K copies) and a ...

Service Manual
Page 161
... printing at 1200 dpi. 4059-XXX the hot roll increases. These voltages are connected to approximately 2.7 V dc during continuous printing. The model 3455 printer fuser temperature is 185.5 degrees C while printing at 600 dpi and 145.5 degrees C while printing at 1200 dpi. The HEATON signal from CN3-9... the hot roll, backup roll, and associated parts as well as the temperature of the fuser hot roll increases. The model 2420, 2450 and 2455 printer fuser temperature is 206.9 degrees C while printing at 600 dpi and 151.5 degrees C while printing at 1200 dpi. The model 1250...
... printing at 1200 dpi. 4059-XXX the hot roll increases. These voltages are connected to approximately 2.7 V dc during continuous printing. The model 3455 printer fuser temperature is 185.5 degrees C while printing at 600 dpi and 145.5 degrees C while printing at 1200 dpi. The HEATON signal from CN3-9... the hot roll, backup roll, and associated parts as well as the temperature of the fuser hot roll increases. The model 2420, 2450 and 2455 printer fuser temperature is 206.9 degrees C while printing at 600 dpi and 151.5 degrees C while printing at 1200 dpi. The model 1250...

Service Manual
Page 166
...in reducing the amount of curl of the media that displays a curl problem. This adjustment does not reduce the printer's overall performance such as they are fed through the printer. The range of the solenoid stator and the solenoid armature. Enter the Diagnostic Mode 2. If GAP=0 displays, ... gap setting by using the Menu < > button to minimum gap. Adjust the fuser solenoid while installed in duplex mode. 4-3 4059 Service Manual Printer Model 2420/2450/2455 1620/1625/1650/1855 3455 Solenoid Air Gap 4.4 mm (.170 inch) 3.9 mm (.153 inch) 4.8 mm (.153 inch) Gap Adjustment ...
...in reducing the amount of curl of the media that displays a curl problem. This adjustment does not reduce the printer's overall performance such as they are fed through the printer. The range of the solenoid stator and the solenoid armature. Enter the Diagnostic Mode 2. If GAP=0 displays, ... gap setting by using the Menu < > button to minimum gap. Adjust the fuser solenoid while installed in duplex mode. 4-3 4059 Service Manual Printer Model 2420/2450/2455 1620/1625/1650/1855 3455 Solenoid Air Gap 4.4 mm (.170 inch) 3.9 mm (.153 inch) 4.8 mm (.153 inch) Gap Adjustment ...

Service Manual
Page 252
..." message. The parts are available as a maintenance kit with the following part numbers: 99A0290 - 100V/750W 2450 99A0500 - 115V/750W 2420/2450/2455 99A0503 - 220V/750W 2420/2450/2455 99A0823 - 115V/750W 3455 99A0824 - 220V/750W 3455 After replacing the kit, the maintenance count must be... 3-20. 6-2 4059 Service Manual 4059-XXX Scheduled Maintenance (2420/2450/2455/3455) The operator panel displays the message "80 Scheduled Maintenance" at this interval to maintain the print quality and reliability of the printer. It is necessary to replace the fuser assembly, transfer roller, compensator...
..." message. The parts are available as a maintenance kit with the following part numbers: 99A0290 - 100V/750W 2450 99A0500 - 115V/750W 2420/2450/2455 99A0503 - 220V/750W 2420/2450/2455 99A0823 - 115V/750W 3455 99A0824 - 220V/750W 3455 After replacing the kit, the maintenance count must be... 3-20. 6-2 4059 Service Manual 4059-XXX Scheduled Maintenance (2420/2450/2455/3455) The operator panel displays the message "80 Scheduled Maintenance" at this interval to maintain the print quality and reliability of the printer. It is necessary to replace the fuser assembly, transfer roller, compensator...
Service Manual
Page 253
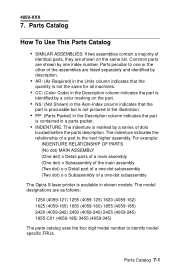
... as follows: 1250 (4059-121) 1255 (4059-125) 1620 (4059-162) 1625 (4059-165) 1650 (4059-160) 1855 (4059-185) 2420 (4059-242) 2450 (4059-240) 2455 (4059-245) 1855-C01 (4059-185) 3455 (4059-345) The parts catalog uses the four digit model number to identify model specific... dot) o o Detail part of a one-dot subassembly (Two dot) o o Subassembly of a one or the other of a part to one -dot subassembly The Optra S laser printer is available in a parts packet. • INDENTURE: The indenture is contained in eleven models. 4059-XXX 7. Parts peculiar to the next higher assembly. The indenture...
... as follows: 1250 (4059-121) 1255 (4059-125) 1620 (4059-162) 1625 (4059-165) 1650 (4059-160) 1855 (4059-185) 2420 (4059-242) 2450 (4059-240) 2455 (4059-245) 1855-C01 (4059-185) 3455 (4059-345) The parts catalog uses the four digit model number to identify model specific... dot) o o Detail part of a one-dot subassembly (Two dot) o o Subassembly of a one or the other of a part to one -dot subassembly The Optra S laser printer is available in a parts packet. • INDENTURE: The indenture is contained in eleven models. 4059-XXX 7. Parts peculiar to the next higher assembly. The indenture...

Service Manual
Page 344
Standard Bin 3-15 Output Bin X Sensor Test 3-16 Print Registration 3-18 Print Tests 3-22 Printer Setup 3-19 Maintenance Page Count (2420/ 2450/2455/3455) 3-20 Restore EP Factory Defaults 3-21 Setting Configuration ID 3-20 Setting the Page Count 3-19 Viewing the Permanent Page Count 3-19 Diagnostic Mode 3-1 ...
Standard Bin 3-15 Output Bin X Sensor Test 3-16 Print Registration 3-18 Print Tests 3-22 Printer Setup 3-19 Maintenance Page Count (2420/ 2450/2455/3455) 3-20 Restore EP Factory Defaults 3-21 Setting Configuration ID 3-20 Setting the Page Count 3-19 Viewing the Permanent Page Count 3-19 Diagnostic Mode 3-1 ...

