
Quick Reference Guide
Page 1
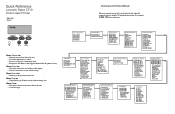
... menu items (for example, PAPER SIZE) have submenus. SUPPLIES MENU Toner Tray 1 Status Tray 2 Status Tray 3 Status Coating Roll Transfer Belt COLOR MENU Color Correction Print Resolution Image Enhancement PAPER MENU Paper Source PAPER SIZE PAPER TYPE PAPER WEIGHT CUSTOM TYPES ... NPA Mode Serial Buffer Job Buffering RS-232/RS-422 RS-422 Polarity Serial Protocol Robust XON Baud Data Bits Parity Honor DSR Quick Reference Lexmark Optra C710 Color Laser Printer Operator Panel Ready 1 Menu 2 Select 3 Return 4 Go 5 Stop 6 Press to: • Enter the menus from the ready state •...
... menu items (for example, PAPER SIZE) have submenus. SUPPLIES MENU Toner Tray 1 Status Tray 2 Status Tray 3 Status Coating Roll Transfer Belt COLOR MENU Color Correction Print Resolution Image Enhancement PAPER MENU Paper Source PAPER SIZE PAPER TYPE PAPER WEIGHT CUSTOM TYPES ... NPA Mode Serial Buffer Job Buffering RS-232/RS-422 RS-422 Polarity Serial Protocol Robust XON Baud Data Bits Parity Honor DSR Quick Reference Lexmark Optra C710 Color Laser Printer Operator Panel Ready 1 Menu 2 Select 3 Return 4 Go 5 Stop 6 Press to: • Enter the menus from the ready state •...

Quick Reference Guide
Page 2
... feeder Paper tray 202 Paper Jam - Fuser and Output Rollers 1 Open the fuser cover, fuser door, and front cover. 2 Remove coating roll. 3 Carefully remove jammed paper. 4 Close the front cover, fuser door, and fuser cover. Note: Paper jammed in the fuser rollers... remove any jammed paper. 3 Place the tray inside duplex unit base). 3 Insert duplex unit inverter tray into duplex unit. © Copyright Lexmark International, Inc. 1999. Recommended Lexmark transparencies are P/N 12A5150 (letter) or P/N 12A5151 (A4). Check Paper Tray x 1 Remove the paper tray. 2 Carefully remove any jammed...
... feeder Paper tray 202 Paper Jam - Fuser and Output Rollers 1 Open the fuser cover, fuser door, and front cover. 2 Remove coating roll. 3 Carefully remove jammed paper. 4 Close the front cover, fuser door, and fuser cover. Note: Paper jammed in the fuser rollers... remove any jammed paper. 3 Place the tray inside duplex unit base). 3 Insert duplex unit inverter tray into duplex unit. © Copyright Lexmark International, Inc. 1999. Recommended Lexmark transparencies are P/N 12A5150 (letter) or P/N 12A5151 (A4). Check Paper Tray x 1 Remove the paper tray. 2 Carefully remove any jammed...

User's Guide
Page 6
...the multipurpose feeder 111 7 Replacing supplies 113 Ordering supplies 113 Storing supplies 115 When to replace supplies 116 Print cartridges 117 Coating roll 118 Recycling used supplies 119 Conserving supplies 119 2-Color Draft 119 Black and White 119 Replacing supply items 120 Replacing print ...cartridges 121 Replacing the coating roll 126 Replacing the fuser kit 131 Replacing the transfer kit 138 8 Solving printer problems 145 Printer problems 145 Theory of ...
...the multipurpose feeder 111 7 Replacing supplies 113 Ordering supplies 113 Storing supplies 115 When to replace supplies 116 Print cartridges 117 Coating roll 118 Recycling used supplies 119 Conserving supplies 119 2-Color Draft 119 Black and White 119 Replacing supply items 120 Replacing print ...cartridges 121 Replacing the coating roll 126 Replacing the fuser kit 131 Replacing the transfer kit 138 8 Solving printer problems 145 Printer problems 145 Theory of ...

User's Guide
Page 16
... printer lets you perform routine printer maintenance procedures without the aid of images and graphics, and so on. This includes replacing the photoconductor, transfer belt, coating roll, fuser, and all four color print cartridges. Print speed Your printer can print duplex jobs at up to accommodate your many printing needs.
... printer lets you perform routine printer maintenance procedures without the aid of images and graphics, and so on. This includes replacing the photoconductor, transfer belt, coating roll, fuser, and all four color print cartridges. Print speed Your printer can print duplex jobs at up to accommodate your many printing needs.

User's Guide
Page 30
... the following pages for a listing of the values for example, PAPER SIZE) have submenus. SUPPLIES MENU (page 17) Toner Tray 1 Status Tray 2 Status Tray 3 Status Coating Roll Transfer Belt JOB MENU (page 35) COLOR MENU (page 19) Color Correction Image Enhancement Print Resolution PAPER MENU (page 20) Paper Source PAPER SIZE PAPER...
... the following pages for a listing of the values for example, PAPER SIZE) have submenus. SUPPLIES MENU (page 17) Toner Tray 1 Status Tray 2 Status Tray 3 Status Coating Roll Transfer Belt JOB MENU (page 35) COLOR MENU (page 19) Color Correction Image Enhancement Print Resolution PAPER MENU (page 20) Paper Source PAPER SIZE PAPER...

User's Guide
Page 31
Press Menu> or You can view the Supplies Menu when the printer is idle or when the printer is low or needs replacement. It is only available when a supply is busy processing or printing a job. Supplies Menu The Supplies Menu provides information about printer supplies that require attention.
Press Menu> or You can view the Supplies Menu when the printer is idle or when the printer is low or needs replacement. It is only available when a supply is busy processing or printing a job. Supplies Menu The Supplies Menu provides information about printer supplies that require attention.
User's Guide
Page 54
... Port Disabled 56 Parallel Port x Disabled 56 Serial x Port Disabled 61 Defective Disk 62 Disk Full 63 Unformatted Disk 84 Transfer Belt Life Warning 85 Coating Roll Life Warning 87 Fuser Exhausted 88 Yellow Toner Low 88 Magenta Toner Low 88 Cyan Toner Low 88 Black Toner Low Print Jobs on Disk...
... Port Disabled 56 Parallel Port x Disabled 56 Serial x Port Disabled 61 Defective Disk 62 Disk Full 63 Unformatted Disk 84 Transfer Belt Life Warning 85 Coating Roll Life Warning 87 Fuser Exhausted 88 Yellow Toner Low 88 Magenta Toner Low 88 Cyan Toner Low 88 Black Toner Low Print Jobs on Disk...

User's Guide
Page 127
... items to keep your printer without the need : Routine maintenance supplies Part number Supply item Approx. Ordering supplies Print cartridge Coating roll Transfer belt Fuser unit The following list identifies the items and part numbers you will need of a service technician. You ... operate your printer operating properly. Chapter 7: Ordering supplies 113 yield 10E0043 10E0040 10E0041 Black print cartridge (includes coating roll) Cyan print cartridge Magenta print cartridge 10,000 pages each (5% toner coverage) (15,000 pages maximum yield) 10E0042 Yellow print...
... items to keep your printer without the need : Routine maintenance supplies Part number Supply item Approx. Ordering supplies Print cartridge Coating roll Transfer belt Fuser unit The following list identifies the items and part numbers you will need of a service technician. You ... operate your printer operating properly. Chapter 7: Ordering supplies 113 yield 10E0043 10E0040 10E0041 Black print cartridge (includes coating roll) Cyan print cartridge Magenta print cartridge 10,000 pages each (5% toner coverage) (15,000 pages maximum yield) 10E0042 Yellow print...

User's Guide
Page 132
... the black print cartridge, make sure you install the coating roll when you need to replace the coating roll. You can order a coating roll separate from the black print cartridge. tion about ordering a coating roll. 118 Chapter 7: When to replace the coating roll before its scheduled time. See page 113 for more ... supplies, see "Replacing print cartridges" on the front of printing, you may indicate it's time to the fuser, replace the coating roll each time you need to replace supplies Warning! If you are indicators you order the black print cartridge. It is located inside ...
... the black print cartridge, make sure you install the coating roll when you need to replace the coating roll. You can order a coating roll separate from the black print cartridge. tion about ordering a coating roll. 118 Chapter 7: When to replace the coating roll before its scheduled time. See page 113 for more ... supplies, see "Replacing print cartridges" on the front of printing, you may indicate it's time to the fuser, replace the coating roll each time you need to replace supplies Warning! If you are indicators you order the black print cartridge. It is located inside ...

User's Guide
Page 134
... of the display to remind you there are supplies that need attention. The Supplies status message appears on the second line of your print cartridges, coating roll, fuser and transfer belt life. It posts an end of the display to be replaced. When a count for a supply nears the end of the supplies...
... of the display to remind you there are supplies that need attention. The Supplies status message appears on the second line of your print cartridges, coating roll, fuser and transfer belt life. It posts an end of the display to be replaced. When a count for a supply nears the end of the supplies...

User's Guide
Page 135
... must install the appropriate new supplies before you to your print cartridges. If you are installing the black print cartridge, make sure you install the coating roll when you replace the print cartridge. To prevent damage to replace one or more specified print cartridges.
... must install the appropriate new supplies before you to your print cartridges. If you are installing the black print cartridge, make sure you install the coating roll when you replace the print cartridge. To prevent damage to replace one or more specified print cartridges.

User's Guide
Page 140
... the same images, have paper jams in the fuser, see "Ordering supplies" on the front of your black print cartridge. Replacing the coating roll When you order a black print cartridge you need to cool before its scheduled time. For more information on ordering a separate... coating roll see toner specks on page 113. Allow the fuser to replace the coating roll before touching. 1 Make sure the printer is turned off (O). 2 Make sure the power cord from the black ...
... the same images, have paper jams in the fuser, see "Ordering supplies" on the front of your black print cartridge. Replacing the coating roll When you order a black print cartridge you need to cool before its scheduled time. For more information on ordering a separate... coating roll see toner specks on page 113. Allow the fuser to replace the coating roll before touching. 1 Make sure the printer is turned off (O). 2 Make sure the power cord from the black ...

User's Guide
Page 141
Fuser door Fuser cover release button 4 Lift the fuser door. Chapter 7: Replacing the coating roll 127 Note: If the duplex unit is installed, lift the duplex top cover first. 3 Press the fuser cover release button and lift the fuser cover.
Fuser door Fuser cover release button 4 Lift the fuser door. Chapter 7: Replacing the coating roll 127 Note: If the duplex unit is installed, lift the duplex top cover first. 3 Press the fuser cover release button and lift the fuser cover.

User's Guide
Page 142
rial from its package. 7 Remove the orange tape and other packing mate- Use the handle to lift the coating roll out of the plastic wrapping is removed from fuser. The coating roll and packing material may contain excess oil that could soil clothing. 6 Remove the new coating roll from the coating roll. Make sure all of the fuser. Coating roll 128 Chapter 7: Replacing the coating roll Caution! 5 Lift coating roll from the coating roll.
rial from its package. 7 Remove the orange tape and other packing mate- Use the handle to lift the coating roll out of the plastic wrapping is removed from fuser. The coating roll and packing material may contain excess oil that could soil clothing. 6 Remove the new coating roll from the coating roll. Make sure all of the fuser. Coating roll 128 Chapter 7: Replacing the coating roll Caution! 5 Lift coating roll from the coating roll.

User's Guide
Page 143
8 Align the bar on the side of the coating roll with the slots in the fuser. 9 Lower the coating roll into the fuser. 10 Close the fuser door. Chapter 7: Replacing the coating roll 129
8 Align the bar on the side of the coating roll with the slots in the fuser. 9 Lower the coating roll into the fuser. 10 Close the fuser door. Chapter 7: Replacing the coating roll 129

User's Guide
Page 144
11 Close the fuser cover. 12 Plug the power cord into a properly grounded electrical outlet. 13 Place the printer power switch to on (I). 130 Chapter 7: Replacing the coating roll
11 Close the fuser cover. 12 Plug the power cord into a properly grounded electrical outlet. 13 Place the printer power switch to on (I). 130 Chapter 7: Replacing the coating roll

User's Guide
Page 146
This is done during step 6 on each side of the fuser. 6 Lift the fuser from the old fuser and transfer it to remove the coating roll from the printer. You will need to the new fuser. To lift the fuser, use the green lifting handles. 7 Set the fuser aside. Thumbscrews 5 Loosen the green thumbscrews on page 135 after you install the new fuser. 132 Chapter 7: Replacing the fuser kit
This is done during step 6 on each side of the fuser. 6 Lift the fuser from the old fuser and transfer it to remove the coating roll from the printer. You will need to the new fuser. To lift the fuser, use the green lifting handles. 7 Set the fuser aside. Thumbscrews 5 Loosen the green thumbscrews on page 135 after you install the new fuser. 132 Chapter 7: Replacing the fuser kit

User's Guide
Page 149
5 Remove the orange tabs and any packing material from the old fuser. Chapter 7: Replacing the fuser kit 135 a Rotate the tabs toward each other as shown. b Pull the tabs up to remove them from the fuser. 6 Open the fuser door on the old fuser. 7 Remove the coating roll from inside the fuser.
5 Remove the orange tabs and any packing material from the old fuser. Chapter 7: Replacing the fuser kit 135 a Rotate the tabs toward each other as shown. b Pull the tabs up to remove them from the fuser. 6 Open the fuser door on the old fuser. 7 Remove the coating roll from inside the fuser.

User's Guide
Page 150
8 Align the bar on the side of the coating roll with the slots in the fuser. 9 Lower the coating roll into the fuser. Bar Slots 10 Close the fuser door. 136 Chapter 7: Replacing the fuser kit
8 Align the bar on the side of the coating roll with the slots in the fuser. 9 Lower the coating roll into the fuser. Bar Slots 10 Close the fuser door. 136 Chapter 7: Replacing the fuser kit

User's Guide
Page 171
... Ready, Power Saver, Busy and Waiting messages-unless another status message of life or empty condition. If you send to the printer, a coating roll may result in the printer. The Fuser Exhausted intervention message is nearing its end of higher priority is not installed in poor toner adhesion to... panel while placing the printer power switch to clear the message. Press Menu> or When a new fuser is replaced when you replace the coating roll. See page 113 for more information about ordering new supplies. Press and hold the Select and Return buttons on hand, order it now. ...
... Ready, Power Saver, Busy and Waiting messages-unless another status message of life or empty condition. If you send to the printer, a coating roll may result in the printer. The Fuser Exhausted intervention message is nearing its end of higher priority is not installed in poor toner adhesion to... panel while placing the printer power switch to clear the message. Press Menu> or When a new fuser is replaced when you replace the coating roll. See page 113 for more information about ordering new supplies. Press and hold the Select and Return buttons on hand, order it now. ...


