
Wireless Setup Guide
Page 6
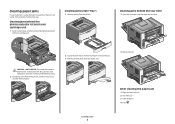
Setting up and out using the handle. Remove the unit consisting of the photoconductor kit. Press the button on the base of the photoconductor kit and the toner cartridge from the unit. Pull the toner cartridge up the printer 6 Remove the tape and packaging material from the printer. Firmly shake the cartridge side-to-side and front-toback several times to distribute toner. Reinsert the unit into the printer.
Setting up and out using the handle. Remove the unit consisting of the photoconductor kit. Press the button on the base of the photoconductor kit and the toner cartridge from the unit. Pull the toner cartridge up the printer 6 Remove the tape and packaging material from the printer. Firmly shake the cartridge side-to-side and front-toback several times to distribute toner. Reinsert the unit into the printer.

Wireless Setup Guide
Page 7
... slide the length guide to loosen them, and then fan them. Close the front door. Setting up the printer 7 Flex the sheets back and forth to the correct position for the paper size being loaded. Push the toner cartridge until it clicks into the photoconductor kit by aligning the rollers on the...
... slide the length guide to loosen them, and then fan them. Close the front door. Setting up the printer 7 Flex the sheets back and forth to the correct position for the paper size being loaded. Push the toner cartridge until it clicks into the photoconductor kit by aligning the rollers on the...
Quick Reference
Page 2
...1 Open the front door, and then remove the photoconductor kit and toner cartridge unit. Pull the level down to cool before touching. 2 Lift the flap at the front of the printer, and then remove any jammed sheets of the printer might be hot. CAUTION-HOT SURFACE: The inside of paper. 2.... Loading paper 2 To reduce the risk of injury from a hot component, allow the surface to release the jam. 3 Pull the jammed sheets from the printer. Clearing jams under Tray 1 1 Remove the tray from the duplex area. 2 Remove the jam. After clearing the paper jam 1 Align and insert the ...
...1 Open the front door, and then remove the photoconductor kit and toner cartridge unit. Pull the level down to cool before touching. 2 Lift the flap at the front of the printer, and then remove any jammed sheets of the printer might be hot. CAUTION-HOT SURFACE: The inside of paper. 2.... Loading paper 2 To reduce the risk of injury from a hot component, allow the surface to release the jam. 3 Pull the jammed sheets from the printer. Clearing jams under Tray 1 1 Remove the tray from the duplex area. 2 Remove the jam. After clearing the paper jam 1 Align and insert the ...
Print Defects
Page 1
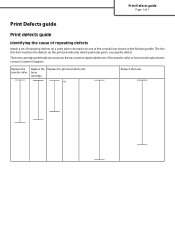
transfer roller. toner cartridge. Print Defects guide Page 1 of 1 Print Defects guide Print defects guide Identifying the cause of repeating defects Match a set of the vertical lines shown ... on the print job indicates which particular part is causing the defect. Replace the Replace the Replace the photoconductor kit. or Replace the fuser. The toner cartridge and the photoconductor kit are customer replaceable items. If the transfer roller or fuser needs replacement, contact Customer Support.
transfer roller. toner cartridge. Print Defects guide Page 1 of 1 Print Defects guide Print defects guide Identifying the cause of repeating defects Match a set of the vertical lines shown ... on the print job indicates which particular part is causing the defect. Replace the Replace the Replace the photoconductor kit. or Replace the fuser. The toner cartridge and the photoconductor kit are customer replaceable items. If the transfer roller or fuser needs replacement, contact Customer Support.
Supplies guide
Page 1
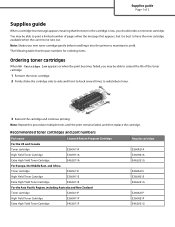
... name Lexmark Return Program Cartridge For the US and Canada Toner cartridge E260A11A High Yield Toner Cartridge E360H11A Extra High Yield Toner Cartridge E462U11A For Europe, the Middle East, and Africa Toner cartridge E260A11E High Yield Toner Cartridge E360H11E Extra High Yield Toner Cartridge ... pages when the message first appears, but it into the printer to redistribute toner. 3 Reinsert the cartridge and continue printing. The following table lists the part numbers for ordering items. Ordering toner cartridges When 88 Cartridge low appears or when the print becomes...
... name Lexmark Return Program Cartridge For the US and Canada Toner cartridge E260A11A High Yield Toner Cartridge E360H11A Extra High Yield Toner Cartridge E462U11A For Europe, the Middle East, and Africa Toner cartridge E260A11E High Yield Toner Cartridge E360H11E Extra High Yield Toner Cartridge ... pages when the message first appears, but it into the printer to redistribute toner. 3 Reinsert the cartridge and continue printing. The following table lists the part numbers for ordering items. Ordering toner cartridges When 88 Cartridge low appears or when the print becomes...

Supplies guide
Page 2
... maintenance kit. Part name Photoconductor kit Part number E260X22G Ordering a maintenance kit 80 Routine maintenance needed appears on your printer: Part name Maintenance kit * Designed for use only in all the items necessary to replace the fuser and transfer ...page. At this message first appears. Supplies guide Page 2 of 2 Part name For Latin America Toner cartridge High Yield Toner Cartridge Extra High Yield Toner Cartridge Lexmark Return Program Cartridge E260A11L E360H11L E462U11L Regular cartridge E260A21L E360H21L E462U21G Ordering a photoconductor kit Depending on the...
... maintenance kit. Part name Photoconductor kit Part number E260X22G Ordering a maintenance kit 80 Routine maintenance needed appears on your printer: Part name Maintenance kit * Designed for use only in all the items necessary to replace the fuser and transfer ...page. At this message first appears. Supplies guide Page 2 of 2 Part name For Latin America Toner cartridge High Yield Toner Cartridge Extra High Yield Toner Cartridge Lexmark Return Program Cartridge E260A11L E360H11L E462U11L Regular cartridge E260A21L E360H21L E462U21G Ordering a photoconductor kit Depending on the...

User Manual
Page 5
... HTML menu...117 Image menu...118 Help menu...118 Understanding printer messages 120 List of status and error messages...120 Maintaining the printer 134 Cleaning the exterior of the printer...134 Storing supplies...134 Conserving supplies...135 Checking the status ...a maintenance kit ...137 Replacing supplies...137 Replacing the toner cartridge ...137 Replacing the photoconductor kit ...139 Recycling Lexmark products...141 Moving the printer...142 Moving the printer to another location...142 Shipping the printer ...142 Administrative support 143 Finding advanced networking and administrator ...
... HTML menu...117 Image menu...118 Help menu...118 Understanding printer messages 120 List of status and error messages...120 Maintaining the printer 134 Cleaning the exterior of the printer...134 Storing supplies...134 Conserving supplies...135 Checking the status ...a maintenance kit ...137 Replacing supplies...137 Replacing the toner cartridge ...137 Replacing the photoconductor kit ...139 Recycling Lexmark products...141 Moving the printer...142 Moving the printer to another location...142 Shipping the printer ...142 Administrative support 143 Finding advanced networking and administrator ...

User Manual
Page 6
Modifying confidential print settings...144 Adjusting Power Saver...145 Setting up e-mail alerts...146 Restoring the factory default settings...146 Troubleshooting 147 Solving basic printer problems...147 Printer control panel display is blank or displays only diamonds 147 Solving printing problems...147 Jobs do not print...147 Confidential and other held jobs do... Gray background ...155 Ghost images...155 Incorrect margins...156 Paper curl...156 Print is too dark...157 Print is too light ...158 Skewed print...159 Toner fog or background shading appears on the page 159...
Modifying confidential print settings...144 Adjusting Power Saver...145 Setting up e-mail alerts...146 Restoring the factory default settings...146 Troubleshooting 147 Solving basic printer problems...147 Printer control panel display is blank or displays only diamonds 147 Solving printing problems...147 Jobs do not print...147 Confidential and other held jobs do... Gray background ...155 Ghost images...155 Incorrect margins...156 Paper curl...156 Print is too dark...157 Print is too light ...158 Skewed print...159 Toner fog or background shading appears on the page 159...

User Manual
Page 7
Toner specks...160 Transparency print quality is poor...160 Streaked horizontal lines...160 Streaked vertical lines ...161 Solid black or white streaks appear on transparencies or paper 162 Embedded Web Server does not open...162 Check the network connections ...162 Check the network settings ...162 Contacting Customer Support 163 Notices 164 Product information...164 Edition notice...164 Power consumption...171 Index 178 Contents 7
Toner specks...160 Transparency print quality is poor...160 Streaked horizontal lines...160 Streaked vertical lines ...161 Solid black or white streaks appear on transparencies or paper 162 Embedded Web Server does not open...162 Check the network connections ...162 Check the network settings ...162 Contacting Customer Support 163 Notices 164 Product information...164 Edition notice...164 Power consumption...171 Index 178 Contents 7

User Manual
Page 52
...weights up to use it. For paper smaller than 60 g/m2 (16 lb) might not be considered concerning the selection of the printer to curl at www.lexmark.com. smoothness between 100-300 Sheffield points; This limits the exposure of the paper or specialty media before printing. Paper and specialty...Stock & Label Guide available on making selections and caring for 60-90 g/m2 (16-24 lb bond) paper. Curl Curl is too rough, toner cannot fuse to feed properly, causing jams. For best performance, use paper between 150-250 Sheffield points produces the best print quality. Paper and ...
...weights up to use it. For paper smaller than 60 g/m2 (16 lb) might not be considered concerning the selection of the printer to curl at www.lexmark.com. smoothness between 100-300 Sheffield points; This limits the exposure of the paper or specialty media before printing. Paper and specialty...Stock & Label Guide available on making selections and caring for 60-90 g/m2 (16-24 lb bond) paper. Curl Curl is too rough, toner cannot fuse to feed properly, causing jams. For best performance, use paper between 150-250 Sheffield points produces the best print quality. Paper and ...

User Manual
Page 54
Use inks that recycled paper produced by the resin in laser printers, despite surface texture. When in the direction of feed Recycled paper, paper of lower weight ( In 1998, Lexmark presented to discourage the use in xerographic copiers. Inks that all recycled paper will feed well. However, no reason...Note: Some much smoother papers (such as premium 24 lb laser papers, 50-90 Sheffield units) and much rougher papers (such as letterhead must be able to withstand temperatures up to work very well in toner. Lexmark has found no blanket statement can be made that are not...
Use inks that recycled paper produced by the resin in laser printers, despite surface texture. When in the direction of feed Recycled paper, paper of lower weight ( In 1998, Lexmark presented to discourage the use in xerographic copiers. Inks that all recycled paper will feed well. However, no reason...Note: Some much smoother papers (such as premium 24 lb laser papers, 50-90 Sheffield units) and much rougher papers (such as letterhead must be able to withstand temperatures up to work very well in toner. Lexmark has found no blanket statement can be made that are not...

User Manual
Page 71
3 If you do not see it, open the front door, and then remove the photoconductor kit and toner cartridge (unit). Note: When the photoconductor kit and toner cartridge are together, they are called a unit. 4 Lift the flap in front of the printer, and remove any jammed sheets. 5 Align and insert the unit. 6 Close the front door. 7 Insert the tray. 8 Press . Clearing jams 71
3 If you do not see it, open the front door, and then remove the photoconductor kit and toner cartridge (unit). Note: When the photoconductor kit and toner cartridge are together, they are called a unit. 4 Lift the flap in front of the printer, and remove any jammed sheets. 5 Align and insert the unit. 6 Close the front door. 7 Insert the tray. 8 Press . Clearing jams 71

User Manual
Page 111
... Notes: • 8 is the factory default setting. Understanding printer menus 111 Description Specifies the printed output resolution Note: 600 dpi is the factory default setting. • Selecting a smaller number can help conserve toner. Specifies the orientation of a multiple-page sheet Notes: •...of a sheet of multiple-page images when using N-up (pages-sides) Notes: • Horizontal is the factory default setting. The printer chooses between portrait and landscape. • Landscape uses Long Edge. • Portrait uses Short Edge. Specifies the positioning of paper Notes...
... Notes: • 8 is the factory default setting. Understanding printer menus 111 Description Specifies the printed output resolution Note: 600 dpi is the factory default setting. • Selecting a smaller number can help conserve toner. Specifies the orientation of a multiple-page sheet Notes: •...of a sheet of multiple-page images when using N-up (pages-sides) Notes: • Horizontal is the factory default setting. The printer chooses between portrait and landscape. • Landscape uses Long Edge. • Portrait uses Short Edge. Specifies the positioning of paper Notes...

User Manual
Page 112
...the contrast of printed objects Note: 0 is the factory default setting. Understanding printer menus 112 Notes: • An optional flash memory card must not be available. You can conserve toner by lightening the output. Automatically adjusts the contrast enhancement applied to enhance fonts ...Note: Off is the factory default setting. Enables more pixels to print in clusters for clarity, in the printer and operating properly for Windows ...
...the contrast of printed objects Note: 0 is the factory default setting. Understanding printer menus 112 Notes: • An optional flash memory card must not be available. You can conserve toner by lightening the output. Automatically adjusts the contrast enhancement applied to enhance fonts ...Note: Off is the factory default setting. Enables more pixels to print in clusters for clarity, in the printer and operating properly for Windows ...
User Manual
Page 120
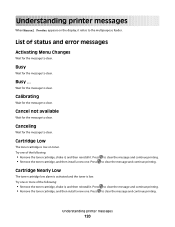
...status and error messages Activating Menu Changes Wait for the message to clear. List of the following : • Remove the toner cartridge, shake it, and then reinstall it refers to the multipurpose feeder. Busy ... Wait for the message to clear. Press to clear.... Understanding printer messages When Manual Feeder appears on toner. Cartridge Nearly Low The toner cartridge low alarm is activated and the toner is low on the display, it . Understanding printer messages 120 Canceling Wait for the message to clear the ...
...status and error messages Activating Menu Changes Wait for the message to clear. List of the following : • Remove the toner cartridge, shake it, and then reinstall it refers to the multipurpose feeder. Busy ... Wait for the message to clear. Press to clear.... Understanding printer messages When Manual Feeder appears on toner. Cartridge Nearly Low The toner cartridge low alarm is activated and the toner is low on the display, it . Understanding printer messages 120 Canceling Wait for the message to clear the ...

User Manual
Page 121
Cartridge Life Exceeded The toner cartridge is exhausted. 1 Remove the used toner cartridge, and then install a new one. 2 Press to clear. Defragmenting Flash DO NOT POWER OFF Wait for the message to clear. Deletion complete Wait for the message to clear. Understanding printer messages 121 Clearing job accounting statistics ...Deleting held jobs Wait for the message to clear. 2 Try to print on the display. Note: While the menus are disabled, printer settings cannot be changed . • Press the down arrow button until Continue appears, and then press if the paper was changed from the...
Cartridge Life Exceeded The toner cartridge is exhausted. 1 Remove the used toner cartridge, and then install a new one. 2 Press to clear. Defragmenting Flash DO NOT POWER OFF Wait for the message to clear. Deletion complete Wait for the message to clear. Understanding printer messages 121 Clearing job accounting statistics ...Deleting held jobs Wait for the message to clear. 2 Try to print on the display. Note: While the menus are disabled, printer settings cannot be changed . • Press the down arrow button until Continue appears, and then press if the paper was changed from the...
User Manual
Page 125
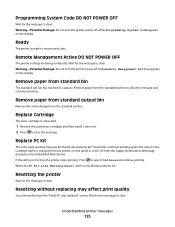
...bin The standard exit bin has reached its capacity. If the setting is exhausted. 1 Remove the used toner cartridge, and then install a new one. 2 Press to clear. Resetting the printer Wait for the message to clear. Replace PC Kit This is ready to clear the message and continue printing... NOT POWER OFF Wait for the message to clear. Remote Management Active DO NOT POWER OFF The printer settings are being configured. Replace Cartridge The toner cartridge is On, then the printer stops printing. Remove paper from standard output bin Remove the stack of paper from the "Verify PC...
...bin The standard exit bin has reached its capacity. If the setting is exhausted. 1 Remove the used toner cartridge, and then install a new one. 2 Press to clear. Resetting the printer Wait for the message to clear. Replace PC Kit This is ready to clear the message and continue printing... NOT POWER OFF Wait for the message to clear. Remote Management Active DO NOT POWER OFF The printer settings are being configured. Replace Cartridge The toner cartridge is On, then the printer stops printing. Remove paper from standard output bin Remove the stack of paper from the "Verify PC...
User Manual
Page 127
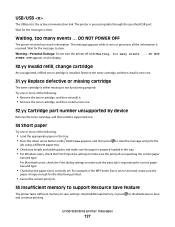
... dialog settings to make sure the print job is requesting the correct paper size and type. DO NOT POWER OFF The printer received too much information. Remove the toner cartridge, and then install a new one or more of the following: • Load the appropriate paper in the tray... Check that the paper size is the active communication link. Try one or more of the following: • Remove the toner cartridge, and then reinstall it received. Understanding printer messages 127 DO NOT POWER OFF appears on the display. 30.yy Invalid refill, change cartridge An unsupported, refilled...
... dialog settings to make sure the print job is requesting the correct paper size and type. DO NOT POWER OFF The printer received too much information. Remove the toner cartridge, and then install a new one or more of the following: • Load the appropriate paper in the tray... Check that the paper size is the active communication link. Try one or more of the following: • Remove the toner cartridge, and then reinstall it received. Understanding printer messages 127 DO NOT POWER OFF appears on the display. 30.yy Invalid refill, change cartridge An unsupported, refilled...

User Manual
Page 128
... or more of the following values: 1 America 2 EMEA (Europe, Middle East, Africa) 3 Asia 4 Latin America 9 Undefined region Understanding printer messages 128 37 Insufficient memory for Flash Memory Defragment operation Try one or more of the following: • Press the down arrow button until..., macros, and other data in order to clear the message and continue 42.xy Cartridge region mismatch Install a toner cartridge that matches the region number of the printer. to process current jobs. to print the portion of the following: • Press the down arrow button until...
... or more of the following values: 1 America 2 EMEA (Europe, Middle East, Africa) 3 Asia 4 Latin America 9 Undefined region Understanding printer messages 128 37 Insufficient memory for Flash Memory Defragment operation Try one or more of the following: • Press the down arrow button until..., macros, and other data in order to clear the message and continue 42.xy Cartridge region mismatch Install a toner cartridge that matches the region number of the printer. to process current jobs. to print the portion of the following: • Press the down arrow button until...
User Manual
Page 130
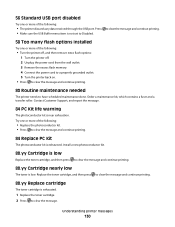
... item is exhausted. 56 Standard USB port disabled Try one or more of the following : • Turn the printer off, and then remove extra flash options: 1 Turn the printer off. 2 Unplug the power cord from the wall outlet. 3 Remove the excess flash memory. 4 Connect the ...continue printing. 80 Routine maintenance needed The printer needs to have scheduled maintenance done. Install a new photoconductor kit. 88.yy Cartridge is low Replace the toner cartridge, and then press to clear the message and continue printing. 88.yy Cartridge nearly low The toner is near exhaustion.
... item is exhausted. 56 Standard USB port disabled Try one or more of the following : • Turn the printer off, and then remove extra flash options: 1 Turn the printer off. 2 Unplug the power cord from the wall outlet. 3 Remove the excess flash memory. 4 Connect the ...continue printing. 80 Routine maintenance needed The printer needs to have scheduled maintenance done. Install a new photoconductor kit. 88.yy Cartridge is low Replace the toner cartridge, and then press to clear the message and continue printing. 88.yy Cartridge nearly low The toner is near exhaustion.


