User's Guide
Page 13
...integrated and optional trays and paper weights from 60 to 90 g/m2 (16 to curve at maximum speed. If the paper is too rough, the toner does not fuse to 43 lb bond) grain long in .), it is the tendency of print media. See the Card Stock & Label Guide ...that can cause feeding problems. Smoothness The degree of smoothness of the printer to be used for duplex printing. Tips on the Lexmark Web site at www.lexmark.com/publications for more information about which print media provides optimum results for laser printers. • The duplex unit only supports certain sizes and types of...
...integrated and optional trays and paper weights from 60 to 90 g/m2 (16 to curve at maximum speed. If the paper is too rough, the toner does not fuse to 43 lb bond) grain long in .), it is the tendency of print media. See the Card Stock & Label Guide ...that can cause feeding problems. Smoothness The degree of smoothness of the printer to be used for duplex printing. Tips on the Lexmark Web site at www.lexmark.com/publications for more information about which print media provides optimum results for laser printers. • The duplex unit only supports certain sizes and types of...
User's Guide
Page 15
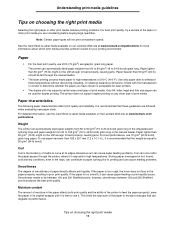
... in toner. Printing on letterhead Check with the manufacturer or vendor to determine whether the chosen preprinted letterhead is acceptable for help when loading letterhead in the media sources. Use the following guidelines when selecting preprinted forms and letterhead paper for the printer: &#...quantities. When printing on transparencies: Tips on a level surface. Selecting preprinted forms and letterhead Use the following table for laser printers. Use papers printed with heat-resistant inks designed for 60 to 210°C (410°F) without melting or releasing hazardous...
... in toner. Printing on letterhead Check with the manufacturer or vendor to determine whether the chosen preprinted letterhead is acceptable for help when loading letterhead in the media sources. Use the following guidelines when selecting preprinted forms and letterhead paper for the printer: &#...quantities. When printing on transparencies: Tips on a level surface. Selecting preprinted forms and letterhead Use the following table for laser printers. Use papers printed with heat-resistant inks designed for 60 to 210°C (410°F) without melting or releasing hazardous...
User's Guide
Page 36
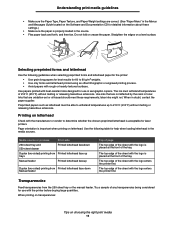
... supplies to maintain optimum print quality. The header or gray area at www.lexmark.com, or contact the place where you bought your toner cartridge. For more information, see the instruction sheet that came with your area. 5 Maintaining the printer Periodically, you need to complete certain tasks to : • Direct sunlight • Temperatures...
... supplies to maintain optimum print quality. The header or gray area at www.lexmark.com, or contact the place where you bought your toner cartridge. For more information, see the instruction sheet that came with your area. 5 Maintaining the printer Periodically, you need to complete certain tasks to : • Direct sunlight • Temperatures...

User's Guide
Page 37
... Menu Duplex in the Defaults Æ Finishing Menu Causes the printer to print the two or more page images on one sheet of paper. Supply Toner Print media Menu selection item What the setting does Toner Darkness in the Defaults Æ Quality Menu Lets you adjust ... back). Duplex printing lets you bought your software application or printer driver to be sure it is unsatisfactory, you conserve toner and paper. Conserving supplies 37 Ordering supplies To order supplies in the U.S., contact Lexmark at www.lexmark.com, or contact the place where you print on both...
... Menu Duplex in the Defaults Æ Finishing Menu Causes the printer to print the two or more page images on one sheet of paper. Supply Toner Print media Menu selection item What the setting does Toner Darkness in the Defaults Æ Quality Menu Lets you adjust ... back). Duplex printing lets you bought your software application or printer driver to be sure it is unsatisfactory, you conserve toner and paper. Conserving supplies 37 Ordering supplies To order supplies in the U.S., contact Lexmark at www.lexmark.com, or contact the place where you print on both...

User's Guide
Page 38
... Pacific Region, Australia, and New Zealand. 6 Designed for use only in Latin America. Ordering supplies 38 When the 88 Toner Low message appears, you should order a new toner cartridge. Maintaining the printer Ordering a toner cartridge Part number Description Average cartridge yield World Wide E250X22G Photoconductor kit Up to have a new cartridge available when the...
... Pacific Region, Australia, and New Zealand. 6 Designed for use only in Latin America. Ordering supplies 38 When the 88 Toner Low message appears, you should order a new toner cartridge. Maintaining the printer Ordering a toner cartridge Part number Description Average cartridge yield World Wide E250X22G Photoconductor kit Up to have a new cartridge available when the...

User's Guide
Page 39
Maintaining the printer Changing a toner cartridge 1 Turn the printer off. 2 Press the button on the base of the printer to remove the toner cartridge. 1 2 Ordering supplies 39 a Press the release button on the left side of the print cartridge assembly. b Grasp the handle, pulling up and out to release and lower the front door. 3 Remove the toner cartridge.
Maintaining the printer Changing a toner cartridge 1 Turn the printer off. 2 Press the button on the base of the printer to remove the toner cartridge. 1 2 Ordering supplies 39 a Press the release button on the left side of the print cartridge assembly. b Grasp the handle, pulling up and out to release and lower the front door. 3 Remove the toner cartridge.

User's Guide
Page 40
... 40 Maintaining the printer 4 Unpack the new toner cartridge. You can use the packing material from the new toner cartridge to ship the old toner cartridge back to distribute the toner. 6 Install the new toner cartridge by aligning the white rollers on the toner cartridge with the white arrows on . For more information, see Recycling Lexmark products on...
... 40 Maintaining the printer 4 Unpack the new toner cartridge. You can use the packing material from the new toner cartridge to ship the old toner cartridge back to distribute the toner. 6 Install the new toner cartridge by aligning the white rollers on the toner cartridge with the white arrows on . For more information, see Recycling Lexmark products on...

User's Guide
Page 41
a Press the button on a flat, clean surface. Extended light exposure can cause print quality problems. 1 Turn the printer offc 2 Remove the print cartridge assembly. Ordering supplies 41 b Lower the front door. Note: Do not press the button on the print cartridge ...assembly 1 2 3 Place the print cartridge assembly on the left side of time. c Grasp the toner cartridge handle, and pull up and out. Maintaining the printer Changing a photoconductor kit Warning: When replacing a photoconductor kit, do not leave the new photoconductor kit exposed to direct light...
a Press the button on a flat, clean surface. Extended light exposure can cause print quality problems. 1 Turn the printer offc 2 Remove the print cartridge assembly. Ordering supplies 41 b Lower the front door. Note: Do not press the button on the print cartridge ...assembly 1 2 3 Place the print cartridge assembly on the left side of time. c Grasp the toner cartridge handle, and pull up and out. Maintaining the printer Changing a photoconductor kit Warning: When replacing a photoconductor kit, do not leave the new photoconductor kit exposed to direct light...

User's Guide
Page 42
Ordering supplies 42 The cartridge clicks into the new print cartridge assembly by aligning the white rollers on the toner cartridge with the white arrows on the base of the photoconductor and pushing the toner cartridge in as far as it will go. b Grasp the toner cartridge handle, and pull up and out. 1 2 4 Unpack the new photoconductor kit. 5 Install the toner cartridge into place when correctly installed. Maintaining the printer 3 Remove the toner cartridge: a Press the button on the tracks of the print cartridge assembly.
Ordering supplies 42 The cartridge clicks into the new print cartridge assembly by aligning the white rollers on the toner cartridge with the white arrows on the base of the photoconductor and pushing the toner cartridge in as far as it will go. b Grasp the toner cartridge handle, and pull up and out. 1 2 4 Unpack the new photoconductor kit. 5 Install the toner cartridge into place when correctly installed. Maintaining the printer 3 Remove the toner cartridge: a Press the button on the tracks of the print cartridge assembly.
User's Guide
Page 45
...door, remove the toner cartridge, and remove the jammed print media. The jam message indicates the area where the jam occurred. However, it properly, you should be able to On or Auto; Open Rear Door 231 Paper Jam - Open Rear Door 241, 242 Paper Jam - Open the rear printer exit, and ...Paper Jam - Check Man Feeder What to clear the message and resume printing. Open the rear printer exit, and remove the jammed print media. Remove Tray 234 Paper Jam - Open the front door, remove the toner cartridge, and remove the jammed print media. Open tray to clear the message. Check Duplex 235...
...door, remove the toner cartridge, and remove the jammed print media. The jam message indicates the area where the jam occurred. However, it properly, you should be able to On or Auto; Open Rear Door 231 Paper Jam - Open Rear Door 241, 242 Paper Jam - Open the rear printer exit, and ...Paper Jam - Check Man Feeder What to clear the message and resume printing. Open the rear printer exit, and remove the jammed print media. Remove Tray 234 Paper Jam - Open the front door, remove the toner cartridge, and remove the jammed print media. Open tray to clear the message. Check Duplex 235...
User's Guide
Page 56
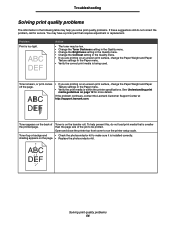
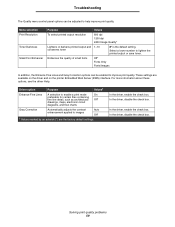
...Weight and Paper Texture settings in the Paper menu. • Verify the correct print media is within the printer specifications. Toner appears on the back of the job to be low. • Change the Toner Darkness setting in the Quality menu. • Change the Brightness setting in the Quality menu. • Change... in the following table may help prevent this, do not correct the problem, call for more details. If the problem continues, contact the Lexmark Customer Support Center at http://support.lexmark.com. Toner fog or background • Check the photoconductor kit to run the...
...Weight and Paper Texture settings in the Paper menu. • Verify the correct print media is within the printer specifications. Toner appears on the back of the job to be low. • Change the Toner Darkness setting in the Quality menu. • Change the Brightness setting in the Quality menu. • Change... in the following table may help prevent this, do not correct the problem, call for more details. If the problem continues, contact the Lexmark Customer Support Center at http://support.lexmark.com. Toner fog or background • Check the photoconductor kit to run the...

User's Guide
Page 57
...fonts, verify the fonts are installed correctly. • Replace the photoconductor kit. Troubleshooting Problem Entire page is too dark. • Change the Toner Darkness setting in the Quality menu. • Change the Brightness setting in the Quality menu. • Change the Contrast setting in the Quality... • Make sure the packaging material is not set too high in the Quality menu to be sure they are supported by the printer, the host computer, and the software application. Printing is white. Characters have jagged or uneven edges. • Change the Print Resolution...
...fonts, verify the fonts are installed correctly. • Replace the photoconductor kit. Troubleshooting Problem Entire page is too dark. • Change the Toner Darkness setting in the Quality menu. • Change the Brightness setting in the Quality menu. • Change the Contrast setting in the Quality... • Make sure the packaging material is not set too high in the Quality menu to be sure they are supported by the printer, the host computer, and the software application. Printing is white. Characters have jagged or uneven edges. • Change the Print Resolution...

User's Guide
Page 58
... loaded. Replace the photoconductor kit. Action Check the photoconductor kit to a darker setting. • The photoconductor kit may be defective. Change the Toner Darkness setting in the Quality menu. • Adjust the Brightness to a darker setting. • Adjust the Contrast to see if it is ...printed in the Paper menu is • Use only transparencies recommended by the printer manufacturer. Print is correct. Ghost images appear. • Make sure the Paper Type setting in black. the sides, top, or bottom of...
... loaded. Replace the photoconductor kit. Action Check the photoconductor kit to a darker setting. • The photoconductor kit may be defective. Change the Toner Darkness setting in the Quality menu. • Adjust the Brightness to a darker setting. • Adjust the Contrast to see if it is ...printed in the Paper menu is • Use only transparencies recommended by the printer manufacturer. Print is correct. Ghost images appear. • Make sure the Paper Type setting in black. the sides, top, or bottom of...
User's Guide
Page 59
...adjusts the contrast enhancement applied to images Auto Off* † Values marked by an asterisk (*) are available on the driver and on the printer Embedded Web Server (EWS) interface. In the driver, disable the check box. Solving print quality problems 59 In the driver, enable the.../Images In addition, the Enhance Fine Lines and Gray Correction options can be enabled to improve print quality. Menu selection Print Resolution Toner Darkness Small Font Enhancer Purpose Values To select printed output resolution 600 dpi 1200 dpi 2400 Image Quality* Lightens or darkens printed output...
...adjusts the contrast enhancement applied to images Auto Off* † Values marked by an asterisk (*) are available on the driver and on the printer Embedded Web Server (EWS) interface. In the driver, disable the check box. Solving print quality problems 59 In the driver, enable the.../Images In addition, the Enhance Fine Lines and Gray Correction options can be enabled to improve print quality. Menu selection Print Resolution Toner Darkness Small Font Enhancer Purpose Values To select printed output resolution 600 dpi 1200 dpi 2400 Image Quality* Lightens or darkens printed output...
User's Guide
Page 63
... needs. Setting the system password Setting the system password protects configuration of network communications and device configuration by using the format: https: //ip_address/. The printer minimizes waste (toner, paper, energy) while maintaining acceptable print quality. If a password has already been set the system password: 1 Open your Web browser. To connect to the...
... needs. Setting the system password Setting the system password protects configuration of network communications and device configuration by using the format: https: //ip_address/. The printer minimizes waste (toner, paper, energy) while maintaining acceptable print quality. If a password has already been set the system password: 1 Open your Web browser. To connect to the...
User's Guide
Page 67
... physical or operating environment • Maintenance by anyone other than Lexmark or a Lexmark authorized servicer • Operation of all toner cartridges, programs, data, and removable storage media (unless directed otherwise...Lexmark's option). The laser system and printer are responsible for warranty service, remove all legal obligations, restrictions, liens, and encumbrances. You may be required to that user. The replacement may be a new or repaired item. Class I level during the warranty period, contact a Remarketer or Lexmark for Lexmark E450dn Lexmark...
... physical or operating environment • Maintenance by anyone other than Lexmark or a Lexmark authorized servicer • Operation of all toner cartridges, programs, data, and removable storage media (unless directed otherwise...Lexmark's option). The laser system and printer are responsible for warranty service, remove all legal obligations, restrictions, liens, and encumbrances. You may be required to that user. The replacement may be a new or repaired item. Class I level during the warranty period, contact a Remarketer or Lexmark for Lexmark E450dn Lexmark...

User's Guide
Page 70
...tray adjustment 20 photoconductor ordering 40 photoconductor kit changing 41 recycling 44 Power Saver, adjusting 62 preprinted forms 15 print cartridge See toner cartridge Print media guidelines 13 print media jams avoiding 18 print media specifications characteristics 13 Printing 19 problems control panel 52 blank... information 2 security 63 sending a job to print 25 Simple Network Management Protocol 64 supplies maintenance kit 43 recycling 44 toner cartridge 38 T toner cartridge changing 39 ordering 38 recycling 44 transparencies loading input tray 19 V verify print 28 W warranty 67, 68 70
...tray adjustment 20 photoconductor ordering 40 photoconductor kit changing 41 recycling 44 Power Saver, adjusting 62 preprinted forms 15 print cartridge See toner cartridge Print media guidelines 13 print media jams avoiding 18 print media specifications characteristics 13 Printing 19 problems control panel 52 blank... information 2 security 63 sending a job to print 25 Simple Network Management Protocol 64 supplies maintenance kit 43 recycling 44 toner cartridge 38 T toner cartridge changing 39 ordering 38 recycling 44 transparencies loading input tray 19 V verify print 28 W warranty 67, 68 70

Menus and Messages
Page 14
... Menu selection Eco-Mode Purpose The printer minimizes waste (toner, paper, energy) while maintaining acceptable print quality. Note: The engine prints at half speed in operation are made . For more information, see the User's Guide ... LED remains illuminated when in Ready state and blinks when in minutes) the printer waits after a job is displayed before it goes into a reduced power state Disabled 1...240 Toner Alarm Controls whether the printer sounds an Off alarm when the printer requires operator intervention On* No changes in all resolutions. The following options are...
... Menu selection Eco-Mode Purpose The printer minimizes waste (toner, paper, energy) while maintaining acceptable print quality. Note: The engine prints at half speed in operation are made . For more information, see the User's Guide ... LED remains illuminated when in Ready state and blinks when in minutes) the printer waits after a job is displayed before it goes into a reduced power state Disabled 1...240 Toner Alarm Controls whether the printer sounds an Off alarm when the printer requires operator intervention On* No changes in all resolutions. The following options are...

Menus and Messages
Page 18
...Toner Darkness Purpose Selects printed output resolution Lightens or darkens printed output Values 300 dpi 600 dpi 1200 dpi 1200 Image Q 2400 Image Q* 1-10 Small Font Enhancer Enhances the quality of small fonts Off* Fonts Only Fonts/Images Lets the printer... Order Reverse Vertical Order 1 2 1 3 2 1 3 1 3 4 2 4 4 3 4 2 Multipage View Determines the orientation of a multiple- Using printer menus Menu selection Multipage Order Purpose Values Determines the positioning of multiple Horizontal* page images when using Multipage Print Solid Quality Menu Use this menu...
...Toner Darkness Purpose Selects printed output resolution Lightens or darkens printed output Values 300 dpi 600 dpi 1200 dpi 1200 Image Q 2400 Image Q* 1-10 Small Font Enhancer Enhances the quality of small fonts Off* Fonts Only Fonts/Images Lets the printer... Order Reverse Vertical Order 1 2 1 3 2 1 3 1 3 4 2 4 4 3 4 2 Multipage View Determines the orientation of a multiple- Using printer menus Menu selection Multipage Order Purpose Values Determines the positioning of multiple Horizontal* page images when using Multipage Print Solid Quality Menu Use this menu...

Menus and Messages
Page 19
...except: • Display Language. • All settings in the Parallel Menu, Network Menu, and USB Menu. • Resources residing in printer memory (RAM) are made to the flash memory card. A higher value will make the display appear lighter, a lower value makes the ... lower value decreases the brightness of toner on the hard disk. Using printer menus Utilities Menu Use this menu selection to change printer settings, remove jobs, set up printer hardware, and troubleshoot printer problems. Menu selection Factory Defaults Purpose Returns printer settings to the factory default values ...
...except: • Display Language. • All settings in the Parallel Menu, Network Menu, and USB Menu. • Resources residing in printer memory (RAM) are made to the flash memory card. A higher value will make the display appear lighter, a lower value makes the ... lower value decreases the brightness of toner on the hard disk. Using printer menus Utilities Menu Use this menu selection to change printer settings, remove jobs, set up printer hardware, and troubleshoot printer problems. Menu selection Factory Defaults Purpose Returns printer settings to the factory default values ...


