Menus and Messages Guide
Page 31
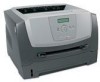
...memory 37 Insufficient collation area 37 Insufficient Defrag memory 38 Memory Full Action The printer is resetting the counter that tracks wear on the photoconductor. Res Reduced remains on the fuser. Insert or replace the toner cartridge. Make sure the link buffers are deleted. • ...All menu settings return to the factory default setting except: - Wait for this printer. • Load the appropriate media...
...memory 37 Insufficient collation area 37 Insufficient Defrag memory 38 Memory Full Action The printer is resetting the counter that tracks wear on the photoconductor. Res Reduced remains on the fuser. Insert or replace the toner cartridge. Make sure the link buffers are deleted. • ...All menu settings return to the factory default setting except: - Wait for this printer. • Load the appropriate media...
Menus and Messages Guide
Page 33
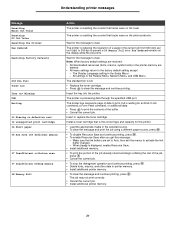
..., call for service, and report the message number and description of the problem. 33 Understanding printer messages Message 58 Too many trays attached 80 Scheduled maintenance 81 Engine Code CFC Failure 84 Photoconduct life warning 84 Replace Photoconductor 84 PC unit abnormal 88 Toner low 200 Paper jam Remove Cartridge 201 Paper jam...
..., call for service, and report the message number and description of the problem. 33 Understanding printer messages Message 58 Too many trays attached 80 Scheduled maintenance 81 Engine Code CFC Failure 84 Photoconduct life warning 84 Replace Photoconductor 84 PC unit abnormal 88 Toner low 200 Paper jam Remove Cartridge 201 Paper jam...
Quick Reference
Page 4
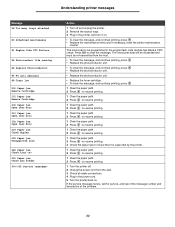
Common light sequences (continued) = On = Blinking = Slow blink Empty = Off Printer Condition Complex page Continue Toner Low / Error Replace PC Kit Load Paper Paper Jam Ready Cancel job/ Reset printer Load print media Load manual feeder Toner low Toner cartridge region mismatch Photoconductor kit life warning Replace photoconductor (printer hard stop) Programming engine code/ Programming system code Understanding the control panel lights 4
Common light sequences (continued) = On = Blinking = Slow blink Empty = Off Printer Condition Complex page Continue Toner Low / Error Replace PC Kit Load Paper Paper Jam Ready Cancel job/ Reset printer Load print media Load manual feeder Toner low Toner cartridge region mismatch Photoconductor kit life warning Replace photoconductor (printer hard stop) Programming engine code/ Programming system code Understanding the control panel lights 4
User's Guide
Page 39
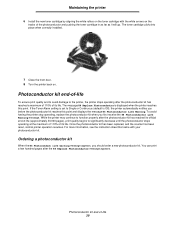
... the Toner Alarm setting is set to the printer, the printer stops operating after the 84 Replace Photoconductor message appears. For more information, see the instruction sheet that came with the white arrows on . Once the photoconductor kit has been replaced, and the counter has been reset, normal printer operation resumes. You can print a few hundred pages...
... the Toner Alarm setting is set to the printer, the printer stops operating after the 84 Replace Photoconductor message appears. For more information, see the instruction sheet that came with the white arrows on . Once the photoconductor kit has been replaced, and the counter has been reset, normal printer operation resumes. You can print a few hundred pages...

User's Guide
Page 40
... the toner cartridge: a Press the button on the left side of the print cartridge assembly. Maintaining the printer Changing a photoconductor kit Warning: When replacing a photoconductor kit, do not leave the new photoconductor kit exposed to release the front door. Photoconductor kit end-of time. c Grasp the toner cartridge handle, and pull up and out. 4 Unpack the...
... the toner cartridge: a Press the button on the left side of the print cartridge assembly. Maintaining the printer Changing a photoconductor kit Warning: When replacing a photoconductor kit, do not leave the new photoconductor kit exposed to release the front door. Photoconductor kit end-of time. c Grasp the toner cartridge handle, and pull up and out. 4 Unpack the...
User's Guide
Page 55
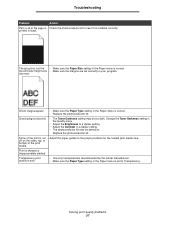
.... Toner fog or background • Check the photoconductor kit to run the printer setup cycle and clean the transfer roll. For more details, see Understanding print media guidelines on the • Replace the photoconductor kit. If the problem continues, contact the Lexmark Customer Support Center at http://support.lexmark.com . than the page size of the...
.... Toner fog or background • Check the photoconductor kit to run the printer setup cycle and clean the transfer roll. For more details, see Understanding print media guidelines on the • Replace the photoconductor kit. If the problem continues, contact the Lexmark Customer Support Center at http://support.lexmark.com . than the page size of the...
User's Guide
Page 56
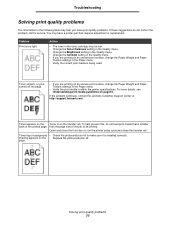
... jagged or uneven edges. • Change the Print Resolution setting in the Quality menu to be sure they are installed correctly. • Replace the photoconductor kit. Printing is not set too high in the Quality menu. Streaks appear on the page. • If you are using preprinted forms...Entire page is removed from the photoconductor kit. • Check the photoconductor kit and toner cartridge to 600 dpi, 1200 dpi, or 2400 Image Q. • Enable Enhance Fine Lines. • If you are using downloaded fonts, verify the fonts are supported by the printer, the host computer, and the...
... jagged or uneven edges. • Change the Print Resolution setting in the Quality menu to be sure they are installed correctly. • Replace the photoconductor kit. Printing is not set too high in the Quality menu. Streaks appear on the page. • If you are using preprinted forms...Entire page is removed from the photoconductor kit. • Check the photoconductor kit and toner cartridge to 600 dpi, 1200 dpi, or 2400 Image Q. • Enable Enhance Fine Lines. • If you are using downloaded fonts, verify the fonts are supported by the printer, the host computer, and the...
User's Guide
Page 57
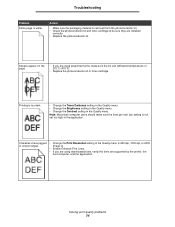
...the print media. Change theToner Darkness setting in the Paper menu is correct. Print is poor. • Use only transparencies recommended by the printer manufacturer. • Make sure the Paper Type setting in the Quality menu. • Adjust the Brightness to a darker setting. •...8226; Make sure the margins are set correctly in the Paper menu is set to a darker setting. • The photoconductor kit may be defective. Replace the photoconductor kit. The job prints, but the • Make sure the Paper Size setting in your program. incorrect. Transparency print ...
...the print media. Change theToner Darkness setting in the Paper menu is correct. Print is poor. • Use only transparencies recommended by the printer manufacturer. • Make sure the Paper Type setting in the Quality menu. • Adjust the Brightness to a darker setting. •...8226; Make sure the margins are set correctly in the Paper menu is set to a darker setting. • The photoconductor kit may be defective. Replace the photoconductor kit. The job prints, but the • Make sure the Paper Size setting in your program. incorrect. Transparency print ...
Service Manual
Page 21
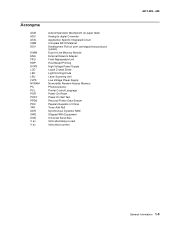
... Bill Of Material Development Roll (of print cartridge/photoconductor system) Dual In-Line Memory Module External Network Adapter Field Replaceable Unit Host Based Printing High Voltage Power Supply Liquid Crystal Diode Light Emitting Diode Laser Scanning Unit Low Voltage Power Supply Nonvolatile Random Access Memory Photoconductor Printer Control Language Power-On Reset Power-On Self...
... Bill Of Material Development Roll (of print cartridge/photoconductor system) Dual In-Line Memory Module External Network Adapter Field Replaceable Unit Host Based Printing High Voltage Power Supply Liquid Crystal Diode Light Emitting Diode Laser Scanning Unit Low Voltage Power Supply Nonvolatile Random Access Memory Photoconductor Printer Control Language Power-On Reset Power-On Self...
Service Manual
Page 29
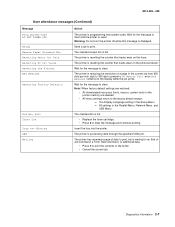
... dpi to prevent a 38 Memory Full error. Wait for the message to clear. The printer is programming new system code. Insert the tray into the printer. The standard output bin is full. • Replace the toner cartridge. • Press to reset. Wait for the message to clear and ...sets) in the Setup Menu - Warning: Do not turn the printer off while this message is processing data through the specified USB port. The printer is resetting the counter that tracks wear on the photoconductor. Send a job to clear. The printer has received a page of the buffer. • Cancel the ...
... dpi to prevent a 38 Memory Full error. Wait for the message to clear. The printer is programming new system code. Insert the tray into the printer. The standard output bin is full. • Replace the toner cartridge. • Press to reset. Wait for the message to clear and ...sets) in the Setup Menu - Warning: Do not turn the printer off while this message is processing data through the specified USB port. The printer is resetting the counter that tracks wear on the photoconductor. Send a job to clear. The printer has received a page of the buffer. • Cancel the ...

Service Manual
Page 46
...Lexmark™ E350d, E352dn Press to Exit Config Menu and press . Four pages print to help isolate print quality problems, like streaking, print test pages using the print quality test pages. Press to Prt Quality Pgs. Try a different PC kit. Try a different toner cartridge and PC kit. • If those fail, replace...defects guide at PCN 2) and the corresponding wire form (spring) found about 14 mm above and to expose the photoconductor resulting in printer service errors unless there is blockage of the manual for cartridge damage. To print the print quality test pages: ...
...Lexmark™ E350d, E352dn Press to Exit Config Menu and press . Four pages print to help isolate print quality problems, like streaking, print test pages using the print quality test pages. Press to Prt Quality Pgs. Try a different PC kit. Try a different toner cartridge and PC kit. • If those fail, replace...defects guide at PCN 2) and the corresponding wire form (spring) found about 14 mm above and to expose the photoconductor resulting in printer service errors unless there is blockage of the manual for cartridge damage. To print the print quality test pages: ...
Service Manual
Page 47
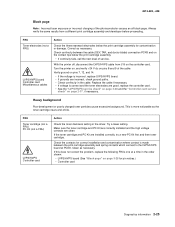
...for pin values.) • Controller card Diagnostics information 2-25 Turn the printer on, and verify +24 V dc on the contact tips below the... nears end-of service. Replace the cable if necessary. • If voltage is made between the cable (DEV, TAR, and doctor blade) connection PCN3 and on pins 8 and 9 of the photoconductor causes an all black page... ground on the controller card. 4512-420, -430 Black page Note: Incorrect laser exposure or incorrect charging of the cable. This is incorrect, replace LVPS/HVPS board. • If grounds are installed correctly, try a new ...
...for pin values.) • Controller card Diagnostics information 2-25 Turn the printer on, and verify +24 V dc on the contact tips below the... nears end-of service. Replace the cable if necessary. • If voltage is made between the cable (DEV, TAR, and doctor blade) connection PCN3 and on pins 8 and 9 of the photoconductor causes an all black page... ground on the controller card. 4512-420, -430 Black page Note: Incorrect laser exposure or incorrect charging of the cable. This is incorrect, replace LVPS/HVPS board. • If grounds are installed correctly, try a new ...

Service Manual
Page 48
Variation in the printer driver. 2-26 Lexmark™ E350d, E352dn Place a sheet of damage or fatigue. See"LVPS/HVPS service check" on page 2-20 for signs of image FRU Fuser Media (not a FRU) Action The fuser may have an unbalanced force against the PC (photoconductor) drum. Make sure recommended media... being used . Replace as necessary. Check to make sure that the laser light path is being used . Note: Do not touch the transfer roll except at the proper temperature to fuse the toner to prevent damage from finger oils or hand lotion. Replace the transfer roll assembly...
Variation in the printer driver. 2-26 Lexmark™ E350d, E352dn Place a sheet of damage or fatigue. See"LVPS/HVPS service check" on page 2-20 for signs of image FRU Fuser Media (not a FRU) Action The fuser may have an unbalanced force against the PC (photoconductor) drum. Make sure recommended media... being used . Replace as necessary. Check to make sure that the laser light path is being used . Note: Do not touch the transfer roll except at the proper temperature to fuse the toner to prevent damage from finger oils or hand lotion. Replace the transfer roll assembly...

Service Manual
Page 148
OR Replace Photoconductor Kit (customer replaceable item) Replace Fuser (call for service) Replace Transfer Roller (call for service) Replace Toner Cartridge (customer replaceable item) If you are unable to one of the sets of 1 Print defects guide Defects often repeat down ...repeating defect caused by the toner cartridge. In such cases, matching the defect frequency to distinguish between these two marks, replace the Photoconductor OR Kit before replacing the Fuser. Print defects guide Page 1 of vertical lines below can help identify the particular part that may be ...
OR Replace Photoconductor Kit (customer replaceable item) Replace Fuser (call for service) Replace Transfer Roller (call for service) Replace Toner Cartridge (customer replaceable item) If you are unable to one of the sets of 1 Print defects guide Defects often repeat down ...repeating defect caused by the toner cartridge. In such cases, matching the defect frequency to distinguish between these two marks, replace the Photoconductor OR Kit before replacing the Fuser. Print defects guide Page 1 of vertical lines below can help identify the particular part that may be ...


