Quick Reference
Page 4
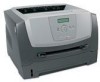
Common light sequences (continued) = On = Blinking = Slow blink Empty = Off Printer Condition Complex page Continue Toner Low / Error Replace PC Kit Load Paper Paper Jam Ready Cancel job/ Reset printer Load print media Load manual feeder Toner low Toner cartridge region mismatch Photoconductor kit life warning Replace photoconductor (printer hard stop) Programming engine code/ Programming system code Understanding the control panel lights 4
Common light sequences (continued) = On = Blinking = Slow blink Empty = Off Printer Condition Complex page Continue Toner Low / Error Replace PC Kit Load Paper Paper Jam Ready Cancel job/ Reset printer Load print media Load manual feeder Toner low Toner cartridge region mismatch Photoconductor kit life warning Replace photoconductor (printer hard stop) Programming engine code/ Programming system code Understanding the control panel lights 4
User's Guide
Page 3
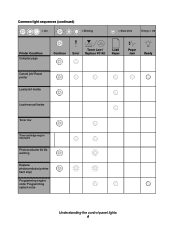
Contents Chapter 1: Learning about the printer 5 Printer overview ...5 Understanding the control panel ...8 Chapter 2: Understanding print media guidelines 10 What types of print media can be loaded? ...10 Selecting... 250-sheet drawer or 550-sheet drawer 33 Recognizing installed options ...34 Chapter 5: Maintaining the printer 35 Storing supplies ...35 Conserving supplies ...35 Ordering supplies ...35 Photoconductor kit end-of-life ...39 Maintenance kit ...42 Recycling Lexmark products ...42 Chapter 6: Clearing jams 43 Identifying jams ...43 Understanding jam messages ...43 Clearing ...
Contents Chapter 1: Learning about the printer 5 Printer overview ...5 Understanding the control panel ...8 Chapter 2: Understanding print media guidelines 10 What types of print media can be loaded? ...10 Selecting... 250-sheet drawer or 550-sheet drawer 33 Recognizing installed options ...34 Chapter 5: Maintaining the printer 35 Storing supplies ...35 Conserving supplies ...35 Ordering supplies ...35 Photoconductor kit end-of-life ...39 Maintenance kit ...42 Recycling Lexmark products ...42 Chapter 6: Clearing jams 43 Identifying jams ...43 Understanding jam messages ...43 Clearing ...
User's Guide
Page 36
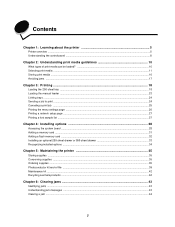
... recommended supplies specifically designed for the printer are: Part number Description Average cartridge yield* World Wide E250X22G Photoconductor kit 30,000 standard pages† For the USA and Canada1 E250A21A Toner Cartridge 3,500 standard pages1 E250A11A Return Program Toner Cartridge 3,500 standard pages1 E352H21A ...
... recommended supplies specifically designed for the printer are: Part number Description Average cartridge yield* World Wide E250X22G Photoconductor kit 30,000 standard pages† For the USA and Canada1 E250A21A Toner Cartridge 3,500 standard pages1 E250A11A Return Program Toner Cartridge 3,500 standard pages1 E352H21A ...
User's Guide
Page 39
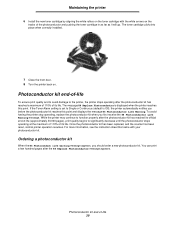
... Single or Continuous (default is displayed when the printer reaches this point and displays the message 84 Photoconductor Life Warning. Photoconductor kit end-of-life To ensure print quality and to avoid damage to the printer, the printer stops operating after the photoconductor kit has reached its life. Once the photoconductor kit has been replaced, and the counter has been...
... Single or Continuous (default is displayed when the printer reaches this point and displays the message 84 Photoconductor Life Warning. Photoconductor kit end-of-life To ensure print quality and to avoid damage to the printer, the printer stops operating after the photoconductor kit has reached its life. Once the photoconductor kit has been replaced, and the counter has been...

User's Guide
Page 40
... base of the print cartridge assembly. c Grasp the toner cartridge handle, and pull up and out. 4 Unpack the new photoconductor kit. b Lower the front door. b Grasp the toner cartridge handle, and pull up and out. Note: Do not press the...printer to direct light for an extended period of -life 40 Extended light exposure can cause print quality problems. 1 Turn the printer off. 2 Remove the print cartridge assembly. Photoconductor kit end-of time. Maintaining the printer Changing a photoconductor kit Warning: When replacing a photoconductor kit, do not leave the new photoconductor kit...
... base of the print cartridge assembly. c Grasp the toner cartridge handle, and pull up and out. 4 Unpack the new photoconductor kit. b Lower the front door. b Grasp the toner cartridge handle, and pull up and out. Note: Do not press the...printer to direct light for an extended period of -life 40 Extended light exposure can cause print quality problems. 1 Turn the printer off. 2 Remove the print cartridge assembly. Photoconductor kit end-of time. Maintaining the printer Changing a photoconductor kit Warning: When replacing a photoconductor kit, do not leave the new photoconductor kit...

User's Guide
Page 41
... see the instruction sheet that shipped with the new photoconductor kit). Photoconductor kit end-of the photoconductor and pushing the toner cartridge in as far as it will go . 7 Close the front door. 8 Turn the printer back on. 9 Reset the photoconductor counter (see Printing the menu settings page on the... tracks of -life 41 Note: Print your printer menu settings pages. The cartridge clicks into place when correctly installed. 6 ...
... see the instruction sheet that shipped with the new photoconductor kit). Photoconductor kit end-of the photoconductor and pushing the toner cartridge in as far as it will go . 7 Close the front door. 8 Turn the printer back on. 9 Reset the photoconductor counter (see Printing the menu settings page on the... tracks of -life 41 Note: Print your printer menu settings pages. The cartridge clicks into place when correctly installed. 6 ...
User's Guide
Page 55
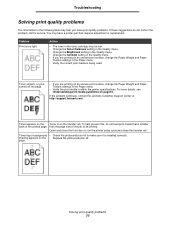
... is being used. You may have a printer part that is smaller back of the job to make sure it is on page10. If the problem continues, contact the Lexmark Customer Support Center at http://support.lexmark.com . To help you are printing on the • Replace the photoconductor kit. Solving print quality problems 55 than...
... is being used. You may have a printer part that is smaller back of the job to make sure it is on page10. If the problem continues, contact the Lexmark Customer Support Center at http://support.lexmark.com . To help you are printing on the • Replace the photoconductor kit. Solving print quality problems 55 than...
User's Guide
Page 56
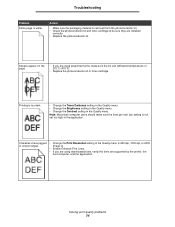
...Note: Macintosh computer users should make sure the ink can withstand temperatures of 210°C (410°F). • Replace the photoconductor kit or toner cartridge. Printing is not set too high in the Quality menu. Solving print quality problems 56 Troubleshooting Problem Entire page... is removed from the photoconductor kit. • Check the photoconductor kit and toner cartridge to 600 dpi, 1200 dpi, or 2400 Image Q. • Enable Enhance Fine Lines. • If you are supported by the printer, the host computer, and the application. Action ...
...Note: Macintosh computer users should make sure the ink can withstand temperatures of 210°C (410°F). • Replace the photoconductor kit or toner cartridge. Printing is not set too high in the Quality menu. Solving print quality problems 56 Troubleshooting Problem Entire page... is removed from the photoconductor kit. • Check the photoconductor kit and toner cartridge to 600 dpi, 1200 dpi, or 2400 Image Q. • Enable Enhance Fine Lines. • If you are supported by the printer, the host computer, and the application. Action ...
User's Guide
Page 57
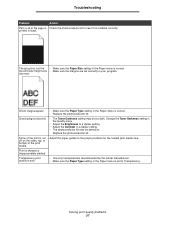
.... Ghost images appear. • Make sure the Paper Type setting in black. Replace the photoconductor kit. Transparency print quality is poor. • Use only transparencies recommended by the printer manufacturer. • Make sure the Paper Type setting in the Paper menu is set correctly... in the Paper menu is correct. • Replace the photoconductor kit. Gray background prints. • The Toner Darkness setting ...
.... Ghost images appear. • Make sure the Paper Type setting in black. Replace the photoconductor kit. Transparency print quality is poor. • Use only transparencies recommended by the printer manufacturer. • Make sure the Paper Type setting in the Paper menu is set correctly... in the Paper menu is correct. • Replace the photoconductor kit. Gray background prints. • The Toner Darkness setting ...

User's Guide
Page 72
...guide 19 paper support 5 paper tray adjustment 19 photoconductor kit changing 40 end-of-life 39 ordering 39 recycling 42 preprinted forms 13 print cartridge See toner cartridge print media jams avoiding 17 print media specifications 11 printer settings 7 printhead lens, cleaning 59 printing 18...11 sending a job to print 24 Simple Network Management Protocol 63 supplies conserving 35 recycling 42 storing 35 supplies ordering maintenance kit 42 photoconductor kit 39 toner cartridge 37 system board accessing 28 system password setting 63 T toner cartridge changing 37 ordering 37 recycling 42 ...
...guide 19 paper support 5 paper tray adjustment 19 photoconductor kit changing 40 end-of-life 39 ordering 39 recycling 42 preprinted forms 13 print cartridge See toner cartridge print media jams avoiding 17 print media specifications 11 printer settings 7 printhead lens, cleaning 59 printing 18...11 sending a job to print 24 Simple Network Management Protocol 63 supplies conserving 35 recycling 42 storing 35 supplies ordering maintenance kit 42 photoconductor kit 39 toner cartridge 37 system board accessing 28 system password setting 63 T toner cartridge changing 37 ordering 37 recycling 42 ...

Service Manual
Page 16
... trays and supply capacity Item 4512-420 Lexmark E350d Available input trays 250-sheet tray ✔ 550-sheet option drawer ✔ 550-sheet tray ✔ Dust cover ✔ Toner and photoconductor Toner cartridge 1,500 standard pages SWE¹ 3,500 standard pages SWE¹ High toner cartridge Photoconductor kit 9,000 standard pages¹ Up to 30...
... trays and supply capacity Item 4512-420 Lexmark E350d Available input trays 250-sheet tray ✔ 550-sheet option drawer ✔ 550-sheet tray ✔ Dust cover ✔ Toner and photoconductor Toner cartridge 1,500 standard pages SWE¹ 3,500 standard pages SWE¹ High toner cartridge Photoconductor kit 9,000 standard pages¹ Up to 30...

Service Manual
Page 46
...Lexmark™ E350d, E352dn The message CONFIG MENU displays. e. f. Four pages print to help isolate print quality problems, like streaking, print test pages using the print quality test pages. Check for solutions to the right of the beam or dust on page 2-15 for cartridge damage. Try a different toner cartridge and PC kit... press . a. c. To exit configuration, turn the printer off the printer. Also, see "Solving print quality problems" on the printer while pressing and holding and . Using print quality test...expose the photoconductor resulting in a 'dirty' print.
...Lexmark™ E350d, E352dn The message CONFIG MENU displays. e. f. Four pages print to help isolate print quality problems, like streaking, print test pages using the print quality test pages. Check for solutions to the right of the beam or dust on page 2-15 for cartridge damage. Try a different toner cartridge and PC kit... press . a. c. To exit configuration, turn the printer off the printer. Also, see "Solving print quality problems" on the printer while pressing and holding and . Using print quality test...expose the photoconductor resulting in a 'dirty' print.
Service Manual
Page 47
...correct the problem, replace the following FRUs one at PCN3. With the printer off, disconnect the LVPS/HVPS cable from a different print cartridge assembly and developer before proceeding.... Make sure the toner cartridge and PC Kit are correctly installed and the high voltage contacts are installed correctly, try a new PC Kit first and then toner cartridge. Check the contacts for.... Correct as the toner cartridge nears end-of the photoconductor causes an all black page. If the toner cartridge and PC Kit are clean. Turn the printer on, and verify +24 V dc on page 2-...
...correct the problem, replace the following FRUs one at PCN3. With the printer off, disconnect the LVPS/HVPS cable from a different print cartridge assembly and developer before proceeding.... Make sure the toner cartridge and PC Kit are correctly installed and the high voltage contacts are installed correctly, try a new PC Kit first and then toner cartridge. Check the contacts for.... Correct as the toner cartridge nears end-of the photoconductor causes an all black page. If the toner cartridge and PC Kit are clean. Turn the printer on, and verify +24 V dc on page 2-...

Service Manual
Page 48
... Variation in the printer driver. 2-26 Lexmark™ E350d, E352dn Place ...a sheet of wear, damage or contamination. Inspect the transfer roll for more information. Note: Do not touch the transfer roll except at the proper temperature to fuse the toner to properly fuse. Check the springs in the printer... driver. Replace as necessary. Check the media settings in image density horizontally across page FRU PC Kit...unbalanced force against the PC (photoconductor) drum. See"LVPS/HVPS ...Kit. The bearing assemblies should support the transfer roll, ...
... Variation in the printer driver. 2-26 Lexmark™ E350d, E352dn Place ...a sheet of wear, damage or contamination. Inspect the transfer roll for more information. Note: Do not touch the transfer roll except at the proper temperature to fuse the toner to properly fuse. Check the springs in the printer... driver. Replace as necessary. Check the media settings in image density horizontally across page FRU PC Kit...unbalanced force against the PC (photoconductor) drum. See"LVPS/HVPS ...Kit. The bearing assemblies should support the transfer roll, ...

Service Manual
Page 148
...Print defects guide Page 1 of vertical lines below can help identify the particular part that may be causing the defect. Replace Photoconductor Kit (customer replaceable item) Replace Fuser (call for service) Replace Transfer Roller (call for service) Replace Toner Cartridge (customer replaceable... repeat down a page. In such cases, matching the defect frequency to distinguish between these two marks, replace the Photoconductor OR Kit before replacing the Fuser. For example, the distance between these two marks represents a repeating defect caused by the toner cartridge.
...Print defects guide Page 1 of vertical lines below can help identify the particular part that may be causing the defect. Replace Photoconductor Kit (customer replaceable item) Replace Fuser (call for service) Replace Transfer Roller (call for service) Replace Toner Cartridge (customer replaceable... repeat down a page. In such cases, matching the defect frequency to distinguish between these two marks, replace the Photoconductor OR Kit before replacing the Fuser. For example, the distance between these two marks represents a repeating defect caused by the toner cartridge.


