Menus and Messages Guide
Page 14
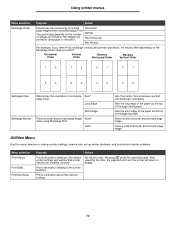
... network settings Values No value for this menu selection to change printer settings, remove jobs, set up printer hardware, and troubleshoot printer problems. Menu selection Print Menus Print Stats Print Net Setup Purpose Prints information relating to the default printer settings and verifies that printer options are portrait or landscape in orientation. Pressing prints the specified...
... network settings Values No value for this menu selection to change printer settings, remove jobs, set up printer hardware, and troubleshoot printer problems. Menu selection Print Menus Print Stats Print Net Setup Purpose Prints information relating to the default printer settings and verifies that printer options are portrait or landscape in orientation. Pressing prints the specified...
User's Guide
Page 4
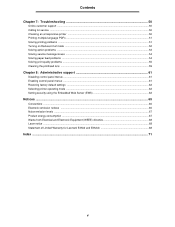
Contents Chapter 7: Troubleshooting 50 Online customer support ...50 Calling for service ...50 Checking an unresponsive printer ...50 Printing multiple-language PDFs ...51 Solving printing problems ...51 Turning on Reduced Curl mode ...52 Solving option...printer operating mode ...62 Setting security using the Embedded Web Server (EWS 62 Notices ...65 Conventions ...65 Electronic emission notices ...65 Noise emission levels ...67 Product energy consumption ...67 Waste from Electrical and Electronic Equipment (WEEE) directive 68 Laser notice ...68 Statement of Limited Warranty for Lexmark E350d...
Contents Chapter 7: Troubleshooting 50 Online customer support ...50 Calling for service ...50 Checking an unresponsive printer ...50 Printing multiple-language PDFs ...51 Solving printing problems ...51 Turning on Reduced Curl mode ...52 Solving option...printer operating mode ...62 Setting security using the Embedded Web Server (EWS 62 Notices ...65 Conventions ...65 Electronic emission notices ...65 Noise emission levels ...67 Product energy consumption ...67 Waste from Electrical and Electronic Equipment (WEEE) directive 68 Laser notice ...68 Statement of Limited Warranty for Lexmark E350d...
User's Guide
Page 50
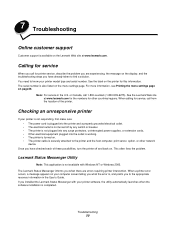
...the outlet is working. • The printer is turned on. • The printer cable is not turned off and back on the menu settings page. 7 Troubleshooting Online customer support Customer support is available on the Lexmark Web site at www.lexmark.com for the numbers for other network device... information, see Printing the menu settings page on the printer for this information. Once you what the error is completed. Lexmark Status Messenger Utility Note: This application is also listed on . See the label on page26. Troubleshooting 50 Note: For service in the User's Guide. This...
...the outlet is working. • The printer is turned on. • The printer cable is not turned off and back on the menu settings page. 7 Troubleshooting Online customer support Customer support is available on the Lexmark Web site at www.lexmark.com for the numbers for other network device... information, see Printing the menu settings page on the printer for this information. Once you what the error is completed. Lexmark Status Messenger Utility Note: This application is also listed on . See the label on page26. Troubleshooting 50 Note: For service in the User's Guide. This...
User's Guide
Page 51
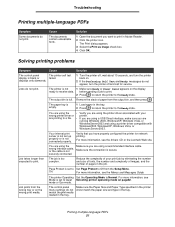
...the cable is not Make sure the connection is full. Reduce the complexity of pages in Adobe Reader. 2 Click the printer icon. mode or Eco-mode. Troubleshooting Printing multiple-language PDFs Symptom Some documents do not print. The output bin is secure. You are using a recommended ...display ready to print. For more information, see the drivers CD or the Lexmark Web site. On. securely connected. displays only diamonds. 1 Turn the printer off, wait about 10 seconds, and turn the printer off and call for network printing. Solution 1 Open the document you have ...
...the cable is not Make sure the connection is full. Reduce the complexity of pages in Adobe Reader. 2 Click the printer icon. mode or Eco-mode. Troubleshooting Printing multiple-language PDFs Symptom Some documents do not print. The output bin is secure. You are using a recommended ...display ready to print. For more information, see the drivers CD or the Lexmark Web site. On. securely connected. displays only diamonds. 1 Turn the printer off, wait about 10 seconds, and turn the printer off and call for network printing. Solution 1 Open the document you have ...
User's Guide
Page 52
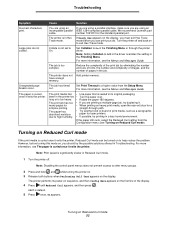
... path. • Try another kind or brand of print media, such as a xerographic paper for laser printers. • If possible, try duplexing it exits the printer. We recommend Lexmark part cable. Set Collation to exit Hex Trace mode. For more information, see the Menus and Messages... menu (see the Menus and Messages Guide. Collate is significantly slower in a less humid environment. The printer does not Add printer memory. Turning on to On in Troubleshooting. The paper has absorbed moisture due to other menu groups. 2 Press and hold and while turning the...
... path. • Try another kind or brand of print media, such as a xerographic paper for laser printers. • If possible, try duplexing it exits the printer. We recommend Lexmark part cable. Set Collation to exit Hex Trace mode. For more information, see the Menus and Messages... menu (see the Menus and Messages Guide. Collate is significantly slower in a less humid environment. The printer does not Add printer memory. Turning on to On in Troubleshooting. The paper has absorbed moisture due to other menu groups. 2 Press and hold and while turning the...
User's Guide
Page 53
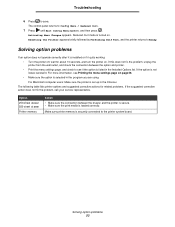
... for related problems. If the suggested corrective actions for about 10 seconds, and turn the printer on page26. • Make sure the option is loaded correctly. If the option is securely connected to save. Troubleshooting 6 Press to the printer system board. The control panel returns to Config Menu / Reduced Curl. 7 Press until Exit...
... for related problems. If the suggested corrective actions for about 10 seconds, and turn the printer on page26. • Make sure the option is loaded correctly. If the option is securely connected to save. Troubleshooting 6 Press to the printer system board. The control panel returns to Config Menu / Reduced Curl. 7 Press until Exit...
User's Guide
Page 54
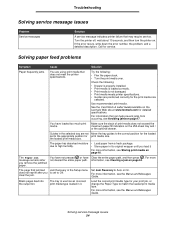
... For information that may require service. Clear the entire paper path, and then press . The page that does not meet the printer specifications. If the error recurs, write down the error number, the problem, and a detailed description. Try the following : &#...lexmark.com for your print job, or change the Paper Type to the appropriate position for print media size. For more information, see the Menus and Messages Guide. Blank pages feed into the output bin. Troubleshooting Solving service message issues Problem Service messages Solution A service message indicates printer...
... For information that may require service. Clear the entire paper path, and then press . The page that does not meet the printer specifications. If the error recurs, write down the error number, the problem, and a detailed description. Try the following : &#...lexmark.com for your print job, or change the Paper Type to the appropriate position for print media size. For more information, see the Menus and Messages Guide. Blank pages feed into the output bin. Troubleshooting Solving service message issues Problem Service messages Solution A service message indicates printer...
User's Guide
Page 55
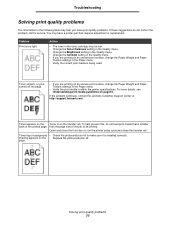
... and Paper Texture settings in the Paper menu. • Verify the correct print media is within the printer specifications. Solving print quality problems 55 You may have a printer part that is installed correctly. Toner smears, or print comes off the page. • If you are...to make sure it is smaller back of the printed page. page. If the problem continues, contact the Lexmark Customer Support Center at http://support.lexmark.com . Troubleshooting Solving print quality problems The information in the following table may help prevent this, do not correct the problem...
... and Paper Texture settings in the Paper menu. • Verify the correct print media is within the printer specifications. Solving print quality problems 55 You may have a printer part that is installed correctly. Toner smears, or print comes off the page. • If you are...to make sure it is smaller back of the printed page. page. If the problem continues, contact the Lexmark Customer Support Center at http://support.lexmark.com . Troubleshooting Solving print quality problems The information in the following table may help prevent this, do not correct the problem...
User's Guide
Page 56
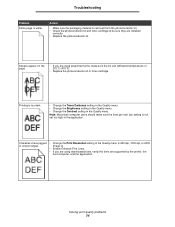
... have jagged or uneven edges. • Change the Print Resolution setting in the Quality menu to be sure they are supported by the printer, the host computer, and the application. Note: Macintosh computer users should make sure the ink can withstand temperatures of 210°C (410...°F). • Replace the photoconductor kit or toner cartridge. Printing is white. Troubleshooting Problem Entire page is too dark. • Change the Toner Darkness setting in the Quality menu. • Change the Brightness setting in...
... have jagged or uneven edges. • Change the Print Resolution setting in the Quality menu to be sure they are supported by the printer, the host computer, and the application. Note: Macintosh computer users should make sure the ink can withstand temperatures of 210°C (410...°F). • Replace the photoconductor kit or toner cartridge. Printing is white. Troubleshooting Problem Entire page is too dark. • Change the Toner Darkness setting in the Quality menu. • Change the Brightness setting in...
User's Guide
Page 57
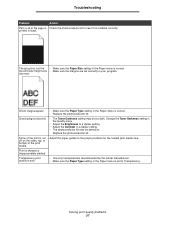
...prints. • The Toner Darkness setting may be too dark. Transparency print quality is poor. • Use only transparencies recommended by the printer manufacturer. • Make sure the Paper Type setting in the Paper menu is set correctly in your program. Ghost images appear. • ...8226; Replace the photoconductor kit. The job prints, but the • Make sure the Paper Size setting in black. Print is correct. Troubleshooting Problem Action Part or all of the page is Check the photoconductor kit to a darker setting. • The photoconductor kit may be defective....
...prints. • The Toner Darkness setting may be too dark. Transparency print quality is poor. • Use only transparencies recommended by the printer manufacturer. • Make sure the Paper Type setting in the Paper menu is set correctly in your program. Ghost images appear. • ...8226; Replace the photoconductor kit. The job prints, but the • Make sure the Paper Size setting in black. Print is correct. Troubleshooting Problem Action Part or all of the page is Check the photoconductor kit to a darker setting. • The photoconductor kit may be defective....
User's Guide
Page 58
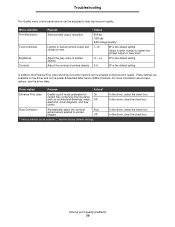
...for On certain files containing fine line detail, such as architectural drawings, maps, Off* electronic circuit diagrams, and flow charts. Troubleshooting The Quality menu control panel options can be adjusted to help improve print quality. Menu selection Print Resolution Toner Darkness Brightness Contrast ...are the factory default settings. Auto Off* † Values marked by an asterisk (*) are available on the driver and on the printer Embedded Web Server (EWS) interface. In the driver, select the check box. Solving print quality problems 58 Adjust the contrast of ...
...for On certain files containing fine line detail, such as architectural drawings, maps, Off* electronic circuit diagrams, and flow charts. Troubleshooting The Quality menu control panel options can be adjusted to help improve print quality. Menu selection Print Resolution Toner Darkness Brightness Contrast ...are the factory default settings. Auto Off* † Values marked by an asterisk (*) are available on the driver and on the printer Embedded Web Server (EWS) interface. In the driver, select the check box. Solving print quality problems 58 Adjust the contrast of ...

User's Guide
Page 59
Cleaning the printhead lens 59 Place the print cartridge assembly on a flat, clean surface. 4 Locate the glass printhead lens within the recessed area in the top of the printer to release and lower the front door. 3 Remove the print cartridge assembly by cleaning the printhead lens. 1 Turn the printer off. 2 Press the button on the left side of the printer. Note: Do not press the button on the print cartridge assembly. Troubleshooting Cleaning the printhead lens Some print quality problems can be solved by pulling on the toner cartridge handle.
Cleaning the printhead lens 59 Place the print cartridge assembly on a flat, clean surface. 4 Locate the glass printhead lens within the recessed area in the top of the printer to release and lower the front door. 3 Remove the print cartridge assembly by cleaning the printhead lens. 1 Turn the printer off. 2 Press the button on the left side of the printer. Note: Do not press the button on the print cartridge assembly. Troubleshooting Cleaning the printhead lens Some print quality problems can be solved by pulling on the toner cartridge handle.

User's Guide
Page 60
Warning: Not using a clean, dry, lint-free cloth may result in as far as it will go. 7 Close the front door. 8 Turn the printer on the guides of the print cartridge assembly with a clean, dry, lint-free cloth. Troubleshooting 5 Gently wipe the printhead lens with the arrows on the tracks in the printer and pushing the print cartridge assembly in damage to the printhead lens. 6 Install the print cartridge assembly into the printer by aligning the arrows on . Cleaning the printhead lens 60
Warning: Not using a clean, dry, lint-free cloth may result in as far as it will go. 7 Close the front door. 8 Turn the printer on the guides of the print cartridge assembly with a clean, dry, lint-free cloth. Troubleshooting 5 Gently wipe the printhead lens with the arrows on the tracks in the printer and pushing the print cartridge assembly in damage to the printhead lens. 6 Install the print cartridge assembly into the printer by aligning the arrows on . Cleaning the printhead lens 60
