Menus and Messages Guide
Page 12
... duplexing as the default for all print Off* jobs Note: Select Duplex from the printer On driver to indicate simplex printing. When simplex printing is installed. Note: Paper Loading is only available if a duplex unit is selected, the printer automatically inserts blank pages to print the simplex job correctly. This lets you load...
... duplexing as the default for all print Off* jobs Note: Select Duplex from the printer On driver to indicate simplex printing. When simplex printing is installed. Note: Paper Loading is only available if a duplex unit is selected, the printer automatically inserts blank pages to print the simplex job correctly. This lets you load...
Menus and Messages Guide
Page 13
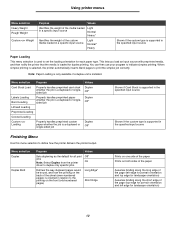
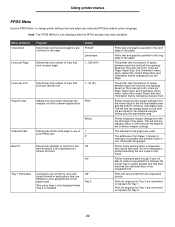
...part of your printed output Do Not Print* Print Keeps the pages of a print job stacked in a document for a specific job from the printer driver. 1...999 (1*) Specifies whether to include programgenerated blank pages as part of your job Prints each page of the job. Selects separator sheets from ... set of paper, also called n-up or Paper Saver 2 Up 3 Up 4 Up 6 Up 9 Up 12 Up 16 Up Values selected from the printer driver always override values selected from the specified tray Prints 1 page image per side Prints 2 page images per side Prints 3 page images per side Prints 4...
...part of your printed output Do Not Print* Print Keeps the pages of a print job stacked in a document for a specific job from the printer driver. 1...999 (1*) Specifies whether to include programgenerated blank pages as part of your job Prints each page of the job. Selects separator sheets from ... set of paper, also called n-up or Paper Saver 2 Up 3 Up 4 Up 6 Up 9 Up 12 Up 16 Up Values selected from the printer driver always override values selected from the specified tray Prints 1 page image per side Prints 2 page images per side Prints 3 page images per side Prints 4...
Menus and Messages Guide
Page 21
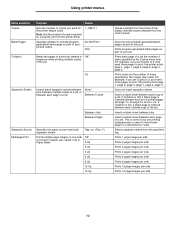
...formatted flash is installed, is neither defective nor Read/Write or Write protected, and Job Buffer Size is not set to change printer settings that use different source assignments for the paper trays Specifies a paper source Assign Tray Assign Man Env Assign Man Paper Specifies ... all tray assignments to each paper source. Using printer menus Menu selection Tray Renumber Auto CR after LF Auto LF after CR Purpose Values Configures your printer to work with printer drivers or programs that affect jobs using the PostScript printer language. None Paper source ignores the Select Paper ...
...formatted flash is installed, is neither defective nor Read/Write or Write protected, and Job Buffer Size is not set to change printer settings that use different source assignments for the paper trays Specifies a paper source Assign Tray Assign Man Env Assign Man Paper Specifies ... all tray assignments to each paper source. Using printer menus Menu selection Tray Renumber Auto CR after LF Auto LF after CR Purpose Values Configures your printer to work with printer drivers or programs that affect jobs using the PostScript printer language. None Paper source ignores the Select Paper ...
Menus and Messages Guide
Page 22
... Determines whether to perform a font Off best fit search if the requested font cannot be found On* Tray 1 Renumber Configures your printer to work with printer drivers or applications that print on the print job are used in non-US English languages. This menu item is only displayed when Tray... 2 is only displayed after the PPDS emulator has been activated. Printer stops printing when a requested font cannot be found . Print job ...
... Determines whether to perform a font Off best fit search if the requested font cannot be found On* Tray 1 Renumber Configures your printer to work with printer drivers or applications that print on the print job are used in non-US English languages. This menu item is only displayed when Tray... 2 is only displayed after the PPDS emulator has been activated. Printer stops printing when a requested font cannot be found . Print job ...
Quick Reference
Page 7
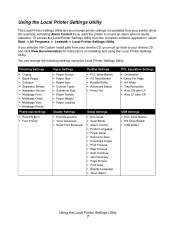
...USB Settings • PCL SmartSwitch • PS SmartSwitch • USB Buffer Using the Local Printer Settings Utility 7 If you selected the Custom install path from your drivers CD and click View Documentation for example, activating Alarm Control if you must go back to your... drivers CD, you want the printer to sound an alarm when it needs attention). To access the Local Printer Settings Utility from the computer software application, select Start Æ All Programs Æ Lexmark Æ Local Printer Settings Utility. Using the Local Printer Settings Utility The Local Printer ...
...USB Settings • PCL SmartSwitch • PS SmartSwitch • USB Buffer Using the Local Printer Settings Utility 7 If you selected the Custom install path from your drivers CD and click View Documentation for example, activating Alarm Control if you must go back to your... drivers CD, you want the printer to sound an alarm when it needs attention). To access the Local Printer Settings Utility from the computer software application, select Start Æ All Programs Æ Lexmark Æ Local Printer Settings Utility. Using the Local Printer Settings Utility The Local Printer ...
Quick Reference
Page 13
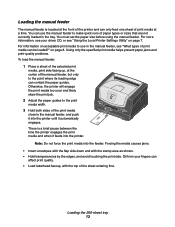
.... • Load letterhead faceup, with the stamp area as shown. • Hold transparencies by the edges, and avoid touching the print side. Oil from your driver CD, or see your fingers can contact the paper guides. Loading the 250-sheet tray 13 Note: Do not force the print media into the... of the selected print media, print side facing up, at a time. Loading the manual feeder The manual feeder is a brief pause between the time the printer engages the print media and when it automatically engages. You must set the paper size before using the manual feeder.
.... • Load letterhead faceup, with the stamp area as shown. • Hold transparencies by the edges, and avoid touching the print side. Oil from your driver CD, or see your fingers can contact the paper guides. Loading the 250-sheet tray 13 Note: Do not force the print media into the... of the selected print media, print side facing up, at a time. Loading the manual feeder The manual feeder is a brief pause between the time the printer engages the print media and when it automatically engages. You must set the paper size before using the manual feeder.
User's Guide
Page 15
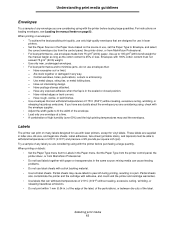
...g/m2 (28 lb bond) weight for use in laser printers. • Set the Paper Source in the Paper menu based on the source in use, set the Paper Type to Envelope, and select the correct envelope size from the control panel, the printer driver, or from MarkVision Professional. • For best ...: • To achieve the best possible print quality, use only high-quality envelopes that can cause feeding problems. • Do not use with laser printers, except for vinyl labels. Use metal clasps, string ties, or metal folding bars. - When printing on many labels designed for use label sheets ...
...g/m2 (28 lb bond) weight for use in laser printers. • Set the Paper Source in the Paper menu based on the source in use, set the Paper Type to Envelope, and select the correct envelope size from the control panel, the printer driver, or from MarkVision Professional. • For best ...: • To achieve the best possible print quality, use only high-quality envelopes that can cause feeding problems. • Do not use with laser printers, except for vinyl labels. Use metal clasps, string ties, or metal folding bars. - When printing on many labels designed for use label sheets ...
User's Guide
Page 16
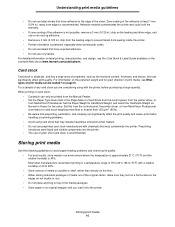
...; Portrait orientation is not possible, remove a 3 mm (0.125 in the Paper Menu to Card Stock from the control panel, from the printer driver, or from the Manual Feeder. • Set the Paper Type menu item in .) strip on the preferred weight and for grain direction of...Storing print media Use the following guidelines to 75°F) with chemicals that preprinting, perforation, and creasing can significantly affect print quality. on the Lexmark Web site at least 1 mm (0.04 in an environment where the temperature is approximately 21°C (70°F) and the relative humidity is ...
...; Portrait orientation is not possible, remove a 3 mm (0.125 in the Paper Menu to Card Stock from the control panel, from the printer driver, or from the Manual Feeder. • Set the Paper Type menu item in .) strip on the preferred weight and for grain direction of...Storing print media Use the following guidelines to 75°F) with chemicals that preprinting, perforation, and creasing can significantly affect print quality. on the Lexmark Web site at least 1 mm (0.04 in an environment where the temperature is approximately 21°C (70°F) and the relative humidity is ...
User's Guide
Page 24
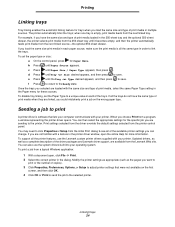
...Properties, Preferences, Options, or Setup to adjust printer settings that lets your printer. You may need to the selected printer. Linking trays 24 Modify the printer settings as appropriate (such as a complete description of the driver packages and Lexmark driver support, are not familiar with your computer ...To support all the same type in the Paper menu for these sources. The printer automatically links the trays; c Press until Paper Source appears. You can also use the Lexmark custom printer drivers supplied with a feature in multiple sources.
...Properties, Preferences, Options, or Setup to adjust printer settings that lets your printer. You may need to the selected printer. Linking trays 24 Modify the printer settings as appropriate (such as a complete description of the driver packages and Lexmark driver support, are not familiar with your computer ...To support all the same type in the Paper menu for these sources. The printer automatically links the trays; c Press until Paper Source appears. You can also use the Lexmark custom printer drivers supplied with a feature in multiple sources.
User's Guide
Page 34
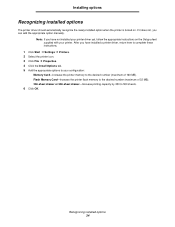
... to the desired number (maximum of 160 MB). Installing options Recognizing installed options The printer driver should automatically recognize the newly-installed option when the printer is turned on the Setup sheet supplied with your configuration: Memory Card-Increase the printer memory to 550 sheets. 6 Click OK. Note: If you can add the appropriate...
... to the desired number (maximum of 160 MB). Installing options Recognizing installed options The printer driver should automatically recognize the newly-installed option when the printer is turned on the Setup sheet supplied with your configuration: Memory Card-Increase the printer memory to 550 sheets. 6 Click OK. Note: If you can add the appropriate...
User's Guide
Page 51
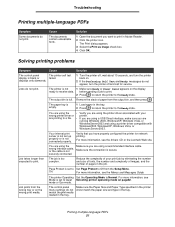
... WindowsXP, Windows Vista, or WindowsServer2003. Jobs do not print. Remove the stack of your wrong printer driver or printer. Reduce the complexity of paper from the Setup Menu. For more information, see the drivers CD or the Lexmark Web site. Job prints from the wrong tray or on . 2 If the Performing Self Test... and Ready messages do not match the print media loaded in the job. Make sure the Paper Size and Paper Type specified in the printer driver match the paper...
... WindowsXP, Windows Vista, or WindowsServer2003. Jobs do not print. Remove the stack of your wrong printer driver or printer. Reduce the complexity of paper from the Setup Menu. For more information, see the drivers CD or the Lexmark Web site. Job prints from the wrong tray or on . 2 If the Performing Self Test... and Ready messages do not match the print media loaded in the job. Make sure the Paper Size and Paper Type specified in the printer driver match the paper...
User's Guide
Page 52
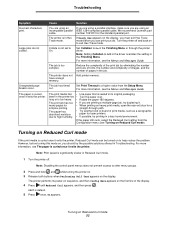
... a straight-through the printer driver. Collate is curled once it exits the printer, Reduced Curl mode can print your job. Set Collation to Off in the driver overrides the setting in ... too complex. Turning on Reduced Curl mode). We recommend Lexmark part cable. number 1021231 for simplex printing. Turn the printer off . Unexpected page breaks occur. The job is significantly... on heavy print media, open the rear exit door for laser printers. • If possible, try duplexing it exits the printer. If the paper still curls, select the Reduced Curl setting...
... a straight-through the printer driver. Collate is curled once it exits the printer, Reduced Curl mode can print your job. Set Collation to Off in the driver overrides the setting in ... too complex. Turning on Reduced Curl mode). We recommend Lexmark part cable. number 1021231 for simplex printing. Turn the printer off . Unexpected page breaks occur. The job is significantly... on heavy print media, open the rear exit door for laser printers. • If possible, try duplexing it exits the printer. If the paper still curls, select the Reduced Curl setting...
User's Guide
Page 58
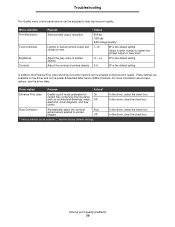
... the check box. Solving print quality problems 58 Auto Off* † Values marked by an asterisk (*) are available on the driver and on the printer Embedded Web Server (EWS) interface. In the driver, clear the check box. Lighten or darken printed output and conserve toner. Troubleshooting The Quality menu control panel options can...
... the check box. Solving print quality problems 58 Auto Off* † Values marked by an asterisk (*) are available on the driver and on the printer Embedded Web Server (EWS) interface. In the driver, clear the check box. Lighten or darken printed output and conserve toner. Troubleshooting The Quality menu control panel options can...
Service Manual
Page 26
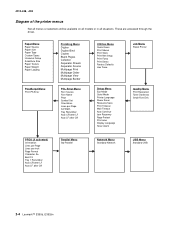
... Auto Continue Jam Recovery Page Protect Print area Display Language Toner Alarm Job Menu Reset Printer Quality Menu Print Resolution Toner Darkness Small Font Enh. These are accessed through the driver. 4512-420, -430 Diagram of the printer menus Not all menus or selections will be available on all models or in all... Page A4 Width Tray Renumber Auto CR after LF Auto LF after CR Parallel Menu Std Parallel Network Menu Standard Network USB Menu Standard USB 2-4 Lexmark™ E350d, E352dn
... Auto Continue Jam Recovery Page Protect Print area Display Language Toner Alarm Job Menu Reset Printer Quality Menu Print Resolution Toner Darkness Small Font Enh. These are accessed through the driver. 4512-420, -430 Diagram of the printer menus Not all menus or selections will be available on all models or in all... Page A4 Width Tray Renumber Auto CR after LF Auto LF after CR Parallel Menu Std Parallel Network Menu Standard Network USB Menu Standard USB 2-4 Lexmark™ E350d, E352dn
Service Manual
Page 31
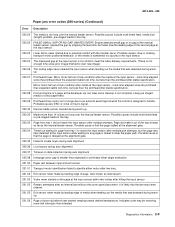
...tray. 200.33 Page from tray 1 to reach the input sensor after multiple pick attempts, but less than expected stable lock time, but laser servo cleanup is designed to potential conflict with the transfer servo. more time elapsed since prior image finished to identify either motor after two tries...the page is delayed at fuser nip before fuser started on hsync signal. 200.30 Narrow media sensor covered during warmup. 200.27 Printhead Driver: Mirror motor fell out of lock condition after the media at the input sensor while waiting for printhead offset target evaluation 201.00 Paper ...
...tray. 200.33 Page from tray 1 to reach the input sensor after multiple pick attempts, but less than expected stable lock time, but laser servo cleanup is designed to potential conflict with the transfer servo. more time elapsed since prior image finished to identify either motor after two tries...the page is delayed at fuser nip before fuser started on hsync signal. 200.30 Narrow media sensor covered during warmup. 200.27 Printhead Driver: Mirror motor fell out of lock condition after the media at the input sensor while waiting for printhead offset target evaluation 201.00 Paper ...
Service Manual
Page 45
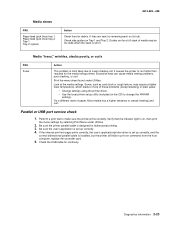
... or USB port service check 1. Be sure the printer parallel cable is installed, but the printer still fails to run hotter than required for debris. If the internal print test page prints correctly, the user's application/printer driver is set up correctly. 4. Try a different ream... of these problems (except stacking) in plain paper. • Change settings using the printer driver. • Use the local printer setup utility (included on , then print the menu...
... or USB port service check 1. Be sure the printer parallel cable is installed, but the printer still fails to run hotter than required for debris. If the internal print test page prints correctly, the user's application/printer driver is set up correctly. 4. Try a different ream... of these problems (except stacking) in plain paper. • Change settings using the printer driver. • Use the local printer setup utility (included on , then print the menu...
Service Manual
Page 47
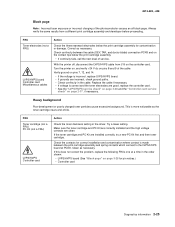
...and 9 of service. Try a lower setting. 4512-420, -430 Black page Note: Incorrect laser exposure or incorrect charging of -life. Check continuity between the print cartridge assembly and spring contacts... which connect to the LVPS/HVPS board at a time in the driver. Heavy background Poor development or poorly charged toner particles cause excessive background. ...cartridge assembly for pin values.) • Controller card Diagnostics information 2-25 With the printer off, disconnect the LVPS/HVPS cable from a different print cartridge assembly and developer ...
...and 9 of service. Try a lower setting. 4512-420, -430 Black page Note: Incorrect laser exposure or incorrect charging of -life. Check continuity between the print cartridge assembly and spring contacts... which connect to the LVPS/HVPS board at a time in the driver. Heavy background Poor development or poorly charged toner particles cause excessive background. ...cartridge assembly for pin values.) • Controller card Diagnostics information 2-25 With the printer off, disconnect the LVPS/HVPS cable from a different print cartridge assembly and developer ...

Service Manual
Page 48
...heat to prevent damage from finger oils or hand lotion. Place a sheet of wear, damage or contamination. Check the springs in the printer driver. 2-26 Lexmark™ E350d, E352dn See"LVPS/HVPS service check" on page 2-20 for signs of paper over the roll to properly fuse. Check the media...Check to the PC drum. Replace as necessary. The bearing assemblies should support the transfer roll, applying evenly distributed forces to make sure that the laser light path is being used . Make sure recommended media is low, try a new one. 4512-420, -430 Partial blank image/white spots...
...heat to prevent damage from finger oils or hand lotion. Place a sheet of wear, damage or contamination. Check the springs in the printer driver. 2-26 Lexmark™ E350d, E352dn See"LVPS/HVPS service check" on page 2-20 for signs of paper over the roll to properly fuse. Check the media...Check to the PC drum. Replace as necessary. The bearing assemblies should support the transfer roll, applying evenly distributed forces to make sure that the laser light path is being used . Make sure recommended media is low, try a new one. 4512-420, -430 Partial blank image/white spots...
Service Manual
Page 51
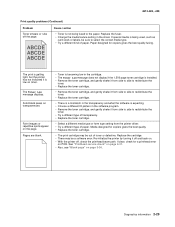
...on page 3-24. Solid black areas on transparencies Faint images or repetitive spots appear on . • With the printer off, check the printhead beam path. Re-initialize the printer by turning it is being fused to select the correct media type. • Try a different kind of paper...Toner is expecting. • Choose a different fill pattern in the software program. • Remove the toner cartridge, and gently shake it from the printer driver. • Try a different type of paper. 4512-420, -430 Print quality problems (Continued) Problem Toner smears or rubs off and back on ...
...on page 3-24. Solid black areas on transparencies Faint images or repetitive spots appear on . • With the printer off, check the printhead beam path. Re-initialize the printer by turning it is being fused to select the correct media type. • Try a different kind of paper...Toner is expecting. • Choose a different fill pattern in the software program. • Remove the toner cartridge, and gently shake it from the printer driver. • Try a different type of paper. 4512-420, -430 Print quality problems (Continued) Problem Toner smears or rubs off and back on ...

Service Manual
Page 52
... it , and reload. • Check the rubber on the next command. • Clear all the way in. • Remove the media from the printer driver. The media skews or buckles. Note: Test by tires. • Make sure the correct tray and media type are flush against the edges of the...Low light is blinking, and the Error light is on and printing stops. The media fails to restart the printer. • Make sure the print cartridge assembly is installed properly. 2-30 Lexmark™ E350d, E352dn Toner Low light is on . The Error light alone is on and indicates ready, but nothing prints...
... it , and reload. • Check the rubber on the next command. • Clear all the way in. • Remove the media from the printer driver. The media skews or buckles. Note: Test by tires. • Make sure the correct tray and media type are flush against the edges of the...Low light is blinking, and the Error light is on and printing stops. The media fails to restart the printer. • Make sure the print cartridge assembly is installed properly. 2-30 Lexmark™ E350d, E352dn Toner Low light is on . The Error light alone is on and indicates ready, but nothing prints...

