User's Guide
Page 3
... get the printer driver to recognize installed options 49 Chapter 5: Using the operator panel 50 Overview of the operator panel 51 Understanding the operator panel lights 52 Secondary errors 54 Operator panel codes 57 Primary codes 57 Secondary error codes 69 Chapter 6: Understanding the printer configuration menus.... 83 Printing the Printer...
... get the printer driver to recognize installed options 49 Chapter 5: Using the operator panel 50 Overview of the operator panel 51 Understanding the operator panel lights 52 Secondary errors 54 Operator panel codes 57 Primary codes 57 Secondary error codes 69 Chapter 6: Understanding the printer configuration menus.... 83 Printing the Printer...
User's Guide
Page 4
... to conserve supplies 105 How to know when you need new supplies 106 Checking the toner and photoconductor levels 106 Recognizing the operator panel light sequences 107 How to change a toner cartridge 108 Lexmark Return Program 111 Refilled toner cartridge notice 111 Recycling Lexmark products 111 How to change a photoconductor kit 112 Contents 4
... to conserve supplies 105 How to know when you need new supplies 106 Checking the toner and photoconductor levels 106 Recognizing the operator panel light sequences 107 How to change a toner cartridge 108 Lexmark Return Program 111 Refilled toner cartridge notice 111 Recycling Lexmark products 111 How to change a photoconductor kit 112 Contents 4
User's Guide
Page 12
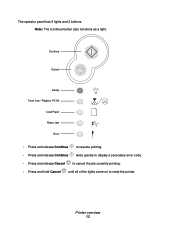
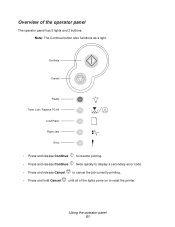
Continue Cancel Ready Toner Low / Replace PC Kit Load Paper Paper Jam Error • Press and release Continue to resume printing. • Press and release Continue twice quickly to display a secondary error code. • Press and release Cancel to cancel the job currently printing. • Press and hold Cancel until all of the lights come on to reset the printer. Printer overview 12 Note: The Continue button also functions as a light. The operator panel has 5 lights and 2 buttons.
Continue Cancel Ready Toner Low / Replace PC Kit Load Paper Paper Jam Error • Press and release Continue to resume printing. • Press and release Continue twice quickly to display a secondary error code. • Press and release Cancel to cancel the job currently printing. • Press and hold Cancel until all of the lights come on to reset the printer. Printer overview 12 Note: The Continue button also functions as a light. The operator panel has 5 lights and 2 buttons.
User's Guide
Page 19
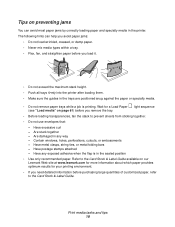
Have metal clasps, string ties, or metal folding bars - Refer to the Card Stock & Label Guide available on our Lexmark Web site at www.lexmark.com for more information about which paper provides optimum results for a Load Paper (see "Load media" on page 61) before purchasing...- Print media tasks and tips 19 Have excessive curl - Are stuck together - Are damaged in the sealed position • Use only recommended paper. light sequence • Before loading transparencies, fan the stack to the Card Stock & Label Guide. Have any way - Tips on preventing jams You can ...
Have metal clasps, string ties, or metal folding bars - Refer to the Card Stock & Label Guide available on our Lexmark Web site at www.lexmark.com for more information about which paper provides optimum results for a Load Paper (see "Load media" on page 61) before purchasing...- Print media tasks and tips 19 Have excessive curl - Are stuck together - Are damaged in the sealed position • Use only recommended paper. light sequence • Before loading transparencies, fan the stack to the Card Stock & Label Guide. Have any way - Tips on preventing jams You can ...
User's Guide
Page 26
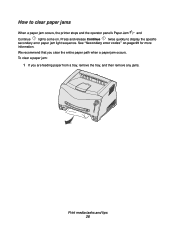
We recommend that you are feeding paper from a tray, remove the tray, and then remove any jams. Print media tasks and tips 26 How to display the specific secondary error paper jam light sequence. To clear a paper jam: 1 If you clear the entire paper path when a paper jam occurs. See "Secondary error codes" on . Press and release Continue twice quickly to clear paper jams When a paper jam occurs, the printer stops and the operator panel's Paper Jam and Continue lights come on page 69 for more information.
We recommend that you are feeding paper from a tray, remove the tray, and then remove any jams. Print media tasks and tips 26 How to display the specific secondary error paper jam light sequence. To clear a paper jam: 1 If you clear the entire paper path when a paper jam occurs. See "Secondary error codes" on . Press and release Continue twice quickly to clear paper jams When a paper jam occurs, the printer stops and the operator panel's Paper Jam and Continue lights come on page 69 for more information.

User's Guide
Page 27
Extended light exposure can cause print quality problems. 3 Remove any jams in the area behind the print cartridge assembly. Print media tasks and tips 27 Warning: Do not leave the print cartridge assembly exposed to direct light for an extended period of time. 2 Open the front cover and remove the print cartridge assembly.
Extended light exposure can cause print quality problems. 3 Remove any jams in the area behind the print cartridge assembly. Print media tasks and tips 27 Warning: Do not leave the print cartridge assembly exposed to direct light for an extended period of time. 2 Open the front cover and remove the print cartridge assembly.

User's Guide
Page 30
... at a time. on the Print window to send the job to the printer before loading the print media. The printer displays the Load Manual Feeder light sequence. When using the manual feeder, send the print job to print. Printing tasks 30 To manually feed a print job: 1 From the computer's software application... sheet of print media can be loaded?" How to manually feed a print job The manual feeder is ready, it will display the Load Manual Feeder light sequence, at which point you should load the media.
... at a time. on the Print window to send the job to the printer before loading the print media. The printer displays the Load Manual Feeder light sequence. When using the manual feeder, send the print job to print. Printing tasks 30 To manually feed a print job: 1 From the computer's software application... sheet of print media can be loaded?" How to manually feed a print job The manual feeder is ready, it will display the Load Manual Feeder light sequence, at which point you should load the media.

User's Guide
Page 33
The printer prints every other page of your print job. 8 Click OK. 9 Click OK on and the Continue light blinks. 10 Load the paper back into the printer with the already-printed side up and the top of the page toward the front of the tray. 4 Select either Long Edge or Short Edge. 5 Select Manual 2-sided printing. 6 Click the Paper tab. 7 Select the appropriate Input options for your job prints, the Load Paper light comes on the Print window. Printing tasks 33 Once the first side of the document first.
The printer prints every other page of your print job. 8 Click OK. 9 Click OK on and the Continue light blinks. 10 Load the paper back into the printer with the already-printed side up and the top of the page toward the front of the tray. 4 Select either Long Edge or Short Edge. 5 Select Manual 2-sided printing. 6 Click the Paper tab. 7 Select the appropriate Input options for your job prints, the Load Paper light comes on the Print window. Printing tasks 33 Once the first side of the document first.
User's Guide
Page 37
..., or you are using the manual feeder, first send the job to print, then load the letterhead when the printer displays the Load Manual Feeder light sequence (see "How to manually feed a print job" on page 30). 2 From the computer's software application, select File Æ Print. 3 Click Properties (or Options, Printer...
..., or you are using the manual feeder, first send the job to print, then load the letterhead when the printer displays the Load Manual Feeder light sequence (see "How to manually feed a print job" on page 30). 2 From the computer's software application, select File Æ Print. 3 Click Properties (or Options, Printer...

User's Guide
Page 39
... desktop. Printing tasks 39 A list of print jobs appears. 3 Right-click the document you want to stop printing, and then click Cancel. The Cancel job light sequence is displayed on your computer. From a Macintosh computer When you are using to cancel. From a Windows computer 1 Click Start Æ Settings Æ Printers. 2 Double...
... desktop. Printing tasks 39 A list of print jobs appears. 3 Right-click the document you want to stop printing, and then click Cancel. The Cancel job light sequence is displayed on your computer. From a Macintosh computer When you are using to cancel. From a Windows computer 1 Click Start Æ Settings Æ Printers. 2 Double...

User's Guide
Page 50
5 Using the operator panel Section Overview of the operator panel Understanding the operator panel lights Operator panel codes Page 51 52 57 Using the operator panel 50
5 Using the operator panel Section Overview of the operator panel Understanding the operator panel lights Operator panel codes Page 51 52 57 Using the operator panel 50
User's Guide
Page 51
Note: The Continue button also functions as a light. Overview of the lights come on to reset the printer. Using the operator panel 51 Continue Cancel Ready Toner Low / Replace PC Kit Load Paper Paper Jam Error • Press and release Continue to resume printing. • Press and release Continue twice quickly to display a secondary error code. • Press and release Cancel to cancel the job currently printing. • Press and hold Cancel until all of the operator panel The operator panel has 5 lights and 2 buttons.
Note: The Continue button also functions as a light. Overview of the lights come on to reset the printer. Using the operator panel 51 Continue Cancel Ready Toner Low / Replace PC Kit Load Paper Paper Jam Error • Press and release Continue to resume printing. • Press and release Continue twice quickly to display a secondary error code. • Press and release Cancel to cancel the job currently printing. • Press and hold Cancel until all of the operator panel The operator panel has 5 lights and 2 buttons.

User's Guide
Page 52
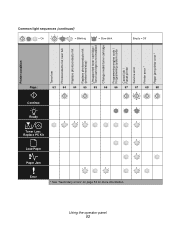
.... Click the indicated page for more information on , and/or blinking indicate printer conditions such as printer status, intervention, or service. Common light sequences = On = Blinking = Slow blink Empty = Off Printer condition Ready / Power Saver Busy Hex Trace Ready Waiting Flushing / Resolution reduced Not ready (printer is offline) ... 59 60 60 61 61 62 62 63 Continue Ready Toner Low / Replace PC Kit Load Paper Paper Jam Error Using the operator panel 52 Lights that are off, on what it means. Understanding the operator panel...
.... Click the indicated page for more information on , and/or blinking indicate printer conditions such as printer status, intervention, or service. Common light sequences = On = Blinking = Slow blink Empty = Off Printer condition Ready / Power Saver Busy Hex Trace Ready Waiting Flushing / Resolution reduced Not ready (printer is offline) ... 59 60 60 61 61 62 62 63 Continue Ready Toner Low / Replace PC Kit Load Paper Paper Jam Error Using the operator panel 52 Lights that are off, on what it means. Understanding the operator panel...
User's Guide
Page 53
Common light sequences (continued) Page: Continue Ready Toner Low / Replace PC Kit Load Paper Paper Jam Error = On = Blinking = Slow blink 63 64 64 65 65 66 ...
Common light sequences (continued) Page: Continue Ready Toner Low / Replace PC Kit Load Paper Paper Jam Error = On = Blinking = Slow blink 63 64 64 65 65 66 ...
User's Guide
Page 54
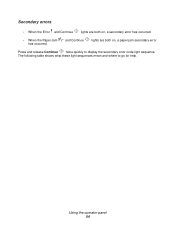
The following table shows what these light sequences mean and where to display the secondary error code light sequence. Using the operator panel 54 Secondary errors • When the Error and Continue lights are both on , a paper jam secondary error Press and release Continue twice quickly to go for help. and Continue lights are both on , a secondary error has occurred. • When the Paper Jam has occurred.
The following table shows what these light sequences mean and where to display the secondary error code light sequence. Using the operator panel 54 Secondary errors • When the Error and Continue lights are both on , a paper jam secondary error Press and release Continue twice quickly to go for help. and Continue lights are both on , a secondary error has occurred. • When the Paper Jam has occurred.
User's Guide
Page 57
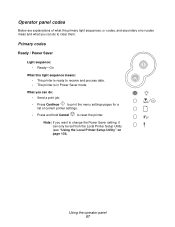
... Below are explanations of current printer settings. • Press and hold Cancel to reset the printer. Primary codes Ready / Power Saver Light sequence: • Ready-On What this light sequence means: • The printer is in Power Saver mode. Note: If you want to change the Power Saver setting, it ...can do : • Send a print job. • Press Continue to print the menu settings pages for a list of what the primary light sequences, or codes, and secondary error codes mean and what you can do to receive and process data. • The printer is ready to clear...
... Below are explanations of current printer settings. • Press and hold Cancel to reset the printer. Primary codes Ready / Power Saver Light sequence: • Ready-On What this light sequence means: • The printer is in Power Saver mode. Note: If you want to change the Power Saver setting, it ...can do : • Send a print job. • Press Continue to print the menu settings pages for a list of what the primary light sequences, or codes, and secondary error codes mean and what you can do to receive and process data. • The printer is ready to clear...
User's Guide
Page 58
... Wait for the message to clear. - Press and release Cancel to cancel the print job. - Wait for the message to clear. - The Ready light is displayed. • Printing a directory, a font list, menu settings pages, or Print Quality Test Pages: - Warning: Do not turn the printer off ...formatting the flash memory. • The printer is storing resources, such as the pages print. Press and release Cancel to cancel printing. - Busy Light sequence: • Ready-Blink What this message is on when printing stops. - The Busy message is displayed as fonts or macros, in flash ...
... Wait for the message to clear. - Press and release Cancel to cancel the print job. - Wait for the message to clear. - The Ready light is displayed. • Printing a directory, a font list, menu settings pages, or Print Quality Test Pages: - Warning: Do not turn the printer off ...formatting the flash memory. • The printer is storing resources, such as the pages print. Press and release Cancel to cancel printing. - Busy Light sequence: • Ready-Blink What this message is on when printing stops. - The Busy message is displayed as fonts or macros, in flash ...
User's Guide
Page 59
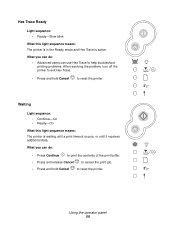
...: • Ready-Slow blink What this light sequence means: The printer is active. Using the operator panel 59 What you can use Hex Trace to help troubleshoot printing problems. After resolving the ...problem, turn off the printer to exit Hex Trace. • Press and hold Cancel to reset the printer. Waiting Light sequence: • Continue-On • Ready-On What this light sequence means: The printer is in the Ready mode and Hex Trace is waiting until a print timeout occurs, or until it...
...: • Ready-Slow blink What this light sequence means: The printer is active. Using the operator panel 59 What you can use Hex Trace to help troubleshoot printing problems. After resolving the ...problem, turn off the printer to exit Hex Trace. • Press and hold Cancel to reset the printer. Waiting Light sequence: • Continue-On • Ready-On What this light sequence means: The printer is in the Ready mode and Hex Trace is waiting until a print timeout occurs, or until it...

User's Guide
Page 60
...release Cancel to cancel the print job. • Press and hold Cancel to reset the printer. Flushing / Resolution reduced Light sequence: • Ready-Blink • Error-Blink What this light sequence means: The printer is reduced from 600 dots per inch (dpi) to 300 dpi to prevent a memory full ...error. Not ready Light sequence: • Continue-On What this light sequence means: • The printer is flushing corrupted print data. • The printer is processing data or printing pages, but...
...release Cancel to cancel the print job. • Press and hold Cancel to reset the printer. Flushing / Resolution reduced Light sequence: • Ready-Blink • Error-Blink What this light sequence means: The printer is reduced from 600 dots per inch (dpi) to 300 dpi to prevent a memory full ...error. Not ready Light sequence: • Continue-On What this light sequence means: • The printer is flushing corrupted print data. • The printer is processing data or printing pages, but...
User's Guide
Page 61
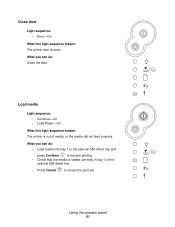
... loaded correctly in tray 1 or the optional 550-sheet tray. • Press Cancel to cancel the print job. Using the operator panel 61 Close door Light sequence: • Error-On What this light sequence means: The printer is open. What you can do : Close the door. Load media...
... loaded correctly in tray 1 or the optional 550-sheet tray. • Press Cancel to cancel the print job. Using the operator panel 61 Close door Light sequence: • Error-On What this light sequence means: The printer is open. What you can do : Close the door. Load media...


