User's Guide
Page 3
...of procedures other than recommended cables or by unauthorized changes or modifications to this equipment does cause harmful interference to the Lexmark copyrighted software in the referenced licenses for the indirect connections to the public telecommunications systems in your product hardware or ..., and the heat may cause the media to release emissions. If this equipment. Conventions Note: A note identifies something that could help you harm. You must accept any radio or television interference caused by using other replacement parts. • Your product uses a ...
...of procedures other than recommended cables or by unauthorized changes or modifications to this equipment does cause harmful interference to the Lexmark copyrighted software in the referenced licenses for the indirect connections to the public telecommunications systems in your product hardware or ..., and the heat may cause the media to release emissions. If this equipment. Conventions Note: A note identifies something that could help you harm. You must accept any radio or television interference caused by using other replacement parts. • Your product uses a ...

User's Guide
Page 5
... a specified period of a repair not included in order to calculate the total printer energy usage. The Power Saver Mode is sometimes helpful to calculate energy usage. The Power Saver Mode is defaced, altered, in need of time, called Power Saver. Lexington, KY This... service The warranty period starts on the purchase receipt and ends 12 months later provided that this product: • Is manufactured from Lexmark or a Lexmark Remarketer, referred to the EPA Sleep Mode. The factory default Power Saver Timeout is available to another user, warranty service under the terms...
... a specified period of a repair not included in order to calculate the total printer energy usage. The Power Saver Mode is sometimes helpful to calculate energy usage. The Power Saver Mode is defaced, altered, in need of time, called Power Saver. Lexington, KY This... service The warranty period starts on the purchase receipt and ends 12 months later provided that this product: • Is manufactured from Lexmark or a Lexmark Remarketer, referred to the EPA Sleep Mode. The factory default Power Saver Timeout is available to another user, warranty service under the terms...
User's Guide
Page 18
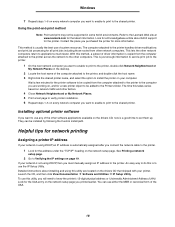
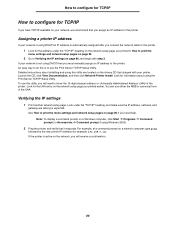
Helpful tips for all print jobs including those routed from other network computers. See Printing a network setup page. 2 Go to know the printer's 12-digit physical ... Network Places. 5 Print a test page to verify printer installation. 6 Repeat steps 1-5 on every network computer you want to enable to print to the Lexmark Web site at www.lexmark.com for the address under the "TCP/IP" heading on the desktop. 2 Locate the host name of driver information is using DHCP, then...
Helpful tips for all print jobs including those routed from other network computers. See Printing a network setup page. 2 Go to know the printer's 12-digit physical ... Network Places. 5 Print a test page to verify printer installation. 6 Repeat steps 1-5 on every network computer you want to enable to print to the Lexmark Web site at www.lexmark.com for the address under the "TCP/IP" heading on the desktop. 2 Locate the host name of driver information is using DHCP, then...
User's Guide
Page 23
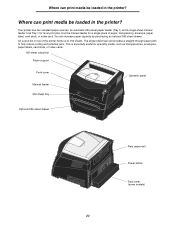
...: an automatic 250-sheet paper feeder (Tray 1) and a single-sheet manual feeder. Use the manual feeder for a single piece of the printer holds up to help reduce curling and potential jams. This is especially useful for most print jobs. Where can print media be loaded in the printer? You can increase...
...: an automatic 250-sheet paper feeder (Tray 1) and a single-sheet manual feeder. Use the manual feeder for a single piece of the printer holds up to help reduce curling and potential jams. This is especially useful for most print jobs. Where can print media be loaded in the printer? You can increase...
User's Guide
Page 27
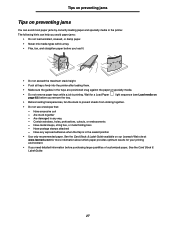
... printing environment. • If you need detailed information before you remove the tray. light sequence (see Load media on our Lexmark Web site at www.lexmark.com for more information about which paper provides optimum results for a Load Paper page 62) before you load it. •... recommended paper. Contain windows, holes, perforations, cutouts, or embossments - Have postage stamps attached - Tips on preventing jams Tips on preventing jams You can help you avoid paper jams: • Do not load wrinkled, creased, or damp paper. • Never mix media types within a tray. • ...
... printing environment. • If you need detailed information before you remove the tray. light sequence (see Load media on our Lexmark Web site at www.lexmark.com for more information about which paper provides optimum results for a Load Paper page 62) before you load it. •... recommended paper. Contain windows, holes, perforations, cutouts, or embossments - Have postage stamps attached - Tips on preventing jams Tips on preventing jams You can help you avoid paper jams: • Do not load wrinkled, creased, or damp paper. • Never mix media types within a tray. • ...

User's Guide
Page 31
How to the holes on the printer, and snap the cover into place. 31 Attach the dust cover to the back of the printer by aligning the tabs on the cover to load the 250-sheet and 550-sheet trays Attaching the dust cover The dust cover helps protect the paper tray from the environment as well as keep the tray from being knocked out of position while it is extended.
How to the holes on the printer, and snap the cover into place. 31 Attach the dust cover to the back of the printer by aligning the tabs on the cover to load the 250-sheet and 550-sheet trays Attaching the dust cover The dust cover helps protect the paper tray from the environment as well as keep the tray from being knocked out of position while it is extended.
User's Guide
Page 32
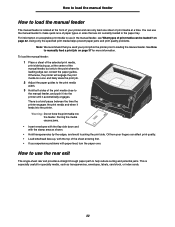
... envelopes, labels, card stock, or index cards. 32 How to use the rear exit The single-sheet rear exit provides a straight-through paper path to help reduce curling and potential jams. This is especially useful for more information. How to load the manual feeder How to load the manual feeder The... • If you send your fingers can only feed one sheet of print media can contact the paper guides. Using only the specified print media helps prevent paper jams and print quality problems. Note: We recommend that are not currently loaded in the manual feeder, see What types of print media...
... envelopes, labels, card stock, or index cards. 32 How to use the rear exit The single-sheet rear exit provides a straight-through paper path to help reduce curling and potential jams. This is especially useful for more information. How to load the manual feeder How to load the manual feeder The... • If you send your fingers can only feed one sheet of print media can contact the paper guides. Using only the specified print media helps prevent paper jams and print quality problems. Note: We recommend that are not currently loaded in the manual feeder, see What types of print media...
User's Guide
Page 42
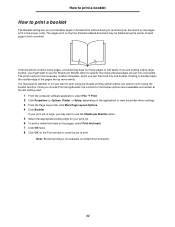
... to print a booklet How to print a booklet The Booklet setting lets you print multiple pages in booklet form without having to print. Printing in bundles helps the outside edge of bundles, which you can then bind into one booklet. The printer will print the necessary number of the pages line up...
... to print a booklet How to print a booklet The Booklet setting lets you print multiple pages in booklet form without having to print. Printing in bundles helps the outside edge of bundles, which you can then bind into one booklet. The printer will print the necessary number of the pages line up...
User's Guide
Page 44
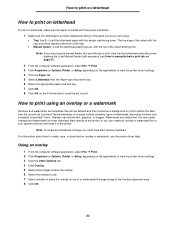
... job is properly loaded according to print, then load the letterhead when the printer displays the Load Manual Feeder light sequence (see the printer driver Help. Typical examples of overlays include company logos or letterheads, decorative borders, and simulated "preprinted" forms. Overlays can be placed at the front of the tray...
... job is properly loaded according to print, then load the letterhead when the printer displays the Load Manual Feeder light sequence (see the printer driver Help. Typical examples of overlays include company logos or letterheads, decorative borders, and simulated "preprinted" forms. Overlays can be placed at the front of the tray...

User's Guide
Page 55
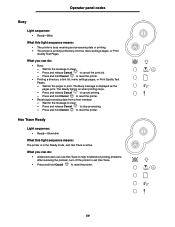
Understanding the operator panel lights Secondary errors • When the Error and Continue lights are both on, a secondary error has occurred. • When the Paper Jam and Continue lights are both on, a paper jam secondary error has occurred. The following table shows what these light sequences mean and where to display the secondary error code light sequence. Press and release Continue twice quickly to go for help. 55
Understanding the operator panel lights Secondary errors • When the Error and Continue lights are both on, a secondary error has occurred. • When the Paper Jam and Continue lights are both on, a paper jam secondary error has occurred. The following table shows what these light sequences mean and where to display the secondary error code light sequence. Press and release Continue twice quickly to go for help. 55
User's Guide
Page 59
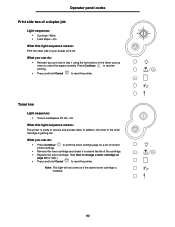
... pages to stop processing. - Press and hold Cancel to reset the printer. Press and release Cancel to print. What you can use Hex Trace to help troubleshoot printing problems. After resolving the problem, turn off the printer to exit Hex Trace. • Press and hold Cancel to reset the printer. •...
... pages to stop processing. - Press and hold Cancel to reset the printer. Press and release Cancel to print. What you can use Hex Trace to help troubleshoot printing problems. After resolving the problem, turn off the printer to exit Hex Trace. • Press and hold Cancel to reset the printer. •...
User's Guide
Page 63
...; Remove the toner cartridge and shake it to reset the printer. What you can do : • Press Continue to print the menu settings page for help.) • Press and hold Cancel to receive and process data. Toner low Light sequence: • Toner Low/Replace PC Kit-On What this light sequence...
...; Remove the toner cartridge and shake it to reset the printer. What you can do : • Press Continue to print the menu settings page for help.) • Press and hold Cancel to receive and process data. Toner low Light sequence: • Toner Low/Replace PC Kit-On What this light sequence...
User's Guide
Page 65
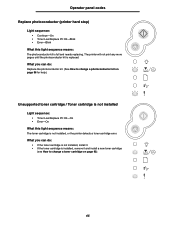
... : • If the toner cartridge is not installed, install it and install a new toner cartridge (see How to change a toner cartridge on page 96 for help.) Unsupported toner cartridge / Toner cartridge is not installed Light sequence: • Toner Low/Replace PC Kit-On • Error-On What this light sequence means...
... : • If the toner cartridge is not installed, install it and install a new toner cartridge (see How to change a toner cartridge on page 96 for help.) Unsupported toner cartridge / Toner cartridge is not installed Light sequence: • Toner Low/Replace PC Kit-On • Error-On What this light sequence means...

User's Guide
Page 80
...: 1 Turn off the printer. 2 Open the front cover. 3 Press and hold Continue prints. 8 Understanding the printer configuration menus Printing the Printer Settings Configuration sheet To help resolve printing problems or to change printer configuration settings, advanced users can print the Printer Settings Configuration sheet for instructions on .
...: 1 Turn off the printer. 2 Open the front cover. 3 Press and hold Continue prints. 8 Understanding the printer configuration menus Printing the Printer Settings Configuration sheet To help resolve printing problems or to change printer configuration settings, advanced users can print the Printer Settings Configuration sheet for instructions on .
User's Guide
Page 84
... sets) in printer memory (RAM) are unaffected. Resources in the Parallel menu, Network menu, LocalTalk menu, and USB menu. Help isolate printing problems when unexpected characters print or characters are reset to the factory default values except: • Display Language. •... Setting Reset Factory Defaults Reset Photoconductor Counter Hex Trace Print Quality Test Pages * Factory default Use this setting, three pages print to help you evaluate print quality: • A text page with printer information, cartridge information, current margin settings, and a graphic. •...
... sets) in printer memory (RAM) are unaffected. Resources in the Parallel menu, Network menu, LocalTalk menu, and USB menu. Help isolate printing problems when unexpected characters print or characters are reset to the factory default values except: • Display Language. •... Setting Reset Factory Defaults Reset Photoconductor Counter Hex Trace Print Quality Test Pages * Factory default Use this setting, three pages print to help you evaluate print quality: • A text page with printer information, cartridge information, current margin settings, and a graphic. •...
User's Guide
Page 86
Detailed instructions about using the Print Server TCP/IP Setup Utility. To use this utility, you will need help. You can use the Print Server TCP/IP Setup Utility. Note: To display a command prompt on a Windows computer, click Start Æ Programs Æ Command prompt (...
Detailed instructions about using the Print Server TCP/IP Setup Utility. To use this utility, you will need help. You can use the Print Server TCP/IP Setup Utility. Note: To display a command prompt on a Windows computer, click Start Æ Programs Æ Command prompt (...
User's Guide
Page 87
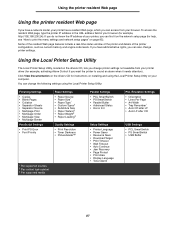
... Setup Utility, located on the drivers CD, lets you change printer settings not available from your printer, you can find it on your browser (for help, see "How to sound an alarm when it needs attention). Some of the resident Web page features include a real-time status window of the printer...
... Setup Utility, located on the drivers CD, lets you change printer settings not available from your printer, you can find it on your browser (for help, see "How to sound an alarm when it needs attention). Some of the resident Web page features include a real-time status window of the printer...
User's Guide
Page 90
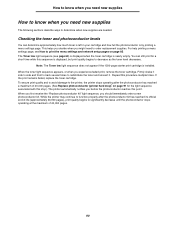
... print, remove the toner cartridge. Firmly shake it side to side and front to back several times to redistribute the toner and reinsert it. This helps you decide when you might need new supplies The following sections describe ways to determine when new supplies are needed. How to know when you... order replacement supplies. Checking the toner and photoconductor levels You can still print for the light sequence associated with this stop )* on page 85. For help printing a menu settings page, see page 63) is displayed when the toner cartridge is installed.
... print, remove the toner cartridge. Firmly shake it side to side and front to back several times to redistribute the toner and reinsert it. This helps you decide when you might need new supplies The following sections describe ways to determine when new supplies are needed. How to know when you... order replacement supplies. Checking the toner and photoconductor levels You can still print for the light sequence associated with this stop )* on page 85. For help printing a menu settings page, see page 63) is displayed when the toner cartridge is installed.
Quick Reference
Page 1
... into place. • Do not exceed the maximum stack height. • Never mix media types within a tray. d Select your print job as shown. © 2005 Lexmark International, Inc., All rights reserved. Tray 1: 89-216 x 210-356 mm (3.5-8.5 x 8.27-14.0 in .) - Tray 2: 148-216 x 210-356 mm (5.83-8.5 x 8.27-14.0 in ...media from the Form Source list box. g Click OK, and then send your media type (transparencies, envelopes, and so on the application) to help ). Warning: Do not force the print media into the printer. • Hold transparencies by flexing or fanning it back and forth.
... into place. • Do not exceed the maximum stack height. • Never mix media types within a tray. d Select your print job as shown. © 2005 Lexmark International, Inc., All rights reserved. Tray 1: 89-216 x 210-356 mm (3.5-8.5 x 8.27-14.0 in .) - Tray 2: 148-216 x 210-356 mm (5.83-8.5 x 8.27-14.0 in ...media from the Form Source list box. g Click OK, and then send your media type (transparencies, envelopes, and so on the application) to help ). Warning: Do not force the print media into the printer. • Hold transparencies by flexing or fanning it back and forth.
Quick Reference
Page 2
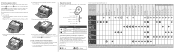
Press and release Continue twice quickly to resume printing. See Common operator panel light sequences for helpful information about network printing. Ready / Power Saver Busy Waiting Flushing / Resolution reduced Not ready (printer is offline) Close door Load media Load ...status, intervention, or service. To clear a paper jam: 1 If you have questions about using and maintaining your printer. • Contact your administrator or Help desk if you clear the entire paper path when a paper jam occurs. The table on their sequence. Clearing paper jams When a paper jam occurs, the...
Press and release Continue twice quickly to resume printing. See Common operator panel light sequences for helpful information about network printing. Ready / Power Saver Busy Waiting Flushing / Resolution reduced Not ready (printer is offline) Close door Load media Load ...status, intervention, or service. To clear a paper jam: 1 If you have questions about using and maintaining your printer. • Contact your administrator or Help desk if you clear the entire paper path when a paper jam occurs. The table on their sequence. Clearing paper jams When a paper jam occurs, the...


